Window sills for plastic windows
On plastic windows, PVC window sills are most often installed. Wooden window sills are mounted less often. And very rarely, they put stone window sills. The latter have their own installation specifics. We will not talk about them in this article.
How to install a wooden window sill on plastic windows? The technology for installing plastic and wooden window sills is not fundamentally different. Therefore, further, we will focus only on the methods of installing PVC window sills.
For those who first decided to install a window sill with their own hands, it is important to know that the quality of the window sill plastic affects the installation process. If you intend to work with an economy class window sill (for example, from the ECO company), then you need to treat it with care
For example, when cutting such a window sill with a jigsaw, large chips may appear.
Where can I buy a PVC window sill in St. Petersburg at an affordable price? - read this article. Below, for comparison, I give the approximate prices of a window sill for plastic windows, having dimensions of 250 x 2000 mm:
- Inexpensive and low quality - "Eco" - 350 rubles.
- Inexpensive, but high quality - "Stained Glass" - 450 rubles.
- Expensive and high quality - "Stained Glass VPL" - 1250 rubles.
- Very expensive and very high quality - "Danke", "Moeller", each - 2200 rubles.
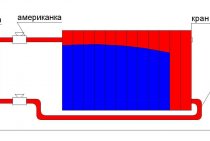
Wiring diagrams
- Side connection. Characterized by maximum heat transfer. With this connection, the input is made from the top of the battery, and the output is from the bottom on the same side. It is the most popular connection scheme.
- diagonal connection. Produced with a significant size of the system. Water enters the radiator through the top, and is discharged from the bottom on the opposite side.
- Lower connection or "Leningradka". It is produced in small one- and two-story houses, as well as during the installation of pipes hidden under the floor. The efficiency of such a system is 5-15% lower than with a side connection.
Why are batteries mounted at the bottom of the wall
Many of our fellow citizens are wondering: “Why are the batteries still placed directly under the windows?”. It would seem that the space near the window is the least protected from the penetration of cold from the street, so why not place heating radiators away from such places?
Closer to winter, when the first frosts are coming, the heating season begins. And, indeed, batteries placed under the windows warm the space more efficiently than radiators installed in other places. The fact is that a window is the place of the greatest heat loss in the entire space of a house or apartment, and it is the weakest point in terms of thermal protection. Go to the window and put your hand on the glass. You will feel that the glass is cold, perhaps even feel a slight breeze of cold air. Even if the most modern, high-quality and reliable double-glazed windows are installed in the window openings of your house, and all the necessary installation technologies are observed, they still let in more cold air than, for example, walls or doors.
All batteries heat the space according to the same principle, using the ability of air to circulate. Let's go back to the laws of physics. Everyone knows that cold air is heavier than warm air and therefore sinks down. The same thing happens with the air from the window. Outdoor frosty air, entering the room through cracks and micropores, falls down to the floor. But thanks to the batteries attached under the window, the cold air has time to heat up and rises to the ceiling, giving way to the next "portion" of frost. Thus, the cold does not have time to spread over the entire area of \u200b\u200bthe room, but, on the contrary, warming up, provides the dwelling with warmth. What happens to cold air if the batteries are away from the window? Due to the temperature difference, cold air circulates from the window deep into the room, and only when it reaches the battery, it begins to heat up and “travel” to the ceiling according to the already planned pattern. Therefore, if the battery is located far from the window, the process of heating the room slows down significantly.
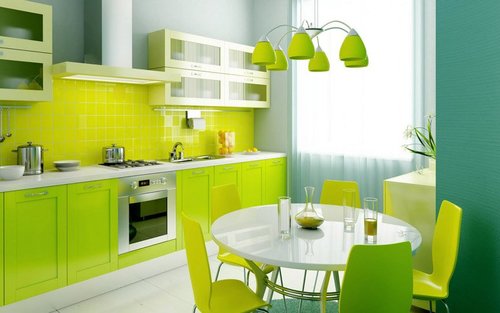
Dining area by the window
If for you the most important thing in the space of the room is not the working area, but where you can sit down with the whole family and have a meal, fly away with your thoughts somewhere in your cherished dreams and, plus, get aesthetic pleasure from beautiful curtains, then be sure to organize a cozy dining area.
If your space allows, then you can just put a table by the window, and if not, then a folding table will be your saving and convenient option. A bench along the window will look beautiful, besides, it will provide more seats than chairs and can be equipped with drawers for storing kitchen utensils under the seats.
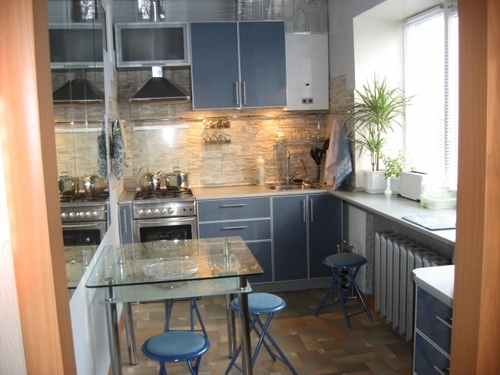
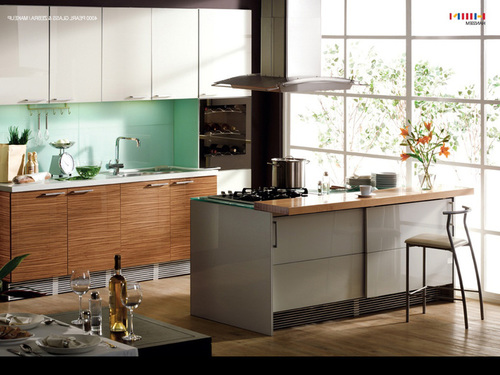
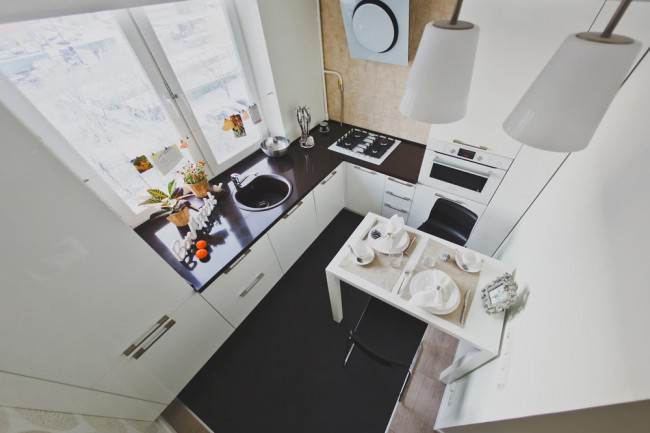
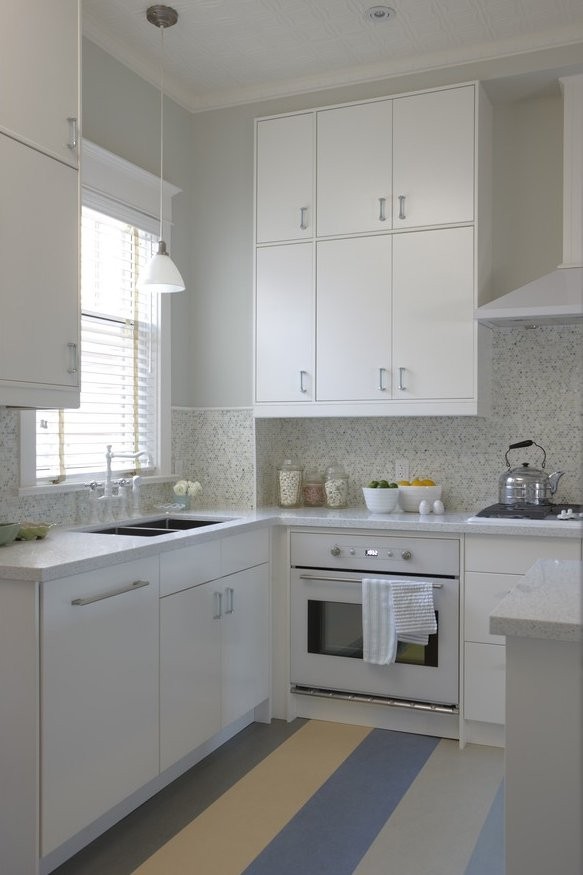
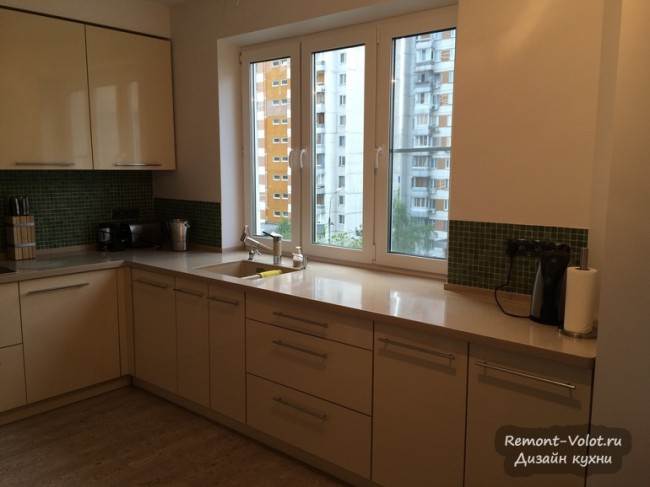
Kitchen along the window is not scary
The eternal problem is the lack of space. Especially in the kitchens of old houses, where this room was not given enough space and most of them today are from 6 to 9 squares, which is very small. One has only to look at the photo of such a room, you immediately wonder how to properly equip it so as not to reduce the space and accommodate everything you need.
Some solve this problem with quadrature by combining several rooms or by making a kitchen-studio, that is, a separate cooking area and a living or dining area. This is a good enough option, but not everyone agrees, especially if the apartment is one-room. On the one hand, the kitchen automatically becomes visually larger, and on the other, there is a feeling of sleeping in the dining room.
Window sill installation
Prior to installation of the window sill, it is necessary to carry out point 14. Installing the vapor barrier sealing tape.
When installing the window sill, you must perform the following steps:
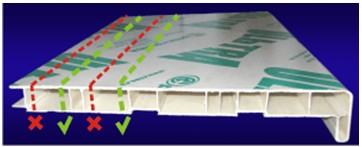
1. Check the window sill for conformity to size, color and the absence of scratches or other damage, after removing the protective film. In the case when trimming of the window sill is required, depending on the size of the opening, the marking is done first, and then the window sill is trimmed. Marking is done with a construction pencil relative to the center of the structure. Trimming is done with an electric jigsaw or a hacksaw for plastic, which are part of the assembly tool kit. 2. Check that the junction of the window sill to the box of the window block is tight, tight and resistant to deformation. 3. The gap between the end of the window sill and the bearing walls on the sides should not exceed 3-4 mm.
Additionally, it is recommended to install a spring clip for a tighter fit of the window sill to the frame profile. The bracket is attached to the stand profile with a self-tapping screw. The brackets are installed by attaching them to the stand profile at a distance of 20-25 cm from each other, after which the window sill simply snaps into the brackets and does not require additional installation.
The recommended overhang of the window sill beyond the inner surface of the wall should be ½ of the width of the heating radiator, but not more than 100mm (without brackets). When the outreach exceeds the specified value, it is necessary to use standard brackets, the distance between which should not be more than 500 mm, the indents from the edge of the window sill should be no more than 250 mm. Check the accuracy of the installation of the window sill using a level in the longitudinal and transverse directions. Be sure to foam the support pads for fixation. It is recommended to apply a strip of white silicone or glue for PVC along the entire length of the window sill, where there will be contact with the frame. carried out in the same way as the installation of the window sill. The departure of the threshold for the inner plane of the wall is from 30 to 40 mm.
. NO GAP BETWEEN THE BOX AND THE WINDOW SILL IS ALLOWED.
In order to avoid scratches on the surface and chips at the cutting site, it is necessary to be careful and cut without much pressure on the window sill.
Based on thermal expansion, the maximum length of the installed PVC window sill is limited to 3000 mm.
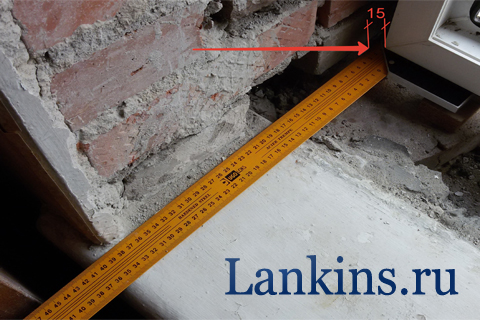
When installing a window sill from the inside and outside under the window of the balcony block, the window sill must go beyond the frame of the balcony door and at the same time block the corner of the lower quarter (wall panel) and protrude no more than 15 mm, unless otherwise agreed with the Customer.
The window sill should go under the bottom surface of the box by at least 5 mm and be pressed against it tightly along the entire length of the junction.
If the distance from the stand profile to the edge of the wall under the window sill is more than 150 mm, it is necessary to provide measures to prevent the window sill from deflecting under load in the area adjacent to the frame and along the plane of the window sill (threshold). For these purposes, additional support pads and fragmentary foaming are used.
If the opening under the window sill is small, then it foams. Structurally, a new window sill is always higher than the old one by about 2-4 cm, so it is usually impossible to keep the wallpaper under the window sill. Sealing under the window sill is made with a building mixture, for further pasting with wallpaper or
Window sills made of chipboard or wooden are installed in the same way.
It is also possible to install using retaining brackets: using fasteners (two - one after the other, retaining brackets are screwed in with cylindrical screws measuring 3.9 * 16 or screws with a half head 4.5 * 16) in a mortar layer of 2 pcs. at a distance of 60 cm - for window sills with a maximum length of up to 2 m.
PVC window sill marking
Following the turnkey plastic window installation technology, the plastic window sill should be installed after the plastic window has already been installed. In the previous article, I already talked about the fact that the tide with the window sill are installed at the same time. Read here.
In order to understand how to install a window sill on plastic windows, you need to understand for yourself that the most important operation in this process is the marking of the PVC window sill. Further, step-by-step verified instructions with a photo, and my video is at the end of the article.
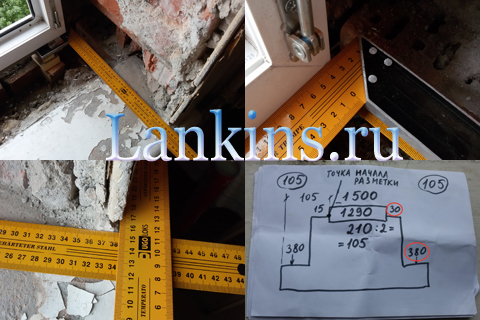
First, take a piece of paper and a pencil. We draw a window in a section in width, in a simple way, in the form of an elongated rectangle. View from above. And we enter the value of the window width in our rectangle.
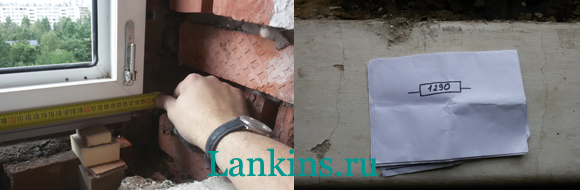
Secondly, we find the starting point of the markup. This is done in the following way. We remove the size of the window sill in length. We write the value above the rectangle. We get two numerical values in a column that need to be subtracted. As in school, in the first grade))).
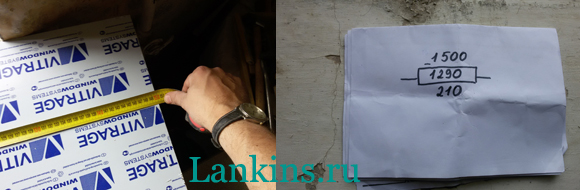
The resulting difference is divided in half. And we get the main figure, determined by the starting point for marking the PVC window sill. This figure is equal to the distance from the edge of the window sill to the edge of the frame on each side.
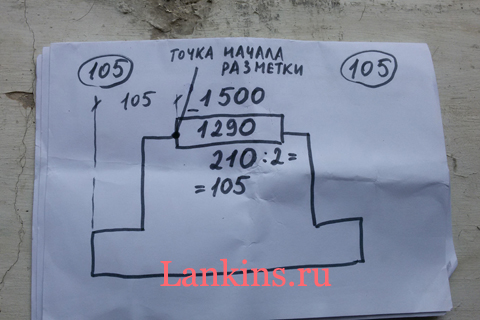
Thus, after installing the window sill and slopes, we will have the same:
- The side protrusions of the window sill - "ears" and
- Slope angles
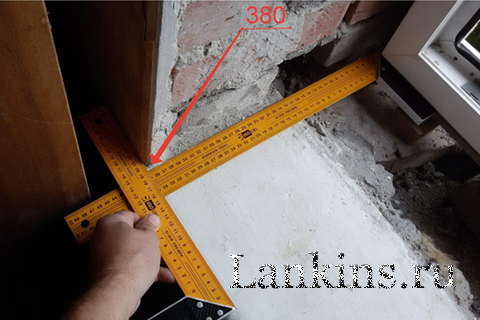
Thirdly, continuing the markup, we take two locksmith squares (90 degrees) with a scale of 30 cm and 50 cm. gap. The main thing to understand is that the position of the square is the future position of the cut-off window sill. It remains only to take the first dimension along the length of the window sill, and write down this dimension on our sheet of paper, on which the starting point for measuring has already been determined.
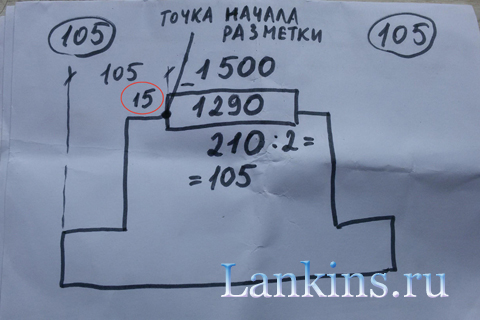
Fourthly, with the help of the second square, pressing it against the inner wall of the room, we fix the second size along the width of the window sill. After that, the last cutting line of the side protrusion is automatically obtained.

Similarly, measurements are taken on the right side of the window sill.
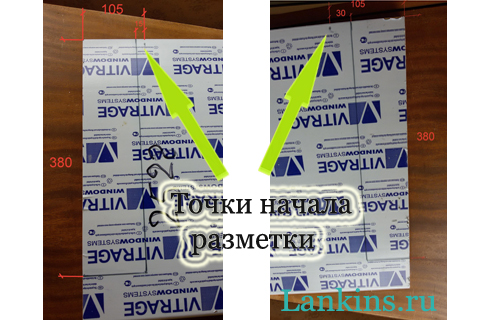
After that, the markup is applied to the window sill itself.
This markup we've looked at is the simplest. It is made in a flat perpendicular opening.
It happens that the opening has a step configuration, then it is necessary to take several measurements. But, the principle of markup does not change.
Fifthly, if the opening has an angle, then the marking of the PVC window sill is carried out at an angle. To do this, as in the first case, we press a large square with one side against the window sill profile, and direct the other perpendicular side at an angle. Imagine that this will be the angular cut line. And we attach the second square to the inner wall of the room. The intersection point of the gons is the end point. We fix its value. Further, leaving the second small square in a fixed position, we again attach the large square to the window sill profile at 90 degrees. We fix the second value at the intersection of the squares.
Thus, the marking of the PVC window sill is done. It must also be said that the cutting line of the lateral protrusion can be either flush with the inner wall of the room or recessed into this wall. It depends on whether the customer will make repairs after installing the window.
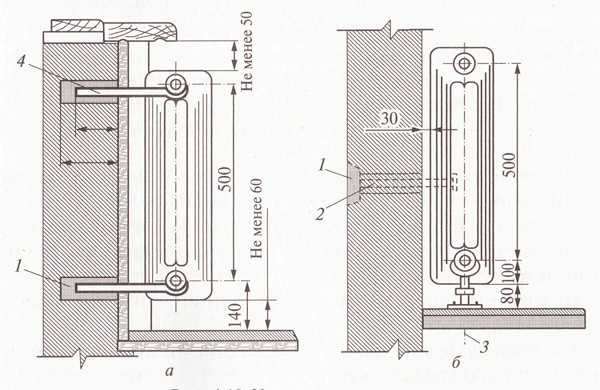
Radiator Placement Recommendations
 The efficiency of the radiator depends on its location.
Specialists pay great attention to the correct location of heating devices. In this case, the heating of the room will be carried out with the greatest efficiency.
Basic recommendations for choosing a place to install batteries:
- For high-quality air circulation around the battery, it is necessary to maintain a distance of 3-4 cm between the heat-insulating layer and the heating device. With a decrease in this gap, air exchange becomes more difficult and the efficiency of the system decreases.
-
If it is impossible to create insulation, the inner surface of the wall is covered with a layer of foil. It serves as a heat reflector that directs heat into the room.
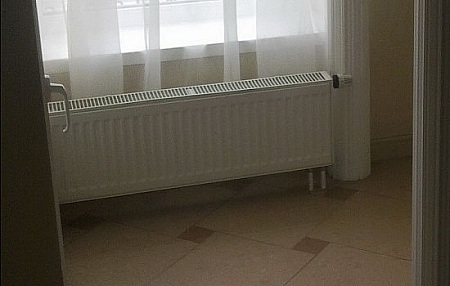
- When installing batteries under the window sill, a gap of up to 10 cm between the radiator and the floor must be observed. The distance from the radiator to the window sill must be at least 8 cm. This is due to the fact that the board is an obstacle when warm air rises up.
- If the house has large windows, 30 cm high batteries are used. Then condensation will not form on the glasses.
- The radiator is installed at an angle of 90°. In case of deviation from the norm, air will accumulate and corrosion will form.
- The battery should be installed exactly in the middle of the window. Then it will cut off the flow of cold air and will not allow them to enter the room.
Alternative
Of course, you can save space with furniture. For example, put a kitchen island with everything you need for cooking or a small corner equipped with everything you need. However, this will not particularly solve the problem, especially if there is a large window and you want a wide window sill, which will also take up part of the space. There is a good option - to combine business with pleasure.
Positioning the kitchen along the window is not a new design decision, but it is very popular. Especially when it comes to small spaces. Usually the entire wall along the window is empty if the furniture is placed on other walls. And it turns out not quite a rational use of space. If furniture and interior items are placed on a wall with a window, then on the other two you can organize a recreation area and a dining area.
In this option, there is another plus - light and air. That is, it turns out, in the case of a strong fumes, in addition to the hood, you can open a window and quickly ventilate the room, getting rid of heavy odors. However, there is another side of the coin. In the case of the sunny side, bright light can interfere with cooking, so if the decision to install the kitchen along the window is still firm, you can close the window with special blinds or shutters to block out the bright sun. Also an important detail in this arrangement of the room is the absence of curtains and curtains. They will not only be inappropriate, but also dangerous, because there should be a stove or hob nearby.
Battery
Another apparent barrier to conquering space is the battery. It is far from a secret that in most rooms the battery is located strictly under the window. Installing furniture there, you need to come up with a good way out of the situation. In principle, you can go two ways: difficult and easier.
Battery transfer
It is rather a very difficult path. After all, it is impossible to do this on your own, without having the skills, and most importantly, special equipment. More precisely, it is possible, of course, but the one who does it will be responsible for the consequences. In this situation, the old reinforcement along with the pipes are cut off. From the remaining ends of the pipes, special polypropylene or other polymeric products intended for this product are carried out to the right place, where the battery will be located. After that everything is welded back.
decoration
Furniture can be placed under the windowsill, leaving a gap for the battery. You can cover it with a decorative screen or decorate it yourself a little. For example, original paint. If, for example, the color of the furniture is black or white, you can paint it in the spirit of a piano with keys, but if the kitchen is multi-colored and suggests the presence of bright colors, then it would be appropriate to paint the battery in a rainbow order.
hide and forget
Another simple way can be to disguise the battery, for example, under a false wall. To do this, it is enough to make a crate from a metal profile, and then tighten everything with drywall, leaving special ventilation or vents with doors. In this case, the wall will look pretty neat along with the furniture.
Conclusion
Placement of furniture is an important issue, especially with small rooms, so it is worth planning and thinking everything over several times before proceeding.
Battery under the window
If a radiator gets in the way and interferes with the desired design, you can consider several options for solving the problem.
- Replace battery withwarm floor, completely removing it. The advantage of this solution is the ability to use different headsets without adjusting them to the installed heating. But not any floor covering can be insulated, and costs will also increase.
- Move to another wall. Transferring the battery will also require additional costs, but access will be open and the headset will fit without any difficulty.
- Make a box for the battery. This option is suitable if a sink is planned to be installed under the window. Drawers can be difficult, but as a last resort, you can use opening doors.
- Drown the radiator deep into the wall. This will require partial demolition to make room. At first glance, the option seems time-consuming, but the specialist will do everything in a few hours, and the cost will be lower.
Small stylish kitchen
Choose the best option, taking into account all the features of your kitchen, layout and wishes. If the battery is already located in the wall in the apartment, then it will be easier to create a kitchen design to your liking.
Why batteries need to be placed under windows
We have all seen that heating radiators in residential premises are located mainly under the windows. And many are interested: why should the batteries be placed under the windows? What generally causes such a layout of the heating system? It turns out that this is no accident - radiators located under window openings actually work more efficiently and can heat a much larger area.

Reasons for placing heating batteries under windows


In addition to the window, the source of heat loss can be:
- floor,
- Door,
- joints between ceilings,
- ventilation system.
But the unconditional "leader" in this regard is still considered a window opening. It is worth noting that some people blame the wrong installation or the lack of insulating material for everything, but in reality, even those windows that were installed in accordance with all requirements draw out the greatest amount of heat energy.
Note! Radiators heat homes using physical laws such as air circulation. Cold air descends
k. has more weight than hot, while the latter, respectively, rises up.

So, why are batteries placed under windows? Because cold air, when it enters the room from the street, goes down, and there it immediately warms up with heating batteries. When heated, it rises, due to which the same air circulation is ensured. In other words, the cold air coming from the windows is also used to make the heating network more efficient. And you can get acquainted with the features of mounting radiators by watching the video below.
How to cut a PVC window sill
After marking, the PVC window sill must be cut off. There are four tools for this:
1. Hacksaw for metal. Yes, the cheapest tool, but it requires good physical preparation.
2. Electric jigsaw. The most acceptable option. You can use inexpensive. For example, I have recently been using Interskol. Such a jigsaw costs from 1700 to 2500 rubles.
The main thing when working with a jigsaw is to set the pendulum stroke to the number "0" and use a metal file with a fine tooth.
3. Bulgarian ("UShM" - angle grinder). The most efficient tool. Allows you to cut the PVC window sill most accurately. But, at the same time, the grinder is very noisy and creates a lot of dust.
4. Cordless saw "Makita HS300DWE" and "Bosch GKS 10.8 V-LI". Lightweight, handy, cordless tool, but very expensive. The cost of such a saw is about 10,000 rubles.
By the way, we do not throw away trimmings from the window sill. They will come in handy during installation. Read about it below.
Recommendations for the installation and operation of radiators
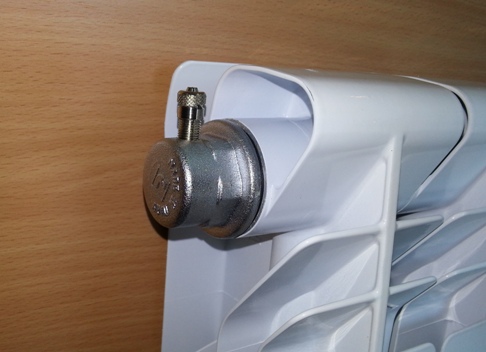 In order for the radiator to warm up well, air is removed from it through the Mayevsky tap
The efficiency of heating and the service life of the heating system depend on the correct installation of the battery. There are a number of recommendations that you need to follow during installation:
- It is recommended to lubricate the gaskets with silicone sealant before installation. This is an optional step, but it will help protect the connection points.
- Do not abruptly open the valves when filling the heating battery with liquid. Otherwise, water hammer may occur, which will damage the system.
-
If thermostatic expansion valves are installed in a one-pipe system, a bypass must be installed. Without it, the entire riser will be regulated, for which the owner may be fined. Ball valves are placed in front of the valves to block the flow and return.
- If the radiator has more than 12 sections with a one-sided side connection, put a flow guide for a length equal to two-thirds of the battery (it is better to do up to the last section). This will allow the radiator to fully warm up.
- If the radiator is filled with water, it is necessary to bleed air from it. If this is not done, the device will not warm up. The air is removed every year at the beginning of the heating season.
After installing the radiator, pipes are brought to it. They are selected in advance by material, cross section and length.
Sequencing
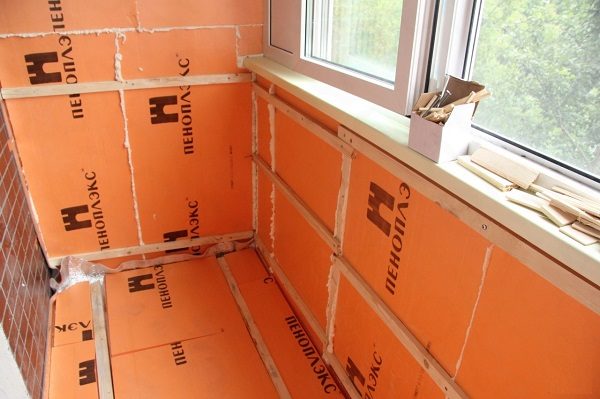 It is necessary to thoroughly insulate and install double-glazed windows!
So, the legal and technically correct sequence of actions, if you want to place a heating radiator on the balcony, consists of the following steps:
- insulation of external walls;
- coordination of redevelopment, obtaining relevant permits and conclusions;
- choosing the optimal type of radiator and installation method;
- wall preparation - installation of thermal insulation, finishing;
- direct installation.
If you are firm in your intentions, then for apartment buildings it is recommended that you transfer the radiator from the room to the balcony, and not install an additional one, which will immediately significantly reduce the efficiency of the common house system - this is unlikely to please the neighbors and entail inspections.
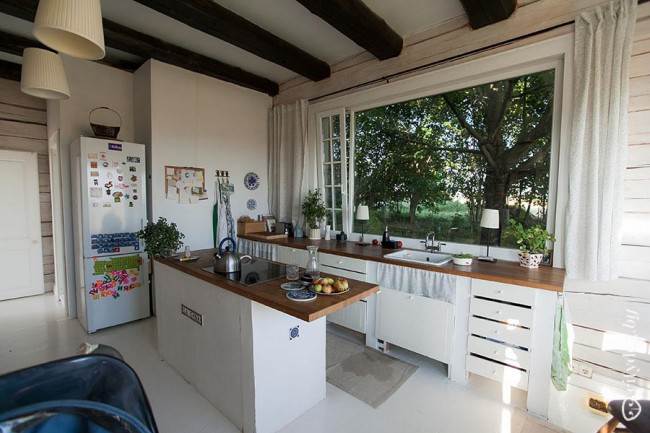
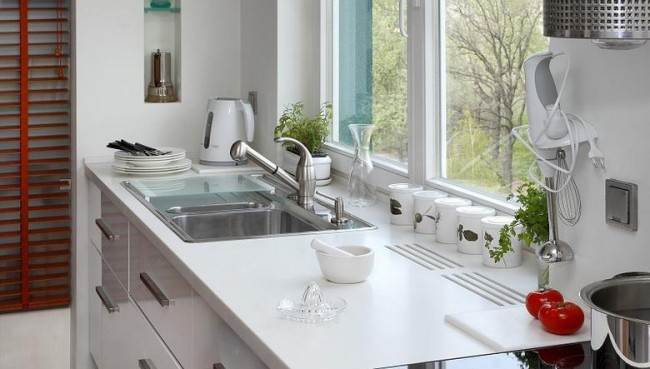
Washing under the window
This layout option allows the hostess to admire the view from the window, and also masks the radiators in the room.When placing a sink next to a window, you need to carefully consider the details before starting installation.
On the island part there is a hob and a cooking zone. The right overhang of the furniture structure can be used as a small bar counter.
 Country-style kitchen with an island and a working area near the window
Choose a compact mixer, otherwise the tap will interfere with the opening of the frames. It is better to purchase a model in which the water flow is directed downwards so that moisture does not get on the windowsill.
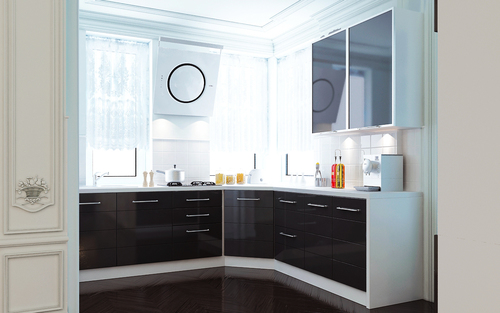
 Corner kitchen in minimalism with black countertops
Roller blinds are a color accent in this interior. They do not take up much space and cover the opening from the sun, if necessary.
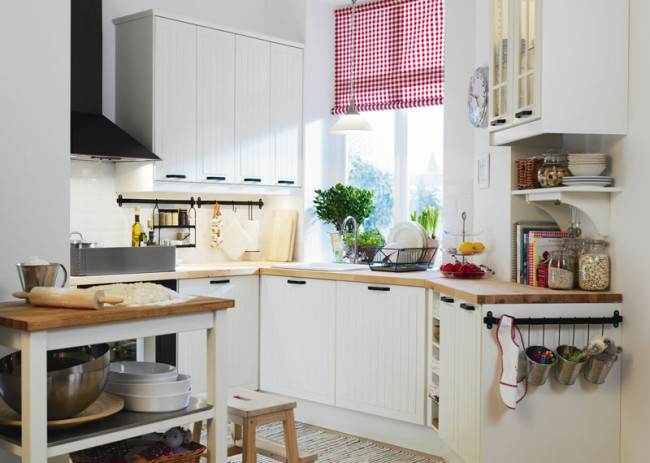 Bright roller blinds in the kitchen in country style
U-shaped set with a sink near the window opening. In order to wash dishes with comfort, a notch for the legs was made in the basement. The faucet with a high spout does not interfere with the opening of the frame, due to the sliding glass unit system.
 White u-shaped kitchen with a sink near the window
An additional lamp was made above the sink, which is useful only in the dark.
 Minimalism in a corner suite with a sink in front of the window
The correct operation of the radiator in the countertop is ensured by special ventilation holes.
 Ventilation grilles for a radiator in a kitchen worktop
The upper tier of cabinets can be extended around the entire perimeter, or open shelves can be made if there is enough storage space.
 Sink and work surface near the window in the corner kitchen
General list of recommendations for installing a window sill
- The window sill is fixed inside the room and below the window opening;
- Below, on the windowsill, at a maximum of 60 mm from its edge, there is a gutter - a teardrop up to 20 mm deep, necessary for draining water;
- The final stage of installation begins only after the preparation of the lower plugs;
- The lower part of the solution of the side slopes is cut down to the wall. Then the wall is cleaned of debris, dust, dirt, etc.:
The window sill is placed like this:
- So that the board is in a strictly horizontal position (measured using a level), and the transverse slope of the window sill inward from the window box is approximately 3;
- The wedges, which are the basis for the installation, should not extend beyond the wall. Therefore, with their correct installation, they will require additional fixation with plaster.
- After that, they proceed to the removal of the window sill, wetting the wall with water and covering it with a lime-gypsum mortar, so that the level of the solution exceeds the level of the wedges by 15 mm;
- The window sill is placed in the solution and pressed against the wedges with force until it stops;
- At the last stage, the excess mortar is leveled and pressed flush with the wall plaster, followed by rubbing. At the same time, the window sill itself enters the groove made on the bar at the bottom of the box. In relation to the side slopes located in the lower part, the same actions are performed - smearing with a solution and subsequent mashing.
It is possible to correctly install the window sill, so as to exclude its subsequent bending and breaking, by placing metal strips under it and inserting the ends of the latter into the lower plug. However, most often you have to deal with plastic and wooden window sills, during the installation of which strength and reliability can be achieved in your own way for each option.
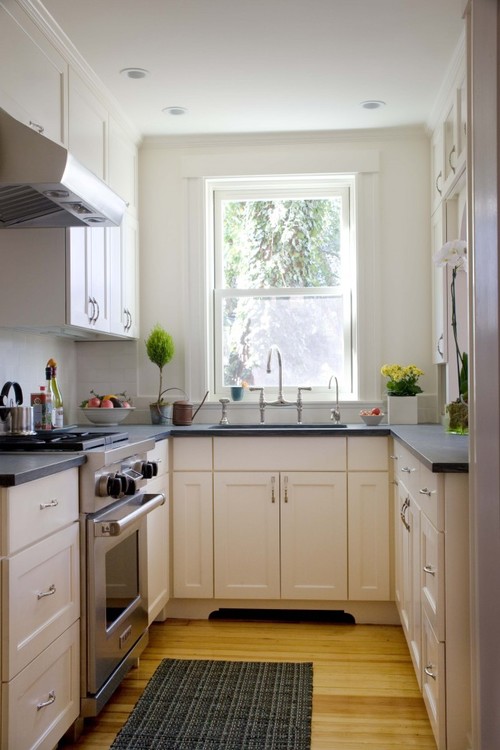
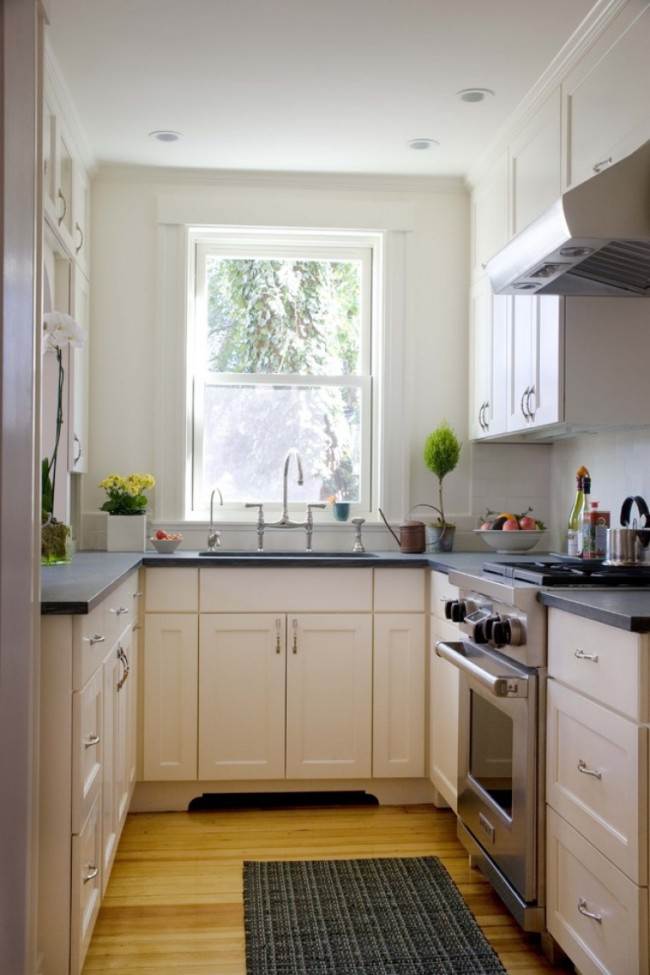
Washing
If you want to get a modern kitchen design, a sink under the window is a great solution that has many advantages. Most often, the window is not involved in space optimization. By placing a sink under it, you will free up some space for other tasks. You can also save a little on electricity by getting more natural light from a window.
Frosted glass - an excellent analogue of curtains
Having made a choice in favor of placing the working area along the window, it is necessary to pay special attention to the curtains. As a rule, it is very difficult to maintain perfect cleanliness where they cook.
Therefore, textiles must be practical and not interfere with the cooking process. Short curtains or blinds are perfect for this.
Modern sunny style
Colorful elements in a bright kitchen make it more interesting.
The disadvantage of placing the sink under the window is the presence of additional costs. The main cost is the transfer of communications. For example, the most pressing issue will be battery transfer. What can be done to successfully implement such a project?
Conclusion
The distance from the window sills to the heating radiator, along with other parameters and installation distances of the elements of the heat supply system, play an important role in creating a comfortable temperature in the room.
 Minimum distances
In this regard, in the absence of sufficient training of the home master, you should seek the help of specialists. They will be able not only to correctly install heating devices, but also calculate the optimal need for equipment for heating a particular room.