Replacing the coolant on a car with an engine UMPO-331 Izh 2126
We work on a cold engine.
Remove the engine mudguard (see "Removing the engine mudguard").
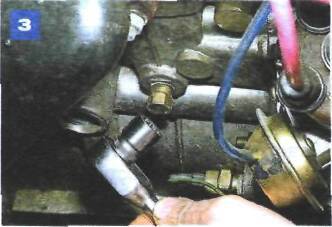
We unscrew the plug of the expansion tank. By substituting a suitable container, ...
... unscrew the drain plug located at the bottom of the right radiator tank and drain the liquid.
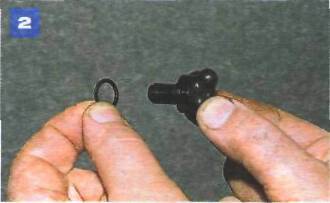
The connection is sealed with a rubber ring - do not lose it.
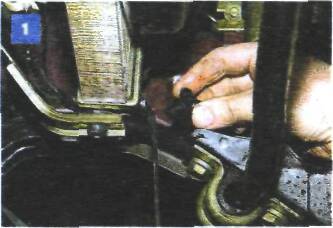
With the “14” head, we unscrew the plug of the hole for draining the liquid from the engine cooling jacket located in the cylinder block next to the ignition distributor.
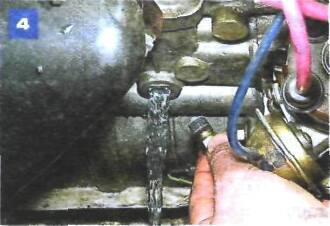
Drain the coolant.
At the end of the drain, we wrap the plugs and drink the liquid through the expansion tank. We start the engine and when the liquid level in the expansion tank drops, we add it. After stopping and cooling the engine, check the fluid level in the tank and top up if necessary.
Self-repair of auto parts is a responsible task, which should be approached as seriously as possible. Sometimes the failure of a spare part takes the driver by surprise, forcing him to spend a lot of time and money looking for a good service station, but there is an alternative solution to the problem, this requires a small amount of knowledge and a set of tools.
When a coolant replacement is being repaired on a car with an UMPO-331 IZH 2126 engine, you need to be extremely careful and not neglect the little things. To get acquainted with the issue, motorists often use various Internet portals dedicated to auto parts. Some of them use narrowly focused forums. But, as a rule, only generalized information is provided there, which is known initially. Where to find a reliable source offering really useful things? Our portal is open for this 24 hours a day. Online mode allows us to help clients at any time convenient for them. Moreover, a mobile version has been developed, available to everyone.
A detailed description of such a unit as replacing the coolant on a car with an UMPO-331 IZH 2126 engine has a good structure with thematic headings. In addition, there is always the opportunity to get acquainted with the intricacies of installation. Often there are situations when the driver is confident in his abilities, but when he gets to work, questions begin to arise. Thanks to our portal, such moments can be easily avoided. The site is a database that is updated regularly. Using it as a support during repair work, the motorist gets a serious advantage. Each of the articles has a reliable support, proven in practice.
In addition to the repair manual, the owner of a personal car will be able to prevent a lot of breakdowns due to the human factor, thanks to the information located on the site. Users are presented with a lot of useful recommendations for proper operation, which will help to significantly extend the life of the unit and avoid many negative consequences.
Online support is an excellent and most convenient way to get the necessary information. Another weighty plus is that articles are written for people. We understand that the reader will do everything with his own hands, and we try to make it as convenient and efficient as possible. Use the resource at any time of the day and find the answer to any question of interest regarding cars.
Manufacturers and types
The standard sizes of thermostats, which by their design are suitable for installation as part of a Chevrolet Niva car engine, are produced by a number of global companies. The table below shows a list of products.
| Model | Product serial number | Opening temperature |
| Thomson | 21230-1306010-05-0 | 80° |
| Zommer | 2123-1306010 | 80° |
| Metal Inkar | 2123-1306010-01 | 80° |
| Pramo | 2123-1306010-02 | 80° |
| WEEL | 182-0114 | 80° |
| Luzar | LT0123 | 80° |
| Herzog | HL36010 | 80° |
| Vkt | VT29003 | 80° |
| Fenox | TS009E7 | 80° |
| Finord | 21231306010 | 80° |
| Pekar | 21231306010 | 80° |
| Finwhale | FinwhaleT123 | 80° |
| Gallant | GLTH14 | 80° |
| Hofer | HF 445 730 | 80° |
There is an opinion among car owners that the most high-quality, reliable and durable thermostats are products manufactured by Russian factories. There are currently three such enterprises:
- City of Stavrovo, Vladimir region, ATO plant;
- City of Rzhev, Tver region, PRAMO plant;
- City of Vladimir, Thomson LLC.
Among foreign models, car owners have good reviews about the Metal Inkar model from a Polish manufacturer.
These products work great in the Chevrolet Niva cooling system, the engine warms up quickly, there are no complaints.
The only negative is that the case is made in two versions - plastic and brass. The second option is not very favored by drivers, although it also works well in a circuit.
Thermostats Zommer, Luzar, WEEL should only be selected from approved manufacturers. There are a lot of fakes on the market and on the Internet. Sellers seek to sell their dubious products under the guise of the original to newcomers to the automotive business. In order not to get burned, when buying, you must require licenses, certificates and supporting documents from sellers.
6. Coolant pump
OHC ENGINES
Withdrawal
| PROCEDURE | |||||||||
|
Repair
| PROCEDURE | |||||
|
Installation
| PROCEDURE | |||||||
|
DOHC ENGINES
Elements of the DOHC engine cooling system
| 1 - pump pulley, 2 - water pump, 3 – sealing ring of the pump, 4 – a branch pipe of a hose from a heater, 5 – a branch pipe of a hose to a heater |
Withdrawal
| PROCEDURE | |||||||||
|
InstallationConnecting Hoses to the DOHC Engine Water Pump Housing
| A - heater hose - until May 1990, B - expansion tank hose - until May 1990, C - radiator hose |
V6 ENGINES
| PROCEDURE | |||||||||
|