Relays and fuses VAZ 2114
- F1 10 Amp (A) rear fog lights and a rear fog light indicator light.
- F2 for 10 A turn signal lamps, turn relay, emergency gang, emergency gang warning lamp.
- F3 at 7.5 A interior lighting (both) and trunk, ignition light, powertrain control system control lamp, brake lamps, computer, if available.
- F4 20 A carrying, relay and rear window heating element.
- F5 20 A horn and its relay, cooling fan.
- F6 30 A power windows and their relays
- F7 for 30 A heater engine, headlight cleaner, windshield washer, cigarette lighter, glove box light, rear window heating relay coil.
- F8 at 7.5 A right fog light.
- F9 at 7.5 A left fog light.
- F10 for 7.5 A left clearance, a lamp signaling the inclusion of a side light, a lamp for lighting a sign, engine compartment, illumination of switches and instruments, a switch for instrument lighting.
- F11 at 7.5 A right size.
- F12 at 7.5 A right low beam.
- F13 at 7.5 A left low beam.
- F14 at 7.5 A left high beam and a light bulb signaling the inclusion of high beam headlights.
- F15 at 7.5 A right far.
- F16 30 A - a light bulb indicating insufficient oil pressure, brake fluid level, parking brake, battery discharge, instrument cluster, lamp health monitoring relay, control system indication, reversing lamps, direction indicators and their relays, as well as an alarm if turn mode, computer, excitation winding of the generator is on at the time of engine start.
The location of the relays and fuses of the new type
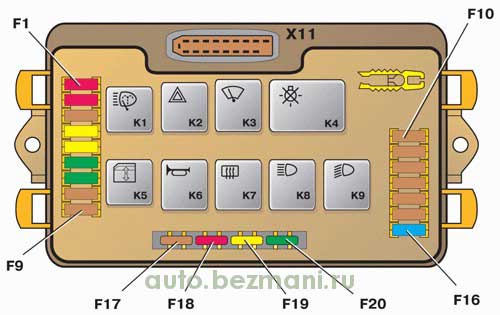
- K1 - relay for switching on headlight cleaners;
- K2 - relay-breaker for direction indicators and alarm;
- K3 - windshield wiper relay;
- K4 - lamp health monitoring relay;
- K5 - power window relay;
- K6 - relay for turning on sound signals;
- K7 - relay for turning on the heating of the rear window;
- K8 - high beam headlight relay;
- K9 - relay for turning on the dipped headlights;
- F1-F20 - fuses.
Connection diagram of the mounting block of the new sample
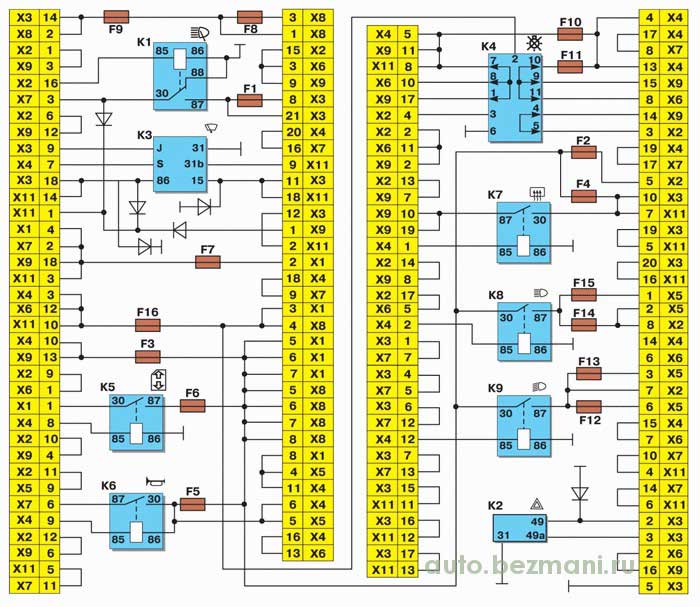
- K1 - relay for switching on headlight cleaners;
- K2 - relay-breaker for direction indicators and alarm;
- K3 - windshield wiper relay;
- K4 - lamp health monitoring relay;
- K5 - power window relay;
- K6 - relay for turning on sound signals;
- K7 - relay for turning on the heating of the rear window;
- K8 - high beam headlight relay;
- K9 - relay for turning on the dipped headlights;
- F1-F20 - fuses.
Location of relays and old-style fuses
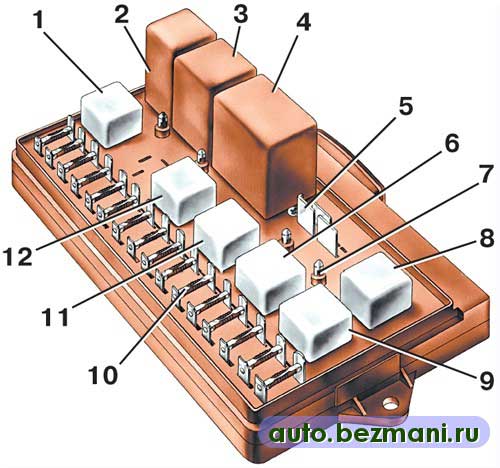
- 1 - relay for switching on the headlight cleaner (K6);
- 2 - rear window washer time relay (K1);
- 3 - relay breaker for direction indicators and alarms (K2);
- 4 - wiper relay (K3);
- 5 - contact jumpers in place of the lamp health monitoring relay;
- 6 - relay for turning on the heating of the rear window (K10);
- 7 - spare fuse;
- 8 - relay for switching on the main beam of headlights (K5);
- 9 - relay for switching on the dipped headlights (K11);
- 10 - fuse;
- 11 - relay for turning on the electric motor of the fan of the engine cooling system (K9);
- 12 - relay for turning on the sound signal (K8).
Connection diagram of the old-style mounting block

- K1 - rear window washer time relay;
- K2 - relay-breaker for direction indicators and alarm;
- K3 - windshield wiper relay;
- K4 - lamp health monitoring relay (contact jumpers are shown inside, which are installed instead of the relay);
- K5 - high beam headlight relay;
- K6 - headlamp cleaning relay;
- K7 - power window relay;
- K8 - relay for turning on the sound signal;
- K9 - relay for turning on the electric motor of the fan of the engine cooling system;
- K10 - relay for turning on the heating of the rear window;
- K11 - relay for turning on the dipped headlights.

Due to winter, constant snowfalls, 5% tinting, and even with the fact that the mirrors already have built-in heating, I decided to connect it
It warms up perfectly, melts the ice for one or two, drops of rain (well, or melted snow) soon disappear completely, so it's a great thing! Now I don’t understand how you can drive in bad weather without heated mirrors
Need to buy: 3m. wires (it took me so much), a conventional 4-pin relay + a wire block to it, a 7.5A fuse (10A is also possible), a VAZ 2114 rear window heating button + a wire block under it ON THE POLARITY OF THE MIRRORS WIRES DO NOT DO ANYTHING We remove the on-board computer, we connect everything stupidly according to the scheme wiring, I also wrapped the relay with an anti-creak so that it would not rattle
downloaded the circuit somewhere, then showed the electrics, he approved, made his little changes (I changed them), so use it to your health)
The principle of operation and the device of the heating system VAZ-2115
17.02.2017
If the heater does not work in the car, especially in the cold season, there is a chance of being left without a vehicle, since in the cold in the car you can simply freeze.
In severe frosts, it is very difficult to clean the windshield from ice to provide a view, and with an idle stove, this becomes doubly problematic. You may not even be able to get to a service station.
But most often, if the principle of operation, the scheme and arrangement of the VAZ-2115 stove are known, you can solve the problem right on the spot yourself.
The device of the heating system VAZ-2115
The electrical circuit of the VAZ heater is represented by the following elements:
- Electric motor with fan. The fan drives hot air into the car interior and onto the windshield.
- Buttons and levers for switching the heat level and airflow rate. The VAZ-2115 has 3 options for the speed of heat flows that can be adjusted.
- Additional resistances that provide the desired rotational speed of the stove fan (lowering tungsten coil coils).
- Fuses and connection wires.
The scheme of the VAZ-2115 stove, presented below, clearly shows its operation device and components.
Wiring diagram for the VAZ heating system
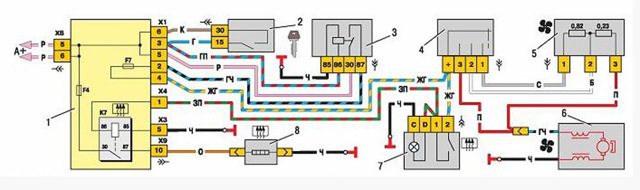
- Mounting block.
- Ignition.
- Unloader ignition relay.
- Furnace motor switch.
- additional resistor.
- Furnace motor.
- Stove control button.
- Heated rear window.
K7 is a relay that turns on the heated rear window.
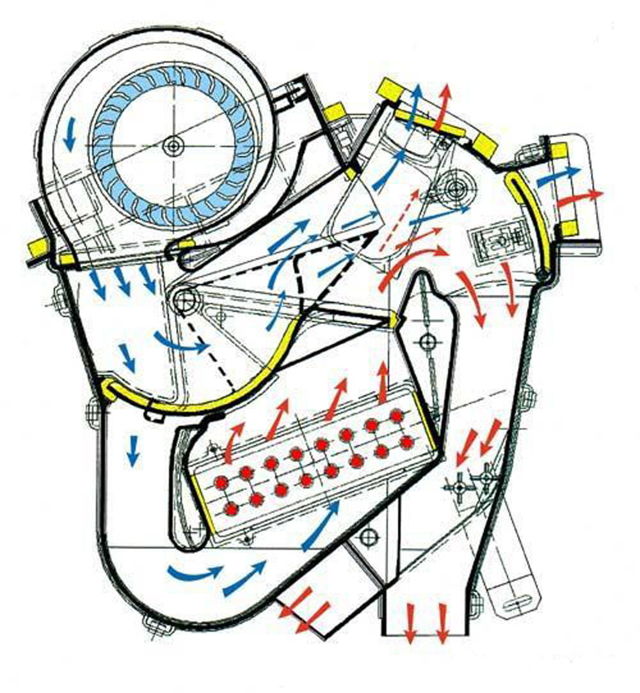
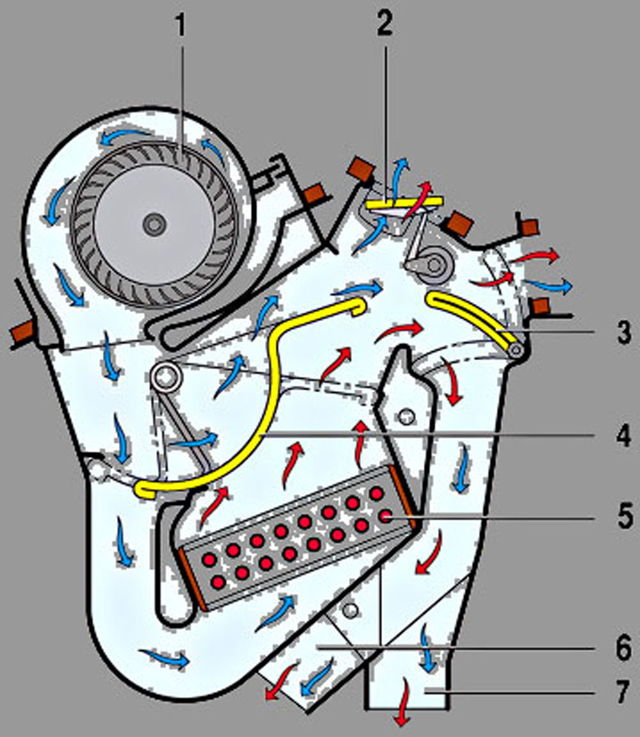
Heater operation diagram
- Fan.
- Windshield damper.
- A damper that distributes air flows to the central and side deflectors; zones that heat the legs of the driver and passenger.
- The damper that controls the stove.
- Radiator.
- Driver's footwell.
- Internal air duct.
The operation of the stove is based on the following principle
The cooling and heating system works on almost all models of VAZ cars in the same way. The heater is turned on with the help of a regulator, which is located in the machine itself, antifreeze is supplied to the radiator. Its temperature after warming up reaches more than 80 degrees. After that, the fan starts to work, which operates at one of 3 speed modes.
The fan starts to create a directed air flow. It moves from the outside of the heating system into the interior of the car. With the help of control dampers, the driver selects heating zones, there are three of them in total: on the feet, on the windshield and in the car interior.
A key element of the car's heating system is the fan, and if it fails, the heating will be lost. Without it, hot air will not enter the cabin, and in order to heat the interior of the VAZ-2115, it will take not a couple of minutes, but a couple of hours.
The main breakdowns of the electrics of the heating system VAZ-2115
If there are no changes in the heating system at any position of the switch knob, then most likely the motor of the system is out of order (the brushes are worn out) or there is no voltage at the terminals. But also in this case, there may be problems with the ignition switch or the mounting block (the F4 fuse is blown).
It is important for the car's heating system to work properly so that the engine ground (installed under the hood) is no more than 3 ohms.
If the heater works normally at maximum engine speed, and problems occur only at low speeds, then the cause of the malfunction most likely lies in the speed switch button or additional resistors.
If you turn on the interior heating system and hear noise, and the stove does not blow properly, then this also indicates an engine malfunction.
Malfunctions may consist in wedging of the impeller or armature bearings. Faults can be eliminated by replacing the components or, if necessary, by lubricating them.
But, as a rule, these actions give a short-term effect and the problem returns.
Over time, any equipment breaks down and needs repair.
Do not forget that over time the system ages and wears out, respectively, the older the car, the more it needs to be prepared for the heating season.
SCHEME AND DEVICE OF THE COOLING SYSTEM
The VAZ 2114 cooling system is liquid, with forced circulation. Antifreeze or antifreeze is poured into the system as a coolant. In the most extreme case, you can also fill in water, but you can’t ride it for a long time - in winter you can defrost the engine, and in the rest of the season, with prolonged operation of the engine on water, the cooling jacket in the block and cylinder head corrodes, rust accumulates in the radiator.
The engine cooling system VAZ 2114 (SOD) consists of the following elements:
- Radiator. It is the main cooling part in the system and performs the function of transferring the heat of the liquid to the surrounding air space;
- Water pump (pump). The pump creates a forced movement of antifreeze in the system, thereby cooling the entire SOD, including the internal combustion engine (ICE). The pump rotates from the timing belt;
- Branch pipes (hoses). Antifreeze circulates through them;
- thermostat. It regulates the passage of the coolant (coolant) through all pipes or only in a small circle and maintains the required operating temperature of the internal combustion engine;
- Electric fan. The fan is located on the plane of the radiator and, due to the generated air flow, cools its surface when turned on. The electric motor turns on only when the temperature set by the sensor (103 ° C) is reached;
- expansion tank. Liquid is poured into the tank, and when the fan is activated, antifreeze flows into it through the return hose, thereby relieving excess pressure in the SOD;
- Expansion tank plugs. There are valves in the plug that relieve the excess air pressure created in the system during the circulation of antifreeze.
The cooling scheme of the VAZ 2114 in the figure below:
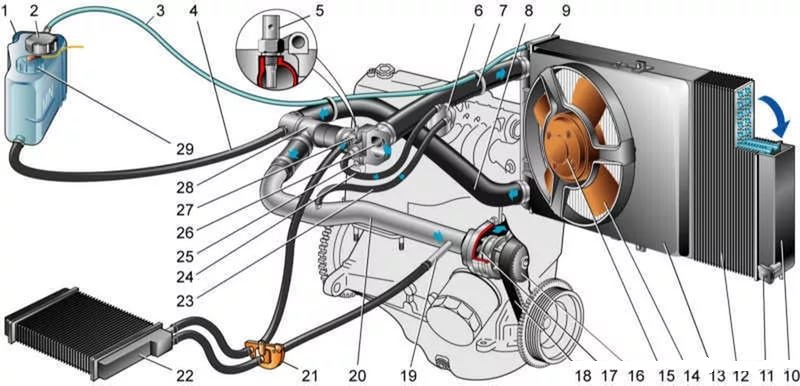 Cooling scheme VAZ-2114
The scheme of the engine cooling system on the VAZ model 2114 is simple and practically does not differ from the scheme of any other fuel-injected internal combustion engine of a passenger car. After starting the engine, the water pump is driven by the rotating crankshaft through the timing belt. The pump creates coolant circulation in the system, and the antifreeze passes through a small circle (pump, upper pipe, cylinder block). When the internal combustion engine is heated to operating temperature, the thermostat valve opens, and the coolant flows through the lower pipe into the internal combustion engine in a large circle.
RADIATOR
The VAZ aluminum radiator consists of a two-row core and two plastic tanks on the sides. The coolant is poured into it through the expansion tank, at the bottom there is a drain plug.
PIPE PIPE
The set of pipes of the cooling system includes:
- Upper and lower branch pipes (main);
- Water pump metal tube;
- Inlet hose from the expansion tank to the radiator;
- Return hose from reservoir to radiator
- Two hoses for throttle body heating.
Check the integrity of the pipes (very often they sell defects in car dealerships)
How the VAZ-2115 cooling system works
The VAZ-2115 has the same cooling system as in other injection-type cars. The principle of operation is based on heat exchange, which occurs with the help of a liquid. The latter can be antifreeze, cooling antifreeze, in extreme cases, water, although experts do not recommend using the latter option.
The cooling system circuit built into the VAZ-2115 consists of the following key components, indicated in the photo:
- electric motor;
- pump - ensures the movement of the filled liquid throughout the system;
- radiator;
- thermostat - regulates the activity of all components of the structure.
The temperature regime available in the VAZ-2115 is also important. If the indicators exceed the set 87 degrees, the following occurs:
- the thermostat valve comes into action and opens;
- the cooling liquid enters a large circulation circle, which involves passing through pipes through the engine and cooling the latter;
- the fan comes into operation, it begins to supply air flow to the radiator grill, and this helps to reduce the temperature.
Among all the components of the cooling system, experts call the most important one, without which the whole mechanism could not work properly - this is a valve coming from the thermostat. The item consists of technical wax, deformed under certain temperatures. This is how the volume of coolant supply is ensured, the intensity of cooling is regulated.
Find out the radiator pipes from VAZ 2108 to VAZ 2115
Radiator pipes vaz 2108, 2109, 21099, 2113, 2114, 2115 ...
Hello dear reader of the RtiIvaz.ru blog. Let's find out today and talk with you about which radiator pipes are installed on Lada VAZ 2108, 2109, 21099, 2113, 2114, 2115 cars.
Many car owners do not know what rubber radiator pipes for the cooling system are for and how they work. Here I am trying in a simple language, explain about vase auto repair kits, and also show on the video what is going on.
Excuse me if I'm wrong somewhere, since the rubber pipes of the cooling system are very difficult to understand. A car enthusiast will try to explain to you about the radiator pipes for the cooling system, which ones and where they fit.
Look at the photo, as well as on the video inlet, outlet, bypass pipes. In general, you need to at least somehow understand the hoses on your Lada VAZ cars for a fulcrum under the hood.
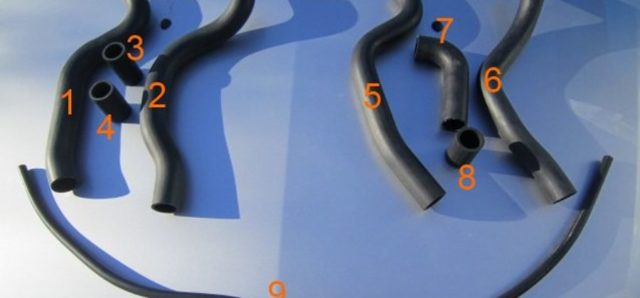
Next, see the photo of the pipes of the Lada VAZ 2108, 2109, 21099, 2113 for cars with a carburetor engine:
For VAZ cars with a carburetor engine
At number 1, the “upper” pipe “supplying” coolant from the engine to the radiator, the so-called “wave”, has the shape of a wave.
And at number 2, the lower “angular” rubber pipe drains the coolant from the radiator to the engine.
Under numbers 3 and 4, there is one "shorty" bypass that connects the engine head to the thermostat, and the second connects the thermostat to the water pump. Expansion tank pipe for carburetor engines numbered 5. Design numbers:
- 2108-1303025 hose leading radiator number -1
- 2108-1303010 hose outlet -2
- 2108 -1303092R thermostat connection coupling numbered -3; 4
- 2108-1303080 hose filling cooling system with extension number -5
You are a car enthusiast, you probably know that the top supply hose brings a very burning liquid from the engine to cool in the radiator. And the outlet lower hose takes the already cooled liquid to the engine. This is the unusual role played by the rubber hoses of the cooling system. Next, see the photo of the pipes of the Lada VAZ 2108, 2109, 21099, 2113, 2114, 2115 for cars with an injection engine:
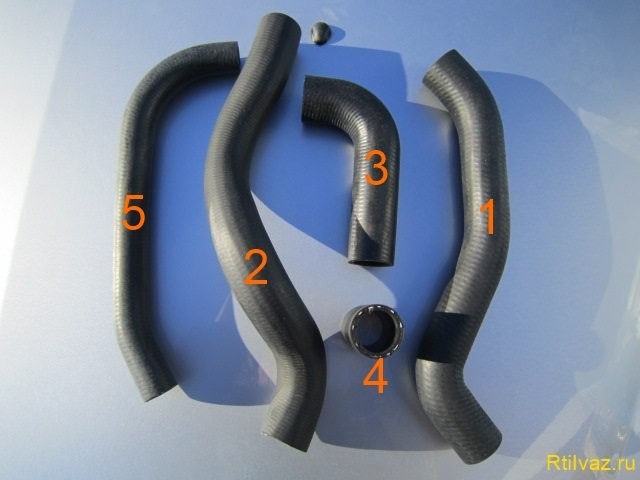
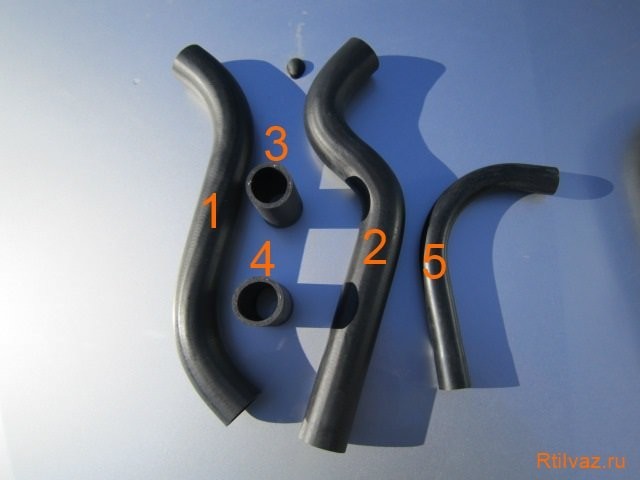
For VAZ cars with an injection engine
Under number 1, the “upper” pipe “supplying” the coolant from the engine to the radiator has the shape of an angular wave. And at number 2, the “lower” branch pipe that drains the coolant.
At number 3, the “angle” is a bypass connected from the engine head with a thermostat and further to the water pump through the “shorty” coupling 4. At number 5 in the photo is the expansion tank hose for injection engines.
Design numbers:
- 21082-1303025 radiator hose, supply number -1
- 21082-1303010 hose outlet - 2
- 2109-1303093-01 hose connecting thermostat and water pump -3
- 2108 -1303092R thermostat coupling -4
- 21082-1303080 hose filling cooling system at number -5
Video:
That the injection and that the carburetor engine still has a hose of the same length and thickness “antifreeze” that removes steam from the radiator to the expansion barrel (see video).
The steam outlet hose "antifreeze" VAZ 2108-2115 differs from the steam outlet hose VAZ 2110-2112 only in length.
What is the difference between auto repair kits for radiator pipes of injection and carburetor engines, I will not describe in this auto article, see friends in the photo and video is clearly visible.
- You will also be interested in:
- Valve clearance adjustment 2101
- Radiator pipes used on Lada
- Car cooling system maintenance
Rear window heating problems and solutions
Scheme:
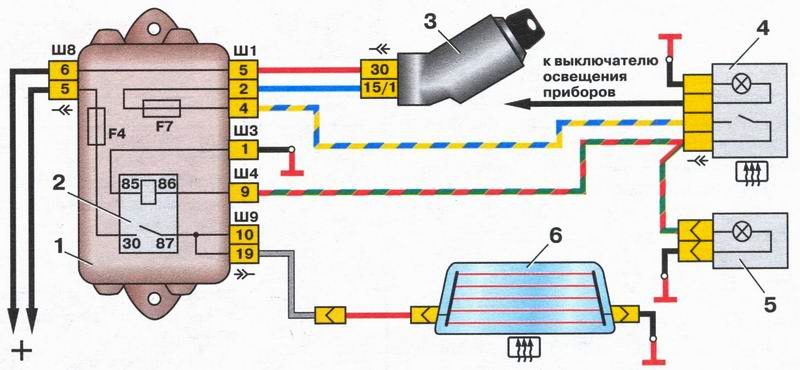
1 - mounting block;
2 - switching relay;
3 - ignition lock;
4 - power button (with backlight);
5 - signal lamp on the instrument panel;
6 - heating thread (element) of the rear window;
The inoperability of the rear window heater is detected immediately, with working heating, the fogged glass, literally in the first minutes, after turning it on, begins to clear up. If the heating does not work, this does not happen and the glass remains misted.
The domestic car VAZ 2114 (Samara-2) is built on the VAZ 21093 platform and is an improved version of it. The interior has a new instrument panel, a new steering wheel, an adjustable steering column, power windows and a new heater. All schemes are taken from open sources and are intended to help in self-repair of the electrical equipment of this car. Enlargement of pictures - by click. The VAZ 2114 fuse box is located in the passenger compartment under the dashboard. When checking the circuit of the electrical part of a VAZ-2114 car, it is impossible to check the health of the circuits for a “spark” - this can lead to burnout of the current-carrying tracks of the mounting block.
Cooling System Care
In order for the cooling system to function properly, it must be looked after and periodically checked for its condition. The most responsible of these operations is the timely replacement of the coolant. It is due to the fact that during circulation through the coolant system it undergoes repeated heating and cooling, as a result of which its chemical composition changes and the cooling properties decrease sharply.
In order to replace the coolant in time, you need to focus on the following important rules:
- antifreeze should be completely changed every 2 years, and antifreeze - every 5 years;
- with high mileage, antifreeze replacement is mandatory after about 15,000 km, and antifreeze after 40,000 km (these figures may be slightly more or less, depending on external conditions);
- in case of a significant change in the color of the coolant, it must be replaced, regardless of the time of its use and the mileage.
As you can see from the above rules, the use of antifreeze is more beneficial, and preference should be given to it.

Coolant replacement
In order to prevent serious errors, the correct replacement of the coolant should be performed as follows:
- Completely drain all old coolant from the system.
- Screw all plugs tightly.
- Pour purified (highly recommended - distilled) water into the system up to the maximum mark.
- Start the engine and let the system warm up well (at the same time, overheating of the engine should be avoided, and idle speed should be maintained around 3000).
- Turn off the engine and leave the car to stand for about 7-10 minutes.
- Drain all distilled water from the system.
- If the water comes out dirty, repeat the whole operation again.
- After clean water flows out, pour coolant into the system.
If during the operation of the car the coolant level drops, then it can be periodically topped up, but at the same time, after the allotted time (the dates were indicated above), it is still necessary to complete its replacement.
Possible breakdowns
As for breakdowns in the cooling system, the most common ones are:
- problems with the radiator (leakage or clogging);
- failure of the thermostat;
- destruction of the water pump (most often the bearings fail or the impeller breaks off);
- fan failure;
- leakage in the pipe system.
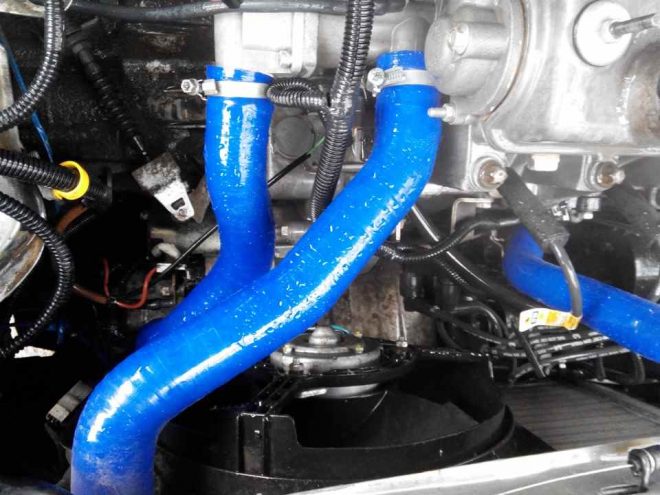
Branch pipes of the cooling system
While the problems with the radiator and other units of the system cannot be solved in one minute, the problems with the nozzles are quite easy to fix - if they have lost their elasticity and began to crack, then they should simply be replaced with new ones. And in most cases, a simple tightening of the clamps will be enough to solve the problem of coolant leaks from the cooling system.