How to connect
All work related to making changes to the heat supply scheme should be carried out in the summer with the equipment turned off and the coolant drained.
Installation steps
- Preparing the system, draining the coolant.
- Determining the location of the cut.
- Welding of bends to the pipeline leaving the boiler.
- Thread cutting and installation of valves.
- Boiler bypass pipe welding.
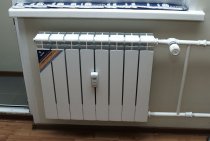
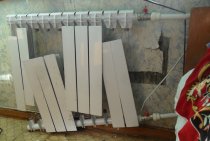
- Battery connection.
Installation features and connection diagram

In your home, you can use the simplest gravity scheme if the heated area is small. In this case, the battery is installed at the level of the boiler or lower. Thus, a circulation pump is not needed, since the heat source is at the bottom and, accordingly, the warm layers will always tend to rise.
It must be remembered that the farther the device is from the boiler, the larger section of the pipeline will have to be laid, and this is unnecessary heat loss. The accumulator is switched on parallel to the pipeline leaving their boiler. This is done in order to be able to take it out of work. For this, a valve is cut into the pipeline.
At the same time, a branch is made from the incoming pipeline with a tie-in valve to the battery. Thus, it will be possible to switch the water flow from the boiler to the tank, thereby reducing the hydraulic resistance of the circuit and not heating the cooling boiler. Before firing up the boiler, a reverse switchover must be carried out.
Practical Tips
- Even if the battery is installed at the bottom, it is recommended to equip it with a circulation pump. This will significantly increase heat transfer and reduce heat loss through the walls of pipelines.
- When using PVC pipelines, it is advisable to combine them with metal valves, as this will always make it possible to repair it.
These devices require quite large capital costs, due to the large amount of metal. Having invested once, you can recoup all costs in one or two seasons, since the battery can also serve as a boiler for hot water supply, so you do not have to spend money on buying and installing another device.
Reliable tank insulation methods
A modern way to insulate an expansion tank is spraying liquid polyurethane foam (PUF). This service is provided by many specialized organizations. To save money, you can do it yourself.
On sale there are kits for different areas for one-time work. At the preparatory stage:
- cleaning the tank from old paintwork, dirt, rust and dust;
- degreasing;
- drying.
After that, a liquid composition is evenly applied to the surface. Its thickness depends on the climatic zone. For the conditions of Russian winters, a layer of 10 cm will be sufficient.
This coating provides good insulating performance and additional protection against corrosion. However, if the tank is damaged, it will have to be applied again.
There are several options for insulating the tank at the stage of creating a heating system. Some experts recommend connecting a circulation pipe. It will ensure the movement of the liquid, which minimizes the likelihood of freezing. Others - to lay a thermal cable for heating.
An open expansion tank installed in the attic requires the organization of high-quality insulation. You can choose a simple but less effective way or invest a little more effort, money and time to create reliable heating. Good luck with your choice.
Overview of the best models
On the Russian market, today well-known foreign companies, as well as domestic manufacturers, offer their products:
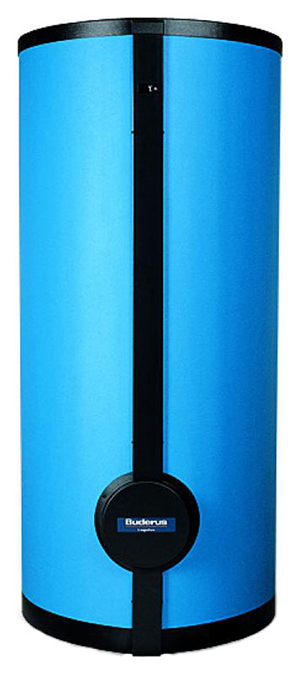
Buderus (Germany) - heat accumulators of a universal type suitable for working with boilers of other brands of solid fuel boilers. Three models of devices are produced: PS - with a volume of 200 to 2000 liters, are not equipped with internal heat exchangers and can be used to store cold water; PR and PNR - with a volume of 500, 750 and 1000 liters. The design feature of PNR is the ability to connect to a solar collector. The tanks are made of carbon steel and fitted with a 100 mm foam insulation layer.
Hajdu (Hungary) - distinguished by a balanced cost relative to quality. The thickness of the heat-insulating layer is 100 mm. The PT and AQ PT series are produced, differing in tank capacities. AQ PT may not be equipped with internal heat exchangers or may have one or two. In the RT series, an electric heater is provided, which allows you to extend the discharge time and use electric heating at night in the presence of a multi-tariff electric meter.

Lapesa (Spain) - produces the MASTER INERTIA, MASTER VITRO, MASTER INOX and GEISER INERTIA models. The model range includes designs designed for industrial and household installations. Polyurethane is used to insulate the tanks, which significantly reduces heat loss. The inner walls of the MASTER VITRO tanks are enamelled, while the MASTER INOX series uses stainless steel. The volume varies from 800 to 5000 liters, the tanks are optionally equipped with heating elements and internal heat exchangers.
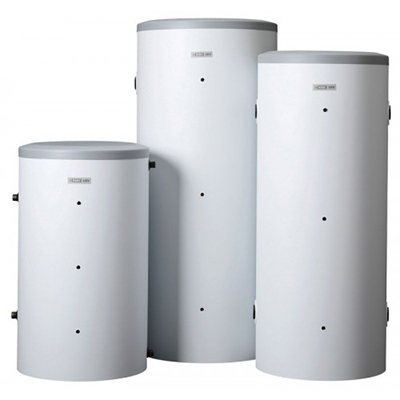
NIBE (Sweden) - the model range provides for the possibility of synchronizing the battery with such components of the heating system as a solar collector or a heat pump. Cascade connection of several tanks at once is possible to increase the storage capacity. The devices are equipped with a built-in electric heater and heat exchangers. Thermal insulation is made of expanded polystyrene up to 80 mm thick. Stainless steel and carbon steel with enamel coating are used for production. The volume of models varies from 100 to 1000 liters.
We did not believe that the battery would work so efficiently. Capital investments are large, but now there is no need to add coal at night.
Manufacturing Recommendations

When self-manufacturing a rectangular tank from sheet metal, special attention should be paid to welds. In the absence of experience, it is better to contact a qualified welder who will correctly select the electrodes and make the connection
If the technology is not followed, even a unit made of stainless steel will leak at the seams.
It is necessary to equip the incoming and outgoing pipelines with valves. Connect the pump in parallel with the check valve, and install the heating element only at the bottom. When using stainless steel, the battery is installed exclusively on the lower floor.
What to insulate?
The choice of insulating material depends on the shape of the tank, otherwise they all show fairly high efficiency:
- Cylindrical tank - rolled foil insulation is used in combination with flexible mineral wool slabs.
- Rectangular tank - rigid plates used in facade insulation, polystyrene foam or flexible insulation.
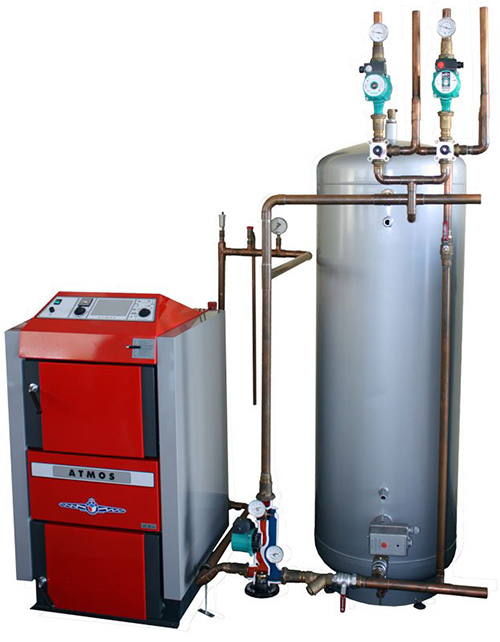
What are fuel cells for?

This is a kind of passive heating fittings that makes the operation of the heating system as convenient as when using a gas boiler. It stores excess thermal energy when the solid fuel boiler is operating normally, heating water for the heating system and domestic hot water.
When the intensity of the flame in the furnace decreases until it is completely extinguished, hot water from the accumulator automatically starts to flow into the system. Thus, it is possible to maintain a comfortable temperature until the next ignition of the boiler, after which the battery automatically returns to charging mode.
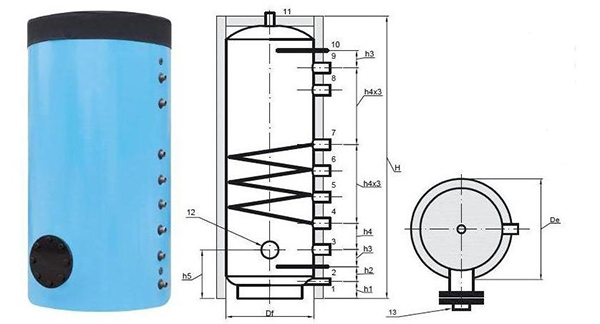
Design

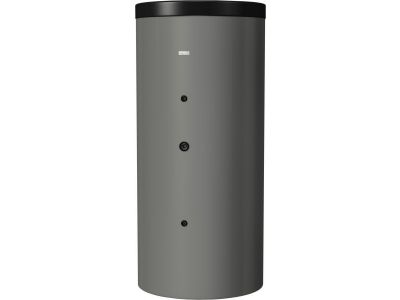
It is a metal tank of various, but most often oval shapes, equipped with flanges for connecting incoming and outgoing pipelines.
According to the available equipment, batteries are divided into:
- Simple - not having additional nodes inside.
- Complex - equipped with additional structural elements located inside.
The container is made of carbon or stainless steel by sheet metal welding. Inside the battery there may be heat exchangers through which boiler water circulates, thereby heating the water in the tank.
Their number and design are determined by the power of the storage device. As additional, a separate tank for heating water for the needs of domestic hot water and a built-in electric heater can also be used.
The principle of operation of the heat accumulator

The principle of operation of a solid fuel boiler previously implied the need to add fuel around the clock. With the advent of the heat accumulator, this problem disappeared. Boiler water passing through the heat exchangers inside the tank partially gives off its heat to the water in it and to the water in the additional tank for the needs of hot water supply.
When the fuel is completely burned in the furnace, the coolant circulating through the system begins to cool and the coolant is supplied to the system from the tank. The presence of automatic supply depends on the complexity of the heating system, while home-made batteries often do without this option by switching manually.
In some models, an electric heater is built in, which allows you to further increase the operating time in the discharge mode.
Where is the device being used?
The scope of the battery is heating systems of various designs. In fact, there is no limit for any systems, however, the larger it is, the larger the tank capacity should be. In industrial models, it is possible to create a cascade of several batteries connected to each other.
Heating risers and installation in a country house
To install heating risers (Figure 2), it is important to follow certain guidelines:
- Installation of risers should be carried out only on a corded plumb line.
- These pipes should be reduced in length and width in order to save metal material.
- The most advantageous place in the country for a heating riser is the corner of the building, which is formed by the outer walls.
- If the house has several floors, then risers are additionally located under the stairwells.
- If heating risers are planned to be hidden in the walls, then their contact with the structures should be excluded.
- Where the riser passes through the ceiling, it is installed in a special tin sleeve or cut wide pipes. The sleeves along the edges should be 2-3 cm higher than the floor or ceiling, so that during heating these heating pipes do not spoil the plaster.
- If the riser passes through wooden structures, those places need insulation.
Creating a do-it-yourself water heating scheme
For example, there is a country option without electricity, but with water, and you need to do the heating yourself. A solid fuel boiler is the best option, but it can be replaced with a water wound furnace. You can make your own oven. To do this, you need pipes with a maximum diameter of 5 cm, welded to a steel furnace. The heat transfer must be high, so the tubes are brought together from below into one pipe and also from above. The resulting two ends serve to start creating a water system. In the case of a brick stove, the tubes can be arranged in a serpentine shape inside the firebox.
Rice. 2
This example takes into account the absence of electricity, so the circulation is created naturally, and not forced by an electric pump.
For good circulation, it is important to calculate the optimal slope of the pipes throughout the piping: the best slope is 1-5mm / 1m of pipe. The number of radiators is not fundamentally important, the main thing is their correct installation (Fig. 1)
When installing radiators, it is important:
- fix the batteries at the same level with a maximum error of 1.5 cm;
- batteries are fixed at an angle.
Do-it-yourself heating for a summer residence also implies the creation of an expansion tank, which is not difficult to make from plastic containers on your own. It is necessary for the natural circulation of the coolant. The tank creates pressure that drives water through the pipes and returns it back to the heated unit. The more radiators, the more tank volume is needed (calculated as 0.1/to the system).
The calculation of the expansion tank should be done with a margin, therefore, it is worth adding from 25% to 40% to the above figures. The tank is installed on top of the boiler, crashing into the water supply pipe. It has a hole at the top through which atmospheric pressure acts. This does not allow unnecessary air to accumulate in a do-it-yourself design.
Device for increasing the heat transfer of a garden stove
Install the frame on the garden stove stove (Fig. 1). The free space (250-300 mm) between the stove and brickwork allows the stove to be used for cooking.
You enter the smoke channel into the heat shield by cutting the chimney. It is better to use thick-walled steel pipe. In the shield, the flame passes one revolution and gives off a significant part of the heat to the bricks. The efficiency of the furnace increases, it keeps heat for a long time. Due to the lower thermal load, the service life of metal chimneys is extended. The upper part of the oven can be used for drying mushrooms, berries, medicinal herbs.
First, a frame is made. As a rule, the width of the slab is equal to the length of the brick (250 mm) and this simplifies the construction of the frame. The shield is designed for a stove with a plate size of 240x450 mm. From a corner with a width of 25 or 30 mm, two frames with dimensions of 260x520 mm are welded. The lower frame is installed on the slab so that the edge of the corner covers the slab. 4 corners 900 mm long are welded to the frame from the outside at the corners. The middle frame of the same dimensions as the lower one is welded at a height of 250-300 mm so that it covers one row of bricks. M5 screws can be used instead of welding.
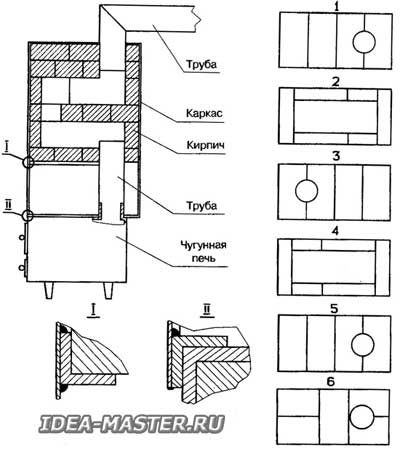 Rice. 2. The design of the thermal shield. Rice. 2. The design of the thermal shield.
|
The frame is installed on the stove stove, a pipe is placed at the exit of the smoke hole and masonry is started (Fig. 2).
The solution is ordinary, on clay. The thickness of the seams is minimal. The 1st row is laid directly on the frame.
In the 1st, 3rd, 5th and 6th rows, the bricks are laid flat, and in the 2nd and 4th rows - on the edge. Samples in bricks can be made by drilling holes along the radius and carefully removing the excess. It is useful to enclose the masonry in a metal screen made of galvanized steel. Sheets are installed inside between the corners, so additional fastening is not required. In this case, you can abandon the top row of bricks.
After the masonry is completed, the top of the last row is fixed on all sides with a 3 × 20 mm steel strip welded to the corners. The protruding ends of the corners are cut off. The gaps between the pipes and the masonry are sealed with an asbestos cord and covered with mortar.
After two or three days of drying, the oven must be heated several times for 10-15 minutes and you can proceed to the usual furnace, not forgetting the general rule for brick ovens: the temperature of the outer surface of the bricks should not exceed 90 ° C.
| Recommend this page to your friends or bookmark it: |
| More about stoves for summer cottages and gardens: | |
|---|---|
| • | Garden oven. Mini bakery in the garden |
| • | Homemade stove for heating the greenhouse |
| • | Clay oven - adobe bakery |
| • | Country mini-oven |
| • | To keep the oven from smoking. Why does the stove smoke |
| • | Experience in building a bath with your own hands. Sauna stove |
Simple insulation methods
The least time-consuming method is mineral wool insulation. This will require a roll material 10 cm thick. It is simply wrapped around the container and fixed with foil tape. Styrofoam is also suitable for tanks of the correct geometry.
Another easy way to insulate an expansion tank in a cold attic is to create a backfill box. For the manufacture of the frame, wood, plywood, chipboard, less often metal is used.
The dimensions of the structure must be 10 cm larger than the expansion tank.
- dry sawdust;
- small expanded clay;
- styrofoam crumb, etc.
The advantages of such methods include simplicity and economy. Their disadvantage is a possible loose fit of materials, as a result of which thermal insulation characteristics are reduced. In addition, most of the materials used can damage small rodents.
It is important to remember that when wet, the insulation loses its thermal insulation ability. Therefore, additional protection against moisture should be provided.

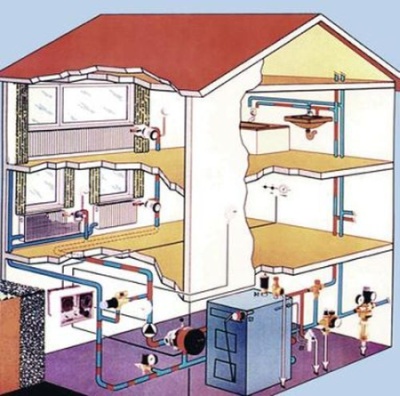
The principle of operation of the heating system for summer cottages
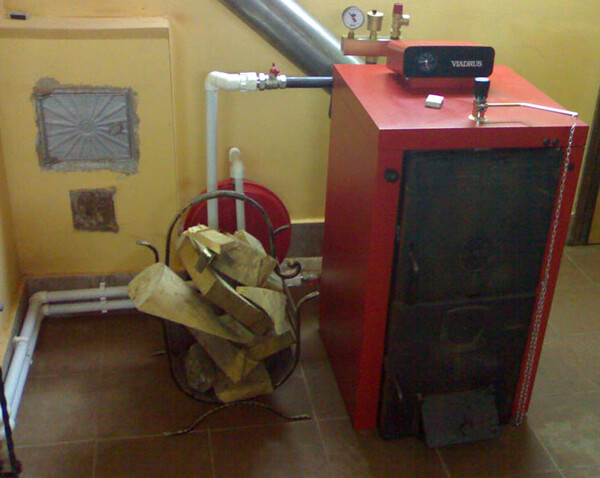
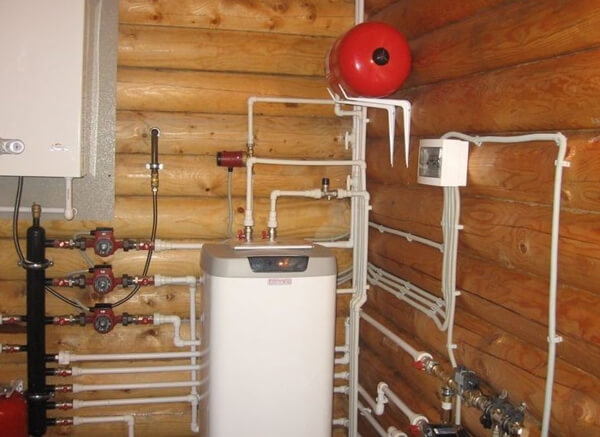
As mentioned above, the best solution for a country house of a country type would be a boiler that runs on either liquid or solid fuel. The choice between these two options is based, first of all, on the ability of the owners to spend this or that amount, possible conditions of transportation, storage, etc. are also taken into account.
It is imperative to take into account the fact that most summer cottages are located in rural areas, where power outages are not uncommon.
Therefore, when equipping a heating system for such a house, it is very important to provide it with the most autonomous mode of operation.
In this regard, it is quite possible to opt for the mechanism that will function through the natural circulation of the coolant. This heating option is perfect for both large and small-sized rooms and will be able to stably and reliably provide the house with heat.
The possibility of using forced circulation is also not ruled out, however, in this case, it will be necessary to install a special generator that feeds the pump in the event of a power outage. The do-it-yourself heating system in the country house can be equipped both in a closed and open type, but in the event that antifreeze acts as a coolant, it is recommended to use an exclusively closed version of the system.
Another important procedure is the calculation of the power of the heating boiler and the number of batteries, as well as the drawing up of a scheme according to which the heating in the house will be connected by hand. If necessary, for the high-quality performance of all these calculations, you can seek help or advice from qualified specialists who are able not only to perform all installation work, but also provide numerous photos of system samples and video materials on their correct assembly and connection.
As a rule, the principle of power calculation is as follows: 1 kW of heat energy is required per 10 m² of house area. To the indicator obtained in the process of such a calculation, you need to add a coefficient, the value of which is affected by the place where the structure is located:
- for warm areas, it ranges from 7 to 9;
- the central regions require a coefficient of 1.5;
- in the northern regions, this parameter should vary from 1.5 to 2.
Another 25% must be added to the power calculated in this way if regular use of hot water for domestic needs is planned, and another 20% will be needed as a reserve, which is essential in case of unforeseen situations and malfunctions.
Equipping the heating of a country house with your own hands
it is extremely important to take into account its size, as well as the frequency of living in it. Do not forget that arranging heating with your own hands is a very laborious process that requires patience and some work skills.
Watch an interesting cottage heating scheme in the video:
Therefore, in order to design a reliable, durable and stable heating system, it is recommended to study additional materials, and in case of emergency, contact a professional who can provide photos of system samples and directly help with the installation of one or another option.
Active heating sunlight collect vacuum collectors
Air solar collector
An air solar collector, equipped with a system of forced transmission and distribution of energy, is able to provide much more heat compared to a passive variant. The air circulation speed is automatically adjusted depending on the temperature in the house and the degree of heating of the collector. The air heated in the collectors can enter the ventilation system or the premises directly. If its temperature is high enough, it can also be used to heat the heat transfer fluid. Excess daytime energy is stored overnight in heat accumulators.
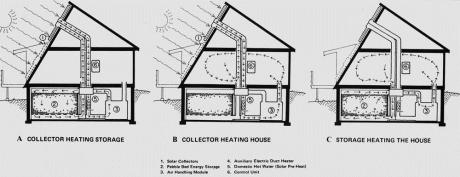
Solar air heating based on a solar collector. From the hollow panel (1) through the air channels (6) the fan drives the air into the technical room, where the automation, depending on the situation, distributes it to the air preparation unit (3) or a massive heat accumulator (2). At the same time, the hot water coil (5) can also heat up. During the day, when the rooms need heating, the system operates in mode B, warm air from the collector is sent to the rooms. When the required temperature in the house is reached, the air flow is redirected to the heat accumulator, mode A. At night, when the collector does not provide heat, the damper closes the channel leading to it, circulation is carried out between the heat accumulator and the premises.
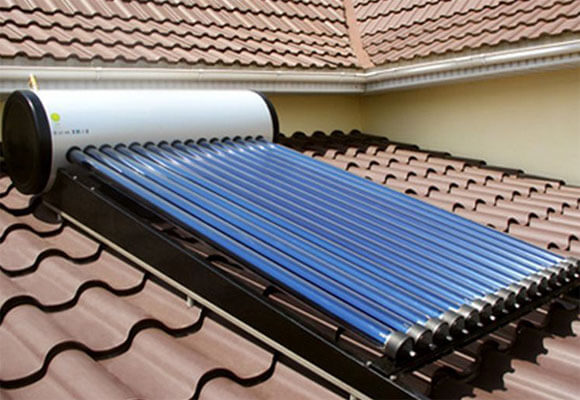
Vacuum solar collector
The most advanced device for solar heating today.
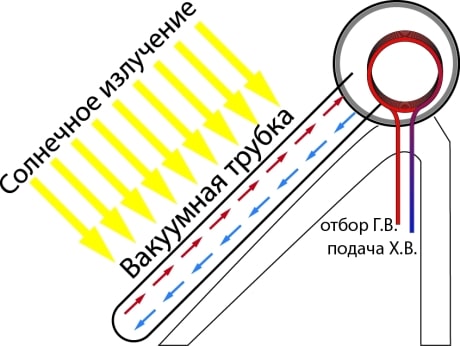
Schematic diagram of a vacuum solar collector. The liquid absorber circulating through the U-shaped tubes, when heated, evaporates and rises up into the collector. The latter is connected to the circuit of the heating system and, in turn, the liquid coolant circulates through it. The absorber gives energy to the coolant, cools down, condenses, goes down. The cycle repeats
Solar heating of a country house based on vacuum collectors is much more efficient than other solar systems, however, in addition to the uneven heat generation traditional for solar systems, it has three more significant drawbacks: in severe frost, heat transfer drops sharply, installations are fragile and expensive.

Vacuum solar collectors should be installed in such a way that they are protected from vandals. This is especially true for our country, getting a pebble into a glass tube is a sweet thing.
Vacuum panels are not connected directly to the heating system. At a minimum, buffer tanks are needed to smooth out uneven heat generation.
The "correct" scheme for connecting a vacuum solar collector to the heating system. Heat is not transferred directly, but through a heat exchanger, daytime excess heat is stored in a heat accumulator (buffer tank) for the night
Please note that the diagram shows a "normal" heating boiler, the solar system only complements it
Electric solar panels can only be used indirectly for heating. It is unreasonable to spend electricity on space heating directly, it can be used more rationally. For example, send fans and automation of active solar systems to work.
Improving the design of the heat accumulator
Above, we described the classic heat accumulator device, however, there are options for making this equipment even more efficient. There are several options:
- Another heat exchanger can be installed at the bottom of the device. which will work in conjunction with solar collectors.Relevant for those who use non-traditional energy sources.
- If your heating system has several circuits, then it will be important to divide the internal space of the tank into several sections. Then the separation by temperature will be more pronounced.
- If your budget allows, then polyurethane foam can be used instead of mineral wool. It is more expensive, but it will be much more efficient to keep the heat of the water.
- You can increase the number of pipes for the heat accumulator a: this way you can connect it to a more complex system with several circuits.
- An additional heat exchanger can also be installed together with the current heat storage. The water heated in it can be used for various household needs, which is very convenient, you must agree.
How to make heating in the country
Many of us prefer to spend our free time outside the city, resting from the hustle and bustle of the world. And someone even lives all year round in a country house, enjoying nature not only in summer, but also in winter. If you spend a lot of time in the country and want it to become a comfortable place for you to relax even in bad weather, it is best to take care of organizing high-quality heating in advance. This is a feasible task for everyone, if you understand exactly what to choose from and how to make heating in the country.
- Type of heating according to the size of the house
- A small residential building - electrical appliances or a miracle oven
- Two-storey house - gas and stove heating
- Country country house - gas heating + "warm floor"
- Country heating system
- Boiler power calculation
- Choosing a strapping scheme
Calculation with respect to radiators
It is also important to carry out a calculation regarding the required sectional quantity for radiators. The formula is as follows: room area * 100 / kW of one section.
- Take into account the area of \u200b\u200bthe rooms, and not the entire cottage. The calculation of the battery is aimed only at heating the room.
- The power of one section of the battery is affected by its material. In the calculation, you can use an indicator of 180W of power from one section of a modern radiator.
Example, you need to calculate radiators for heating a room of 25 sq. m. In this case, the section produces 180W of power. Then 25 sq.m * 100/180W = 13 section. That is, you need a radiator with 13 sections in the room, but if the room is angular, then 13 * 1.2 we teach 15 sections.
It is important to remember that no matter how well the calculation for heating the building is carried out, improper installation of all elements will lead to inefficient heating (Fig. 4)
Benefits of using solar systems
Installing solar collectors will significantly reduce the cost of traditional heating. Solar energy is free, and besides, solar systems do not harm the environment. That is why in countries where the authorities are worried about the environment, this method of heating houses is widespread (read: “Do-it-yourself solar system“). The massive use of solar systems will save resources that are traditionally used for heating (coal, natural gas) and solve the energy problem.
Solar heating has the following advantages:
- efficient operation and significant savings on the main heating system of the house;
- safety of use;
- long service life;
- aesthetic appearance, the ability to select the parameters of the collector.
Finally
Experts recommend buying a tank at certified points of sale. In this case, papers are always presented to the consumer, which confirms the quality of the product. Moreover, in the event of breakdowns, defects or violation of the integrity of the container, there is always the opportunity to return a low-quality product to the seller.
What's with the detonation? Or, according to the scenario, a bomb should explode next to the tank? When burning, polyethylene (LDPE, from which the tanks are made) softens very quickly, as an experienced arsonist, you should know this. Speaking of arson.Burning the neck of the tank is one thing. Have you tried putting a filled closed tank on a fire (I hope)? Something tells me that you, dear, are already confused. Either you are afraid that you will explode from the pressure, then you say - “what pressure?”. Okay, let's clarify. The task of the drainage system is to equalize the pressure in the tank with atmospheric pressure. At first it was just a tube (or a cork, like on a tank for a boat motor), then they began to install valves (but their task is not to hold any pressure, but to prevent contact with the external environment), and now they are steam traps. But in the event of (God forbid) a fire inside a metal tank, which itself tolerates heat well, the fuel will eventually boil. At the same time, vaporization will significantly exceed the throughput of the drainage system, the pressure in the tank will begin to grow rapidly. If the process is not stopped in time, the tank will burst, the pressure will drop sharply. Do you know what happens to a boiling liquid when the pressure drops sharply? I think - you know, you love physics. At a polyethylene tank, the top will melt much earlier than gasoline boils, this saves you from fuel ejection. And, finally, I didn’t come up with safe plastic tanks, you can google them in sufficient quantities. Yes, plastic containers are not allowed to be filled at gas stations. But in this container (and I think you yourself have seen it more than once) they sell the same gasoline and many other flammable liquids in packaged form. Are they safe? Then you can use this container. I don’t understand at all - why are you so pissed off? Yes, about safety: on sports cars when using plastic fuel tanks, a mandatory fireproof partition between the tank and the pilot is regulated.