Connection types
First, you should decide which system to include the device in:
- Connecting the heated towel rail to the heating system. The traditional way and the only one where there are no hot water networks. Its disadvantage is that the heating system works only in the winter season. Dignity - in the heating pipeline, the circulation of water is carried out forcibly and the heated towel rail will be hot during the entire heating season, acting as an additional battery.
- Connecting a water heated towel rail to a hot water supply system. Such systems are also subject to outages, but for a shorter duration. In addition, the disadvantage of this method is that the unit will heat up only during the consumption of hot water, cooling down at night, even with direct connection to the riser. In small-apartment houses or private houses, this problem is even more acute.
The scheme for installing and connecting a heated towel rail to a hot water riser in a bathroom looks like this:
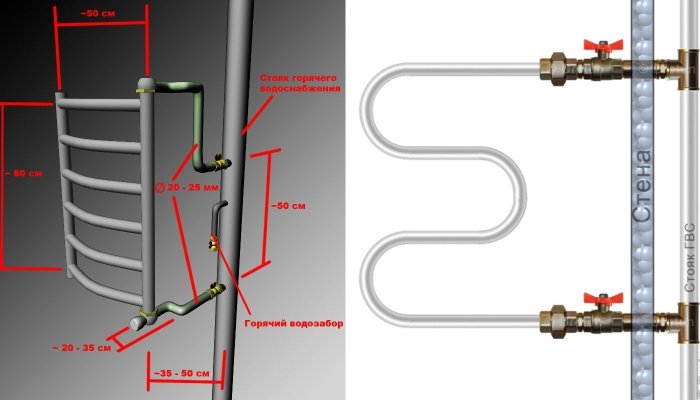
As already noted, the best solution to many problems is the use of combined devices powered by the mains in the absence of hot water in the system.
After choosing a pipe network for our device, the next question is how to include it in it:
- Direct tie-in to the riser. If the bathroom has already been equipped with a heated towel rail, then it is connected to the heating pipe in this way. Replacing it with a new one, you can, without further ado, use the same type of connection. You can also embed the new device directly into the hot water riser.
- Inclusion in the apartment pipeline. The advantage of this method is that during the work it is not necessary to block the entire riser, but it is more suitable for the heating system. The above problem with the hot water pipeline will be further aggravated: the appliance will only heat up when washing dishes, taking a shower or bath.
With bypass jumper
 Towel dryers in old houses, as already mentioned, were a direct part of the heating pipe. Such a connection creates problems in the event of an accident or repair and does not make it possible to turn off the device when it is not needed.
Therefore, the most reasonable thing when installing a new device would be to insert parallel to it into the riser of the bypass jumper and shut-off valves, to which it is connected. This useful addition to the pipeline must be provided for in the connection diagram.
What to expect
The desire to immediately warn that a high-quality installation of a heated floor from a towel dryer requires certain calculations, knowledge and skills, otherwise you will inevitably encounter such problems:
Too hot towel dryer. An overheated floor surface can also become a problem if your appliance is working too hard. Sometimes reducing the temperature of the dryer does not work, and then the whole installation does not make sense.
In different buildings there may be failures with hot water, and if at the same time you have an underground structure, then it will make the surface not just cold, but icy
This point must also be taken into account during installation. The problem can be solved by installing a temperature control meter.
With an illiterate work order, you risk disrupting the usual supply, and leaving both your own and your neighbor's living space without hot water at all.
Too much pressure in the set with an inadvertent kink of pipes leads to a breakthrough of the entire structure, after which the illegal installation of the floor will open and the results can be the most unpleasant.
If you were planning to turn to specialists, you will most likely get a refusal, since, in general, companies do not want to get involved in criminal types of installation.
Warm floor from towel dryer
If you are not afraid of this kind of complexity, you can try to install a warm floor from a towel dryer yourself. To do this, there are several important types of connections.
Device selection
All designs of these units are divided into three types:
- Water.
- Electrical.
- Combined.
When replacing an old device with a new one, it is most logical to use a water type. Electric devices are used where there is neither a centralized heating system nor hot water supply, or as a backup for the time of their shutdown.
If there is a heating network or hot water supply in the house, it is more reasonable, instead of reserve ones, to use combined structures that do not take up additional space, and their installation differs little from the installation of water appliances.
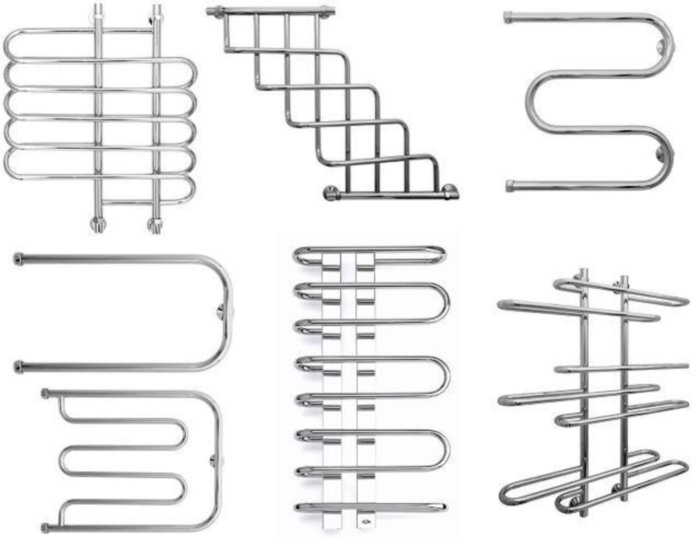
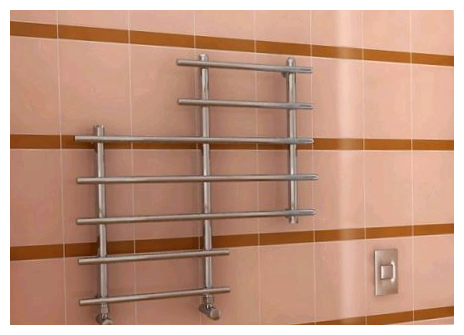
The external design of water devices is quite diverse:
- 1st type: M‑, U‑, F‑shaped — traditional forms.
- 2nd type: "ladders", "snakes" and other types of original design of modern devices.
To include them in the existing system, the location of the installation pipes is also important:
- Lateral - usually used for devices of the 1st type;
- Bottom or top - more common among type 2 devices.
The choice of a suitable option is determined by the availability of free space in the bathroom, the location of the piping system and the type of connection scheme. more details about which water heated towel rail is better to choose in this article.
Work principles
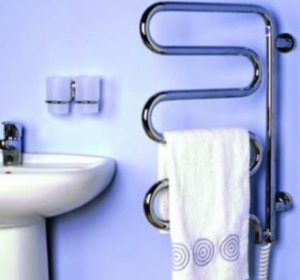
The towel dryer is a heating device designed for installation in residential areas and private buildings. In appearance, it strongly resembles the usual part of the design of external communications, however, its main purpose is hidden in the name itself - it is convenient to use such a device for drying towels and small linen. Plus, sometimes the towel dryer acts as a compensating loop and acts as an additional source of heat in the bathroom.
All models of towel dryers are divided into 2 important categories: water and electric.
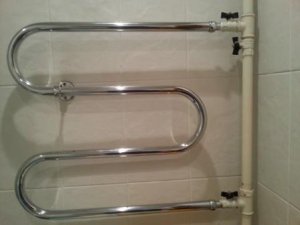
The former are attached to the main structure of the pipeline, or to the heating system and work due to the supply of hot water. In appearance, they are similar to a curved pipe, which, for great aesthetics, is covered with a nickel layer.
Electric towel dryers, therefore, are powered by a socket and are convenient in that any area of \u200b\u200bthe apartment is suitable for their installation, where there is a power source nearby. Such a device gives off a lot of heat, while consuming a small fraction of electricity, which is its main advantage.
Towel dryers can be of various options
Today on the market there is a large selection of good quality foreign models, among which, as a rule, you can choose the right one. And for our purposes, we need the most ergonomic device that will last a long time.
Very often, water models are used to install a warm floor from a towel dryer, but sometimes electric ones are preferred. Everything is very simple - the incoming hot water is passed under the floor covering with the help of several additional turns of pipes. Electric heating is much thinner than the thinnest pipes, which in most cases complicates the task.
If you have already picked up a towel dryer, then you need to prepare well for future work.
Dismantling the old device
You should start by disassembling the old heated towel rail. For this:
- Having agreed with the neighbors at the entrance and the management company, we block the heating riser and drain the water from it.
- If the old structure was welded to the pipes of the riser, we cut it off with a grinder. In the case of a detachable connection, unscrew the fastening couplings.
- In rare cases, when the installation dimensions of the new device coincide with the old ones, we can assume that we are very lucky.Most often this is not the case and you have to cut pipes even with a collapsible connection.
- The cutout in the riser must be greater in height than the distance between the inlet pipes of the new heated towel rail by the length of the spurs and couplings required for inserting the bypass.
- When cutting off, we take into account not only the installation dimensions of the new device, but also the possibility of cutting threads on pipes.
- We remove the old device from the wall by cutting off its brackets with a grinder or a hacksaw.
What is required for installation
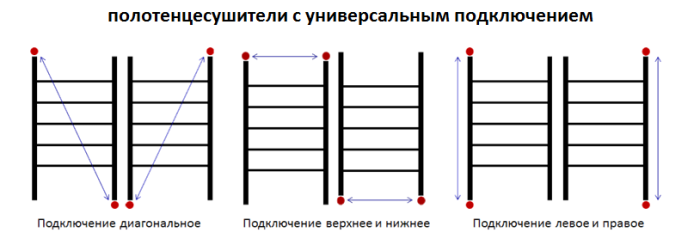
Before starting any work, it would be quite a good idea to sketch out a wiring diagram or, in extreme cases, a small freehand sketch of the placement of the unit, choosing the most appropriate option for connecting the device to the pipeline network.
The simplest diagrams for the correct connection of a heated towel rail with your own hands for universal ladder devices:
Tools
To replace or install a water heated towel rail, you will need a set of plumbing tools, the composition of which depends on the type of water pipes in the apartment. Considering that copper, polypropylene and other modern types of pipelines are still rare, we will describe the toolkit for standard ¾ 'steel pipes:
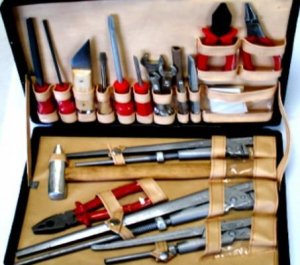
- Keys: gas #2 or #3; adjustable - "crocodile"; adjustable wrench.
- Pipe cutter or hacksaw for metal.
- Thread-cutting dies ¾ 'with lever knob.
- Electric drill with a perforator, concrete drills.
- Angle grinder with a cutting disc for metal - "Bulgarian".
- Fastening tools: hammer, screwdrivers, pliers.
- Marking tool: tape measure, level, pencil.
materials
In addition to a set of tools, installation and consumables are also required for work:
- Turns, bends, couplings, spurs and possibly other types of fittings.
- Shut-off valves, ball valves are best.
- Linen tow plumbing, or mounting FUM‑tape.
- Installation and fasteners: brackets, screws, dowels, anchor bolts, etc.
Having prepared everything you need, you can get to work.
All work on the heating pipeline is best done in the summer, when the system is turned off, there is no pressure in it and you can easily drain the water from the riser. But in this case, having completed the work, it will be impossible to test its quality: you will have to wait for the start of the heating season.
general information
With the adoption of SNiP 2.04.01-85, in which the term "towel dryer" appeared, the device soon came into general use.
 Unaesthetic and, moreover, useless with the end of the heating season, iron structures painted with “silver” or nitro paint, nevertheless, were to the taste of householders, and soon they began by hook or by crook to get and install nickel-plated, elegant, elegant and practical Euro units.
This topic has not lost its relevance even now: there are still many old-built houses in the housing stock, where apartment owners, starting repairing or replacing plumbing equipment, turn their attention to such useful and necessary devices in equipping a bathroom that are quite within the power of a home master to self installation
Installation and connection step by step instructions
Before starting the installation, it is useful to lay out on the floor both the device itself and all the fittings for it, in order to once again clarify all the dimensions. To do this, you can even dry-assemble all the connections. Nobody canceled the proverb about measuring seven times!
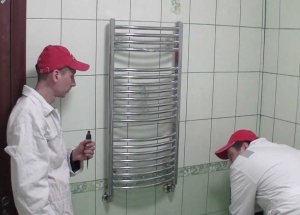
- We mark the installation dimensions of the new heated towel rail on the wall.
- Having chosen the location of the future unit on the wall, it is necessary to carefully examine it for the passage of internal communications, both pipeline and electrical. Special devices - metal wire detectors - can help with this.
- We drill holes, insert dowels and hang the device on the wall, fixing it with screws or bolts.
- We cut the threads on the cut ends of the pipeline.
- We prepare the jumper-bypass by carefully marking and installing tees-outlets for the heated towel rail and a shut-off valve on it.
- During operation, we seal all connections with sanitary tow or Teflon tape.
- We install it in the cutout of the riser using spurs, straight couplings and lock nuts, so that the tee outlets are exactly opposite the inputs of our device.
-
Spurs of different lengths are used to adjust the installation dimensions of pipeline sections and simplify their connections. They have cut threads at the ends: short on one side and long on the other.
A lock nut and a coupling are screwed onto the long one. A tee, angle or valve is screwed onto the pipe on one side. They are screwed with a short thread, which is then connected to the other side of the pipe by a coupling with a long threaded end and fixed with a lock nut.
- We fasten shut-off ball valves to the taps, and connect the inputs of our unit with them.
- We open the ball valves to the heated towel rail, and close the valve on the bypass.
- We open the general valve of the riser. If there is water pressure in the system, carefully check the connections made for tightness.
Everything! Our new heated towel rail is ready to go. In this video you can watch the process of dismantling and installing a new heated towel rail in the bathroom with your own hands:
https://youtube.com/watch?v=Lx-2Qop81SA
Work on the pipeline system of an apartment building should be carried out after agreeing them with the management company, only with sufficient experience or under the guidance of a qualified craftsman.
Modern heated towel rails can be quite complex in design, such as double-circuit ones. Before installing them with your own hands, you should study all the technical specifications and installation rules.
You also need to remember that some units must be selected for galvanic compatibility with metal pipelines of the materials from which they are made.