Wire connection

Wiring diagram for underfloor heating
Connection of several strips of heating film is carried out by parallel connection using a junction box. In the case of using a film with a ground layer, the ground wire is connected bypassing the thermostat (connection to the ground layer is carried out using a separate terminal). It is recommended to use an 8-fold junction box with a minimum depth of 25 mm. After connecting the wires, a control test of the system is carried out.
Gently lift the protective layer and insert one connector plate so that there is reliable contact with the conductive bus.

After connecting the connectors to the two copper bars, first crimp the clips with your fingers and then with pliers.


Strip the end of the wire and clamp it securely into the barrel of the connector with pliers.


Use 50x40mm butyl rubber tape to insulate the copper busbars. Copper busbars with wires connected are insulated with two sections (top and bottom).


Bar sections free from joints are insulated with one piece of insulation.


It is necessary to carefully “wash” the contact point with your fingers, while 25 mm wires must be covered with insulation.
The wires are laid around the perimeter of the room in the left 50-mm gap or in the strobe cut out in the thermal insulation, starting from the strip of film furthest from the mounting box. Fix the wires with special tape. It is not allowed to lay electrical wires over or under the heating film. Route the wires from the heating film to the thermostat or junction box.
Is it possible to mount a film floor under the tile
To answer this question, it is necessary to take into account the operating recommendations provided by the manufacturer. In particular, it says: "The product can be laid under tiles, wood, laminate, linoleum, etc."
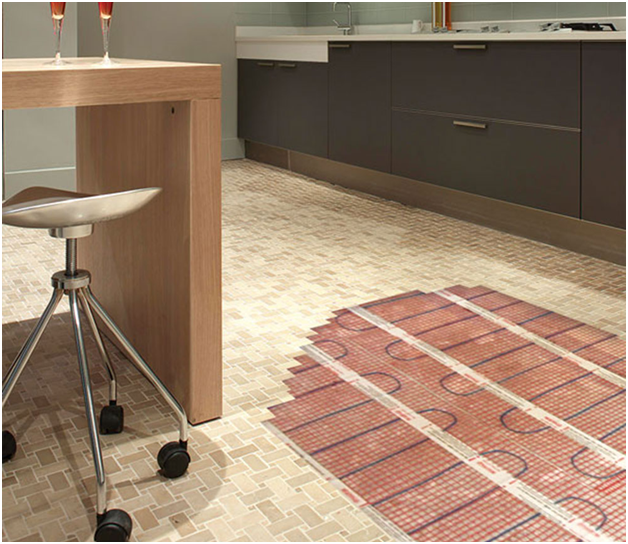
A thin electric film underfloor heating under the tiles is mounted quickly, does not “steal” free space and does not affect the quality of installation.
Since the heating system is resistant to moisture and precipitation, it is possible to lay the film on the street, followed by porcelain stoneware cladding. This will permanently solve the problem of icing paths, garage heating, etc.
Laying an infrared warm film floor under the tiles with your own hands requires a certain professionalism and the availability of building material. Although the technology is fully and in detail described by the manufacturer, if you have doubts about your capabilities, it is better to seek help from a specialist.
Necessary materials
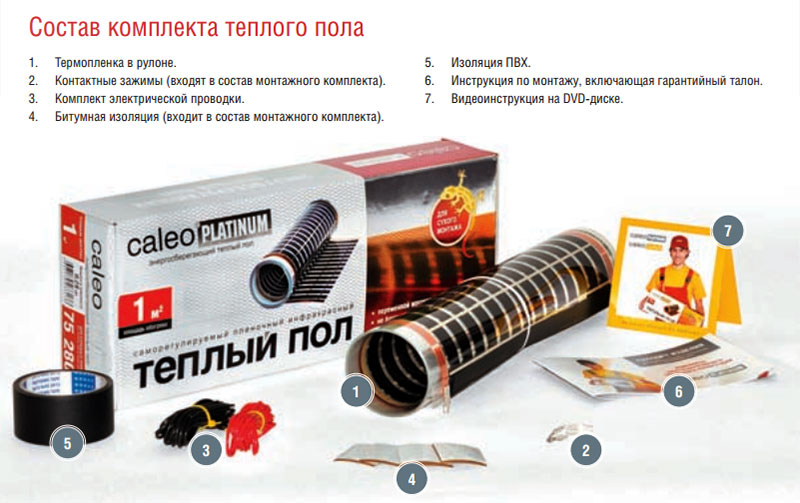
Standard equipment of the underfloor heating film system
- Thermal film in a roll;
- Contact clamps;
- Set of wires;
- Bituminous isolation on a self-adhesive basis.
- Heat reflective insulation;
- Heat-resistant polyethylene film;
- Thermostat and mounting box for it. It is selected based on the selected power of the underfloor heating and the type of installation (embedded or overhead);
- Additional temperature sensor if necessary (one will be included with the thermostat);
- Double sided tape;
- Additional wire for mounting the thermostat. It may also be needed if you install several sets of underfloor heating in one room (you will need to add their power to calculate the cross section). The cross section of the wire is selected depending on the power of the system and the material of the purchased wire (see table).
| Wire section, mm2 | Maximum allowable power consumption with copper wire, kW | Maximum allowable power consumption with aluminum wire, kW |
|---|---|---|
| 1,5 | 3,5 | 2 |
| 2,5 | 5,5 | 3,5 |
| 4 | 7 | 5,5 |
| 6 | 9 | 7 |
How to mount and connect a film warm floor with your own hands
2017-12-22 Evgeny Fomenko
The technology for installing a film underfloor heating is perhaps one of the simplest among all types of underfloor heating. And, without having special skills, it is quite possible to do it yourself, without resorting to the help of specialists. Often it is used as the only source of heating, but if you live in latitudes with harsh winters, it may not be enough.
The infrared floor can be used under almost any floor covering. Regardless of the surface under which we are going to lay it, the materials used do not change much. But there are small differences. For example, if we lay under linoleum or carpet, then in order not to damage the film, we will have to use solid cushioning materials.
While under the tile you will have to make a cement screed on a reinforcing base. These floors are laid without preliminary surface preparation, it is enough just to carefully insulate the floor so that the heat rises up, and does not go into the floor. Let's take a closer look at how to properly lay an electric underfloor heating under various materials.
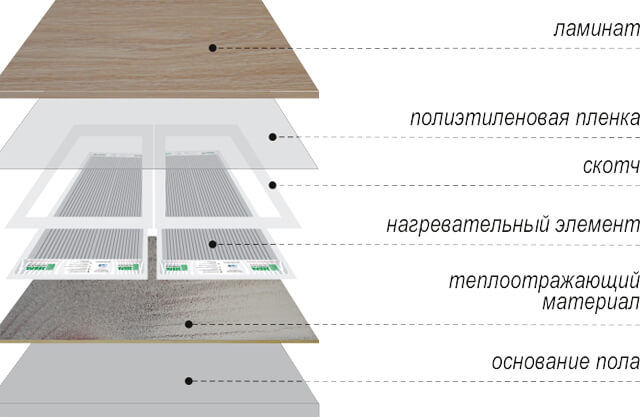
So, for a parquet board or under a laminate, the cake looks like this:
- primary floor.
- Heat reflective material.
- thermal film layer.
- Polyethylene film.
- Plywood or fiberboard. These plates are used to protect the heating element from mechanical damage.
- Linoleum.
Well, and, perhaps, the most time-consuming option is to lay it under the tile. But with all the complexity of installation, this option is the most effective method of heating. Because the tile heats up quickly and can keep the temperature longer.
Infrared film underfloor heating
In order to understand exactly how a high-quality tape floor differs from other varieties on the market.
Let's take a closer look at its main distinguishing characteristics:
They are absolutely safe for humans, the element that conducts heat in them is carbon. Thanks to this system, you can create comfort and keep warm in your home, your loved ones will get sick less and you will forever forget about frozen feet.
This type of heating is more useful for our body, infrared radiation is widely applicable in many areas, for example, in medicine. How much does it cost - this is perhaps one of the most expensive heating options, but it fully justifies its cost.
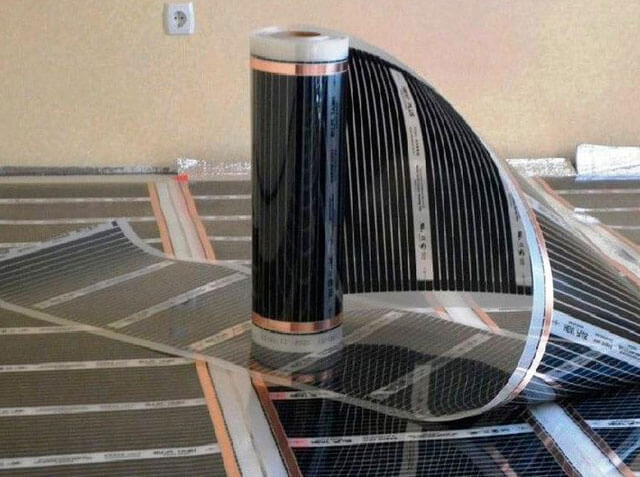
Film underfloor heating
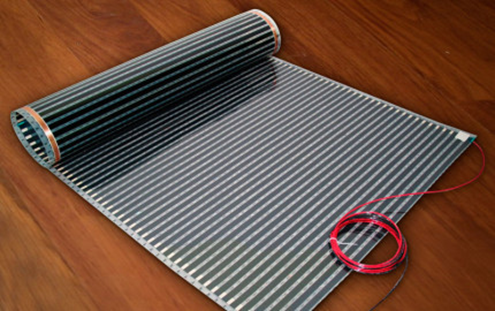
In order to understand how this system works, you need to understand its structure in detail. It is made of a dense thin film (polyester), divided into segments and filled with carbon paste (carbon paste), applied by spraying. In a more expensive version, it fills the entire space completely and has a pasty consistency.
When it is affected by electricity, it emits infrared radiation. Current is supplied through copper-silver wires, which are connected to a power source. The degree of heating is controlled by a thermostat connected to the floor. And he, in turn, reads the readings from the temperature sensor, which is located on the outside of the film.
To save energy, it is more profitable to connect an automatic thermostat, it independently determines the most favorable operating time. This is currently relevant, as electricity prices have risen a lot.
The package includes the following components:
- Thermal insulation material that directs heat outside, rather than warming the ceiling of the neighbors.
- Gasket material.
- Mounting diagram
Let's consider the installation scheme of a film underfloor heating, namely, how to lay it on your own, I don’t resort to specialists for help, we’ll figure out which side to put.
For a good connection, do the following:
The entire installation, subject to the instructions, will take about 3 hours if the floor is laid under linoleum or laminate. If you have not dealt with an electrician up to this point, it is better to take the help of a qualified specialist. Since, not all errors can be corrected, and the material is quite expensive.
Types and types of fastening of quartz vinyl panels
There are several ways to connect tiles:
- With adhesive locks. Each tile has 4 adhesive strips: 2 outside and 2 inside. Thanks to them, the panels are connected to each other. The gap between them is imperceptible, even by touch it is very difficult to determine. It is necessary to lay this type of panel on a flat surface. In the reviews, many write that it is not necessary to remove the old coating, the main thing is that the base is even.
- Glue mounting. In this case, the quartz vinyl tile does not have any locks and is attached with a special adhesive to the floor base. This material is attached only to a perfectly leveled surface, preferably on a cement screed treated with a primer.
- Glue method. The entire back side of the quartz vinyl panel is covered with a compound that provides adhesion to any kind of surface. According to reviews, most use this method of attaching tile material.
- Groove method. It is similar to the connection of tiles, where there is a spike on one side and a groove on the other. For laying this coating, a flat subfloor surface is also required.
- Connection with a lock. The basis for it is plastic, with spikes located along the edge in such a way as to be fixed in special locks that are located on the adjacent panel. To install tiles with a locking connection, a flat surface is required, since this material is not flexible and plastic enough.
The process of installing tiles on underfloor heating
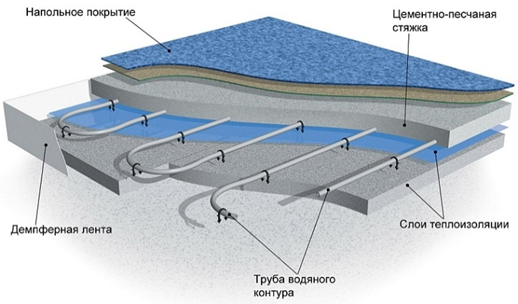
The heating system "underfloor heating" for absolutely all variants of floor coverings is composed of the following elements:
- material for thermal insulation from the bottom of the structure to direct heat and cut off cold surfaces;
- special pipes for the heat carrier;
- reinforcing mesh and pipe fastening elements;
- concrete screed;
- vinyl floor tiles.
Calculations are made in advance of the location of the contours of the heating pipes. Their number is limited by the power of the heating boiler for heating a specific volume of liquid. One circuit - no more than twenty-five linear meters of a heating pipe.
It is proposed to do the work in the following order:
- A thermal insulation layer is laid on the surface of the rough coating, and a damper tape is used to compensate for the thermal expansion of concrete.
- For fixing pipes - guides. In the usual version, it is enough to lay a reinforcing mesh and fasten the pipes with clamps every twenty to twenty 5 cm. The fastening should fix the pipe, leaving room for thermal expansion.
- Pipe installation near the walls is carried out at a distance of 70 mm.
- The procedure for laying pipes provides for the output of the tips to the distribution manifold.
- After pipe-laying work, a leak test is carried out and the temperature of the liquid is brought to 20 - 25 degrees, a screed is made.
- After drying the final screed, the preparation and installation of PVC tiles begin.
- The surface of the screed is thoroughly cleaned of dirt, defects are eliminated, and dust is removed.
- Leave the tile in the room at a temperature of 20 degrees for a period of at least 12 hours, so that it takes on dimensions and straightens out.
- Tiles with a locking fastening system and on a self-adhesive basis will not be difficult during the installation process. Installed from the far room corner with a ledge of each row by 1/3 or 1/2 lamellas. At the same time, the protrusions of the following tiles are inserted into the grooves of the locks without excessive effort.Self-adhesive tiles are straightened during laying to release air under the product and firmly adhere the coating.
- The tile, the installation process of which is planned using glue, requires its scrupulous choice, taking into account operating temperature conditions.
Laying option
Having become acquainted with the conditions and requirements for the process of installing a “heated floor” hydraulic system, the owners of the premises will easily select the material that is suitable for floor coverings from the point of view of aesthetics and use in practice to solve the issue of energy saving. Of interest is the installation process of the underfloor heating system. PVC tiles. The initial costs for the purchase of equipment and the implementation of installation work will be more than justified in a short time.
One of the options for laying the final floor covering of vinyl tiles is shown in the material below.
Vinyl tile installation
Underfloor heating ‘target=”_blank”>’)
Electric cable underfloor heating and PVC tiles
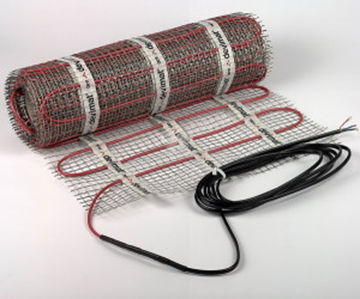 They are a special mesh (cable mat) with a heating cable attached to it in a snake-like manner.
A cheaper option is also used, which involves installing only a cable fixed to the base. Heating of the system is carried out due to the transformation of electrical energy into thermal energy.
It is impossible to lay PVC tiles directly on such a structure, since the installation of the latter requires evenness of the base. Therefore, if you choose this type of underfloor heating, you will need to hide it under a concrete screed.
The advantages of this system include more budgetary installation (compared to the water circuit), temperature uniformity along the entire length, the ability to install in rooms where the temperature drops to zero degrees (country houses, etc.).
Tiles and porcelain tiles are very practical materials, but they are cold for walking barefoot. The floor heating system solves this problem, as well as providing additional room heating. At first glance, infrared underfloor heating is best suited for tiles, as it has the thinnest heating elements. But in fact, the film creates more problems than benefits when laying in tile adhesive. In this article, we will look at how you can install infrared floor heating with your own hands. 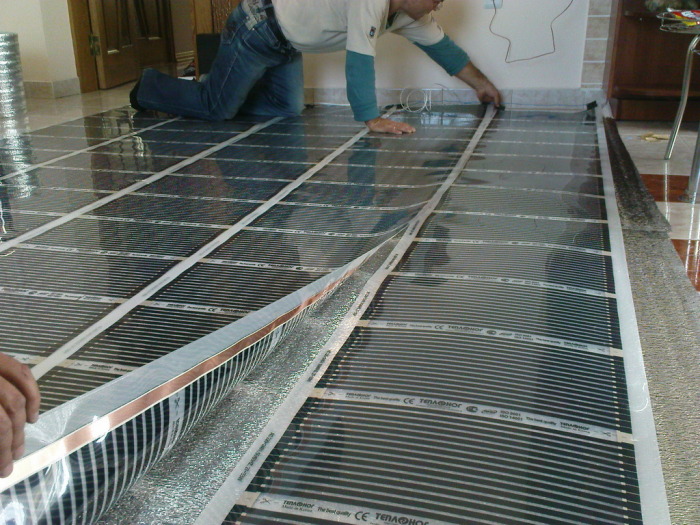
Quick article navigation
Locked Quartz Vinyl Tile
When laying interlocking tiles on a “warm floor”, the condition must be observed - to leave compensation gaps along all walls from 5 to 10 mm. The gaps allow the tile to move as it expands so that the joints are not damaged.
Castle tiles Art East recommended for use with electrical heating systems, it is not advisable to use water heating. Heating temperature is not more than 28 ° C . In general, the castle tile is sensitive to temperature changes and changes its size. The temperature gap must be left at least 1 cm. This also applies to installation with "warm floors", and use on balconies, rooms on the south side, where heating in the sun can occur.
The manufacturer does not recommend the use of any substrate under the interlocking tiles, both during normal installation and when laying on a warm floor.
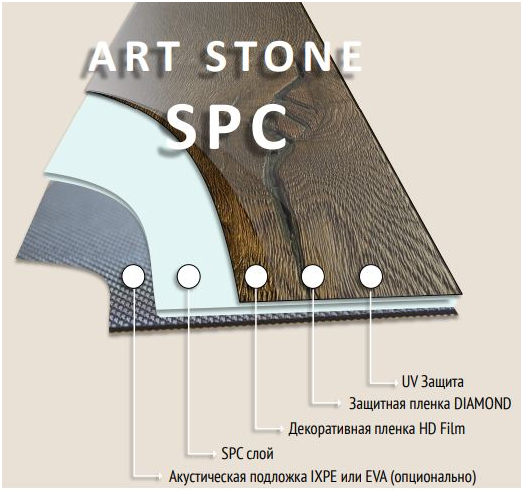
At the brand Art East there is one more collection art STONE 33/42 class, which stands out for its structure. This tile uses a rigid SPC board as a load-bearing base. Such a plate is a stone-polymer (Stone Polymer Composite).
Unlike quartz-vinyl laminate with WPC (Wood Polymer Composite) board, STONE tiles from ART EAST:
78% calcium carbonate and free of blowing agent, wood flour and plasticizers;
thinner, but at the same time stronger, more resistant to maintaining dimensions when changing humidity and temperature;
more durable due to the same denser structure.
ART STONE SPC is an interlocked stone resin tile that has been laboratory tested to outperform WPC floors. All these characteristics make the Stone collection tiles the most suitable material for underfloor heating than other PVC interlocking tiles.
Tests show that ART STONE can also withstand temperatures above 28°C. But the brand representative still recommends not taking risks and using this limitation during operation. Art Stone interlocking tiles can be used with any kind of underfloor heating systems.
PVC interlock tiles floor Click – composed of 30% quartz. Compared to other quartz-vinyl coatings, it is soft. Floor Click Quartz-Vinyl Laminate underfloor heating is dimensionally resizable and can also expand when installed in areas with intense sunlight (south-facing, floor-to-ceiling windows, etc.). When laying, be sure to leave a gap of 1 cm. It is also desirable to perform expansion joints under the thresholds at the entrances to the rooms and every 8-10 meters of a continuous web. Use 1.5mm or 1mm thick LVT underlay. It is not recommended to lay on infrared heating, tiles can rise at the joints.
Castle tile collection Decoria - the material is hard and fairly stable, contains up to 70% quartz sand. The manufacturer advises to use a substrate when laying on a concrete screed, otherwise the floors begin to crackle. It is allowed to use with heating systems, including film ones. Use with water systems where the temperature may exceed 28 degrees is not desirable.
It is possible to lay decoria interlocking tiles with or without expansion joints (sills).
tile Alpine floor on locks can be laid on heating systems. It is better to use a cable type to regulate the temperature and keep it no higher than 28 ° C. A clearance around the perimeter of 8-10 mm is required.

Advantages of a warm floor
Below we will consider perhaps the simplest underfloor heating - ic floor under the tile.
Its merits are as follows:
- The air in the room does not lose its freshness, because this type of heating does not affect it in any way.
- Infrared heated floor under the tiles, radiating long wavelengths, heats not only the surface of the floor itself, but also the entire body of the person who is currently walking on it.
- This method of heat transfer allows it to be re-emitted from previously heated objects, which increases the overall temperature in the room even more.
- The content of negative ions in the air increases by at least 4 times.
- In the process of functioning, the infrared film does not emit dust, noise and vibrations.
- The amount of generated electromagnetic radiation is so small that it can be neglected.
- This type of heating is perceived by a person much more pleasantly at initial low temperatures in the room than in the case of water heating.
So what is the film infrared heat-insulated floor laid under the tile? By and large, infrared heating consists of a thin film 0.3-1 mm thick, equipped inside with an electrically conductive element. Below will be described how to install an infrared underfloor heating under the tile.
Installation of a warm floor
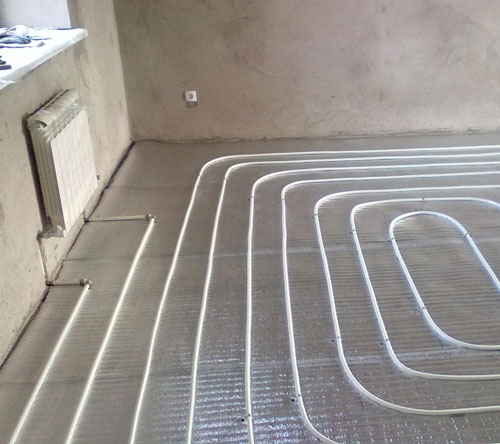 Laying the underfloor heating water circuit on the insulating material
When installing a floor heating system under PVC floor tiles, pipes laid in a screed are used. The installation process is as follows:
- The concrete base is cleaned of debris, if necessary, local repairs are performed.
- The overlap is leveled with building self-leveling mixtures.
- Insulating material is laid on the base with a foil layer up.
- A damper tape is fixed around the perimeter of the room.
- Pipes are laid according to the chosen scheme - "snail" or "snake".To fix the contours, special plastic hooks are used. Also, pipes can be laid on a reinforcing mesh, to which they are attached with plastic bundles.
- The system is connected to the collector, filled with water and checked for performance.
- The pipes are poured with a screed, having previously turned off the system. It will be possible to turn it on only after the solution has completely dried.
If pouring the screed is not possible, for example, on a wooden base, the pipes are laid using a dry method. In the boardwalk, channels are cut out for pipes, and after they are laid, an even plywood base is mounted under the quartz vinyl tile.
Water heated floor and PVC tiles
 It is a complex, closed structure consisting of pipes, a pump, a distribution manifold, valves, fittings, an air vent, and fasteners.
One of the main advantages of this model is the minimum heat loss. In addition, it is environmentally friendly, does not create electromagnetic radiation (unlike electric floors).
Most often they are installed in private houses, cottages, since installation of a heating boiler is necessary. In apartments, hydraulic compatibility with the room's pre-installed heat exchange system will be required.
Water models are demanding on the thermal conductivity of finishing materials. In this context, PVC tiles are the best choice.
The disadvantages include the risk of leakage, time-consuming installation.
Vinyl adhesive tile
Vinyl tile is a fairly soft material. When heated, the tile expands greatly. Dimensional changes can be affected not only by the floor heating system, but also by exposure to direct sunlight. But still, some manufacturers consider it possible to use their vinyl tiles and the "warm floor" system.
For example, a company Tarkett gives the following instructions:
Do not install Art Vinyl tiles on a heating system that does not ensure that there is no condensation on the substrate.
Do not allow the surface temperature of the base to exceed 27 ° C .
Before laying modular tiles, the heating system is turned off 3-4 days before the start of work.
Laying is carried out at a room temperature of 15-28 ° C, optimally at 20 ° C.
The heating system is connected no earlier than 72 hours after the end of laying.
Experience shows that when heated above 27 ° C, Tarkett, Forbo vinyl tiles become soft, so we, as experts, do not recommend laying vinyl tiles on a “warm floor”. We believe that this material can diverge at the joints and deform under the influence of heat.
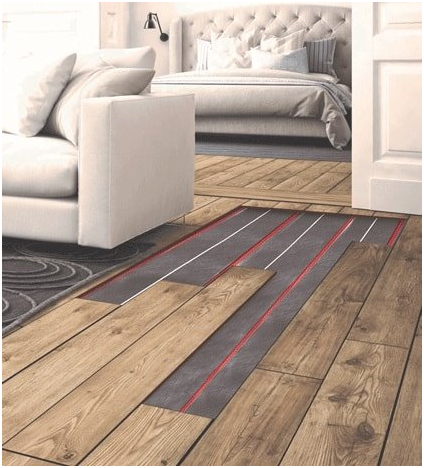
Do-it-yourself laying a film floor under a tile
At the initial stage, preparatory work is carried out. The surface is cleaned of debris and leveled. The thickness of the warm floor can reach up to 1.5 cm. An approximate sequential layer of materials to be laid is as follows:
- heat-reflecting substrate - 2-3 mm;
- infrared film - 0.4-0.5 mm;
- paint mesh - up to 2 mm;
- a layer of concrete mortar (or tile adhesive).
Immediately you need to decide on:
- the location of the thermostat;
- effective distribution of the film under the tiles.
Installation of a warm floor begins with laying a heat-reflecting substrate. The best option would be to use strips, the size of which is 0.6 m. If you purchase a wide material, it should be cut off.
An infrared film is laid on top of the substrate. There are the following requirements for this work:
- do not place stationary furniture on the film (it can lead to system burnout);
- the film should cover up to 70% of the area in the room;
- the presence of indentation from the walls at the level of 10-12 cm;
- the film is not mounted with an overlap.
It is more expedient to distribute the film along the maximum length of the room. The marked heating material is cut off.It is recommended to cut pieces of film in places where there is no graphite layer. If you still need to cut it off along the graphite layer, then this place is subsequently isolated with adhesive tape or electrical tape. The film is attached to the substrate with adhesive tape.
Next you need to do the connection of the film floor
Particular attention is paid to the correct installation of the thermostat and temperature sensor. It’s worth mentioning right away that one thermostat can normally “serve” a room with an area of 12-15 m²
It is installed next to the wiring.

The cable is fastened to the film using copper clamps. The degree of reliability of the connections is checked using the halves of the clamps, which must be in contact with each other. To isolate the clamps, bituminous tape and silicone sealant are used.
While the sealant dries, the thermostat is mounted. When using an overhead device, the cable is routed outside the wall and placed in a plastic box. If the thermostat is built-in, then a hole is hollowed out under it in the wall and strobes are made for the cable.
The temperature sensor is mounted under the film. To do this, a groove is made in the base, and the sensor itself is placed in a corrugated tube. The sensor wire is laid in such a way that it is located directly under the tile.
The thermostat is securely attached to the wall and connected to the electrical cable. Foil tape is glued obliquely to the film. To ground the floor, one of its ends is connected to the wire.
With the help of a test inclusion of the heating system, its performance is checked. All sections should heat up for 5-8 minutes. Using a tester, the places of cuts and joints of the film are checked.
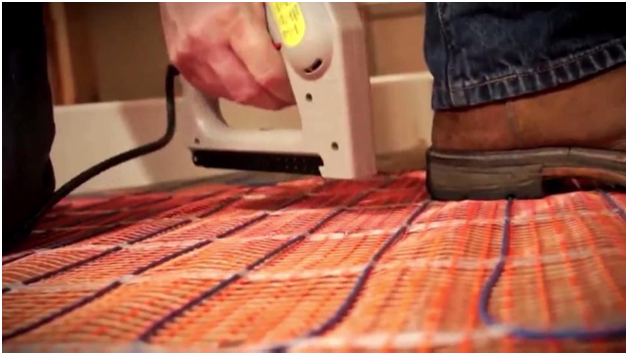
Next, laying the warm floor is performed in the following sequence:
- holes are made;
- dowels are inserted into them;
- a paint grid is attached with self-tapping screws;
- a thin and uniform primary concrete screed is created;
- there is a complete drying of the screed;
- the last check of the functioning of the warm floor is carried out;
- a fixing screed is applied;
- after it dries, a tile is laid.
Screwing in self-tapping screws when attaching the masking grid should be done very carefully. They can damage the surface of the film or contacts, which will cause a break in the electrical circuit. After the final fixation of the mesh, it is necessary to test the warm floor.

When laying the film floor is prohibited:
- work at high humidity and air temperature below 0ºС;
- use nails as fasteners;
- connect the film without grounding;
- bend it at an angle of 90º in a section up to 5 cm long;
- install the film in close proximity to other heating devices.
To avoid mechanical damage to the film, installation work is recommended to be carried out in soft shoes. You can use the infrared warm floor after about a month, when the concrete base under the tiles is completely dry.
Video on the device of the film floor:
Benefits of using quartz vinyl flooring and underfloor heating
- Thermal conductivity. Quartz vinyl tiles retain heat.
- Fast heating. Due to the small thickness of PVC tiles (up to 7 mm), heat spreads quickly and evenly.
- Environmental Safety. There are no harmful and toxic additives in the structure of quartz vinyl: there is no emission during heating.
- Antistatic. Static voltage does not accumulate on the surface, PVC tiles do not conduct current, they are absolutely safe together with a film heating system.
- Stability. Quartz vinyl tolerates temperature changes without consequences.
- Versatility. Quartz vinyl tiles of adhesive or lock type are compatible with all types of heating, except for infrared film type.
Pros and cons of underfloor heating with quartz vinyl tiles
 Quartz vinyl tiles have good moisture resistance
Quartz vinyl tile is a modern finishing material that has the following advantages:
- Layering. Each layer is made from environmentally friendly safe raw materials. When heating a warm floor, the finishing coating does not emit harmful substances into the environment.
- Moisture resistance. Such a floor covering is universal and can be used in rooms with high humidity. This is convenient, since often electric underfloor heating is laid in the bathroom.
- Wear resistance. If we compare the coating with a laminate, it corresponds to class 32 in terms of wear resistance.
- Practicality. The coating is easy to care for, does not absorb dirt and can be cleaned with simple detergents.
- Fire resistance. This material does not burn and does not support a flame, therefore it can be used in rooms with high fire safety requirements.
- High thermal conductivity. A system with such a coating will evenly heat the room.
- Soundproof properties. The multi-layer structure suppresses shock waves and noise up to 19 dB.
- Maintainability. A single element is easily removed and replaced with a new one. For this, you do not need to call the wizard. During the operation of the electric floor heating, it may be necessary to replace the cable section. The final coating is disassembled during the repair and reassembled after it is completed.
 The adhesive way of laying vinyl tiles makes it difficult to dismantle it
Like any other material, quartz vinyl has disadvantages:
With the adhesive installation method, it will be difficult to dismantle the tile.
The surface of quartz vinyl, laid on a concrete base, feels cool and uncomfortable to the touch.
Therefore, a warm floor in such conditions will be more than appropriate.
Gaps are formed between the tiles - this is the main difference from rolled materials.
It is important to carefully level the subfloor before laying the tiles. Otherwise, all its defects will be visible.
Ways of laying film underfloor heating
As a rule, when laying a warm floor with power supply, three methods of their location are used:
- Flooring directly under the coating, as is the case with a film floor.
- Location in the thickness of the screed, on which, after it dries, the finish coat is laid.
- Installation of an electric underfloor heating over a screed under a tile.
If the floor screed is in perfect condition, you can install a warm floor under a laminate or linoleum directly on it, which will significantly save time for additional work. When laying a cable electric floor in the kitchen, in the bathroom or on the loggia, the heating elements are hidden in the thickness of the screed, having previously laid a thermally insulating layer.
In the case of laying underfloor heating in two-story houses, where floor insulation on the ground floor is completed, additional screed and thermal insulation are not required. Ceramic tiles laid on top and a thick layer of glue will serve as protection for the warm floor. True, you should first check the instructions for it.
Is it possible to lay a film floor under a tile
Infrared warm floor is intended primarily for "dry" installation under laminate, linoleum, PVC tiles, carpet. Many manufacturers, to attract customers, claim that their film can be laid in a screed or tile adhesive under the tile.
There are 3 main reasons why you should not do this:
First, the film has low adhesion. If you immediately pour a screed on it or lay tiles, it will turn out to be floating. Because of this, the concrete will have an empty sound when tapped, and if something heavy is dropped on the floor, the screed may even crack.
Sometimes, for better adhesion of the solution with the top layer, they try to make a lot of cuts and notches.But imagine how difficult it will be to isolate it all. Moreover, it is necessary to insulate reliably and durable, so as not to break the tile later if you start to be shocked by leaks and the RCD will constantly work.
- Secondly, the composition of the film itself. All tile adhesives and screed mortars are alkaline. Over time, polyester film (PET) corrodes, regardless of the thickness or number of layers. At best, you will short circuit and spark from exposed electrical connections.
- Thirdly, there are rod and cable electric floors that are ideal for under-tile installation. When installing them, you do not need to invent or invent anything, they are specially made for a “wet” installation.
But there are several mounting options, which are discussed below.
Infrared film underfloor heating and PVC tiles
 Appeared on the market not so long ago, but have already gained considerable popularity. They are a flexible, thin system, the functioning of which is based on long-range infrared radiation. The heating element is a hexagonal carbon nanolattice enclosed in two layers of polymeric material and connected by silver-plated copper busbars.
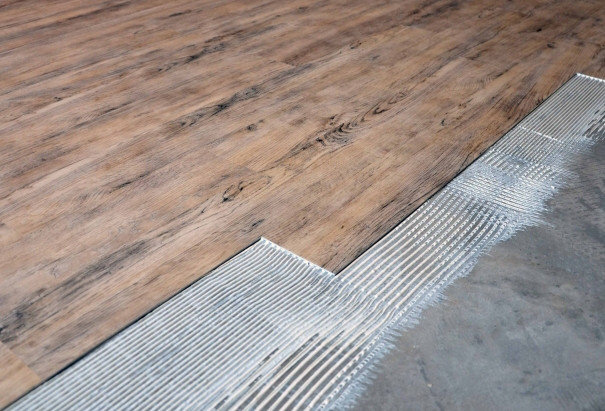
Installation is quite simple, glue is applied to the leveled base, on top of which sheets of film underfloor heating are laid, and then another layer of adhesive composition is applied to the latter, on which adhesive PVC tiles are already being laid.
The advantages include high efficiency, excellent thermal conductivity, excellent maintainability of the entire complex, both PVC coating and underfloor heating. In addition, the infrared spectrum is as close as possible to the solar spectrum, therefore it acts as a kind of “native” for a person in terms of physiology.
An undoubted advantage is that PVC tiles transmit radiation with virtually no loss, which makes it effective to combine such a heating system with this type of finishing flooring. It is also worth noting the simple installation that you can do yourself.
The disadvantages include significant energy consumption (especially in large areas), heating of furniture (without legs), dependence on a constant power supply.
Advantages of quartz vinyl tiles
Many appreciate quartz vinyl tiles for their high strength and phenomenal wear resistance. Among other things, due to the fact that polyvinyl chloride is included in the composition of this finishing material, quartz vinyl floor tiles acquire natural warmth. In the reviews, buyers note that it is pleasant to the touch, unlike ceramic. The main advantages of quartz vinyl flooring:
- Environmental friendliness of the material. Harmful substances are not emitted even at high temperatures.
- Quartz vinyl tile, reviews of which tell us that it does not absorb water at all, is widely used in rooms with high levels of humidity.
- Fire resistance. It does not support the combustion process, that is, it is a self-extinguishing material.
- High resistance to chemical agents.
- A high level of wear resistance and, accordingly, durability, the service life of the tile is 25 years.
- Resistant to temperature changes.
- Impact resistance.
- It has noise-absorbing qualities.
- Ease of maintenance and repair. Tiles can be washed with any detergent. If repairs are needed, a single tile can be easily removed and replaced with a new panel.
- Excellent aesthetic properties.
- If desired, you can make a "warm" floor under quartz vinyl tiles, there is no need to lay a substrate.
- The material does not conduct electricity and is antistatic.