Laying schemes for the water circuit
Schematically, laying pipes for arranging a liquid circuit can be done in one of the following ways:
Coil. The method of laying such a contour is the simplest and is performed in loops. This option will be optimal for a room divided into zones of various purposes, for which it will be convenient to use different temperature conditions.
The installation of the first loop is carried out around the perimeter of the room, then a single snake is allowed inside. Thus, in one half of the room the most heated coolant will circulate, in the other - cooled, respectively, and the temperature will be different.
The coils of the coil can be evenly spaced, however, the bends of the water circuits in this case will have strong creases.
Double coil. In this case, the supply and return circuits are located next to each other throughout the room.
Corner coil. It is used exclusively for corner rooms, where there are two external walls.
The advantages of the serpentine shape include simple layout and installation. Disadvantages: temperature fluctuations in one room, pipe bends are quite sharp, so a small step cannot be used - this can cause a pipe break.
Snail. Using this layout, the supply and return pipes are mounted throughout the room. They are placed parallel to each other and are installed starting from the perimeter of the walls and moving to the center of the room.
The supply line in the middle of the room ends with a loop. Further, parallel to it, a return line is installed, which is laid from the center of the room and along its perimeter, moving to the collector.
The presence of an external wall in the room may cause double laying of pipes along it.
The advantages of this method include: uniform heating of the room, due to smooth bends, the system has little hydraulic resistance, and savings in consumables can reach 15% compared to the serpentine method. However, there are also disadvantages - complex design and installation.
Contour laying schemes
The most common ways of laying water floors are snail and snake. Each of these schemes has its own distinctive features and advantages.
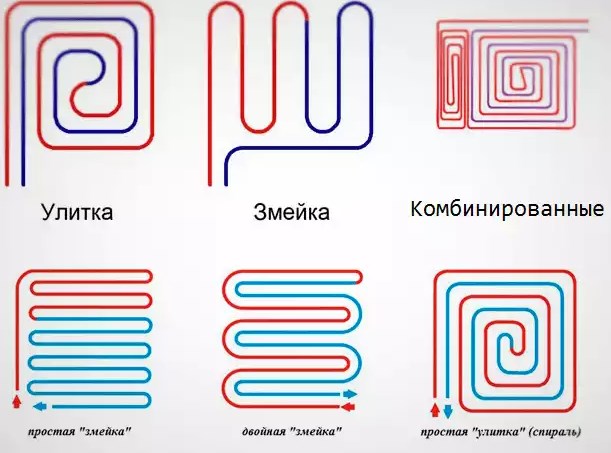
Snail
With such a laying scheme, the coolant and the return pipe are located at a close distance from each other, due to which there is a better heating of the room. This option is ideal for freezing areas. The laying of such a contour is carried out along the entire perimeter of the room to its center. In the center, the coolant ends with a loop, from which the return pipe returns to the collector parallel to the coolant.
snake
Such laying of a water heated floor is not able to evenly distribute heat over the entire area of \u200b\u200bthe room, but it is simple in design and with its help it is possible to provide heat to the coldest areas. The laying of such a contour is carried out from one wall, where the collector is located, to another, returning to the starting place from the opposite side.
To improve the quality of the water heating system in buildings with a large area, it is recommended to combine these installations.
Basic pipe installation methods
There are only two ways of laying pipes for arranging a warm floor - flooring and concrete. In the first method, ready-made materials are used for the base: polystyrene insulation and modular or rack-type panels. There are no wet jobs that require a long drying time, so installation is fast.
When using the second option, the heating network is immured with a screed. Depending on the thickness of the concrete, the time for its complete drying is calculated. There is an exposure of 28 days for strengthening, and only after that it is allowed to mount the selected floor covering.This is the most time-consuming and financially costly way.
#1: Laying on profiled thermal insulation boards
The arrangement of a warm floor system by a similar method is the simplest. As a basis, polystyrene insulation mats are used here.
The standard parameters of such plates are 30 * 100 * 3 cm. They have grooves and low posts on which the finishing material is laid.
In this case, pouring a concrete screed is optional. If tiles or linoleum will be used for flooring, gypsum-fiber sheets will initially be laid on the base. The thickness of such plates should be at least 2 cm.
#2: Device by modular and rack panels
In most cases, such panels are used in houses built of wood. Fastening pipes for arranging a warm floor is carried out on a rough base.
The modular system is equipped with chipboard panels, 2.2 cm thick, on which the heating lines are laid. These modules are equipped with channels for accommodating aluminum fixing plates. With this laying method, the insulation layer will be located in the wooden floor.
All strips are placed with a distance of 2 cm. Based on the applied pitch between the pipes, strips of the appropriate length (15–30 cm) and width (13–28 cm) are used.
To reduce heat losses on the plates, latches for pipes are installed. If linoleum was chosen for the floor covering, one layer of gypsum-fiber boards is laid on the pipes, if a laminate or parquet board is dispensed with.
The slatted flooring system is almost identical to the modular one, however, it does not use panels, but strips, the minimum width of which is 2.8 cm.
Laying is carried out directly on the logs with a step of 40-60 cm, and the distance between the slats is at least 2 cm. Extruded polystyrene foam or fibrous mineral wool is chosen for thermal insulation.
Both methods are more suitable for wooden floors. In other cases, choose a more complex option with a concrete screed.
#3: Installation of the pipeline on the screed
Despite the laboriousness of the process, the installation of a heating network with a concrete screed is the most popular.
The process consists of the following steps:
- First of all, the base is prepared. Irregularities in the subfloor are eliminated with a perforator.
- The first layer is waterproofing material. It spreads in strips so that the edges overlap each other by 20-30 cm. Also, the film should also go to the base of the walls by 15 cm. The joints are glued with construction tape.
- Thermal insulation spreads over it.
- A damper tape is glued between the future filling and the walls. This action is required to compensate for the expansion of the screed during floor heating.
- Laying reinforcing mesh. It helps to increase the strength of the screed.
- Pipes are attached to the fittings according to the selected scheme using plastic puffs.
- The control check of the underfloor heating system is carried out by filling it with liquid and pressure testing.
- Next, the guide beacons are installed.
- The final stage is the pouring of the cement screed.
For rooms with a large area, the sector division method should be used, with cells no larger than 30 m 2. For each of them it is necessary to equip an individual circuit.
If the lower floor is heated, then expanded polystyrene 20–50 mm thick is used as a heater. When there is a basement unheated floor or basement below, the thickness of the thermal insulation should be 50-100 mm. The pouring of warm floors with a concrete-sand mixture can be performed on a reinforcing mesh or without it.
If polystyrene foam plates with connectors for contours act as a heater, the use of a grid is optional.
When a standard thermal insulation material is used, a thin polymer or metal mesh is used to fix the heat-conducting line.
On our site there is a series of articles on the design, installation and connection of water heated floors.
Ways of laying a warm floor laying pipes with a snake and a snail
In one of the previous articles, it was mentioned that the type of pipe laying affects the temperature of the warm floor. In this article, we will find out what methods of laying underfloor heating are and which method is better to use when.
The method of laying a warm floor with a "snake" is used in rooms with low heat losses. The figure shows this type of installation:
When laying with a “snake”, you need to remember that the supply, hotter water flow, is directed towards potentially cold zones. For example, to external walls.
In the figure, the green wavy line shows the temperature difference: the colder zones of the warm floor will be in the direction of lowering this line. The following diagram makes this clearer:
In the following figure, a kind of “snake” is a double “snake”:
Here the temperature is distributed more evenly.
It must be said that the shape of the pipe loops at bends may depend on the material of the pipe. So, if the warm floor is made of pex pipes, then the snake will most likely look like this:
When laying with a snake, the temperature difference at the inlet and outlet should be within 5 degrees. If the difference is large, then as you move away from the collector, the floor will not feel warm.
Pros and cons of laying a warm floor with a "snake"
The advantage of this method of laying a warm floor is the ease of design and installation.
- uneven distribution of heat, as seen in the diagrams above,
– Difficulty laying with a small step, since small bending radii can lead to a pipe fracture: the “snake” laying method is recommended only for a step of at least 300 mm. If the pitch between the pipes is smaller, we use another method of laying a warm floor - a “snail”, in which the pipe bends only 90 degrees.
Where is it better to lay a warm floor with a "snake"?
The method of laying a warm floor with a “snake” is more suitable for small areas, because the temperature difference on them will not be too noticeable.
Laying a warm floor with a “snail” (in other words, a spiral) guarantees a uniform heating surface:
When laying with a snail, the temperature difference in the supply and return can be up to 10 degrees. This is due to the fact that when laying out the “snail”, the supply and return alternate:
Laying a warm floor with a snail saves pipes up to 10 ... 15% and gains in hydraulic resistance. Reduce the spacing near external walls. And the pipe coming directly from the collector and having the highest temperature should be located just in such zones.
Edge or boundary zones are areas of the floor near external walls, especially if there are windows or doors.
The methods of laying a warm floor in such areas are the same, only the pipe is laid with a smaller step. The pipe pitch in the edge zone is 75-150 mm, and in the remaining zones 150-300 mm:
You can lay the edge zone with a corner snake:
That's all about the ways of laying a warm floor.
So, you got a general idea about the device of a water-heated floor. All these points will be considered when the turn comes to the design and actual installation. But a water floor pipe is, of course, far from everything that is needed for the heating system to work. Therefore, there are several articles about other materials and equipment ahead.
ways of laying a warm floor, laying a warm floor with a snail, laying a warm floor with a snake
Scheme 1.
Based on thermostatic mounting kit VT.ICBOXSuch a scheme (see Fig. 4) is used with a coolant in the supply pipeline with a temperature of up to 60°C. At higher coolant temperatures, it is necessary to apply special technical solutions (partial use of a "warm wall"; use of finely porous screeds, thermal insulation of pipes). The advantages of this scheme include its simplicity and economy.
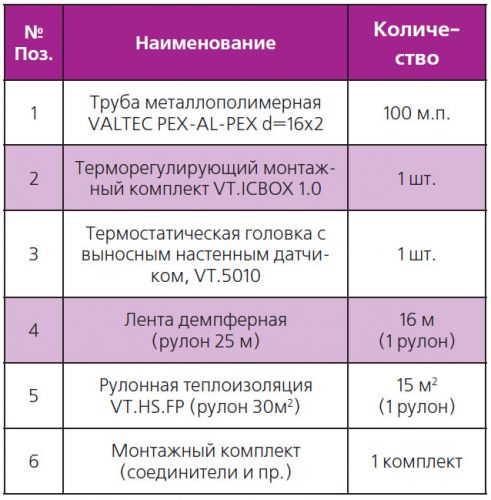
Table 2.Specification* of "warm floor" materials for "Scheme No. 1" (floor area 15 m2)
* Materials for cement-sand screed with plasticizer are not included in the specification.
It is recommended to use it when laying underfloor heating in small rooms, given that one VT.ICBOX mounting unit can serve only one underfloor heating loop with a length of not more than 100 m. A collector and a pump-mixing unit are not required for such a scheme. The heat carrier temperature in the underfloor heating circuit is controlled by a built-in thermostat, which is part of the VT.ICBOX unit.
When the temperature of the coolant rises above the set value, the thermostat reduces the flow, thereby lowering the floor temperature. Mounting kits VT.ICBOX 1.0 and VT.ICBOX 2.0 are available for the "warm floor" device. Automatic maintenance of the temperature in the room in the VT.ICBOX-1.0 node is carried out using a servo drive or a thermostatic head with an external temperature sensitive element, and in the VT.ICBOX-2.0 node. – only with the help of a thermal head.
The disadvantage of systems with VT.ICBOX nodes when connected to a high-temperature heating system is the uneven distribution of the coolant temperature along the length of the pipe, which leads to significant differences in floor temperature over adjacent pipes. Therefore, when using a warm floor based on VT.ICBOX sets, it is recommended: as a finishing floor covering, use materials that are resistant to high temperatures, for example, ceramic tiles; gender. The greater the thickness of the screed, the smaller the difference in floor temperature between adjacent pipes; lay the pipes in a "snail". In this case, "hot" pipes evenly alternate with "cold" ones, which will avoid the presence of overheated floor areas.
Rules for calculating pipe footage
You can calculate the footage of elements for assembling underfloor heating after drawing up a diagram of the entire system.
When calculating, the following nuances are taken into account:
- In places where furniture, large floor equipment, household appliances are located, pipes are not laid.
- The length of contours with different section sizes must correspond to the following parameters: at 16 mm it should not exceed 70 m, 20 mm - no more than 120 m. The location of each circuit corresponds to an area of 15 m 2. If you do not follow these recommendations in the heating network, the pressure will be low.
- The discrepancy between the length of the lines is not more than 15 m. For a large room, several branches of heating are made.
- Provided that effective heat-insulating materials are used, the optimal pipe spacing is 15 cm. If the house is located in an area with harsh climatic conditions, where the temperature drops below -15 ° C, the distance should be reduced to 10 cm.
- If the laying option was chosen in increments of 15 cm, the cost of materials is 6.7 m per 1 m 2. Laying pipes with an interval of 10 cm - 10 m per 1 m 2.
Underfloor heating can only be completed with a solid pipe. Depending on the footage, several or one bay with pipes for the water circuit is purchased. Then it is divided into the required number of lines.
Work on the arrangement of heated water floors always begins on the coldest side of the room. The question of choosing the optimal route of the heat carrier is very important - the water temperature decreases closer to the end of the circuit.
Calculation of the required material
A distinctive feature of water heated floors, from other additional heat sources, is that the coolant and the return pipe, which will be located in the screed, must be solid, without joints. Therefore, before proceeding with the installation work, it is necessary to correctly calculate the pipes, according to the following criteria:
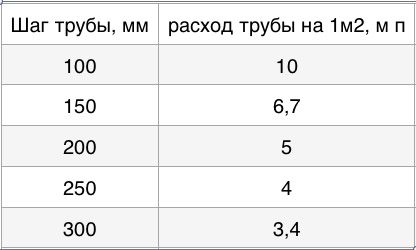
To calculate pipes per 1 sq. m.affects the distance between the turns of the pipes in the circuit. If the step distance is 10 cm, then approximately 10 meters of pipes will be required, if 30 cm - 3.4 meters. This calculation is used for all methods of laying contours.
The length of the whole circuit does not exceed - 70 cm. If you calculate the pipes in increments of 10 cm, then it turns out that one circuit is enough for 7 square meters. m
If the area of \u200b\u200bthe room exceeds this indicator, the number of circuits will need to be increased accordingly.
When counting pipes, it is important not to exceed a step distance of 30 cm. If the water floor is planned to be installed as the main source of heat supply, 10 cm is considered the optimal step distance.
You will also need to draw up a diagram of the location of the contours. It is compiled in the following way: the areas for the location of overall furniture and electrical equipment are subtracted from the total area of \u200b\u200bthe room. If you neglect this rule and still install a warm floor in these places, the heating system will begin to malfunction in the heat supply from overheating and eventually fail. Also, the contour cannot be laid close to the walls, a distance of 20 cm must be observed here.

The pipeline is fixed on the reinforcing mesh
Collector connection diagram
The choice of a ready-made mechanical or automatic collector model depends on the characteristics of the heating system.
The first type of control module is recommended for underfloor heating without a radiator, the second can be used in all other cases.
According to the scheme, the assembly of the distribution comb for underfloor heating is carried out as follows:
- Setting the frame. As an installation area for the collector, you can choose: a prepared niche in the wall or a collector cabinet. It is also possible to mount directly on the wall. However, the location must be strictly horizontal.
- Boiler connection. The supply pipeline is located at the bottom, the return pipeline is at the top. Ball valves must be installed in front of the frame. They will be followed by a pumping group.
- Installation of a bypass valve with a temperature limiter. After it, the collector is installed.
- Hydraulic test of the system. Check by connecting to a pump that contributes to pressurizing the heating system.
In the mixing unit, one of the mandatory elements is a two- or three-way valve. This device mixes water flows of different temperatures and redistributes the trajectory of their movement.
If servo drives are used to control the collector thermostats, then the mixing unit is expanded with a bypass and a bypass valve.
Design and installation of underfloor heating
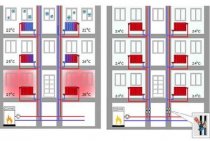
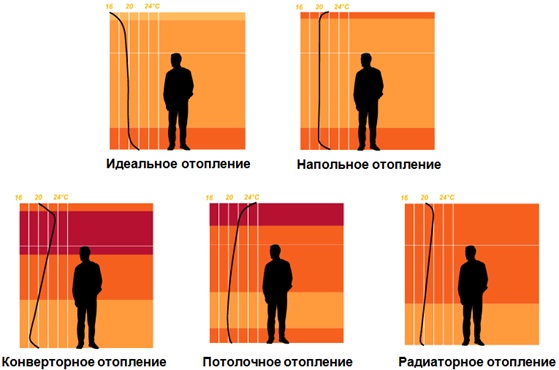
“Feet warm and head cold” is the most important principle of the microclimate of any dwelling, which has a beneficial effect on the health of its inhabitants.
This principle is especially important to apply in such rooms as a bathroom, swimming pool, toilet, where the floor is lined with "cold" materials - tiles, marble. This will protect the air from dampness, and the walls from fungus.
It is useful to install this heating system in the hallway. In addition to a thermal curtain from the incoming cold, it will help you warm up faster and dry your shoes quickly.
And for the little inhabitants of the house, a warm floor is generally indispensable, since they spend most of their time on the floor. Its device in the children's room will protect children from drafts and hypothermia in the cold season. This technology can be used in other rooms in conjunction with the main heating system or completely replacing it. At the same time, the “heat from below” principle will have a beneficial effect on the health and working capacity of people, will help to avoid dampness in the premises and the appearance of such unpleasant consequences as fungus and mold.
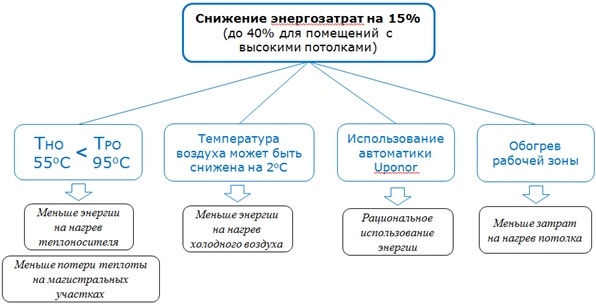
| The use of underfloor heating also increases comfort through a self-regulating effect that better maintains a constant comfortable temperature. | And there is also a cost reduction of 15% in ordinary rooms and up to 40% in rooms with high ceilings. Why this happens is shown below: |
The versatility of the warm floor allows you to install it in any room, and a large heat transfer area allows you to achieve uniform heating of the air over the entire area. That is why underfloor heating is often installed as an addition to those systems that cannot cope with heating or heat unevenly. Their installation is simple and allows you to make the heating system "invisible". There are no restrictions on the choice of materials for the floor with proper installation, you can lay parquet, laminate, wood, and the already mentioned stone and tile.
This technology can also be part of "smart home" systems, that is, turn on before the arrival of the owners and turn off after departure, saving electricity and fuel.
To date, there are 2 options for installing underfloor heating:
- water heated floor
- electric underfloor heating
each of them has its pros and cons, but in this section we will take a closer look at water heated floors.
You can find a comparison with electric underfloor heating in the article in the section "Articles / Underfloor heating"
Features of connecting the electrical system
Electric underfloor heating is more often used as inter-seasonal heating and is used when the central heating is not yet turned on. Its main advantages include:
- Simplicity and speed of installation;
- No need for "wet" processes;
- Relatively low cost;
- Slight rise in floor level.
Unfortunately, there are also disadvantages:
- Electromagnetic radiation - according to the manufacturers, it is within the normal range, but additional shielding will not hurt;
- The high cost of operation - electricity is much more expensive than other types of fuel;
- Load on house wiring.
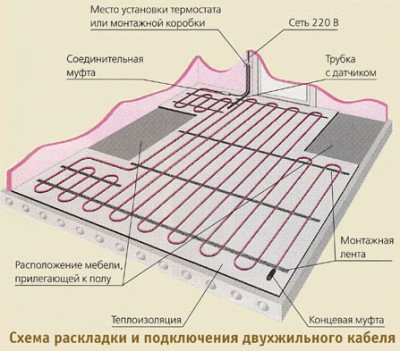
What cables can be used?
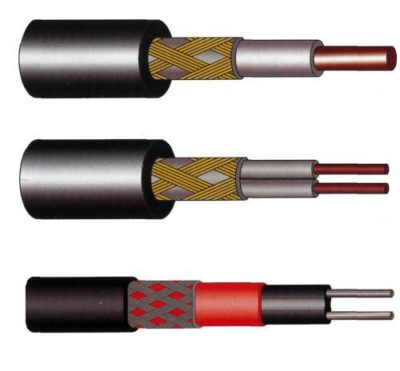
The main heating element of such a system is a special cable, which is laid on the floor with a snake and attached to the mounting tape. The connection scheme depends on which cable you have chosen:
- Single-core resistive - the cheapest and simplest type of cable in design. It is a heating core through which current flows. In this case, most of the electricity is converted into heat. The main feature of this type of cable is the need to connect both ends to the mains, which is not always convenient.
- Self-regulating cable - here it is not conductive wires that are heated, but special polymer couplings. This cable can rightly be called the most convenient to use, but also the most expensive.
- Two-core resistive - in addition to the heating core, this cable also contains a conductive one. This will allow you to connect it to the network with only one end, and somewhat reduces the level of the magnetic field.
Note that laying a resistive cable on floor areas that will be filled with furniture is strictly prohibited. This will inevitably lead to overheating of the system and its failure.
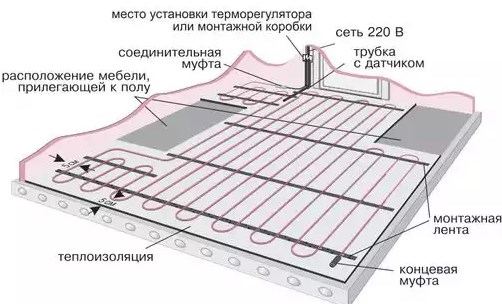
Connecting sensors and thermostats
The distance between the turns is determined based on the required specific heating power and cable power. After laying the cable, we install the floor temperature sensor, having previously protected it with a corrugated tube.
The sensor is installed in the middle between the turns of the cable at a distance of 0.5 m to a meter from the wall. A vertical piece of wire connecting the sensor to the thermostat is placed in a strobe.
The first voltage supply to the underfloor heating cables should be carried out only after the concrete has completely dried - not earlier than after 28 days.

We hope that with the help of this material you figured out how to properly connect everything yourself. If you still have any questions, we suggest you look in our other articles, or, if you do not want to do everything yourself, seek help from highly qualified specialists.
Snail quick and easy layout of underfloor heating loops
Easy and simple program for calculations when laying underfloor heating. Useful for both professionals and independent builders. Allows you to significantly speed up planning and save on material
The program allows you to quickly and conveniently draw underfloor heating loops, while drawing takes place according to the grid that is set when creating a new project - and after that the design takes place with reference to this grid, which makes it possible to avoid arbitrary bends that are impossible when performing work. It comes out quite quickly and accurately - after all, you always get to the right node and you don’t need to aim.
In addition to the loops, the program has the ability to draw rooms - this is done so that you can quickly calculate the area of \u200b\u200bthe room in which the installation will be done, as well as in order to know the amount of the substrate that will be used. Substrates come in different types: either a metal mesh, or plastic, or special options. The snail allows you to estimate the upcoming financial costs with sufficient accuracy.
Within half an hour, a specialist, being right on the site, will take measurements and draw up a plan of the room, outline the loops of warm floors and receive a preliminary estimate - that is, everything is very prompt. There is no need to learn some specialized CADs, which, although they allow a lot, require long-term training - in order to start drawing at least primitive warm floors in the bathroom, you need to master this system for more than one year! When creating a loop, the color and thickness of the line are specified - important traces are made easily distinguishable. The program provides a dynamic estimate - when calculating the estimate, you can enter the cost of a meter of pipe and immediately see the final amount.
An important function of the program is to print the project on any number of pages. The project can be printed with any detail, after which it will be printed on several pages that can be glued together and get a large diagram. Projects can be stored both locally on the user's computer and in a cloud service: each user is allocated their own secure file storage for storing their projects. After receiving the registration key, the user will have access to his projects from any computer where this program is installed and where there is Internet access. In the future, it is planned to implement a simple viewer directly from the Internet through the user's browser or through an android application.
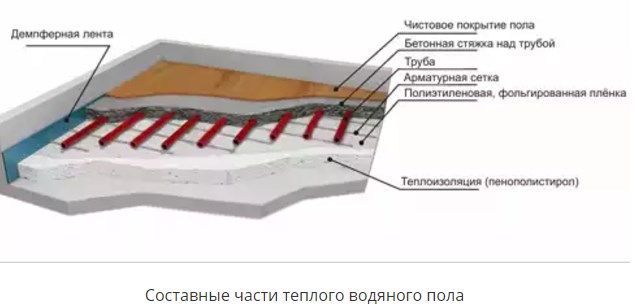
Laying a warm water floor
Most often, when laying a warm water floor, concrete pouring is used. With this method, the pipeline will be located in a cement mortar, which in turn will contribute to the high-quality fastening of pipes and their protection. Installation of a warm floor is carried out in several stages.
Preparation of the red floor
If the base of the room has an uneven surface, holes or cracks, in this case it must be carefully leveled. To do this, after removing debris, dirt and dust, a concrete screed is poured.

Laying waterproofing
Many at this stage of laying underfloor heating make the mistake of considering waterproofing to be an unimportant element in the design. However, according to the recommendations of experienced specialists, the waterproofing layer must be installed, since it plays an important role in protecting the insulation from the concrete screed.

Insulation installation
Insulation is one of the important steps in laying a warm water floor, since it is it that prevents heat loss that is spent on the ground under the building and on the basement. The most common heaters are:
- EPPS. This expanded polystyrene is valued for its noise-insulating and moisture-resistant properties, low thermal conductivity and long service life.
- PPS. These profile mats are very easy to use. They have special protrusions on the surface for fastening pipes, so you can save a lot of free time during installation. But here it is worth noting that they have a very high price.
The thickness of insulation for laying a warm water floor should be determined by the type of base of the room and the weather conditions of the region.
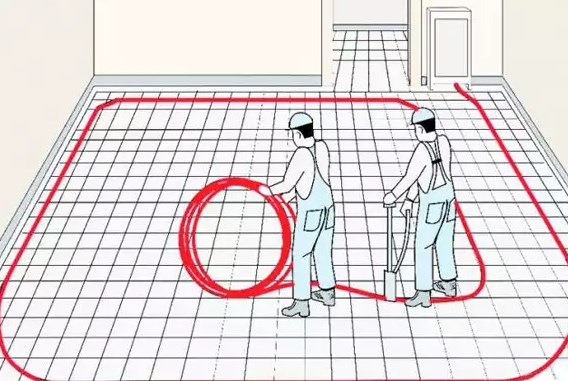
Pipe laying
Before proceeding with the laying of the pipeline, it is necessary to apply a diagram of the direction of the pipes on the basis of the prepared room with a marker, taking into account their pitch, thickness and angles of rotation.
The sequence of laying the contours is carried out in the following order:
- 10 meters of the pipeline are unwound from the bay.
- A corrugation with a fitting is put on the end of the pipe and attached to the manifold.
- According to the marked scheme, the pipe is simultaneously unwound, laid and fixed.
- Having gone all the way, the pipe is brought to the collector.
- Having noted the distance, the pipe is cut off and connected to the collector.
This laying principle is suitable for all types of water heating circuits. Along with these works, you can simultaneously fix the damper tape, which will prevent deformation of the screed and walls.
Pouring cement mortar
Before you start pouring concrete screed, you need to check the operation of water-heated floors and the presence of air in the pipes. After the entire crimping of the system has been checked, focusing on the height of the floor, beacons are installed and the screed is poured. The quality of the screed will depend on the concrete mix. It should include:
- reinforced fiber;
- plasticizers.
In this case, the screed will be mobile during drying, and after drying it will have high strength.
The nuances of choosing the optimal step
The degree of efficiency and cost of the entire circuit depends on the correct choice of the step between the laid pipes of underfloor heating.
However, its calculation depends on many factors. The standard distance between the contours is 100-200 mm.
Variable or constant pitch is also possible:
- If the heating load is less than 50 W per 1 m 2, the circuit pitch will be constant and equal to 200 mm.
- With an increased heating load of 80 W per 1 m 2 or more, the distance will be 150 mm.
- In other cases, a variable step must be used. For example, along the perimeter of one or two external walls, the laying of the water circuit will be with the smallest step of 100 mm. Moving to the center of the room, the gaps will gradually increase to 200 mm.
In practice, if it is planned to heat economically with underfloor heating, a step of 150 mm is used. It is this indicator that is optimal in almost any conditions.
If the heat loss of the building exceeds the heat transfer, it is worth thinking about its effective insulation - in this case, reducing the step will not solve the problem.
A detailed algorithm for calculating pipes for underfloor heating is described in this article.