Furnace business
§ 4. Basic rules and sequence of work when laying furnaces
When starting to lay the stove, you should make sure that its foundation is laid, correctly and firmly, and the place where the stove is installed is closed from precipitation (rain, snow).
Then it is necessary to check the correctness of the turn of the furnace in relation to the walls of the room, and to establish whether the flow beams or rafters interfere with the unhindered passage of the chimney through the ceiling and roof.
After a preliminary check, the stove-maker lays out two layers of bricks (flat) on top of the foundation and a waterproofing layer on them (roofing, roofing material, cement layer).
When laying out the first rows, care must be taken to ensure that all sides of the masonry are parallel. This can be checked with a square or a whip (Fig. 113).
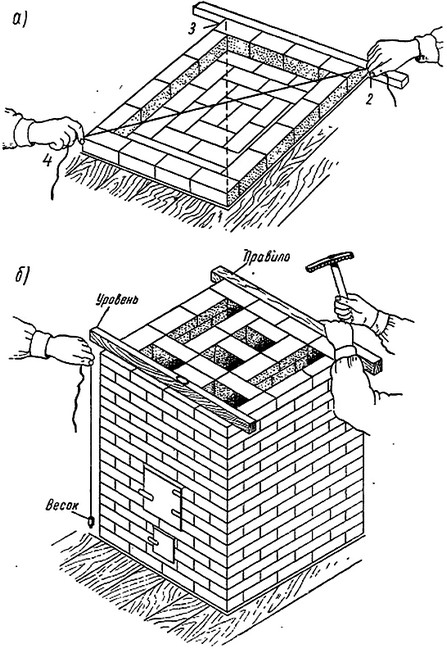
Rice. 113. Checking the correct laying of the furnace:
a - checking the correct laying of the furnace; b - checking the laying of the furnace by weight, level and rule
The scourging is superimposed from one corner of the masonry to another (diagonally), and if the distance between corners 1-3 and 2-4 is the same, then the masonry has the correct shape.
The layout of the critical parts of the furnace - the firebox and smoke turns - is carried out with a preliminary selection of bricks and laying each row dry (without mortar). Dry layout is done with tied seams, fitted and hewn bricks. And only after that the whole row is already laid on the solution.
Without preliminary layout, it is possible to lay the less critical parts of the furnace and continuous rows without chimneys.
Refractory and ordinary bricks expand differently when the temperature rises, so their masonry should not be bandaged to avoid cracking.
The thickness of the seams should be as small as possible: no more than 5 mm with ordinary bricks and 2-3 mm with refractory bricks. In order for the seams to be thin, the clay mortar must be prepared without lumps and impurities, not too thick.
Bricks should fit snugly against each other with all faces; it is not allowed to fill the gaps with inaccurately chipped rubble.
Bricks should be hewn and chiseled as rarely as possible, since the hewn surface is always less durable. It is not allowed to turn such a surface inside the firebox or smoke circuits.
It is impossible to lubricate the inner surface of the firebox and channels with a clay solution, since the clay will quickly crack under the influence of fire, fall off and clog the smoke circulation.
In order for the surface of the masonry to be smooth, it must be carried out very carefully, every 5-6 rows to wipe with a wet rag and remove the clay solution squeezed out of the joints. Every 3-4 rows, it is necessary to check the correctness of the walls of the furnace with a rule, level and plumb line.
When laying the brick, it must be well moistened (immersed in water). Otherwise, as a highly porous body, it will quickly absorb moisture from the solution, and the dehydrated (dry) solution will not be able to “seize”, and the masonry will be fragile. Refractory bricks to remove dust that prevents setting with mortar are only moistened with water.
Bandaging of seams during oven masonry is required. Overlapping of vertical seams is done not less than 1/2 brick, and overlapping in 1/4 brick is allowed as an exception in some cases.
When lining fireboxes from refractory bricks, it is necessary to use a refractory mortar without binding the lining with ordinary brickwork. If it is not possible to perform the lining separately, then the walls, under and arch of the firebox are entirely laid out from refractory bricks.
Using an ordinary brick for laying a firebox (when firing a stove with wood), the inner masonry of the firebox should also not be tied up with the masonry of the outer walls, because, although the material is homogeneous, the inner layer will heat up much earlier and, expanding more than the outer one, can break the integrity of the masonry.
stove stove
I would like to pay special attention to the stove for the bath, as its design has its own characteristics. An open heater will take a long time to warm up and it is necessary to periodically add fuel to the stove
Then you can take a steam bath from the heart. But then the work should have an exit to the next room - a dressing room.
In this case, all the waste will leave the bathhouse itself. If such a stove is not strongly heated, then the heater will quickly get cold and steam, as it should not come out.
If the heater is located on the side and closed, then the room with stones is filled with combustible gases from all sides except for its front part. In this case, the oven heats up quickly.
A more acceptable version of the stove for a bath is a bell-shaped one. In this case, the heater is such that the temperature under the hood is very high and forced into the stones. In this case, the oven heats up in a short period of time and you can heat up as much as you like. In the presence of fuel in the furnace, the bell-type furnace independently regulates the mode.
Basic rules for laying a good stove.
I will tell you a few secrets, the knowledge of which will allow you to put together a well-functioning sauna stove that will not smoke and will not fall apart after several fireboxes.
1. All protrusions along the path of smoke (high - exit of hot gases, underturns - lower turns, passes - upper turns) are rounded off. Smoke paths should be as smooth (as far as possible) and level. Plastering of smoke channels is not allowed; during the laying process, they are simply thoroughly cleaned of mortar.
After laying several rows, we remove the influx of clay-sand mortar inside the smoke channels with a spatula. Then, with a wet rag, wash off the remnants of the clay-sand solution.
2. The section of chimneys and chimneys anywhere (including on bends) should not be less than the section of the hail. If the hail consists of several holes, then their total area is taken into account.
3. There must be no narrowing of the channel in the chimney (from the top of the chimney to the top of the pipe).
|
Wall laying.
Corner masonry. 4. Brick is laid in such a way that the bricks must be tied together - each upper brick lies on the two lower ones, covering the joint. The joint of the lower ones should fall approximately in the middle of the upper (covering) brick. The bandaging of the corner is carried out according to the same principle. 5. As I said, the bricks in the masonry are laid in such a way that the burnt sides come into contact with fire and smoke, if possible. |


Preparing bricks for laying.
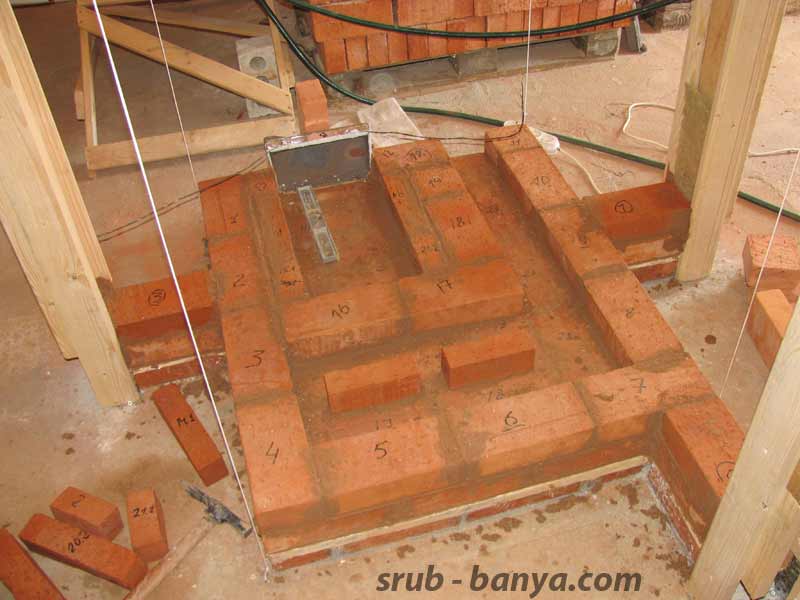
The furnace is assembled in rows, a selection of drawings of all rows is called ordering. Brick processing is carried out during the laying process.
|
Row numbering of bricks. Each row is pre-layed out without mortar - dry. Bricks are adjusted (cut or cut) so that the vertical gaps are 5-10 mm, the evenness of the outer walls, the verticality of the corners, the evenness of the smoke channels are ensured. Each brick in a row is numbered in accordance with the developed scheme. |
|
Brick grinding.
One of the spoons of kiln bricks may have a corrugated surface. Grinding sequence: first, large irregularities are removed with a grinder with a diamond wheel, then fine grinding is performed manually, with an abrasive stone (circle). |

After the bricks are fitted and numbered, they are soaked in water. Soak until no more bubbles appear.
After soaking, you can put a row on the solution.
There is an opinion that it is not necessary to wet the oven bricks - in order for the oven to dry faster.
However, in order to lay slightly wetted bricks, you need to be a good specialist, since after applying the mortar to the brick, there are only a few seconds to lay it correctly - the mortar sets very quickly on a dry brick.
And since we are far from being pros and, moreover, even among professional stove-makers there is no consensus on soaking or not soaking, we will soak the bricks.
Fireclay bricks before laying are dipped in water for just a couple of seconds just to wash off the dust. The refractory solution is applied with a spatula or trowel.You need to work very quickly, as the fireclay instantly absorbs the moisture of the solution.
The fireclay core takes on the adverse effects of high temperature, protecting the kiln array made of ceramic (clay) bricks from destruction. The refractory mixture is sintered only in the high temperature zone - in the furnace and in the hail area (hot gases exit into the smoke circuit).
Despite the fact that there is no strong adhesion between fireclay bricks, the design of the fireclay core is such that it is stable, not subject to movement and destruction.
The problem can only be if you come across a poor quality fireclay brick. Such a brick begins to collapse (crack, break off) after 2-3 years of operation. But for 5-6 years, even such a brick is enough.
Then repairs are needed.
The uniqueness of brick ovens is that they are absolutely maintainable.
For example, in the furnace that I will talk about, it is easy to completely replace the fireclay core by disassembling the sidewall of the furnace.
When laying the fireclay core, it is necessary to carefully monitor that the distance between the bricks of the fireclay core and the furnace mass is 8-10 mm. This is necessary for the free thermal expansion of the fireclay core from exposure to high temperatures and the unhindered passage of secondary air from the doors of the explosive to
In no case should ceramic and fireclay bricks be tied together during the laying process!
Ceramic and fireclay bricks have different coefficients of thermal expansion and such masonry will quickly collapse.
Proper brick laying
Scheme of laying the foundation for the furnace.
Being engaged in laying bricks, it is required to constantly check the verticality of the structure with a plumb line. Such checks need to be done after about three rows. In work, the laying is checked for horizontality using a level with a rail. As you know, during the laying of a brick, it is often necessary to chop, and sometimes chop. Before doing this, make a notch on the brick. With this simple element, you will greatly facilitate your work.
To obtain a thin seam, some nuances must be observed. In particular, the layer of mortar to be laid out must necessarily be thin, but at the same time, the seams must be full and tightly adjacent to each other so that voids or shells do not occur. In addition, clay is smeared on brick with hands, it can be done with a trowel, while probing with fingers and leveling to the required thickness. This is necessary so that the remaining lumps and large grains of sand are not missed in the solution layer.
After a layer of mortar is applied, bricks are laid on it, which must first be driven dry immediately for a full row. Next, the finished mortar is taken from the box, the selected brick is placed with the left hand, the mixture is carefully smeared under it
The solution is aligned with the fingers along the row that was laid out earlier. In this case, a solution remains on the hand, it is cleaned off with a brick edge. The next step is to lay the brick with the left hand on the mixture, when using light pressure, it is advanced, while ensuring lapping in the seams.
Helpful Hints
As for the solution
To save time and effort when laying the facing row, cover it with masking tape 60 cm wide. This will allow you not to be constantly distracted by checking the mortar on the front side of the bricks. Just when the mortar has set, you can remove the adhesive tape and sweep the masonry with a stiff-bristled brush.
The mortar for masonry can be prepared independently, or can be purchased in specialized stores. There are a lot of choices now. See that the mixture is refractory. Its packaging is different from 5 to 25 kg. If you put the oven, it is better to take a large package at once. For cosmetic repairs, you can use 5 kg.
Since ceramic bricks can withstand heating up to 650 degrees, in order to keep the masonry intact, it is necessary to isolate fireclay (masonry) with cardboard at least 5 mm thick.
Regarding the laying process
To facilitate the laying process in certain places of the structure, as well as for a greater visual effect, you need to use an ordinary metal corner of 50 mm. It should not be visible from the outside, but it should press the bricks from both sides.
According to professionals, six corners will be needed on the “overheating”, and the length of each should not be more than 75-80 cm (otherwise, the corner will deform and sag from heating).
To comply with elementary safety rules and to give the oven a nice look, it is best not to use metal corners on the front side. It is advisable to replace it with a wedge-shaped lock.
Your stove will serve faithfully for many years, if all its components (damper, grate, doors, etc.) are laid in grooves with a depth corresponding to the thickness of the fittings.
For the front part of the jumpers, use metal threaded studs with a diameter of at least 16 mm. Their use will allow you to conveniently form a finish on the front of the furnace, without using corners to hold the bricks.
After we have prepared a brick for the jumper, we drill a hole in the middle, put it on a hairpin and coat everything with mortar. Then we tighten. When the jumper was put in place and the sagging was determined “at a glance”, the structure should be strengthened with another hairpin.
It is possible to make molding bricks yourself, even if you are not a high-profile specialist. The main thing is patience and desire. Often you want to decorate the stove masonry with decorative elements (rounded edges, in the style of an armir, curly, etc.).
All you need is a grinder, a ceramic diamond cutting wheel and an assistant who will need to constantly pour water on the bricks during the grinding process.
Do not forget about safety measures when working with a grinder to avoid injury and dust inhalation and vision.
As for the straight seam
There are some tricks for laying out a perfectly even seam. On a row of masonry, it is worth laying two metal quadrangular rods with a thickness equal to the thickness of the seam. Typically 8 mm. The solution is applied on top. Then bricks. The rods are removed after laying the last brick in the row. But! It is no longer possible to upset bricks after this procedure! Otherwise, masonry will deform.
Know that if you do not want to destroy the masonry, then the length of the pond should be no more than a meter. To facilitate the sliding of the rod at the time of removal from the solution, it should be lubricated with used oil or taut.
Fireplace arches are in fashion now. Apply fantasy, a little more time. To create an arch, you can use drywall with a thickness of 12 mm as the easiest way. The process is simple: we cut out the arch of the shape you need, install it on the workplace, press it to the base with the help of something at hand and lay out the bricks prepared in the desired shape along the template guide.
Regarding pipe laying
The main mistake when laying out the pipe is a slope of more than 5 degrees relative to the base. This is unacceptable, as it will lead to a laborious correction of the work. There is an opportunity to prevent such a mistake: first lay out the base of the pipe.
Then, using a plumb line, determine the point on the roof where your pipe should go and fix the screw. And so on for each corner of the pipe. Next, stretch the bright threads from the base to the roof and masonry is guided by them. As professionals advise, the pipe is best laid with 1.5 × 2 bricks.
The pipe should be 1.5 m or more from the roof ridge and protrude 0.5 m in height.
After the construction of the pipe, it will need to be properly insulated. You can find out how to do it right here.
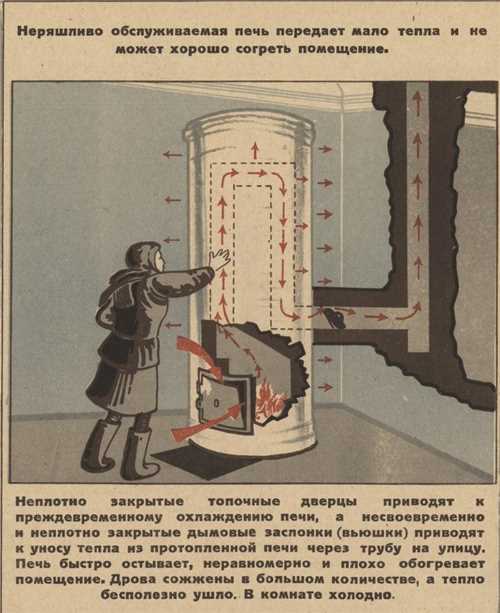
Important Reminders
For the correct and efficient operation of the furnace and for safety reasons, the following firebox rules must be observed:
- It is necessary to close during the process of burning fuel not only the door of the firebox, but also partially the view with a valve.
- Only at the end of a strong burn-out of firewood, when there are large voids between them (air flows through them, cooling the stove), slight stirring of firewood is allowed.
- Burning firebrands and coals should be in the center of the firebox on the draft path. They are surrounded by burning coals. In this case, the traction force is reduced.
- If the flame turns blue on the burnt coals, and then disappears, carbon monoxide will be obtained. In this case, the coals are moved closer to the door, leveling them over the area of \u200b\u200bthe grill. The door is tightly closed, and the pipe is opened for 10 minutes for the final release of carbon monoxide.
- It is not recommended to heat the stove with wood at night. Compliance with this rule will help to avoid severe carbon monoxide poisoning, which can lead to death.
- To remove gases from the furnace, using coal or peat, a hole with a diameter of 15 millimeters is made in the smoke damper.
- Since the ash pan door regulates the air supply to the oven, the ash pan must match the dimensions of the grate.
- If they heat with coal, firewood is first burned in the oven, and then coal is poured onto the burning coals of firewood with a layer of 60 millimeters. After this layer of coal flares up, pour the next layer 150 millimeters thick. It must be maintained during the entire combustion process. In this case, the oven will warm up for a long time, well and evenly.
- Do not allow cracks in the oven masonry. It is necessary to ensure that the furnace appliances close the furnace tightly, providing uniform heating of the furnace.
- Violation of the internal partitions of the oven can cause uneven heating. In order to correct this shortcoming, it is necessary to dismantle one of the walls of the furnace, shift the partitions and lay the furnace again. Even small cracks should not be left in the oven.
- The floor under the stove is covered with felt, which is soaked in liquid clay, and covered with roofing steel, which is painted with oil paint on both sides.
- The laying of the furnace is sometimes carried out on trenches - columns consisting of two rows of bricks for the entire width of the furnace. They form an air gap between the hearth and the floor of the furnace, contributing to the ventilation of the space and cooling. A distance of 7-13 millimeters is kept between them and they are covered from above with a furnace hearth consisting of two rows of brickwork. It must be strictly horizontal.
The average duration of furnace firing is 1-1.5 hours. The surface of the furnace after the firebox in rare cases heats up to 900 degrees Celsius. The normal heating temperature of the oven is 700 degrees Celsius. When the temperature is too high, an unpleasant odor is emitted from the dust burned on the stove. However, in any case, the oven should not be overheated. As a result of its overheating, cracks form, and there may be a breakdown of the stove masonry.
It is unprofitable to build an oven that is too large, which is not heated every day. It will take up a lot of space in a building that overheats a lot. To cool such a room, the windows are opened, which entails extra fuel consumption, and this is unacceptable when it is necessary to properly heat the stove.
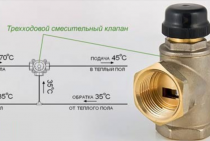
Expert answers
%username%:
open the first one a little so that it pulls, and when it burns out completely, close it completely
Vitaly Rudenko:
two dampers are made to switch the furnace to summer and winter modes of operation. in winter, you do not fully open the damper, which lets hot smoke into the heater wells. in summer, direct current opens, the heat goes directly into the pipe
from Igor
slightly wrong. one damper (summer version) directs into the pipe and at the same time works as a heating pipe (if it has not been heated for a long time) !!! the second one completely blocks the pipe !!! i.e., opened 2 immediately and after 10 minutes closed one completely (then the smoke will not go directly into the chimney, but through the shield and stove bench !!!) (it makes no sense to open it in summer - in winter !!!)
Cat smile:
Vertical damper - stroke to the knees - for winter. Horizontal - into the shaft of the pipe, both open first, melt, then push the horizontal completely, and the vertical - after the coals burn out.
BANNED:
I have two, because the pipe is long, so that one does not cool down by 2m, the second is 4m under the ceiling.
last name:
Elena Spitsyna:
grandfather mikhey:
Bricks will not warm up. Tried on a potbelly stove.
L:
can
Ravza95:
It may be possible, but the thermal balance will be disturbed. The walls can burn out quickly. Or leave an air gap between the walls of the stove and the brick, for air circulation and heat removal. There are grilles on the sides of the walls, just for such ventilation.
Alex Mishin:
It is not designed for this, so it can quickly burn out. The specialists who designed it knew what they were doing, and you, having no education in this area, just "improve" someone else's development, like Leskov's Lefty flea: shoe it - And she couldn't jump...
Alexander:
You just need to take another oven with a heat accumulator. Believe me, nothing good will come of it. Why do long-burning stoves have a battery - the laying of firewood in it should smolder for 4-8 hours, there are even more .... unless it's bullshit.
last name:
if you make gaps, the brick will not warm up, if it is dense, the stove will overheat and burn out faster, better put an economizer on the stove looks like this due to heat from the stove and distribute heat throughout the room.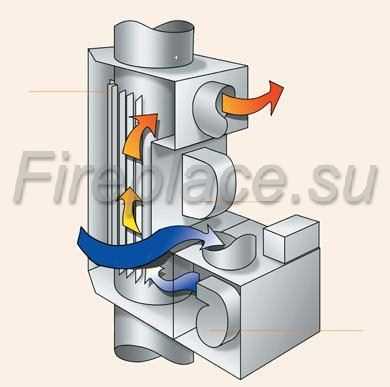
Bell-type furnace
Another type of furnace is a bell-type furnace. It has a very high efficiency - up to 70%. It is self-regulating and this is a plus of this type. Flue gases are first completely burned out under the hood before passing into the chimney. In this case, all the heat is given to the furnace. The principle of a gas view operates here: when the standard damper is closed, the cap gases exclude the release of cold air from the hail. This ensures optimum oven operation. Those. even with a temporarily open view, no waste is formed.
This type of stove has a rather complicated design and it only works for heating, so the hob cannot be adapted to it.
Best Answers
IfIn Your LifeAss,DoOopsOops:
we have everything in the process of firing the fully open one, they push it in a little bit and finally close it when all the coals have burned out
Market relations:
close immediately
Grey:
usually two dampers, one "summer" - direct, the other "winter" - through the channels of the butt, summer, as soon as it flares up, close, and the winter one is completely closed when everything burns out so that heat does not escape into the atmosphere. and each stove has its own character
Abyr Val:
Hmm, always drowned with the damper and blower fully open. No, I would save money.
Frida:
i think you are logically right
Sergey Kurbanov:
Everyone has their own oven. the main thing here is to know that it is IMPOSSIBLE to close THIS damper UNTIL EVERYTHING BURNED OUT! BURN! But other.. . I'll tell you a secret, in addition to the damper, there is also a BLOWER! That is, the blower cover is correct. And by opening or closing it, you can also achieve a normal combustion level. So we don’t touch the damper at all, that is, it’s open, I adjust the draft by blowing. BUT if you have a Russian stove, without a blower cover, without grates ..
then you can also have a tower, which can also shut off the stove, WHEN EVERYTHING BURNES OUT, of course. The point here is that a different stove is melted in different ways. In addition (you probably noticed) that the valve can still be closed when the furnace warms up, which you do
So it is important not to get burned from the smoke.
Tatyana:
When all the firewood has burned out and the coals are flickering with a red light ... It is dangerous to close if, after mixing the coals, there is at least one blue light.
Brick oven masonry schemes
Now with regard to the laying of a brick oven. There are two types: Dutch and Swedish.Each of them has its own advantages and disadvantages.
Dutch scheme:
- easy to implement
- the gas convector passes sequentially through all channels,
- the convector and the firebox are connected only by a hail, which makes it possible to build a stove in a room with a different layout, but low efficiency (up to 40%),
- the difficulty in arranging water heating, if the circulation is disturbed, the efficiency will decrease and the return of soot will increase.
Swedish scheme:
- Efficiency is up to 60%
- is a chamber oven: the chamber is an oven, it is enveloped in hot gases. From the bottom to the ceiling there is a vertical convector channel, which is located behind the oven. In a special niche, the hob is heated.
Swedish ovens have their advantages:
- the oven and the convector are energetically independent of the part with the firebox. Therefore, it is possible to equip the oven with a hot water heat exchanger with a storage tank. The place for the location of the tank can be drying or overlapping the furnace. Two types of heat exchanger: W or U.
- flue gases burn out in the chamber part of the construction. They reach the convector at temperatures up to 800 degrees. That is why the convector is made of brick using a cement-sand composition.
- since the convector is narrow and high, the room warms up evenly everywhere
- part of the flue gases can be launched from the chamber into the stove, then make a turn in the convector and the characteristics of the furnace do not change
- the convector can be changed in dimensions, rotated and shifted tangentially to the chamber part. This allows you to install a Swedish stove in any room and several rooms can be heated at once.
Under the Swedish oven, it is imperative to construct a foundation. This is due to the fact that in a narrow and low structure at different heights, the heat stresses are not the same and the furnace can be unstable. An experienced specialist will help you fold such an oven correctly and safely.
How to install doors
Scheme of laying the stove in rows.
Near the frames of the doors, the masonry is carried out with special care. The masonry and the frame must always have a gap between them in height and width of up to 5 mm. This is a necessary point, because when heated, the frame expands, and when cooled, it shrinks again. With a tight adjoining of the masonry to the frame, the bricks gradually move apart and the masonry subsequently collapses. The frame is separated from the masonry with asbestos tape coated with clay mortar. If you leave only the solution, then it will quickly crumble.
The door frame is fixed directly to the masonry with handles in four places. For this, lobes, twisted wires are used, there are 4 of them. To optimally fix the earlobes, holes are needed in the framework
It is important that the ends of the lobes are deeply and securely embedded in the seams. To do this, nails without hats are tied to them, their length is approximately 120 mm
Thanks to such nails, the knitting is firmly pinched in the seams. Instead of wire, paws made of strip iron are used; when they are pinched in the seams, the fastening is more reliable compared to wire lobes.
Do not use the door frame as a support for laying bricks.
It is better to use an additional cast-iron or steel strip for this purpose, you can make a jumper. According to experts, it is still better to prefer a jumper. If the furnace holes have a width not exceeding 35 cm, they can be covered with a tile, the length of the tile is 40 cm or more. The tile is prepared in advance, the edges are sawn off, put up with the glazed side.
Rules for the direct laying of a brick oven
The structure of the furnace also begins with the construction of a foundation for it. And you can read about this in the article "How to make the foundation for the furnace correctly".
- We make the foundation with one slab of reinforced concrete. When the foundation is on trenches, a strip foundation is used using rubble stone. The foundation must exceed the dimensions of the body by at least 5 cm.three layers of roofing material are laid on top as insulation. After 5 mm of asbestos and then roofing sheet metal. On it we lay a sheet of felt moistened in a thin composition for masonry. Wait for the felt to dry before starting work. A separate foundation is needed for almost all brick structures due to the rather heavy weight. If you have a floor on logs, you must first strengthen it with jumpers. When there is a monolithic foundation under the house, you can simply put a litter and start laying it out.
- The laying of the furnace itself from the outside is carried out with the help of red brick on a cement-sand mixture (clay is undesirable for a number of reasons). This is how the underfloor part of the structure is obtained. The fire or furnace part is made of ceramic bricks, alternating with fireclay bricks.
- In front of the door that shuts the blower, and in the floor area, a metal sheet for the roof is placed on a 5 mm asbestos pillow. One of its edges from the root side is laid from above into the nearest seam between the bricks. The sheet should protrude by 0.3 m, and in the sides - by 0.15 m or more. The protruding edges are bent and nailed to the floor.
- In a gas convector, the channel transitions in the lower area should be ½ larger than the upper ones. (For reference: the overflows are the lower channels, the passes are the upper ones). What for? To facilitate the removal of accumulated soot below. For the same purpose, the edges of the upper channels are rounded off.
- At a temperature in the chimney of not more than 800, the furnace is constructed from ordinary brick with a cement-sand mixture. The chimney, if necessary, is divided with basalt cardboard or asbestos at least 5 cm thick, which is determined by fire safety.
- The fluff serves as a barrier to the wind, which performs an aerodynamic role and helps to avoid smoke from the stove. Its height should be 2 rows of bricks. The protrusion behind the chimney is half a brick.