Installing the pump is easy
In many regions, tap water is unfortunately not potable, and bottled water is indispensable. If the cooler takes up a lot of space or is not feasible for the family budget, then a pump that simply installs on a 19-liter bottle is a good alternative. Even children can use this water pump.
How to assemble a bottled water pump
The pump comes standard with:
- the main pumping element (if it is disassembled, then inside there will be a corrugated chamber with a spring, due to the compression and unclenching of which water is taken)
- water intake pipes (usually three)
- spout
- protective cap
- tube cleaning brushes
Depending on the manufacturer, the completeness of the product may vary.
The instruction on how to assemble the pump is quite simple, there are just a few steps:
- As a rule, there should be gloves in the box, all procedures must be performed with them.
- The first thing to do is install the water spout into the pump until it clicks.
- Then we collect the tubes, which consist of three sections. They are composite, so there shouldn't be any problems.
- Next, insert the resulting pipe into the base of the pump with the narrow end. It is preliminary recommended to lower the end of the tube into boiling water, this will allow hermetically connecting the tube and the pump.
Everything. The pump is ready to go.
How to install a pump on a water bottle. Recommendations for use
Nothing complicated here either. The bottle is released from the thermal cap and cork. The assembled mechanism must be placed on the neck, pressed with force until you hear a characteristic click and fixed with a nut (it is already on the base of the pump).
Please note that the tube should lightly touch the bottom of the bottle, if the tube is shorter, it will be problematic to pump out all the water. https://www.youtube.com/embed/udQcwnbuIT0
The peculiarity of the pump is that when you start pumping, the water “thinks” for some time, and only after a few clicks it starts to go through the faucet. At the end of the process, the same thing happens, but in the reverse order: that is, you need to stop pumping a little in advance, otherwise the water will overflow over the edge of the dish. This is not a critical feature, which will not be difficult to get used to.
The only downside is that you need to pump it up manually (it’s not very convenient with a saucepan or kettle). And the pump gives out a strictly defined portion of water, that is, half a glass cannot be poured.
Sanitizing your pump at home
Wash your hands before changing the pump. The dishes should not touch the pump spout, and even more so, you should not drink water directly from the spout.
With each change of the bottle, all parts of the pump must be washed with running water and dried. If this is not done, then microbes can easily multiply in a humid environment, as evidenced by a slimy yellowish coating.
Once every 2-3 months, carry out a complete sanitization of the pump (this also applies to the cooler) according to the instructions:
- Disassemble the pump by disconnecting the tubes and spout.
- Rinse in 40-degree water using dish detergent, then soak all parts in a disinfectant solution (250 g of citric acid per 2 liters of water) for half an hour.
Citric acid will help to cope with plaque, if it has managed to form.
To install a bottle of water, you need to choose a shady place with a temperature not exceeding 20 ° C (the sun's rays should not fall on the water).
A mechanical water pump is one of the most popular and affordable ways to dispense bottled water. There are mostly positive reviews online.
In order not to be disappointed in the purchase, special attention should be paid to the plastic of the mechanism, it must be made of high-quality durable odorless plastic
How to make a water manicure at home
The originality of painted nails has always attracted attention. The uniqueness of the pattern on the nails will certainly highlight the owner, creating an impression of elegance and sophistication.
Water manicure or nail painting with water will always be in fashion, as it is ideal for special occasions and for everyday manicure. Read on to learn how to do a water manicure at home.
Water manicure - a brief history
The art of water nail art originated in Japan and within a few years became one of the manicure manias in this region and even other countries, continuing to gain more and more fans and create new obsessions in the art of manicure.
Then, in a short time, water manicure gets on the covers of magazines, in advertisements, posters, even in movies, quickly spreading around the world, becoming a very popular type of manicure, even its fan clubs have been created.
There are two ways to create a water manicure: drip, where models are created by dripping nail polish, or stretching, where a model is created with a tool.
With the drip method of painting nails, the pattern varies from colored varnish stains, to complex shapes and patterns, such as spirals and geometric patterns, and when stretched, you can get simple round shapes, as well as patterns such as balls, hearts, animals, leaves, cobwebs, etc. .d.
How to make a water manicure at home
Water manicure does not require the use of a large number of tools: you need a container that you will fill with cold water (room temperature), nail polishes of the desired colors that you want to combine, and in order for them to stretch more efficiently, they must be more liquid, from a set of brushes for nails, a needle is needed, or in its absence, you can use a few sticks of toothpicks, a little adhesive tape or adhesive tape.
You also need nail polish to be used as a base and clear polish, a few cotton pads and, of course, nail polish remover.
The procedure or sequence of steps to follow to get a water manicure is as follows:
1. Start with the application of the main varnish, preference is given to white. After it dries, you need to wrap the skin around the nail with tape. This is necessary so that when the nail is immersed in water, it does not stain the rest of the surface of the finger with nail polish.
2. Having prepared the nail in this way, you can start playing with colors
Let's drop a little varnish on the surface of the water in the container, but this must be done carefully, because if you drop the varnish from too far, its inertia will be enough for it to sink into the water, and the idea is that it will remain and disperse on the surface of the water
You can drop the desired amount of varnish, but there should not be two successive drops of varnish of the same color. Here you can use your imagination by combining the desired colors. You can even try a combination of black and white.
3. Now you need to use a needle or toothpick sticks to draw a pattern and to mix colors on the surface of the water. Draw lines, circles or any other trajectory more or less complex. After this operation, the tool must be wiped with nail polish remover, as it will be needed later.
4. Next, you need to apply on the nail what happened on the surface of the water. We need to dip the nail in water, keeping it parallel to the surface of the water, and remove excess varnish around the finger with a needle or toothpick.
Now you can pull the nail out of the water, remove the adhesive tape and it remains only to admire the result. The procedure must be repeated for each nail, wait until everything dries and apply the last coat of colorless varnish.
1 Device design
The device of the vibration pump baby is quite simple. It consists of three main parts:
- frame;
- electromagnet;
- anchor vibrator.
The body of the device is made of metal alloys and consists of two halves. The lower part is cylindrical. The top is made in the form of a cone.
The electromagnet of the device consists of a U-shaped metal core, on which several layers of electrically conductive winding are placed. The winding is fixed on the core with a compound (plastic resin). The same material secures the magnet inside the body of the device, isolating the coil from the metal components of the device. The composition of the compound also includes quartz-containing sand, which removes heat from the magnet, preventing it from overheating.
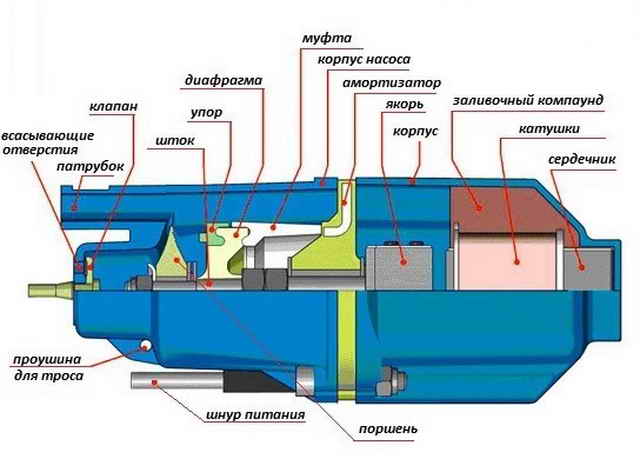
Vibration pump device Kid
1.1 How it works
Proper repair of a vibration pump is not possible without a clear understanding of how the device works. The principle of operation of the pumps, the kid refers them to the inertial type of devices.
Submersible type devices are switched on only after complete immersion in the working environment. The whole algorithm of the device has the following form:
- The pump is connected to the electrical network.
- After connecting, an electromagnet begins to act, which attracts the anchor. The magnet works intermittently, with a frequency of up to 50 inclusions per second. When it is turned off, the anchor returns under the force of the spring.
- When the armature is retracted by the spring, it also retracts the piston attached to it. As a result, a space is formed into which water saturated with air enters. This composition of the liquid provides greater elasticity, and hence susceptibility to vibrations.
- Under the action of the vibrator, the water begins to move. And subsequent portions of liquid from the inlet rubber valve put pressure on the previous liquid, directing the flow exclusively in the direction of the outlet pipe.
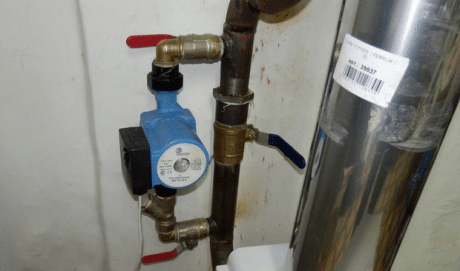
The device and principle of operation of the circulation pump
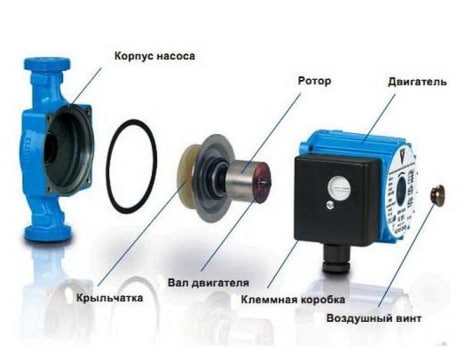
The device of pumps for a water heating system is not particularly difficult. The main functional elements are:
- Product body. Usually made of cast iron or brass, bronze (less often).
- Electric motor.
- The impeller is an impeller with blades. One of the most durable parts, as it experiences heavy loads. Reinforced polymeric materials are used for their manufacture.
- Rotor shaft on which the impeller is fixed. The shaft itself has a bearing mount.
- Terminal box. An electrical cable is connected to it.
- Air propeller. Through it, air is removed from the working chamber.
Circulation pump device
A device in which the rotor is separated from the stator and works directly in a liquid medium is called a "wet" pump. It is these products that are installed in private homes. They work almost silently, crash directly into the water supply, are compact, easily disassembled and repaired independently. At the same time, their average efficiency is 50-55%. This is quite enough for the house.
How does a circulation pump work? When it is connected to the mains, the shaft with the impeller starts to move. As a result of its rotation, a rarefaction (draft) occurs in the suction pipe, which ensures a constant flow of fluid into this zone. Due to centrifugal force, water is injected to the outlet pipeline.
Note! The liquid passing through the working chamber naturally cools the device, so no additional measures are required to remove excess heat.
Pump in the heating system
Common breakdowns and how to fix them
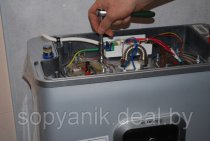
It is possible to identify the main "symptoms" of the incorrect operation of the device and the "treatment" suitable for each of them. It is impossible to do without knowledge of the pump device.
Heating circulation pump makes noise or vibrates
There may be several reasons for this:
- The device has been idle for a long time. In this case, you will need to disassemble it and forcibly turn the rotor.
- Something is blocking the rotation of the impeller. The pump is disassembled and the foreign object is removed. To prevent such a breakdown in the future, a strainer can be installed in the supply pipe.
- Illiterate installation of the device. Qualified specialists can correct the situation.
- Air has entered the body of the product. This situation is relevant for the beginning of the heating season. Air is vented through special screw plugs. Some models have an automatic air vent. If not, you can install it yourself.
- Bearing wear. In this case, vibrations and a characteristic hum take place. Changing the bearing is easy. It is necessary to disassemble the device, remove the old bearing and replace it with a new one.
Bleeding air through the propeller
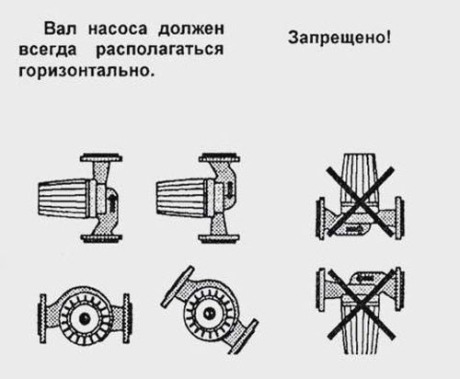
Correct installation of the device
The pump does not turn on or turns off immediately after starting work
In cases where the device refuses to work initially, the problem most often lies in the power supply. You need to check the integrity of the cable, the quality and correctness of the wire connection, the voltage at the terminals.
With a high degree of probability, the pump may not turn on due to a blown fuse. The reason for its failure is strong or frequent voltage drops. The problem is solved by replacing the fuse, which is not difficult. But the combustion of the drive winding is a direct road to specialists or even to a store for a new device.
If the pump turns on without problems, but after a few minutes it stubbornly turns off, it is recommended to check the wiring. Incorrect phase connection or poor contact could cause this problem.
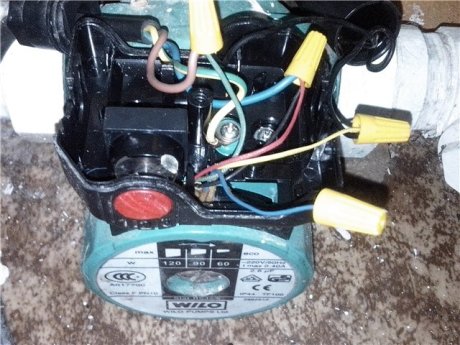
Wires for powering the device from the mains
Change in water pressure (water heating system)
The circulation of water in the pump is determined by its design features and performance characteristics
During the operation of the device, be sure to pay attention to the pressure of the coolant in the pipes. It must correspond to the value indicated in the pump passport.
Undesirable pressure changes may occur due to a violation of the integrity of the product body. Carefully inspect for leaks the joints of the pipes and the pump, the places where the bolts are attached. Evaluate the quality of the lubricant on the threaded flanges. Airing the coolant will also lead to a drop in its pressure.
Incorrectly connected phases will cause the impeller to rotate in the wrong direction, which will adversely affect the operation of the pump. Another reason for a decrease in water pressure can be a severe clogging of the filter, which must be thoroughly cleaned or replaced.
Disassembled device
Thus, minimal knowledge of physics, the device of the circulation pump and the principle of its operation will allow you to independently detect a malfunction, and in some cases, eliminate it. However, in some situations, specialists are indispensable. You can’t do without them even when the technical information doesn’t want to fit in your head (it’s not for everyone, you need to understand this).
The main thing is to understand in time that something is wrong with the device and clearly formulate the problem. In this case, you will achieve a timely and most effective solution to it. And your house will be filled with warmth again!
How to dismantle and disassemble the circulation pump
To detect malfunctions in the product, it must be dismantled and disassembled. Dismantling is carried out as follows:
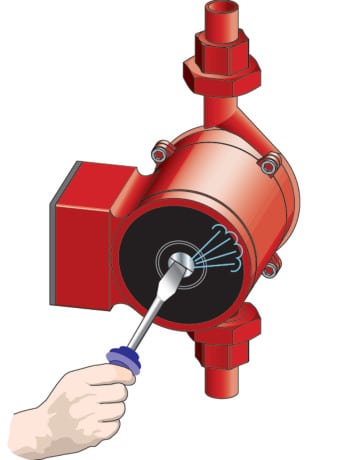
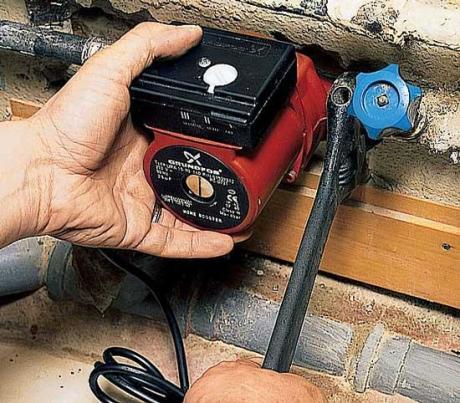
- The pump is disconnected from the mains.To disconnect the cable from the terminal box, you must remove the housing from the power supply unit of the device. At this stage, you can also make sure that the supply voltage is normal. To do this, just look at the indicator of the device - it should glow.
- The water supply is shut off (side screws), its remains in the system are drained.
- The pump itself is removed with a hex screwdriver. If the bolts become stuck during operation, moisten them with WD After 15-20 minutes, try again.
Dismantling the circulation pump
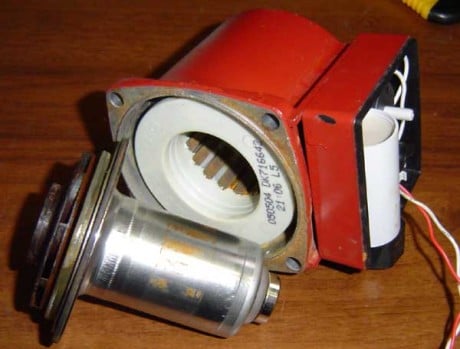
How to disassemble the circulation pump? There are no difficulties here either. It consists of separate parts (modules), which are assembled into a single whole with the help of screw fasteners. You can get the problem module and replace it, if possible. However, in some cases it is more expedient to purchase a new device.
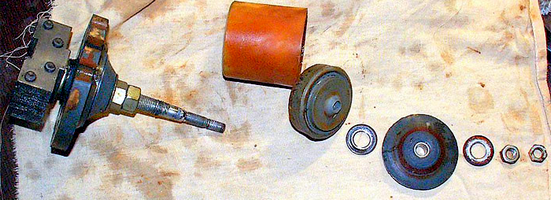
Individual device modules
3 Troubleshooting the most common problems
The most obvious sign of a breakdown of a vibration electric pump is the lack of water pumping when the device's engine is running. There may be several reasons for this phenomenon.
The first of these is the loosening of the nuts on the vibrator rod. The anchor is constantly oscillating, from which the nuts are gradually untwisted, which leads to a change in the position of the part. As a result, the water stops pumping. The pump is running idle. In this case, the pump is protected from dry running by disassembling and tightening the nuts at the base of the stem. The top nut must be fixed with a second regular or grub nut.
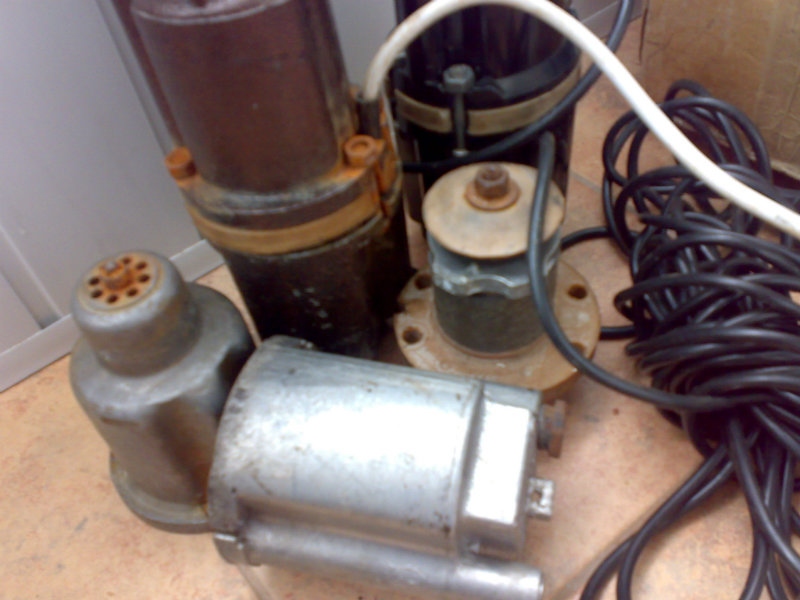
A good help in repair is a donor pump of the same brand
The second reason for the idling of the device is a malfunction of the valves. This problem is typical for the operation of the apparatus in liquids with a high amount of abrasive substances. They damage the valve material and lead to its rapid wear. In this case, it is also necessary to disassemble the device and, if necessary, change the valves to new ones. It will not be superfluous at the same time to check the condition of the armature rod. This part is very sensitive to damage, and in the event of a malfunction, it is practically impossible to replace.
3.1 Replacing the camping
The coil inside the device is insulated from the aluminum surface of the body with a special compound - a compound. It is also responsible for fixing the magnet and protecting it from the magnet. But with prolonged use of the device in idle mode, its body expands from temperature and the compound can peel off, which leads to insulation failure.
Disassembly of the inside of the pump Kid
When repairing the pump, the baby in this case is replaced with a sealant or liquid glass. The whole process goes through the following steps:
- Disassembly of the device by the method described above.
- Search for a place of detachment. It is carried out using a small hammer or a metal bolt. By tapping on the body, it is necessary to note the places where the sound is more booming. These are the voids where the campound moved away from the walls.
- All components of the device are removed and washed, taking the opportunity. It is necessary to remove all dirt, plaque and layers.
- After that, grooves are made on the surface of the magnet assembly and on the inner plane of the body with a grinder or other tool. They can be done randomly.
- Further, both surfaces are degreased, and a sealant or liquid glass is applied to them.
- The assembly is inserted into the cylindrical body and pressed down for the drying time of the sealant.
- After all joints are tacked, the pump is assembled back.
3.3 Using a second pump
In the event of a breakdown of the main components, the components of the device can be taken from the second (donor) pump. In this case, it is possible to make one working device out of two broken devices.
At the same time, it is important to choose the right model in order to select the components as accurately as possible.
In addition, in the "Kid-M" model, the suction valves are located on the top cover, which distinguishes them from the standard "Kid" version. And the “Kid-Z” variant is designed for narrow wells and its cover will not fit other models in terms of its dimensions.
As donor mechanisms, an electromagnet coil, valves, the top cover of the device, and a piston are used. If the armature rod is damaged, it cannot be removed from the body without special equipment. In this case, the entire vibrator assembly can be replaced.