The technology of warming the foundations of the bath
The method of insulation of the foundation depends on the structure of the soil and the very design of the foundation. For a bath, most often, tape, columnar or slab foundations are built.
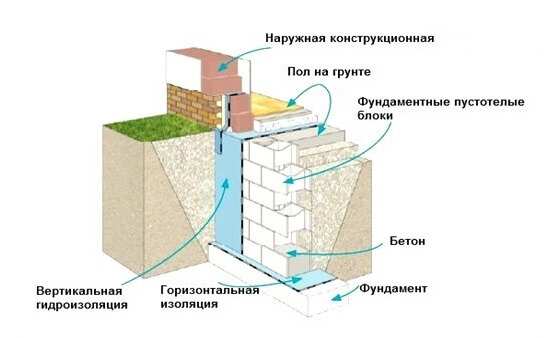
Insulation of strip foundations
 Insulation of the foundation and adjacent soils has two main goals:
- heaving soils - to move away from the foundations the process of freezing of the soils adjacent to it and to minimize the depth of their freezing in winter;
- non-rocky soils - reduction of heat losses occurring directly through the foundation.
Traditional ways to reduce the effect of frost heaving consist of making a 10 cm thick sand preparation under the base of the foundation and backfilling around the perimeter of the foundation with non-rocky soil.
But it is practically possible to completely eliminate the occurrence of frost heaving, only by eliminating the very cause of soil freezing by insulating the foundation along its entire perimeter.
These works are performed in the following sequence:
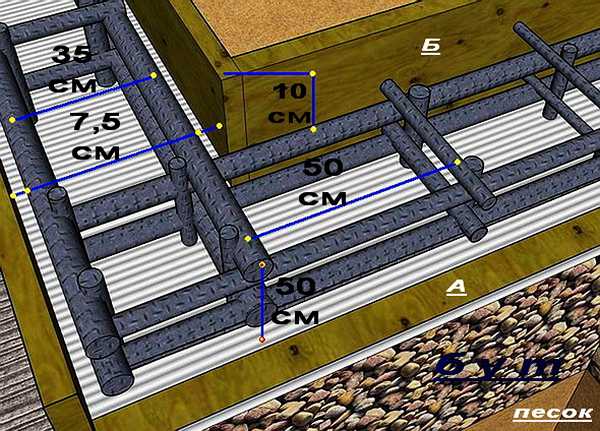
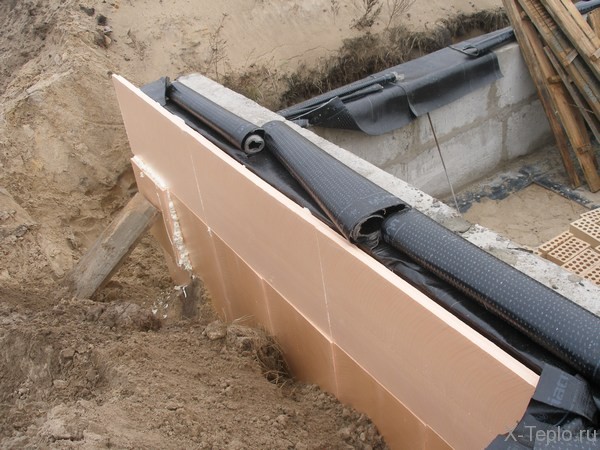
- A trench is cut off around the entire perimeter of the bath, the depth of which is 0.5 m, and the width should be equal to the depth of regional seasonal freezing, which can be found for your particular area in building regulations or reference books or on building Internet sites. For example, this value is 1.4 m for the Moscow region.
- Coarse-grained sand is laid at the bottom of the trench with a layer of 20 cm, carefully compacted with pouring it with water.
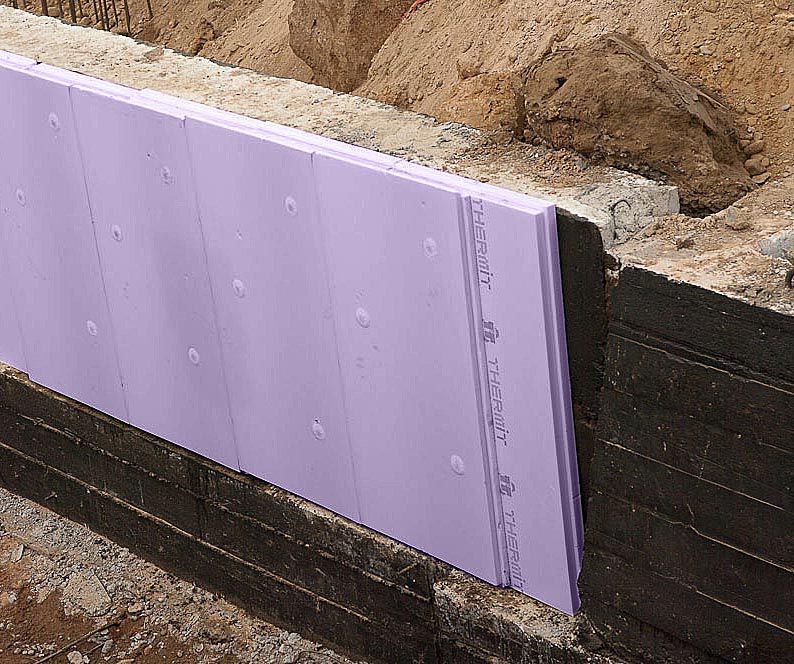
- Insulation is laid on the sand, with careful sealing of the seams with metallized tape. The slabs should have a slight slope away from the foundation. The thickness of the plates is calculated using a special formula. For extruded polystyrene, there are tables that make it easy to determine the required thickness. Such tables are available in reference building literature and on the Internet.
Since heat losses in the zone of outer corners are greater than in flat areas, in these places, at a distance of 150 cm from the corners, it is necessary to lay a heater 1.5 times thicker than in areas along the walls.
- Over the entire surface of the underground part of the foundation and the plinth, extruded polystyrene plates with a thickness of at least 100 mm are attached. The insulation is fastened with the help of special types of mastics and dowels with umbrella-type screws (with a wide cap). In the underground part of the foundation, there is no need for careful fastening, since this area will subsequently be covered with sand. On the plinth, the insulation plates are fixed with a consumption of approximately 5 - 8 dowels for each plate. The thermal insulation of the basement is protected by basement siding, porcelain stoneware tiles or cement plaster on a grid of rowan grouse.
- A layer of sand of 30 cm is laid on the insulation with careful tamping.
- On top of the sand, along the perimeter of the bath, a concrete or asphalt pavement is made.
Such insulation effectively eliminates the freezing of soils around the foundation, preventing the occurrence of frost heaving, and reliably provides a significant reduction in heat losses.
If there are any problems with the performance of insulation from the outside, insulation is performed from the inside. The fastening of heat insulators from the inside of the foundation is carried out in the same way as described above for external insulation.
Warming of the slab foundation
 If the bath is being built on weak subsidence or silty soils, then the best solution is a slab foundation.
Thermal insulation boards are laid directly on the waterproofing layer. The protection of insulation slabs from the liquid components of the concrete mixture depends on the method of reinforcing the reinforced concrete monolithic slab.
If reinforcement is carried out by knitting reinforcing bars, then it is enough to use a polyethylene film more than 200 microns thick laid on top of the insulation.
When reinforcing using welding, it is necessary on top of the film, which is laid with an overlap of 15 cm, a protective screed made of lean concrete or cement mortar. The seams of the film must be sealed with double-sided tape.
As a heater, it is most effective and rational to use extruded polystyrene foam. The use of other types of insulation will cost much more with less effective effect.
Features of insulation technology
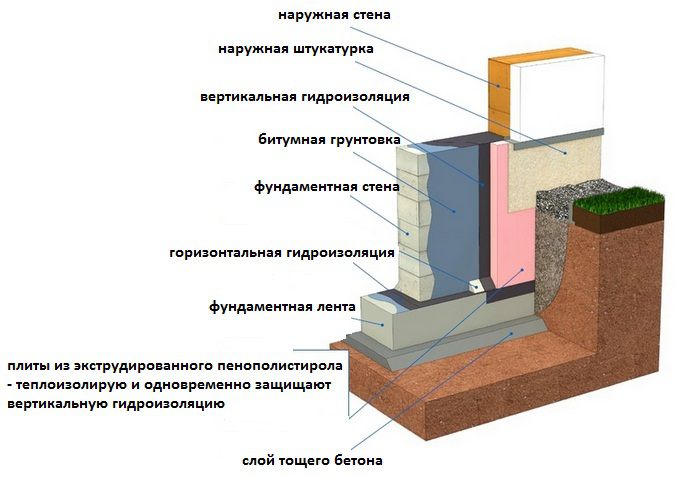
The foundation is insulated to a certain depth, the value of which is usually equal to the level of soil freezing in the coldest period of the year. A place for a heat insulator is prepared in advance, already at the stage of building the foundation itself. At the same time, the formwork - the frame, which is subsequently poured with the foundation, is made wider by the thickness of the polystyrene foam layer. After pouring the foundation and removing the formwork, the heat insulator is attached from the outside to the concrete or cement base of the building, and the area protruding above ground level is finished with a finishing material directly on the surface of the insulation.
Usually, before laying the insulator on the foundation, a layer of waterproofing is fixed - a polyethylene or foil film that protects the base of the building from the damaging effects of external moisture. This layer also serves as additional thermal insulation and protection of the foundation from mechanical damage. All seams between sheets of expanded polystyrene and waterproofing are sealed with metallized adhesive tape. This problem can also be solved by laying the insulation overlapping or in two layers, while the second layer overlaps all the seams and joints of the previous one.
Expanded clay insulation can be used to seal areas around pipes or cables. In addition, recently, thise insulation of the foundation, carried out by combining several materials, has gained particular popularity. A feature of this modern method is the installation of the base of the building on pillars with a conical extension at the base. This significantly increases the stability of the structure, while a ventilated space remains under the foundation, which can just be covered with expanded clay. And the rest of the thermal insulation is carried out according to the same rules.
The foundation of any structure is the basis for its strength and durability. For a bath, in addition to its main purpose, the foundation also retains the heat that is created inside the room. Quite common is the erroneous opinion that it makes no sense to insulate the foundation of a bathhouse due to the economic inexpediency of these works. Since staying in the bath is of a periodic nature, it is easier to heat it well once or twice a week, even if you spend more firewood on it, than to carry out expensive and very time-consuming work related to the insulation of the foundation. But the possible premature destruction of the uninsulated foundation, and then the walls, will soon show the inconsistency of such reasoning. How to insulate the foundation of the bath will be described in this article.
Materials for the installation of an insulated foundation
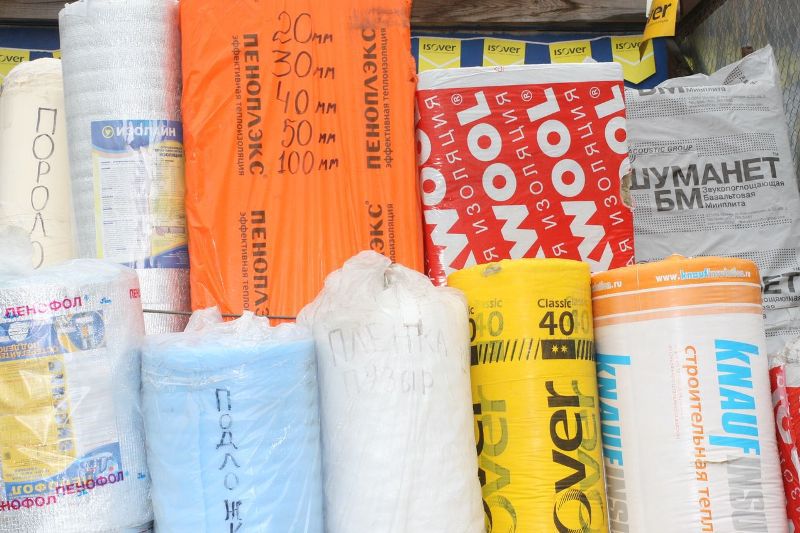
To perform the insulation of the foundation of the bath, various heat insulators can be used:
- insulation based on expanded polystyrene;
- mineral and glass wool in the form of plates and mats;
- bulk insulation - expanded clay, slag, sawdust and so on.
The main requirements for heat-insulating building materials when performing foundation insulation work are the ability not to absorb water and not shrink after backfilling with soil.
Mineral wool and heat-insulating materials based on it are more susceptible to moisture, and in the conditions of the mandatory presence of high temperatures in the bath, very unpleasant odors may occur after a while. In addition, mineral wool boards are subject to compressibility under the action of soil pressure.
Various bulk heaters, due to their rather high thermal conductivity and low resistance to water, mainly serve as an addition to the main thermal insulation.
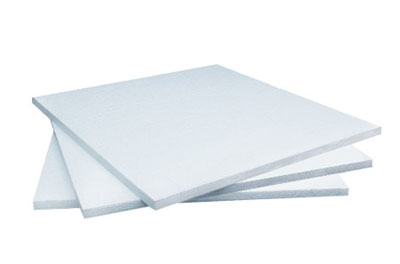
A good solution is to use sheet foam, which has a low thermal conductivity and does not absorb moisture. But the durability of foam plastic is much less than that of the foundation material, which limits its use as a heater for foundations.
Foamed glass is more durable than polystyrene and has comparable thermal conductivity, but it is much more expensive.
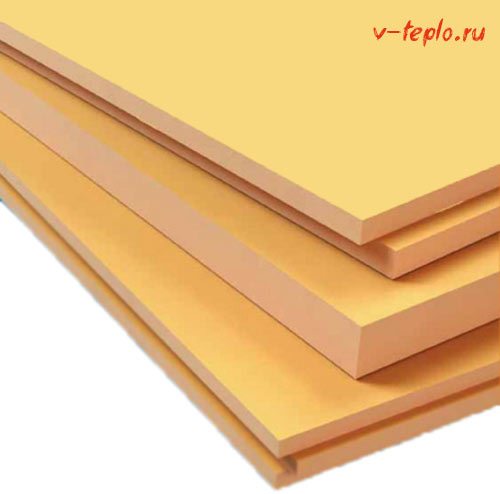
The best insulation for foundations is undoubtedly extruded polystyrene foam, which is several times cheaper than foam glass.
This is due to the following advantages:
- High rates of strength;
- Low thermal conductivity;
- Not exposed to rodents, birds and insects;
- High resistance to various chemical and physical aggressive agents, low and high temperatures and moisture;
- Very high fire resistance;
- Increased elasticity, which allows the use of extruded polystyrene foam for insulation of foundations of any size and shape;
- Increased, more than forty years, service life;
- This is an environmentally friendly material, when it is used, no harmful substances are released.
Recently, it has become very popular to insulate the outer surface of foundations with sprayed polyurethane foam.
Spraying ensures the absence of butt joints and uniform distribution of the heat insulator. Low thermal conductivity provides a high degree of thermal insulation with a polyurethane foam layer thickness of already 50 mm. The insulation is absolutely not afraid of exposure to moisture and other aggressive environments.
The widespread use of this progressive modern method of thermal insulation is hindered by its high cost, which is due to the need to use special equipment for spraying. In addition, it is very problematic to perform thermal insulation with sprayed polyurethane foam on your own, which means it becomes necessary to resort to the services of expensive specialists.
Formwork reinforcement
After hardening, concrete becomes absolutely inelastic, so that it can withstand the effects of various natural factors well, it is necessary to give it additional rigidity and strength with the help of reinforcement - steel rods connected according to certain rules.
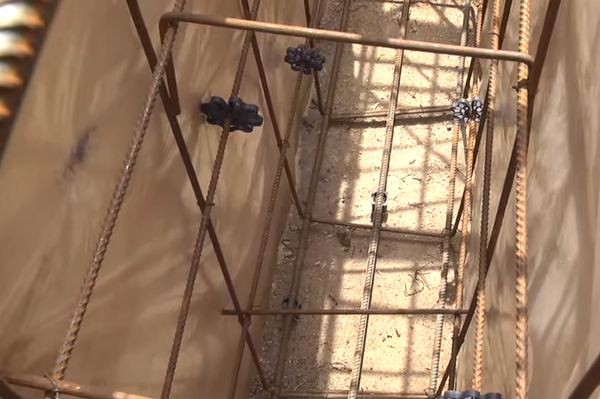
Approximate layout of reinforcement
It is more convenient to install the reinforcement after the formwork has been assembled. To do this, pieces of reinforcement are driven into the bottom of the trench in two rows. They should be 5 cm from the formwork panels, and their height, after they are driven in, should be 5 cm less than the height of the foundation. Then horizontal bars of reinforcement are placed on the bottom. They are tied with wire to vertical supports at a height of 7-10 cm from the bottom of the trench (to make it more convenient, you can put bricks under the reinforcement - this will be the desired height). The upper reinforcement belt should be deepened into the future foundation by 6-8 cm.
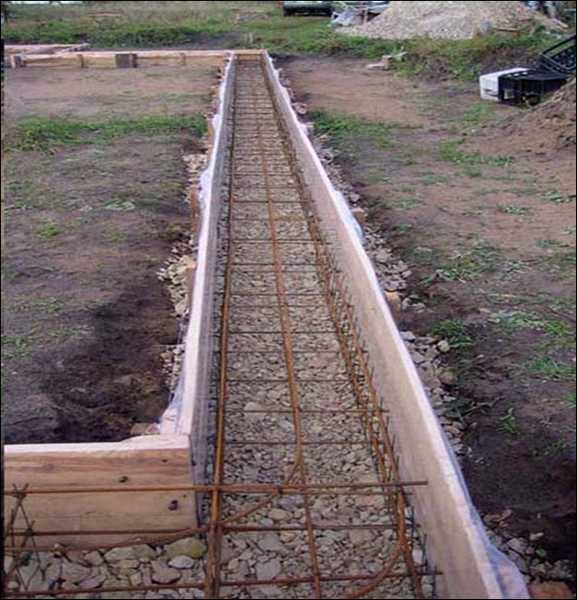
This is what foundation reinforcement looks like
After the reinforcement is completed, it remains only to provide technological openings for the supply / drainage of water, light and ventilation. To do this, you need to cut off a piece of plastic pipe, attach it to the reinforcement strapping in the right place. To prevent the pipe from becoming clogged with concrete, it can be covered with sand.
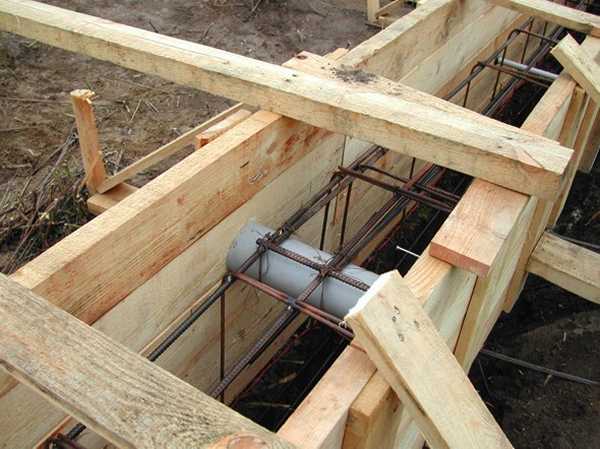
After installing the reinforcement, it is necessary to provide technological holes
Why insulate the base of the bath
An uninsulated foundation has direct contact with the soil. The operation of the bath leads to the formation of wet condensate on the lower surface of the floor adjacent to the foundation. Moreover, the outer side of the floor is a cold surface in contact with the air surrounding the bath. You can easily understand that moisture will constantly accumulate from the underside of the floor and gradually undermine the base of the bath, forming dampness, rot and mold.
With the onset of cold weather, another problem joins. The moistened lower surface of the bath and the foundation itself are a source of dampness on the soil. In the process of freezing, the moist layers of the soil form the so-called "buoyancy forces" - after all, it is known that the liquid expands when it freezes. And this, in turn, causes deformation of the base of the building, its skew. It is not difficult to guess that such a foundation collapses very quickly under the simultaneous influence of soil swelling and dampness, mold and fungi from the inside.
When the owners insulate the foundation only from the inside, the outer surface of the building is practically given free rein to the frosty air. The non-insulated side is even more exposed to the effect of swollen soil, freezes even more, which means it collapses faster
Therefore, it is very important to insulate the foundation, first of all, from the outside, and only then from the inside.
How to insulate the foundation
Based on the foregoing, insulation should be carried out from the outside of the foundation. To solve this problem, you can use sheet foam - an excellent material with very low thermal conductivity. It does not absorb moisture, so it breaks down rather slowly.
But not slow enough. The insulation must "live" as long as the object it insulates. The durability of the foam is much inferior to the foundation material.
Foam glass is much more suitable - foam glass, which has thermal conductivity comparable to foam plastic, but much more tenacious. However, it is much more reliable to use extruded polystyrene foam specially created for such purposes.
This material is much lighter than foam, but much stronger.
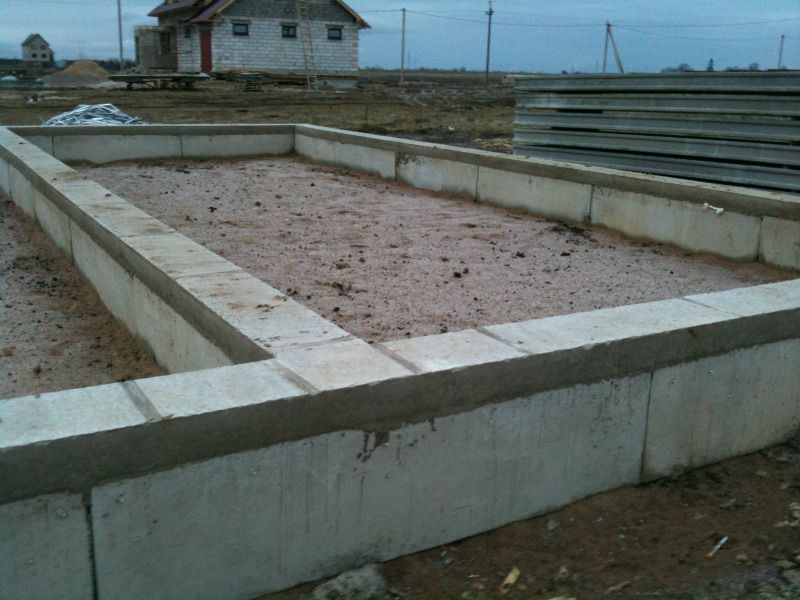
Pouring a strip foundation for a bath
If the load on the foundation is small, winters are not very cold and there is usually little precipitation, M-400 cement can be used for concrete, in other cases, M-500 is taken. If you will pour the foundation in the cold season (temperature below + 5 ° C), you need to add a plasticizer, as well as take measures to insulate the concrete.
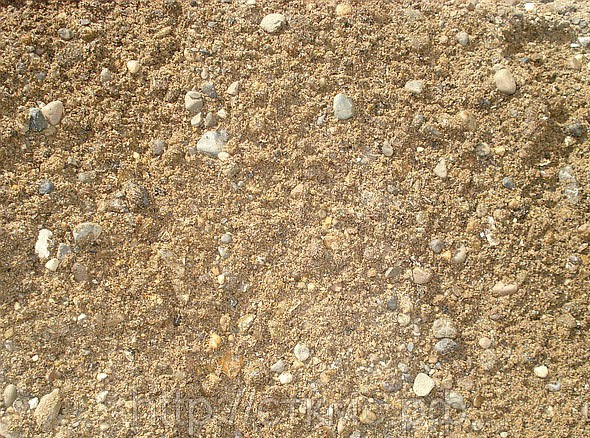
The mortar for pouring the foundation is made of cement, sand and gravel. The proportions are basically the following: 1 * 3 * 5. This means that for 1 part of cement, 3 parts of sand and 5 parts of crushed stone are taken. Crushed stone is used in several fractions, usually medium (60-70%) and fine. To improve the plasticity of the solution, plasticizers are added to it. In private housing construction, liquid glass is used to increase strength, and for better plasticity, the most common is liquid soap (200 ml per batch in a concrete mixer) or dishwashing detergent (the same proportions).
The use of gravmass makes it possible to obtain very durable concrete.
The first version of the mortar guarantees high strength, but it hardens very quickly, which is inconvenient if there is a shortage of working hands (if the concrete has time to seize, and another portion is poured onto it, solidity will be broken, which means strength will decrease). The second version of the concrete mix hardens slowly, but its strength is lower (although it is enough for any bath).
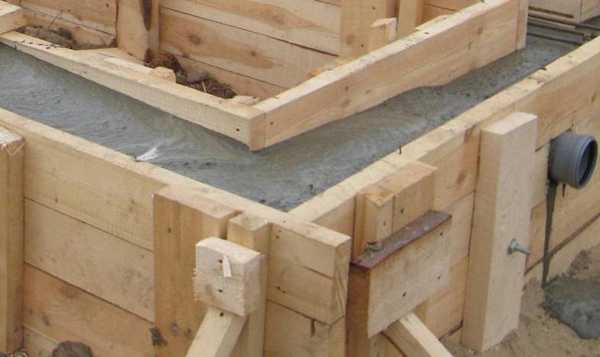
Filling the strip foundation
All components of the concrete solution are mixed in a dry form, then water is added (a ratio of 0.5 to the volume of cement) and everything is mixed well again. The finished solution is poured into the formwork. In order to avoid the formation of "cold bridges", it is advisable to fill the foundation at a time.If this is not possible, concrete layers should not be less than 20 cm.
After all the solution is poured and leveled, it is necessary that air comes out of the solution. To do this, you can pierce the concrete in several places and knock on the formwork, but it is more efficient to use a construction vibrator.
After three days, the formwork can be removed (some advise not to remove the formwork earlier than a week), but at least 3 weeks must pass before the mortar is completely hardened. If the weather is hot, the foundation should be periodically (two or three times a day) watered, if, on the contrary, it is too humid, you need to cover it with roofing paper or plastic wrap. Only after three weeks you can start building walls.
After the foundation has dried out, you need to waterproof it, and then start building walls.
The main reasons for the need to insulate the foundations of the bath
The foundation of the bath must be insulated for the following reasons:
- To prevent the formation of condensate on its inner walls. In the warm season, heated air freely penetrates under the uninsulated foundation from the street. The inner walls of the foundation are rather cold due to contact with wet ground. When a cold wall meets warm air, water condensate begins to form on it. The result - all summer the inner surfaces of the foundation will be constantly wet. Gradually, mold and mucus form on them, which subsequently leads to the destruction of the structure. After two or three years, it may be necessary to overhaul the foundation.
- To maintain a comfortable thermal regime in the bath. According to studies, up to a quarter of all heat losses can occur through an uninsulated foundation.
- To eliminate the effects of frost heaving. In winter, freezing of wet soil layers inside the space under the bathhouse and outside the uninsulated foundation leads to swelling of the soil. The result is the occurrence of cracks and deformations in the body of the foundation and the walls of the bath.
- Protection of waterproofing from various kinds of possible mechanical damage.
The result is greater durability of the foundation waterproofing.
Warming of the foundation of the bath is made from the outside and from the inside
Important: it is strongly not recommended to carry out work on the insulation inside, if the insulation is not done outside. Because in this case, there is an increased freezing of the outer walls of the foundation in winter when the heat formed inside the foundation is protected
Soil heaving begins to occur more intensively, which leads to the fastest destruction of the bath foundation structure. Internal insulation is performed only in the most extreme cases, when it is not possible or very difficult to perform external insulation. Of course, when warming from the inside, there will undoubtedly be a positive effect, but still the freezing of the foundation surface occurs from the outside. If there is a financial possibility, then it is most rational to carry out the insulation of the foundation of the bath both outside and inside.
Features of extruded polystyrene foam
Due to the properties of the feedstock and the closed-cell structure that prevents water from penetrating inside, plates made from extruded polystyrene foam have excellent technical characteristics and a long service life of at least 40 years. This makes it an excellent material for organizing the thermal insulation of the foundation of the bath.
In addition, it has been found that rodents like extruded polystyrene foam less than regular granulated polystyrene foam. They spoil it much less often, even if it is an obstacle to water and food.
For use in the foundations of civil and industrial structures, heat-insulating boards with high compressive strength are used as vertical thermal insulation.In private construction, it can be somewhat less, because the depth of the foundations here is less, respectively, and the pressure of groundwater and soil on the heat-insulating material is much lower.
In personal construction, it is recommended to use boards with a strength of at least 200 kPa, while in structures requiring increased strength properties, for example, when installing load-bearing floors, boards with a compressive strength of at least 500 kPa should be used.
Calculation of the thickness of thermal insulation
The required thickness of the thermal insulation of a structure installed below ground level can be calculated using a special formula. For areas that rise above ground level, there is another formula. But for those who do not want to bother with complex mathematical calculations, tables have been created that indicate the thickness of thermal insulation made of extruded polystyrene foam, recommended for individual regions.
In the range of these materials there are specially created thermal insulation boards equipped with a surface with milled grooves. Such a device allows it, together with a geotextile fabric, to work perfectly as wall drainage. So it successfully performs three functions at the same time: it insulates the foundation, protects the waterproofing from mechanical damage, and removes water from the foundation in the drainage system.
Best Answers
Cat smile:
There are two options: 1) Drain water from all pipes between the ducts. ,
2) Heating with electricity.
It is better to arrange a drain, but if this is a problem, arrange an insulated box for the inlet faucet and parts of the inlet pipe to the faucet, and place a low-power light bulb in the box, its heat is enough not to freeze the faucet. , The rest of the water, inside the bath itself - drain.
VD-23:
asbestos cord or cardboard
Massi:
try filling it with foam
Alexander:
there are many materials. old glass wool, new fiber materials.
yuri morozenkov:
there is a wire. Or more correctly, a thermal cord. it raises the temperature of the water by several degrees. Hit the search engine. I saw him firsthand. but dear bastard
Vasily Zadov:
You can insulate it with anything, BUT, if there is no heat input, and this is either a direct current of water (water from the ground +4 somewhere), or additional heating, you can try a heating cable if you don’t feel sorry for the electricity. But if there is no additional heat input, then at least a meter of insulation will still freeze in a week. If there was a diagram, I would advise in more detail.
Wooden base repair
 Scheme of one of the types of bases for a block bath
Sometimes the foundation for the bath is prepared from a thick beam, concreted directly into the ground, and sometimes a monolithic version is equipped. You need to know some little things before you properly repair the foundation of the bath or build a new foundation for the bath with your own hands:
- For example, a wooden structure made of sleepers or a log house is pulled together from the outside with brackets in the places of their subsidence. How to tighten the frame, how many staples you need, you can calculate. With other foundations a little more difficult. You need to know how much the concrete itself dries, and only then mount the log house or beams. If the bearing blocks burst during installation and their height is small, you can add a reinforcing layer of concrete around the blocks, filling in all the cracks formed in the column.
- Deciding to make the foundation of the bath yourself, you will not only save a lot of money, but also get a good experience. It is not difficult to build a monolithic or any other foundation with your own hands, you only need to go through all the stages of construction in turn and not violate the technology.
- Make the right calculation, markup for construction, excavation, reinforcement, insulation. Do all the necessary waterproofing work. It would not be superfluous to consult with builders (developers) who have been building this type of foundation for a long time and have good experience.
Decide what material to build the foundation from, from a log house, sleepers, what will be the height of the building, how many sleepers or timber are needed. Do you need a monolithic or concrete foundation for a log house, a wooden one from sleepers or a capital one for a building made of foam blocks.
Knowing how to make a foundation for a bath is not all, it is necessary to carry out preliminary calculations, and only then can you start building it with confidence. It is up to you to decide which foundation is better for a bath, but it is better to calculate how much materials you need for this in advance and draw its device. After a simple calculation, you can do everything perfectly, because you won’t need heavy equipment here, except perhaps a concrete mixer with a wooden chute and a drain for concrete.
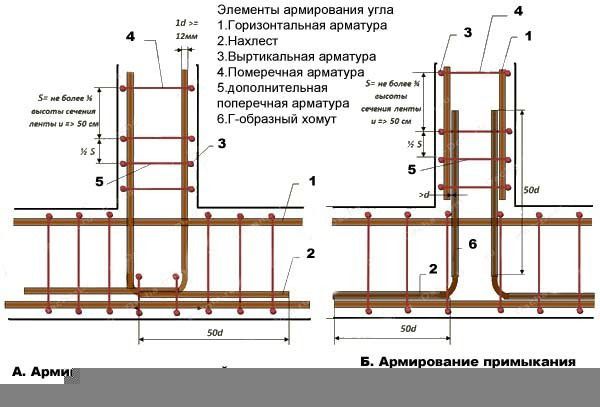
Reinforcement
The armored belt is made of thick reinforcement (>12 mm longitudinal and 6-8 mm transverse, vertical reinforcement). For work, you will need a grinder, a wire for tying an armored belt, a welding machine, and a tape measure.
Reinforcement
The belt consists of longitudinal (four or more), transverse and vertical reinforcements. In this case, the entire structure must be 5 cm away from the formwork, soil and the upper point of the foundation, and be reinforced in the corners of the building. The cross section of the armored belt is a rectangle or square.
The reinforcement is cut to the required length. Longitudinal and transverse rods are laid out on the ground, which are connected with wire at the points of contact. It is not recommended to weld the frame, since the welded frame may lose its integrity during the compaction of the poured concrete or the operation of the built bath.
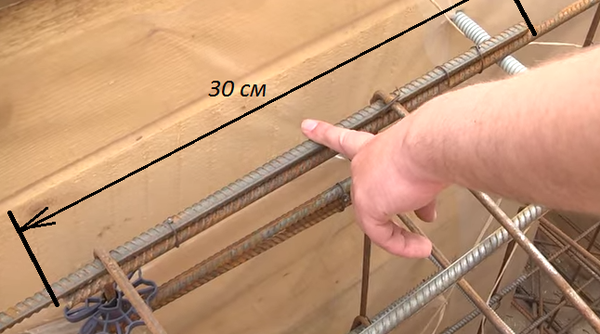
The longitudinal rods are laid out and connected to each other with an overlap of about 30 cm.
Knitting longitudinal rods
The distance between the transverse and vertical bars should not exceed 50 cm. In the event that the strip foundation is up to 120 cm wide, then it makes sense to make the frame not from two, but from three longitudinal reinforcements. With a high foundation height, it is also worth increasing the number of longitudinal bars. Also, the frame is reinforced from above with U-shaped clamps, designed to increase the strength of the structure and reduce the risk of cracking of the tape base.
Clamps
At the corners of the bath, the frame is additionally reinforced with reinforcement located at an angle of 45 degrees relative to the horizontal rods.
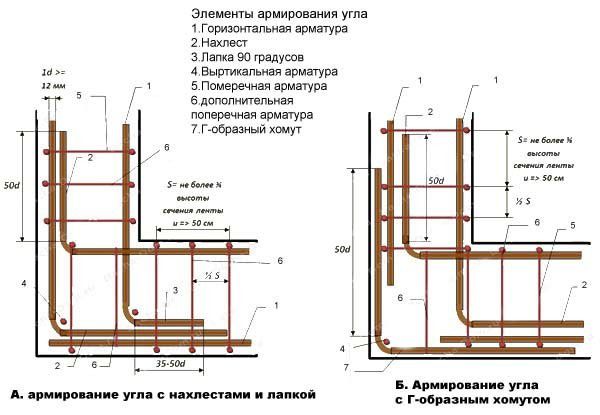
Corner reinforcement
Corner reinforcement
The finished connected frame is installed on plastic supports. To prevent movement during the pouring of concrete, plastic fasteners are inserted between the formwork and reinforcement.
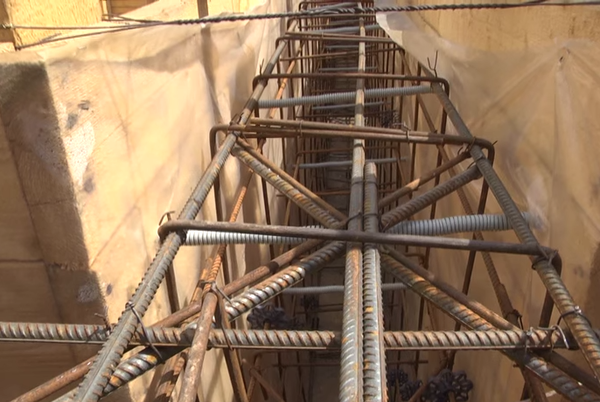
Strip foundation reinforcement
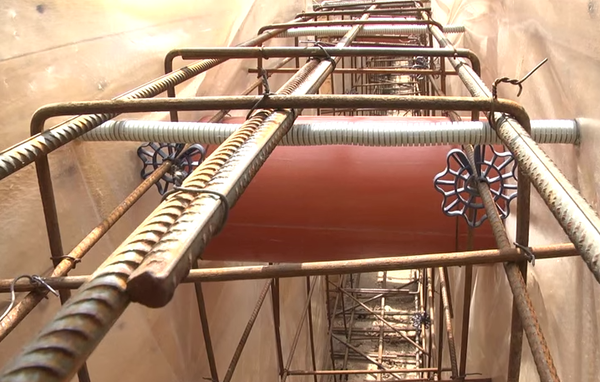
Reinforcing and laying communications
Pouring a strip foundation for a bath
The main rule is solidity, that is, the entire mass of concrete must be poured into the formwork in one day. Therefore, if you do not have a concrete mixer, you should order ready-made concrete M200 or M400 at the factory. Be sure to make sure that the mixer with concrete can drive up to either side of the foundation of your bath.
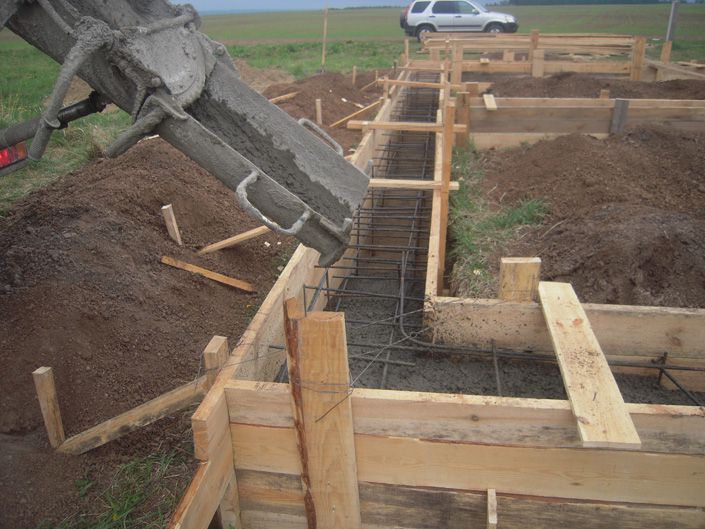
Pouring concrete
You can prepare concrete yourself by mixing dry bulk materials in the following proportions:
- cement M400 or M500 - 1 part;
- sifted sand - 3 parts;
- crushed stone is clean without foreign inclusions - 4 or 5 parts.
Water is added to the dry mix in such an amount that the finished concrete is not too thick and does not spread.
Concrete is laid out in the formwork in layers of 20 cm, leveled with shovels, a trowel and at the same time either pierced with a reinforcement bar or compacted with a vibrodrill. This is necessary to remove existing voids (air bubbles)
For the same purpose, it is important to tap the formwork walls
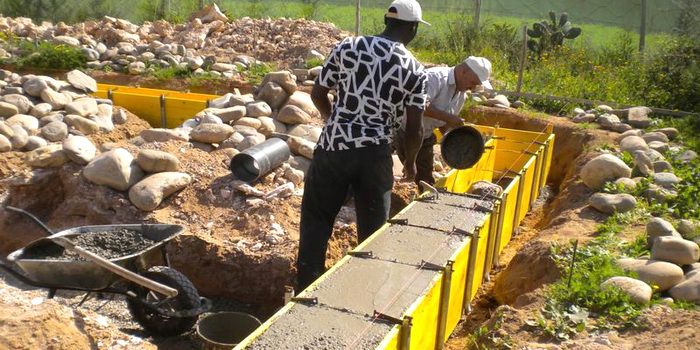
Foundation pouring
The flooded foundation at night and in the rain should be covered with a film, and spilled with water during the day. When the concrete hardens (after 14 days), you can remove the formwork and grind the surface of the foundation, however, further construction is not recommended to start earlier than a month after pouring.
foundation with waterproofing
The finished foundation for the bath must be waterproofed by gluing two layers of roofing material onto the bituminous mastic.
Waterproofing scheme