Detailed instructions for warming a wooden floor, do-it-yourself laying
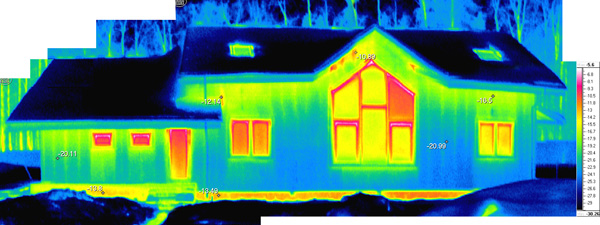
Insulation of a wooden floor will create comfort and reduce heating costs, significantly reducing heat loss. In addition, high-quality insulation of the wooden floor with your own hands will allow you to maintain the desired temperature in the room, get rid of mold and high humidity.
In this article, we will look at how to independently insulate a wooden floor, what floor insulation technologies are, and more. others
Floor insulation technologies
Insulated floor device
Before proceeding with the insulation of a wooden floor from below, decide on the following characteristics, namely:
- With the conditions for using the floor (inside the room - humidity and temperature, load and purpose).
- The height of the insulation layer and the entire structure is possible.
- Choosing the right floor insulation Materials for warming a wooden floor:
Ecowool floor insulation
Mineral wool (slag, stone and glass).
Thermal insulation of the floor with mineral wool Thermal insulation of the floor with foam foam Thermal insulation of the floor with polyurethane foam Thermal insulation of the floor with isolone
In addition, foam, sawdust and expanded clay can also be used. The choice of insulation depends on various indicators and on the individual capabilities and preferences of the owner of the house.
Read more about all thermal insulation materials in the article on our website "Insulation of floors with various materials: the pros and cons of each."
Floor insulation technology consists of several stages:
- Thermal insulation. When designing a layer of thermal insulation, determine its thickness. This thickness of floor insulation depends on climatic conditions, the type of heat-insulating material
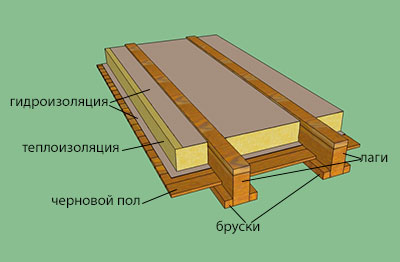
Do-it-yourself wooden floor insulation scheme
Floor insulation along the lags
Usually, for the thermal insulation of a wooden floor, the method of floor insulation along the logs is used. It is quite simple and at the same time very effective, because it eliminates large heat losses. The method is relevant for floors that are close to the ground (ground floors and basements).
Thermal insulation of the floor along the lags
The technology of floor insulation along the lags takes place in this way:
- Pre-install wooden logs with a T-shaped penetration into the log house or on the foundation with a gap of 0.6-1 m.
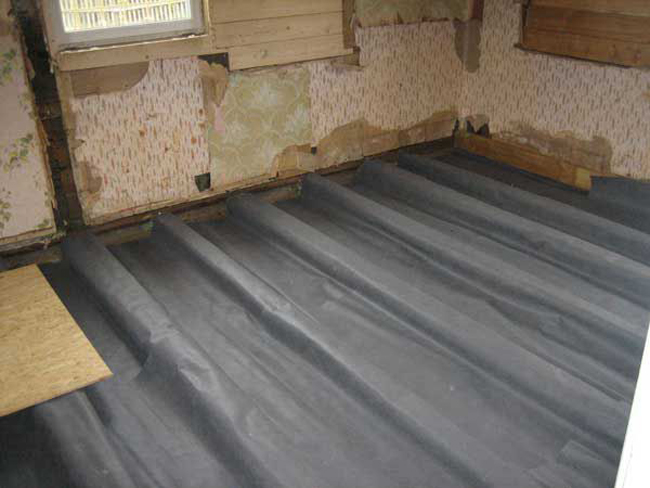
- Sew boards or shields from below or fasten them to cranial bars, on which insulation will be laid in the future.
- Lay insulation on the flooring between the lags.
- Lay hydro and vapor barrier layers. However, this is necessary only in some cases, and, above all, depends on the type of insulation. For example, protection against moisture and vapors is necessary when using ecowool and mineral wool.
What else you should know about beam loads
The ceiling, as a rule, is at the same time the floor of the next floor and the ceiling of the previous one. So, you need to make it so that there is no risk of combining the upper and lower rooms by simply overloading the furniture. Especially such a probability arises when the step between the beams is too large and the lags are abandoned (plank floors are laid directly on the timber laid in the spans). In this case, the distance between the crossbars directly depends on the thickness of the boards, for example, if it is 28 millimeters, then the length of the board should not be more than 50 centimeters. In the presence of lags, the minimum gap between the beams can reach 1 meter.
You should also take into account the mass used for the floor. For example, if mineral wool mats are laid, then a square meter of the basement will weigh from 90 to 120 kilograms, depending on the thickness of the thermal insulation. Sawdust concrete will double the mass of the same section.The use of expanded clay will make the floor even harder, since the load per square meter will be 3 times more than when laying mineral wool. Further, we should not forget about the payload, which for interfloor ceilings is 150 kilograms per square meter minimum. In the attic, it is enough to accept an allowable load of 75 kilograms per square.
Many owners of suburban areas in the construction of houses choose wooden floors. This is due to the fact that wood is an environmentally friendly material that has an aesthetic appeal and natural naturalness. In most cases, the installation of a wooden floor requires a lag - wooden beams laid on the main floor
When installing, it is very important to choose the right distance between the floor lags.
Scheme of laying lags.
Floor slab cake
It will not be so multi-layered, its main task is to reduce the audibility between floors. On the other hand, the ceiling must be strong in order to withstand the weight of interior partitions, engineering equipment and furniture.
The beam structure will be the most convenient. By the way, it can be beaten in the interior of the first floor. In any case, a double floor is needed - rough and finish.
For the structure to be strong, the cross section of the beam must be at least 15 cm. The length of a solid wood beam is from 2.5 to 3.6 m, from glued beams - from 4.2 to 6 m.
The gap between the insulation and waterproofing will improve the characteristics of the "pie"
Step 5
Finishing is laid on top, and then the floor covering.
The beam ceiling is convenient in that the space between them can hide all engineering communications - cables, pipes, etc. Such ceilings are the best option for a wooden house.
A beautiful flat warm dry floor is not just aesthetically pleasing. This is the warmth in the house and the health of its residents.
Video - floor device in a wooden house made of timber
Of all the possible options for arranging flooring, this is the simplest and most practical. As a rule, such floors are widespread in the construction of private houses and baths, especially wooden ones, from a log house or timber.
This article describes the technology for arranging an insulated lag floor. You will learn all the stages of doing the work with your own hands, and heaters that are optimally suited for thermal insulation of the log floor in a private house will also be considered.
General recommendations
Make sure the wood is dried and treated with an antiseptic or bitumen. This will significantly extend the life of the structure. With a humidity of more than 20%, the tree can hook, violating the integrity of the structure. Boards brought from the warehouse should lie down at room temperature for several days. This is especially true for the winter season. It is not recommended to lay the floor when the air humidity is less than 60%.
It is not necessary to saw and plan the boards in the room where the floor is being installed. Sawdust can cause rotting.
Don't forget to use waterproofing. For sound insulation, as a rule, fiberboard, rubber, polyethylene foam, slag or sand are used. The heat in the house will last longer if you fill the voids under the floor with mineral wool, expanded clay, expanded polystyrene or isospan.
Use the rule after laying. Lay it across the beams, remove the gaps, leveling the height. This is easy to do with the help of special modern adjustable fasteners that have appeared on the construction market. The floor is laid only after all leveling procedures.
The smaller the step, the longer the floor will last. However, the main indicator of durability is the coating and base material. The most durable is larch wood.
The installation of beams is usually carried out along the window, i.e. across the room. The floor boards are then placed along the room, i.e. from the window. However, this is just a recommendation and a matter of taste.
The floor is laid from the corner, placing the boards perpendicular to the lags.The distance from the walls should be about 1 cm. It is left in case the tree deforms, depending on the temperature and humidity of the environment. This distance closes the plinth. If the boards lie close to the wall, the floor may swell.
The board is attached to each beam. Holes for screws should be drilled in advance to avoid delamination.
The most common indentation between lags is from 50 to 56 cm. As a rule, it does not exceed a distance of 69 cm.
Dismantling the logs and the wooden floor is quite simple. It is necessary to take out all the furniture from the room, remove the baseboards, open the boards or sheets of chipboard. After checking, the old boards are replaced with new ones. The lags themselves can be partially replaced. A piece of rotten wood is simply cut out and a new one is put on.
Remember to use protective impregnation for new boards. Check the ends of the beams for rot, inspect the base insulation, if any. Repairing the floor can be a reason to insulate the home.
Logs are deservedly the easiest and most popular way to create a reliable foundation for our floor. If desired, everyone can take up this interesting business and achieve the goal step by step. The most pleasant reward for your hard work will be a warm and cozy atmosphere for many years to come.
What are lags for?
Lags for the floor are ceilings made of wood, metal, plastic or reinforced concrete. As a rule, they are in the form of beams that are laid across the future finishing coating. This is a kind of crate that serves as the base of the floor.
Most often they are made of wood in the form of bars of certain parameters. It is more affordable, cheaper and not inferior in quality to other materials. This installation method is used to securely fix the floor in order to avoid deflections under heavy furniture so that it does not vibrate or creak. According to statistics, it is used in 90% of cases.
The main advantages of the lag:
- noise absorption;
- floor ventilation;
- increase in thermal conductivity;
- the ability to use empty space for various engineering communications;
- uniform load on the base;
- floor leveling;
- increase in coating strength up to several tons per square meter;
- ease of installation and replacement;
- low cost.
The material for the log is most often pine, spruce or fir. Larch is more expensive, so it is not so popular. Since they serve as the base for the floorboard, grades 2 or 3 are fine. They may not be as neat as grade 1. The presence of knots and smudges of resin will not affect the reliability of the structure.
As a rule, the tree is stored in certain conditions. The humidity of the material ready for use should be about 15-20%, but no more. Before starting work, the wood is subjected to mandatory treatment with special impregnations.
They are harmless to human health and often require simple dilution with water in certain proportions. This prevents the appearance of fungus and mold on the tree, protects against bugs and rodents. The procedure is quite simple, but reapplication is required after 3 or 5 hours.
floor laying
When laying a wooden structure on the foundation, it is tightly fastened to it and to the supporting structures of the walls. The disadvantage of this method is that in case of deformation of the overall structure (and it is inevitable under temperature and humidity changes), the floor can also skew.
Laying on beams
If the house is seasonal, you can make a single-layer floor. For a residential building, a two-layer one is more suitable - rough and finish.
The beams are aligned and fastened to the foundation. The distance between them is 2.5-3 meters. To create a double floor, logs are laid on top of the beams - bars 5-6 cm thick. The laying step is 60-70 cm. A rough flooring is made from unedged boards on them. It needs to be trimmed and sanded. There may be small gaps between the boards, which will be covered with hydro and thermal insulation.On the insulating layers, the bars are again laid, which serve as the basis for the finishing layer. Their height should be no more than 2-3 cm, this will ensure ventilation between the layers. Finishing coating can be chosen according to your taste - wood, laminate or linoleum.
Laying on support posts
More acceptable would be laying the floor on the posts. In this case, there is no adhesion of the floor cake to the walls, a gap is left between them. This design is called "floating". It is suitable for houses where there is no basement.
Work order
- Marking for posts (step 60-70 cm) and sampling the soil by about half a meter. Moreover, it is not necessary to choose the entire soil over the area of \u200b\u200bthe house, so as not to then fill it back up to a certain level so that a draft does not walk under the floor.
- Backfilling and tamping the bottom under the posts - it must be hard.
- The columns are made of burnt bricks or poured with concrete. In the latter case, you need to make formwork. Their upper part is leveled.
- Backfilling of the heat-insulating layer (expanded clay, sawdust), about 25 cm should remain to the top of the columns.
- After the solution has completely solidified, the beams are laid.
It is more convenient to set the supports first along the perimeter, and only then in the middle. On top of them, two layers of waterproofing are laid out - roofing material. Logs are laid out along the supports from a bar or log. Further assembly of the floor is carried out in the same order as the installation on the beams. The space between the poured soil and the subfloor is covered with heat-insulating material, leaving 5 cm free for ventilation.
The choice of thermal and waterproofing
Several materials can be chosen as thermal insulation. The most environmentally friendly is expanded clay. It is inexpensive, non-flammable, does not rot, and mold does not form on it. But its thermal insulation qualities leave much to be desired.
Another environmentally friendly material is sawdust. At sawmills, they can be obtained almost for free. They have low thermal conductivity, suitable for attic insulation. The disadvantages include their ability to decrease in volume over time, exposure to moisture and, as a result, the formation of fungus. You can reduce these risks with the help of additives - clay, cement, lime or boric acid, as an antiseptic.
Mineral wool (or glass wool) is also a budget option. It does not burn, holds heat well and has high soundproofing properties. But its styling requires compliance with a certain technology, in addition, it can cause allergies and skin irritation.
Polyfoam is one of the most convenient options in all respects. It is cheap, has good thermal insulation qualities, and is easy to install. On it you can make a dense reinforced screed. From the same series - extruded polystyrene foam, it is more resistant to moisture.
Waterproofing
This is an equally important component of the floor pie. The easiest option is plastic wrap.
The second option is pasting roll materials, consisting of a waterproof material with a bitumen-polymer composition applied to it. Its use is justified where groundwater comes close to the surface. Most often, ruberoid is used for this purpose.
The most technologically advanced and most expensive option is a membrane coating. It is a self-adhesive film consisting of three layers - a rigid plastic film, a bitumen-polymer and an anti-adhesive layer. It is convenient to use it to create waterproofing in rooms with a complex configuration.
What else to consider when laying plank floors
Question:
Are there any other secrets to know when doing flooring work?Answer:
As a rule, there is nothing secret in the work on the arrangement of floors, but it is not so rare that they neglect the little things that may appear later. So, for example, you should not start work immediately, as soon as the lumber was brought to the site.Especially in winter. It is necessary to let them lie down in the room, warm up to the temperature of the room in which they will be laid. Floors should not be installed at low relative air humidity (below 60%).
Do not trim, plan, or saw materials in the same room as the flooring. Sawdust, falling under the floor, can cause it to rot prematurely. All harvesting operations are best done in another room.
When driving nails and tightening self-tapping screws, it should be remembered that a hat sticking out above the board can cause tool breakage when planing floors after laying. To avoid this, a slight broadening under the cap should be provided.
Floor Options
The floor can be wood or concrete. The choice depends on the desire of the owner and technical feasibility.
Wooden floor - advantages and disadvantages
It would seem that the answer is simple - a wooden house should have a wooden floor. It is easier, cheaper and faster to make it without resorting to the services of professional builders. The design will be light enough and any foundation will withstand it. Again, this is an environmentally friendly option and it fits well into the interior.
However, there are a few "buts". A wooden floor will last a maximum of 10 years. The tree tends to rot, no matter how you protect it from external influences. In addition, carpenter beetles will also do their job. For a wooden floor, constant humidity in the house is important - no more than 60%. Otherwise, the floor will begin to deform and rot. Laying a wooden floor must be done with great care so that later it does not warp or creak.
Concrete floor
Its main advantage is durability. You can put any finishing coating on it - laminate, linoleum, ceramic tiles. However, this is a rather heavy structure that not every foundation can withstand. Concrete is used only for laying the floor of the lower floor.
In modern wooden cottages, as a rule, there is a basement, where a boiler room, workshop or other utility rooms are equipped. For the overlap between the basement and the first floor, it is better to use concrete slabs. This is a more expensive option than wooden logs, but more reliable.
Laying technology for single timber decking
In rooms with a small area, the beams are mounted and attached directly to the wall. If, however, laying the log on the support posts is considered, then it is necessary to take into account the requirements that will ensure the reliability of the overall structure. Let's say the gap between the pillars is 0.8 m - the supporting beams must have a cross section of at least 100X100 mm. With an increase in the parameters between the supports up to 1 meter, beams of 120X120 mm will already be required. Logs are mounted across the room at intervals corresponding to the thickness of the boards. For example, a distance of 0.5 m will be enough to install a cover of 28 mm. For quality floor installations in a wooden frame
tongue-and-groove lumber is used from coniferous or hardwood with a thickness of 28-40 mm
. Traditional location - perpendicular to the wall with windows
. The material is fixed with nails, their length is taken from - 2.5 times the thickness of the lumber. Possible two mounting methods
:
- usual;
- parquet.
The essence of the usual method
in that a nail is driven into the front of the board
. Second option
- it driving a nail at an angle of 45° into the corner of the comb
.
In order to ventilate the underground space at the corners of the floor, it is necessary to organize openings that are closed with decorative grilles. Its design should prevent the ingress of foreign objects and water during cleaning. It should be remembered that there are not enough vents in the flooring, and it is necessary to foresee windows for ventilation in the basement of the building.
The desire for environmental safety drives city dwellers closer to nature. And increasingly, wood is becoming a building material.And this is understandable. A wooden house has numerous advantages compared to a stone house or one built from artificial materials using modern technology. One of the most important parts of a home is a properly installed floor.
When building a house, care is taken not only about its beauty, but also that it is warm and comfortable. Wall insulation is only half the battle. The house must be protected from the cold from below. Wood is a natural material subject to decay, therefore, reliable insulation from moisture is also important. And finally, it should look beautiful and match the interior decoration of the room. In order for all goals to be achieved, it is not enough to lay the boards on a concrete base.
The floor in the house should be smooth, warm, beautiful and durable. All these qualities are achieved by laying the floor in several layers:
- base;
- heat and vapor barrier;
- draft floor;
- clean coverage.
It looks like a layer cake, doesn't it? That is why it is called the pie of the floor. Its proper arrangement will help to avoid:
- high energy costs for heating the house;
- excessive moisture, which will inevitably lead to the appearance of mold and mildew;
- rotting of internal wooden structures.
How to choose the right cross section
The cross section of the beam for the manufacture of logs is determined by 2 factors: the span length between the support points (pillars, linings or transverse beams) and the maximum load that the floor will be under during its operation (for a dwelling it is no more than 300 kg / m 2).
The cross section of the beams should be rectangular with a width that is a multiple of 1.5 and a height of 2, that is, the aspect ratio in the section should be 1.5x2. When laying beams, the large side should be vertical.
This will allow to achieve maximum rigidity of the structure with minimum volumes of wood and, accordingly, minimum costs. Table 1 shows the dependence of the cross section of the beam on the dimensions of the span.
Table 1
Also, the cross section of the beam will depend on the thickness and strength of the flooring.
When installing the floor, you should pay attention to the layer of heat-insulating material
This means that the beam must be purchased taking into account the size of the ventilation gap.
For the construction of a wooden floor along the logs, it is recommended to use a beam with a small margin of section. Beams can be mounted both on a concrete base and directly on the ground. The differences in these laying methods lie in the supports that will be used under the bars. If the base is soil, then concrete or brick columns should be used as supporting elements, which are installed every 1.2 m. These elements are made of M100 red brick.
The use of columnar supports allows you to save on the thickness of the wood. So, with a log length of 400 cm, just one support installed in the middle will allow you to reduce the cross section from 180x100 to 110x60, which in the end will significantly affect your budget.
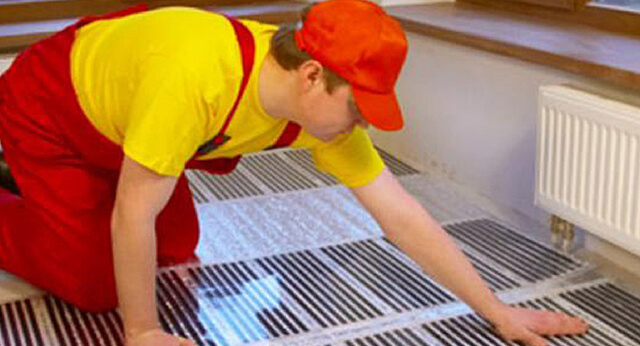
Underfloor heating system
Various types of "warm floor" are produced:
- film infrared;
- heating mats (thermomats);
- cable;
- water.
But the best option is to use an infrared warm floor under the linoleum. Such a system can easily be placed under linoleum, as it is a film material that does not take up much space (for more details: “ How to lay an infrared warm floor under linoleum“).
Underfloor heating has shown itself to be an element of maintaining a comfortable temperature in the house. However, heat can quickly leave the room if the thermal insulation system is not properly implemented.
Thermal insulation under linoleum is carried out quite simply and everyone can do it on their own. The main thing is to decide on the choice of which insulation to put under the linoleum.
1 Why is it necessary to insulate the lag floor
In general, among the advantages that determine the rationality of arranging the lag floor, one can single out the possibility of doing all the work with one's own hands, without the need to contact construction organizations, or rent expensive equipment.
Also an important factor is the speed of arrangement and the simplicity of the technology by which a wooden floor is built with.
Such a design is not deprived of disadvantages - a lag wooden floor has an order of magnitude lower bearing capacity than a concrete screed. Also, due to the characteristics of the tree, it is not recommended to equip the lag floor in rooms with high humidity.
Such a floor, in comparison with a concrete screed, dampens impact noise worse, but this issue is solved by high-quality heaters, which in most cases have good soundproofing properties.
Any floor, including a lag one, is the coldest inner surface in a private house, which, in addition to discomfort, especially in the winter season, can adversely affect health, since a person’s feet react very painfully to constant walking on a cold surface.
1.1
Features of insulation
When performing thermal insulation of the floor with materials and, the thermal conductivity of which ranges from 0.3 to 0.4 W / mk, you will need to lay a layer of insulation 150 mm thick if the flooring is located above a cold basement, or 100 mm - if the floor is on concrete screed.
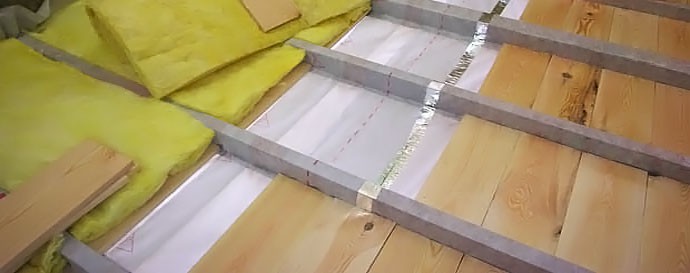
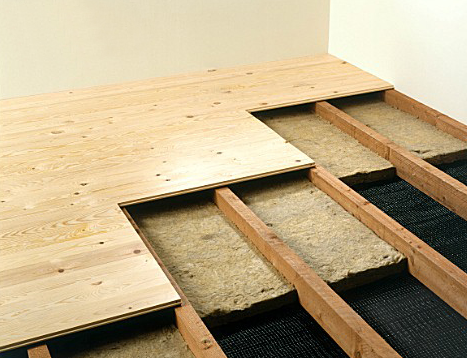
The slab insulation is laid between the lags in two layers so that the middle of the upper plate falls on the joints of the lower layer - this technology guarantees the absence of cold bridges (zones with greater thermal conductivity than the main part of the structure), which can become insulation joints.
Also, when insulating a wooden lag floor in a private house, a vapor barrier is mandatory. For this, special vapor barrier membranes (films) are used, which are laid on top of the insulation, and protect the material from the formation of condensate.
Condensation is the main enemy of any thermal insulation, since when moisture is absorbed, the insulation is prone to losing its thermal insulation characteristics, gaining weight and rotting.
Lay a vapor barrier membrane and may also be needed under the insulation. This is necessary in cases where a wooden lag floor is installed immediately on the ground surface, or in a private house, on top of a concrete floor slab located above a damp basement.
To improve the soundproofing properties of the insulation, you can use special acoustic pads that fit under the logs and contribute to more effective noise reduction. This is a good option if there is any production equipment located under your floor or in the basement of the house.