What is an electrolyser, its characteristics and application
This is the name of a device for the electrochemical process of the same name, which requires an external power source. Structurally, this apparatus is a bath filled with electrolyte, in which two or more electrodes are placed.
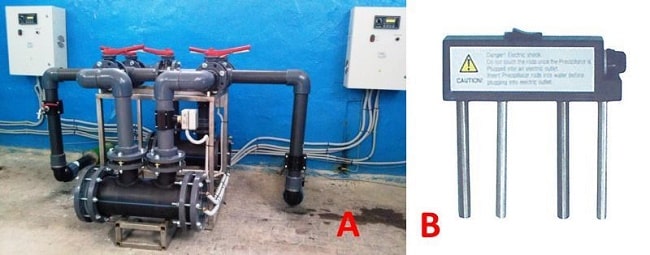
The main characteristic of such devices is performance, often this parameter is indicated in the name of the model, for example, in stationary electrolysis plants SEU-10, SEU-20, SEU-40, MBE-125 (membrane block electrolyzers), etc. In these cases, the figures refer to hydrogen production (m3/h).

Industrial stationary electrolysis plant producing 40 m3 of hydrogen per hour (SEU-40)
As for the remaining characteristics, they depend on the specific type of device and scope of application, for example, when electrolysis of water is carried out, the following parameters affect the efficiency of the installation:
- The voltage level (minimum electrode potential), it should be from 1.8 to 2 volts, a smaller value “will not start” the process, and a larger one leads to excessive energy consumption for heating the electrolyte. If a power supply is used as a source, for example, at 14 volts, it makes sense to divide the bath capacity with plates into 7 cells, in accordance with Figure 2. Fig. 2. The location of the plates in the electrolyzer bath
Thus, by applying 14 volts to the outputs, we will get 2 volts on each cell, while the plates on each side will have different potentials. Electrolyzers using a similar plate connection system are called dry electrolyzers.
- The distance between the plates (between the cathode and anode space), the smaller it is, the less resistance there will be and, therefore, more current will pass through the electrolyte solution, which will lead to an increase in gas production.
- The dimensions of the plate (meaning the area of the electrodes) are directly proportional to the current flowing through the electrolyte, which means that they also affect performance.
- Electrolyte concentration and its thermal balance.
- Characteristics of the material used to make the electrodes (gold is an ideal material, but too expensive, so stainless steel is used in homemade circuits).
- Application of process catalysts, etc.
As mentioned above, plants of this type can be used as a hydrogen generator, to produce chlorine, aluminum or other substances. They are also used as devices by which water is purified and disinfected (UPEV, VGE), as well as a comparative analysis of its quality is carried out (Tesp 001).
A) Installation of direct water electrolysis (UPEV); B) Tesp 001 water quality analyzer
We are primarily interested in devices that produce Brown's gas (hydrogen with oxygen), since it is this mixture that has all the prospects for use as an alternative energy carrier or fuel additive. We will consider them a little later, but for now let's move on to the design and principle of operation of the simplest electrolyzer that splits water into hydrogen and oxygen.
Selected points of use
First of all, I would like to note that the traditional method of burning natural gas or propane is not suitable in our case, since the combustion temperature of HHO exceeds that of hydrocarbons by more than three times. As you understand, structural steel will not withstand such a temperature for a long time. Stanley Meyer himself recommended using a burner of an unusual design, the diagram of which we present below.
Scheme of a hydrogen burner designed by S. Meyer
The whole trick of this device lies in the fact that HHO (indicated by the number 72 in the diagram) passes into the combustion chamber through valve 35.The burning hydrogen mixture rises through channel 63 and simultaneously carries out the ejection process, dragging along outside air through adjustable holes 13 and 70. A certain amount of combustion products (water vapor) is retained under the cap 40, which enters the combustion column through channel 45 and mixes with the burning gas. This allows you to reduce the combustion temperature several times.
The second point that I would like to draw your attention to is the liquid that should be poured into the installation. It is best to use prepared water that does not contain salts of heavy metals.
The ideal option is a distillate, which can be purchased at any auto shop or pharmacy. For the successful operation of the electrolyser, potassium hydroxide KOH is added to the water, at the rate of about one tablespoon of the powder per bucket of water.
And the third thing we put special emphasis on is safety. Remember that the mixture of hydrogen and oxygen is not accidentally called explosive. HHO is a hazardous chemical compound which, if handled carelessly, can cause an explosion. Follow safety rules and be especially careful when experimenting with hydrogen. Only in this case, the “brick” that our Universe consists of will bring warmth and comfort to your home.
We hope the article has become a source of inspiration for you, and you, having rolled up your sleeves, start manufacturing a hydrogen fuel cell. Of course, all our calculations are not the ultimate truth, however, they can be used to create a working model of a hydrogen generator. If you want to completely switch to this type of heating, then the issue will have to be studied in more detail. Perhaps it is your installation that will become the cornerstone, thanks to which the redistribution of energy markets will end, and cheap and environmentally friendly heat will enter every home.
Building a hydrogen burner
Let's start creating a water burner. Traditionally, we will begin with the preparation of the necessary tools and materials.
What will be required in the work
- Stainless steel sheet.
- Check valve.
- Two bolts 6x150, nuts and washers to them.
- Flow filter (from washing machine).
- transparent tube. The water level is ideal for this - in building materials stores it is sold at 350 rubles per 10 m.
- Plastic sealed container for food with a capacity of 1.5 liters. The approximate cost is 150 rubles.
- Herringbone fittings ø8 mm (these are great for hose).
- Bulgarian for sawing metal.
Now let's figure out what kind of stainless steel to use. Ideally, steel 03X16H1 should be taken for this. But buying a whole sheet of "stainless steel" is sometimes very expensive, because a product 2 mm thick costs more than 5,500 rubles, and besides, it needs to be brought somehow. Therefore, if a small piece of such steel is lying around somewhere (0.5x0.5 m is enough), then you can get by with it.

Nickel-hydrogen battery housing
We will use stainless steel, because ordinary steel, as you know, starts to rust in water. Moreover, in our design, we intend to use alkali instead of water, that is, the environment is more than aggressive, and ordinary steel will not last long under the action of an electric current.
Manufacturing instructions
First stage. First, take a sheet of steel and place it on a flat surface. From the sheet of the above dimensions (0.5x0.5 m), 16 rectangles should be obtained for the future hydrogen burner, we cut them out with a grinder.
Second phase. We drill holes for the bolt on the reverse side of the plates. If we planned to make a “dry” electrolyzer, then we drilled holes from the bottom as well, but in this case this is not necessary. The fact is that a “dry” design is much more complicated, and the useful area of \u200b\u200bthe plates in it would not be used 100%.We will make a “wet” electrolyzer - the plates will be completely immersed in the electrolyte, and their entire area will participate in the reaction.
Third stage. The principle of operation of the described burner is based on the following: the electric current, passing through the plates immersed in the electrolyte, will cause the water (it should be part of the electrolyte) to decompose into oxygen (O) and hydrogen (H). Therefore, we must have two plates at the same time - the cathode and the anode.
With an increase in the area of these plates, the volume of gas increases, therefore, in this case, we use eight pieces for the cathode and anode, respectively.
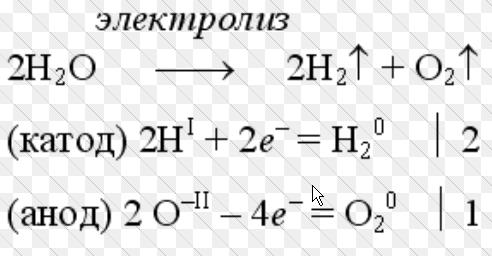
Each water molecule is made up of two hydrogen atoms and one atom
Fourth stage. Next, we have to install the plates in a plastic container so that they alternate: plus, minus, plus, minus, etc. To insulate the plates, we use pieces of a transparent tube (we bought it as much as 10 m, so there is a supply).
We cut small rings from the tube, cut them and get strips about 1 mm thick. This is the ideal distance for the hydrogen in the structure to be efficiently generated.
Fifth stage. We fasten the plates to each other with washers. We do it as follows: we put a washer on the bolt, then a plate, after it three washers, another plate, again three washers, etc. We hang eight pieces on the cathode, eight on the anode.
Next, tighten the nuts and isolate the plates with previously cut strips.
Sixth stage. We look at exactly where the bolts rest in the container, we drill holes in that place. If suddenly the bolts do not fit in the container, then we cut them to the required length. Then we insert the bolts into the holes, put washers on them and clamp them with nuts - for better tightness.
Next, we make a hole in the cover for the fitting, screw the fitting itself (preferably smearing the junction with silicone sealant). We blow into the fitting to check the tightness of the cap. If the air still comes out from under it, then we also coat this connection with a sealant.
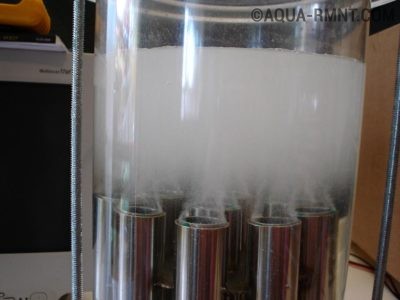
Seventh stage. At the end of the assembly, we test the finished generator. To do this, connect any source to it, fill the container with water and close the lid. Next, we put a hose on the fitting, which we lower into a container of water (to see air bubbles). If the source is not powerful enough, then they will not be in the tank, but they will definitely appear in the electrolyzer.
Next, we need to increase the intensity of the gas output by increasing the voltage in the electrolyte. It is worth noting here that water in its pure form is not a conductor - the current passes through it due to the impurities and salt present in it. We will dilute a little alkali in water (for example, sodium hydroxide is great - it is sold in stores as a Mole cleaning agent).
A few good tips
Next, let's talk about other components of the hydrogen burner - the filter for the washing machine and the valve. Both are for protection. The valve will not allow the ignited hydrogen to penetrate back into the structure and explode the gas accumulated under the lid of the electrolyzer (even if there is a little of it). If we do not install the valve, the container will be damaged and the alkali will leak out.
The filter will be required to make a water seal, which will play the role of a barrier that prevents an explosion. Craftsmen, who are familiar with the design of a home-made hydrogen burner, call this shutter a “bulbulator”. Indeed, it essentially only creates air bubbles in the water. For the burner itself, we use the same transparent hose. Everything, the hydrogen burner is ready!
It remains only to connect it to the inlet of the "warm floor" system, seal the connection and begin direct operation.
How hydrogen heating works
This heating method was developed by one of the Italian companies.A hydrogen boiler works without generating any harmful waste, which is why it is considered the most environmentally friendly and silent way to heat a house. The innovation of the development is that the scientists managed to achieve the combustion of hydrogen at a relatively low temperature (about 300ᵒС), and this made it possible to manufacture such heating boilers from traditional materials.
Hydrogen fuel cells for the home
During operation, the boiler emits only harmless steam, and the only thing that requires costs is electricity. And if you combine this with solar panels (solar system), then these costs can be completely reduced to zero.
How does everything happen? Oxygen reacts with hydrogen and, as we remember from middle school chemistry lessons, forms water molecules. The reaction is provoked by catalysts, as a result, thermal energy is released, heating the water to about 40ᵒС - the ideal temperature for a “warm floor”.
Adjusting the power of the boiler allows you to achieve a certain temperature indicator necessary for heating a room with a particular area. It is also worth noting that such boilers are considered modular, because they consist of several independent channels. In each of the channels there is a catalyst mentioned above, as a result, a coolant enters the heat exchanger, which has already reached the required indicator of 40ᵒС.
Water seal and fuse
Pay your attention to figure No. 1 - there are two containers (I designated them A and B), well, a needle from a disposable syringe (C), all this is connected by tubes from droppers. It is necessary to pour water into the first container (A), this is a water lock
It is necessary so that the explosion does not reach the electrolyzer (if it explodes, it will be like a fragmentation grenade)
It is necessary to pour water into the first container (A), this is a water lock. It is necessary so that the explosion does not reach the electrolyzer (if it explodes, it will be like a fragmentation grenade).
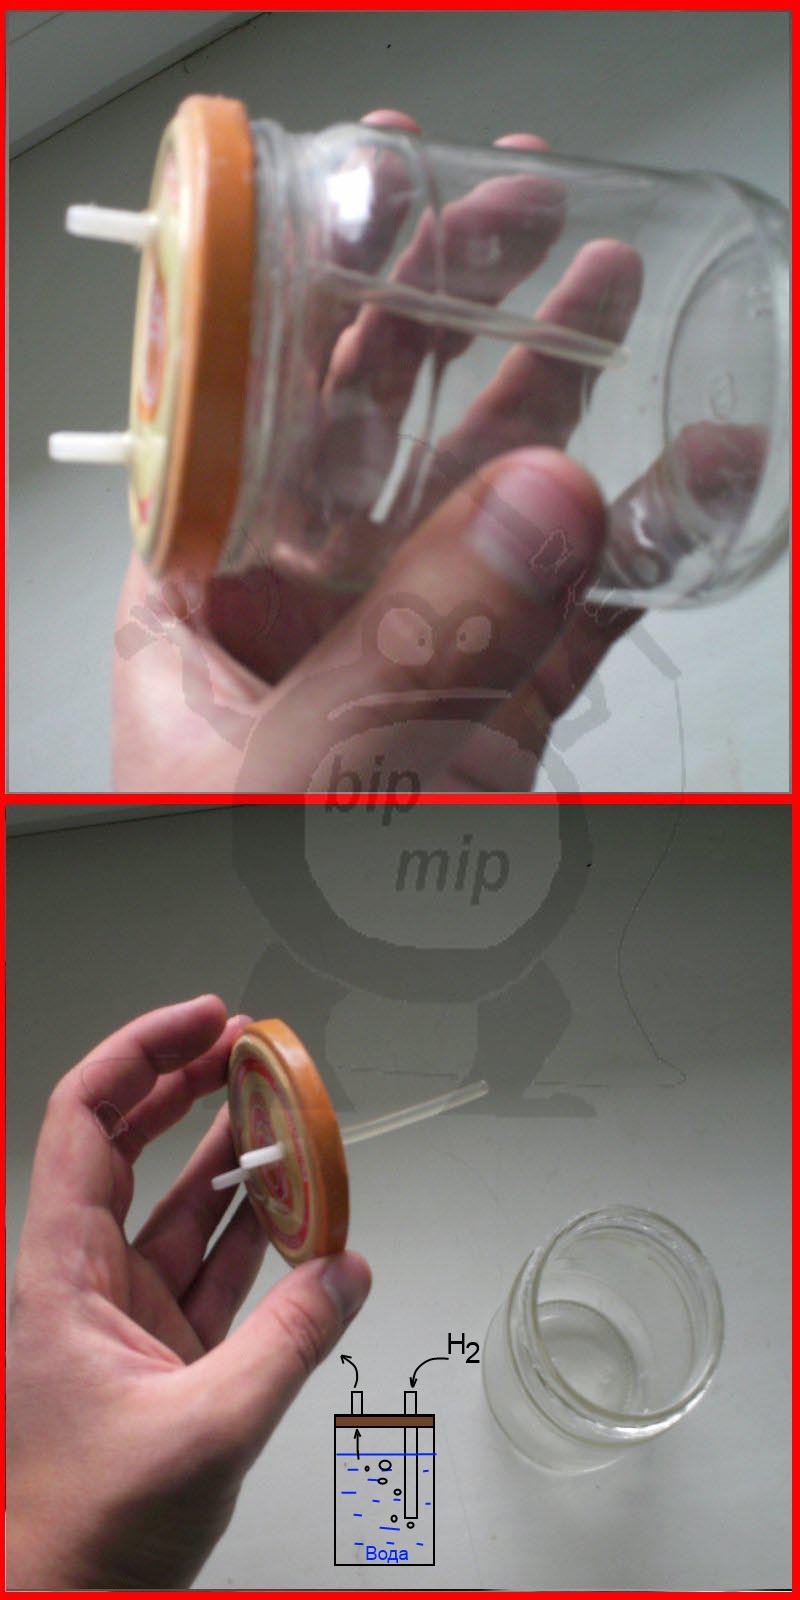 Figure No. 5 - Water lock
Please note that there are two connectors in the water seal cover (I adapted all this from a medical dropper), both of them are hermetically glued into the cover using epoxy glue. One tube is long, through it hydrogen from the generator should flow under water, gurgle, and through the second hole go through the tube to the fuse (B)
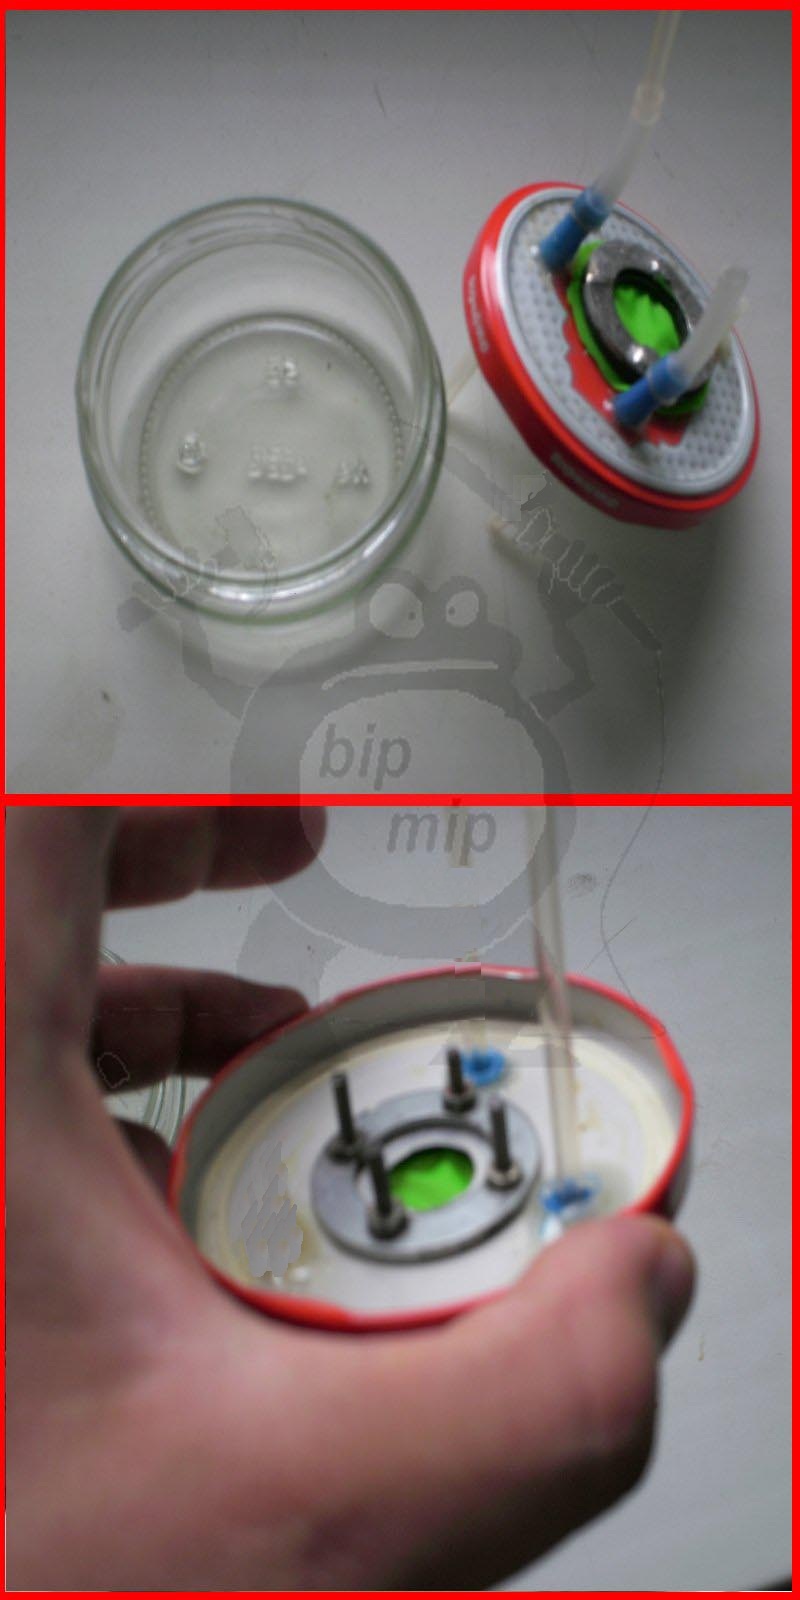 Figure #6 - Fuse
In a container with a fuse, you can pour both water (for greater reliability) and alcohol (alcohol vapor increases the burning temperature of the flame).
The fuse itself is made like this: You need to make a hole with a diameter of 15 mm in the cover, and holes for the screws.
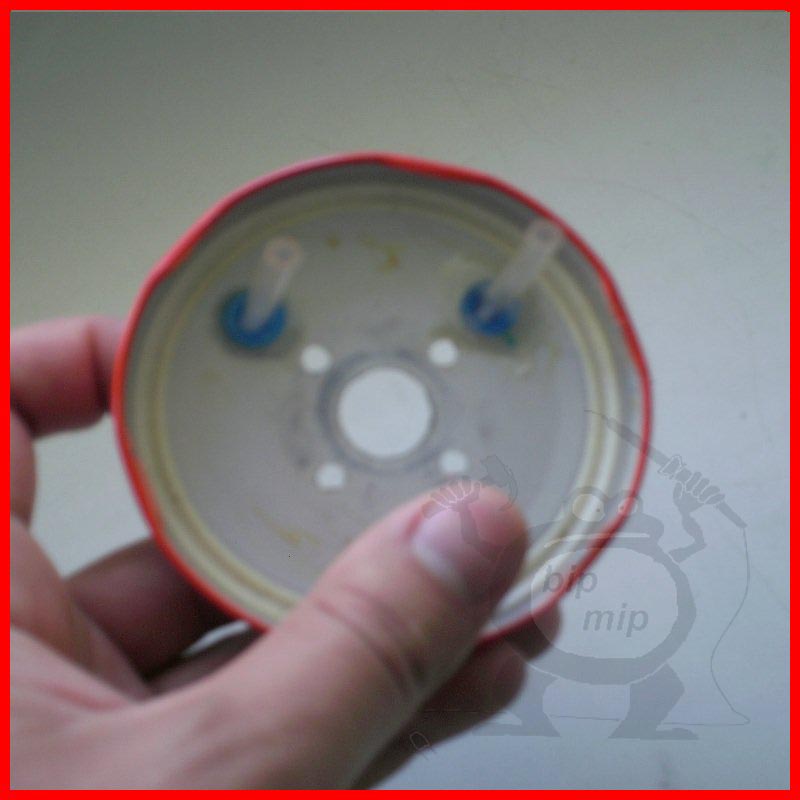 Figure No. 7 - What the holes in the lid look like
You will also need two thick washers (if necessary, you need to expand the inside diameter of the washer with a round file), two water gaskets and chocolate foil or an ordinary balloon.
 Figure No. 8 - Sketch of the protective valve
It is assembled quite simply, you need to drill four coaxial holes in the iron washers of the cover and gaskets. First you need to solder the bolts to the top washer, this can easily be done with a powerful soldering iron and active flux.
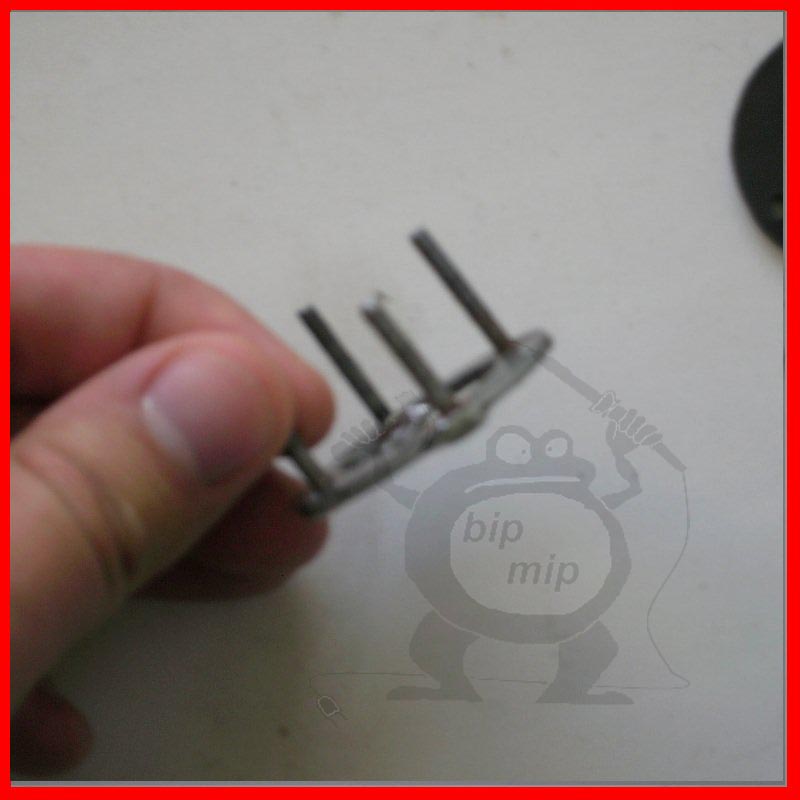 Figure No. 9 - Washer with screws
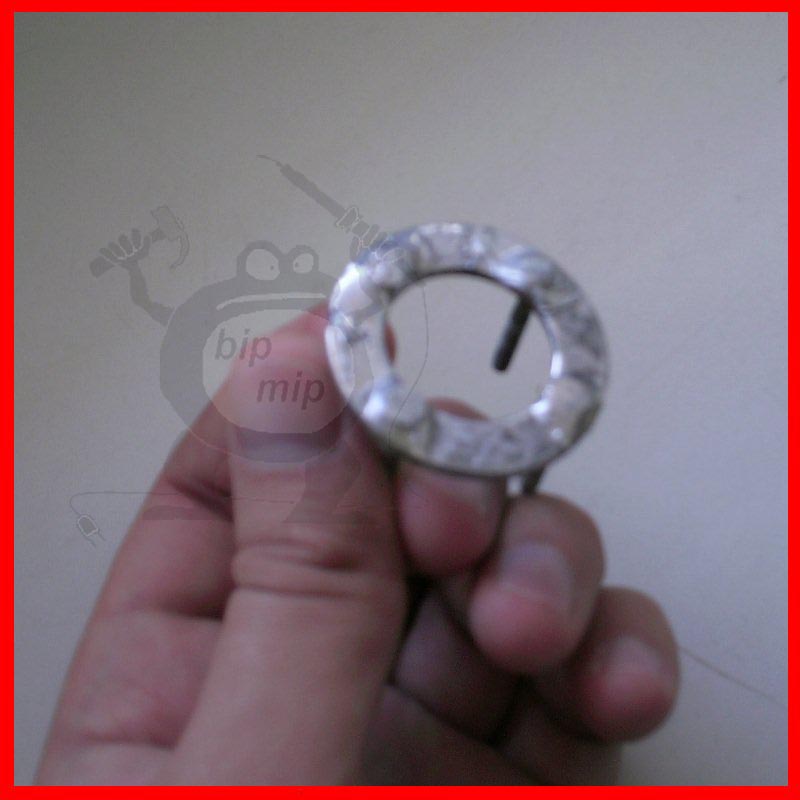 Figure No. 10 - Soldered screws to the washer
After you have soldered the screws, you need to put one rubber gasket on the washer and directly your valve. I used a thin rubber band from a burst balloon (it's much more convenient than putting on thin foil), although foil also works quite well, at least when I tested my hydrogen torch for explosiveness, it was foil in the valve.
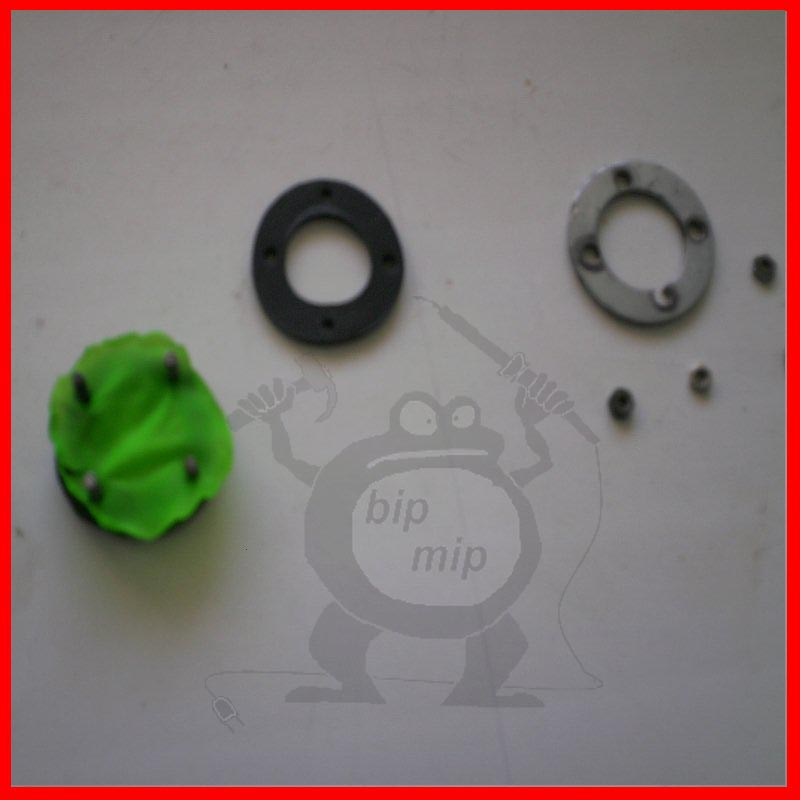 Figure No. 11 - We put on the gasket and protective rubber
Then we put on the second gasket and you can insert the protection into the holes made in the lid.
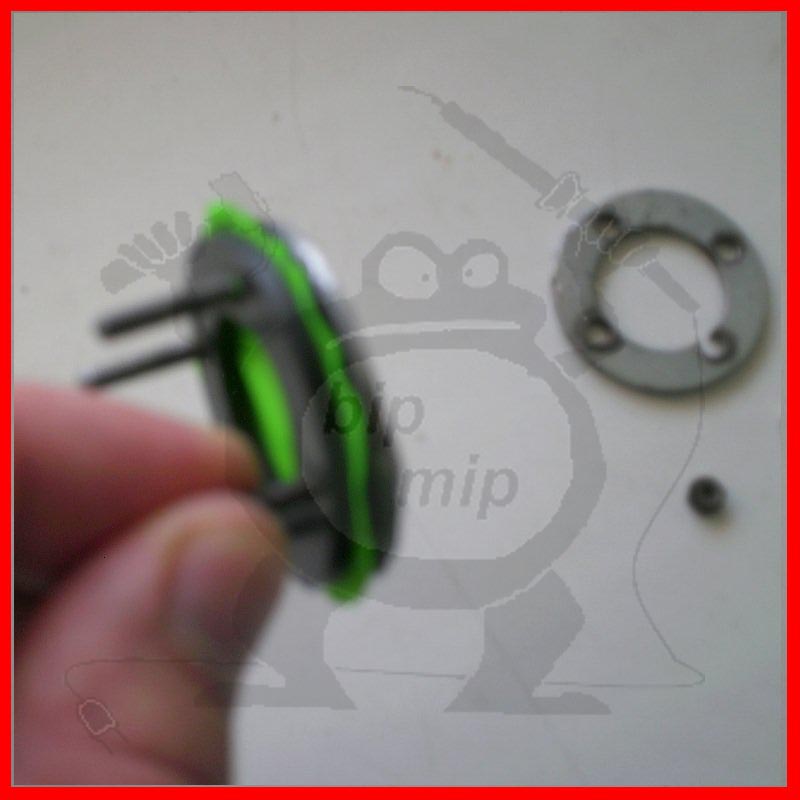 Figure No. 12 - Finished valve
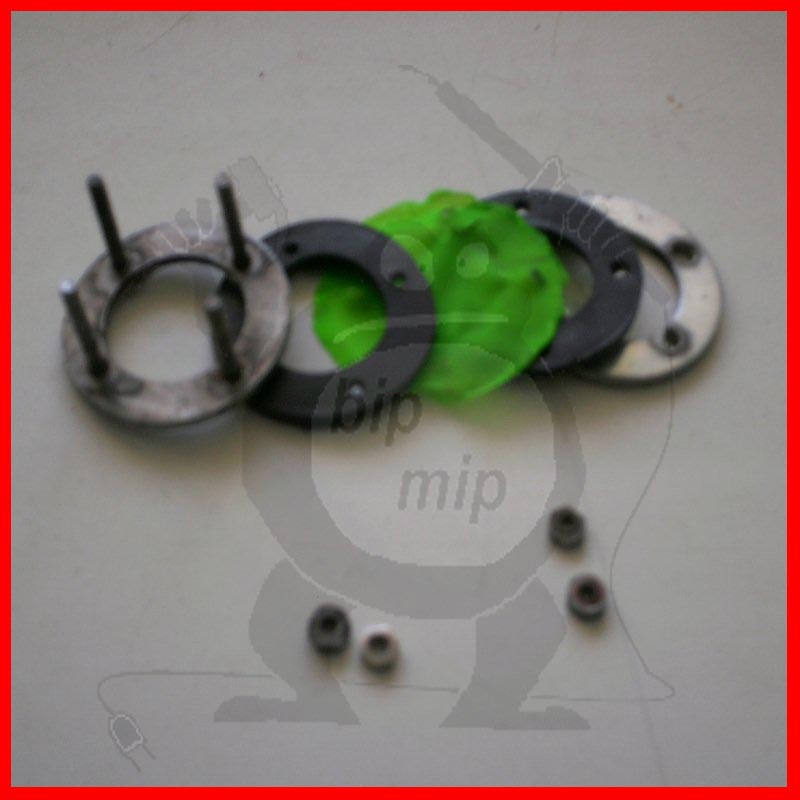 Figure No. 13 - Security elements
The second washer and nuts are needed to tightly and firmly fix the protection by tightening the nuts (look at figure No. 6).
Understand correctly and take note that safety rules cannot be neglected, especially when working with explosive gases. And such a simple device can save you from unpleasant surprises. The protection works according to the principle “where it is thin - it breaks there”, with an explosion it knocks out a protective film (foil or rubber band), and the explosive force does not go into the electrolyzer, besides, this is also prevented by a water seal. Take my word for it, if the electrolyzer explodes, it will not seem enough to you :)!!!
 Figure #14 - Explosion
It should be understood that an emergency situation is necessarily inevitable. The fact is that the flame burns at the exit of the nozzle (which is a fairly good needle from a disposable syringe) only because gas pressure is created (pressure is agreed).
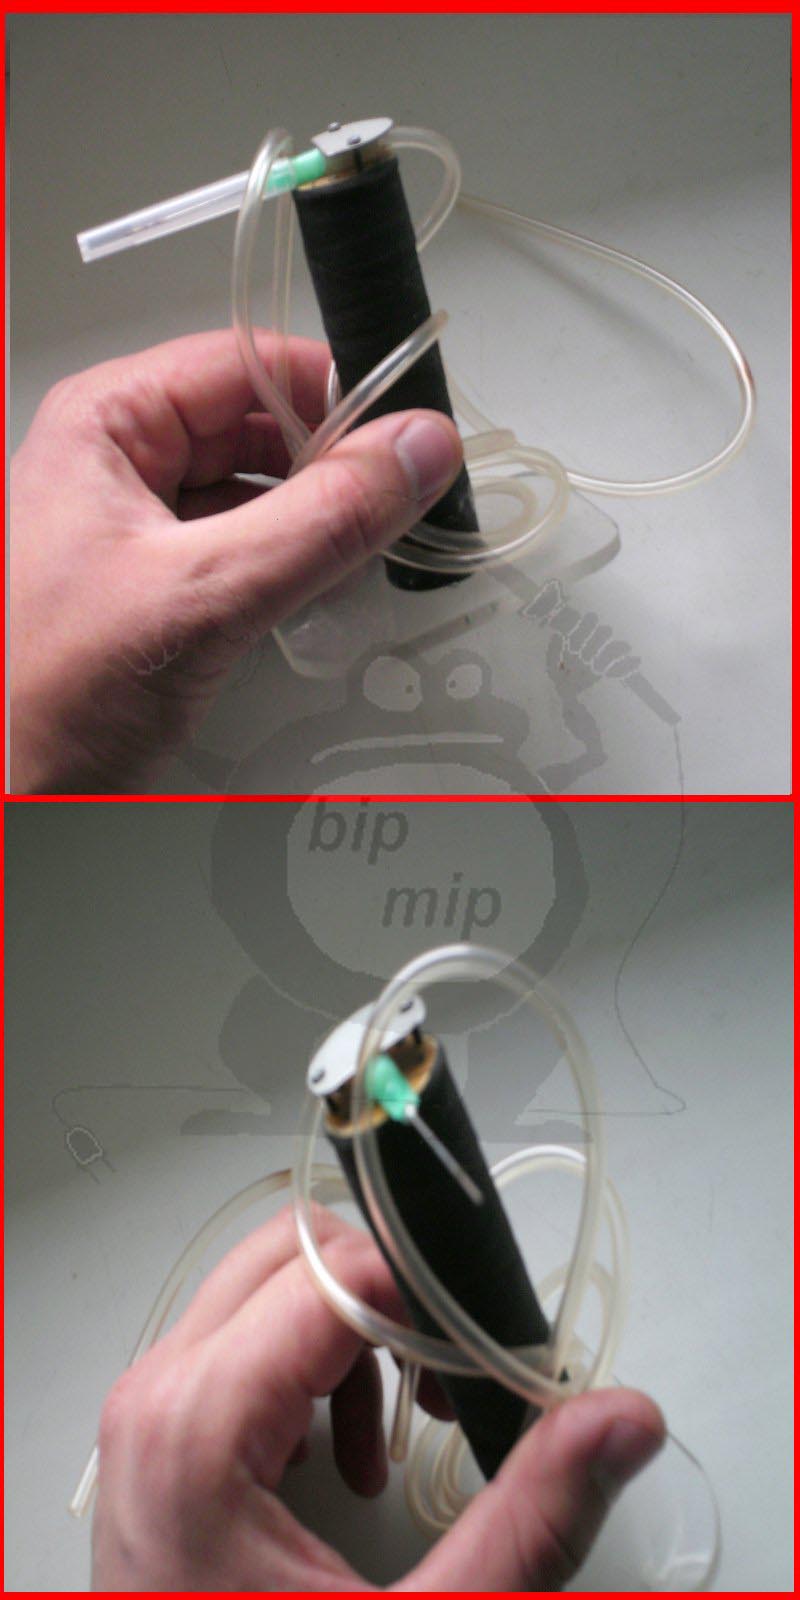 Figure No. 15 - Nozzle from a syringe, on a pedestal
For example, you work with your burner and now the light is cut out, believe me! You will not have time to bounce off the burner, the flame will instantly go back through the tube and the explosion of the protective valve will thunder (it is needed to blow it and not the electrolyzer) - this is quite normal when the burner is homemade - be vigilant and careful, stay away from the hydrogen burner and wear personal protective equipment!
Personally, I am not very enthusiastic about the hydrogen burner, and I tried to make it only because I already had a ready-made electrolyzer. Firstly, it is very dangerous, and secondly, it is not very effective (I am talking about my hydrogen burner and not about burners in general) it was not possible to melt what I wanted with it. And therefore, if you came up with the idea of making this type of burner, ask yourself a completely rational question “is it worth it”, since assembling an electrolyser from scratch is quite a troublesome business, and you also need a powerful power supply that would be enough to match the hydrogen pressure and outlet nozzle diameter. Therefore, “if only it was” I don’t recommend you do it, but only if you really need it.
Thank you for visiting bip-mip.com
Types of electrolyzers
Let's take a brief look at the design features of the main types of water splitting devices.
Dry
The design of a device of this type was shown in Figure 2, its feature is that by manipulating the number of cells, it is possible to power the device from a source with a voltage significantly exceeding the minimum electrode potential.
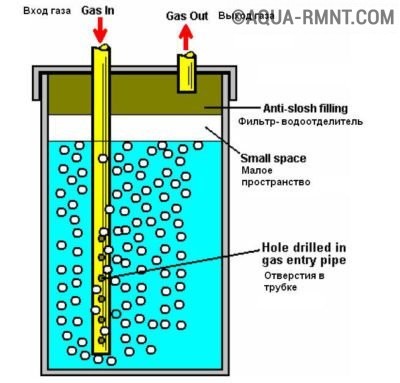
Flowing
A simplified arrangement of devices of this type can be found in Figure 5. As you can see, the design includes a bath with electrodes "A", completely filled with a solution and a tank "D".
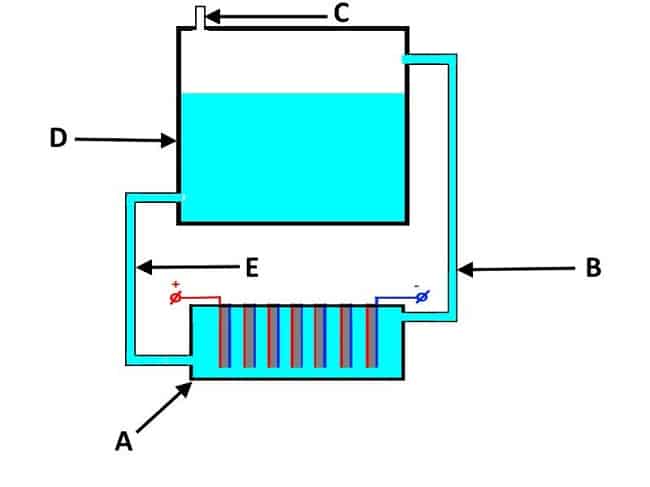
Figure 5. The design of the flow electrolyzer
The principle of operation of the device is as follows:
- at the entrance of the electrochemical process, the gas, together with the electrolyte, is squeezed out into the container "D" through the pipe "B";
- in the tank "D" there is a separation from the electrolyte solution of the gas, which is discharged through the outlet valve "C";
- the electrolyte returns to the hydrolysis bath through pipe "E".
Membrane
The main feature of devices of this type is the use of a solid electrolyte (membrane) based on a polymer. The design of devices of this type can be found in Figure 6.
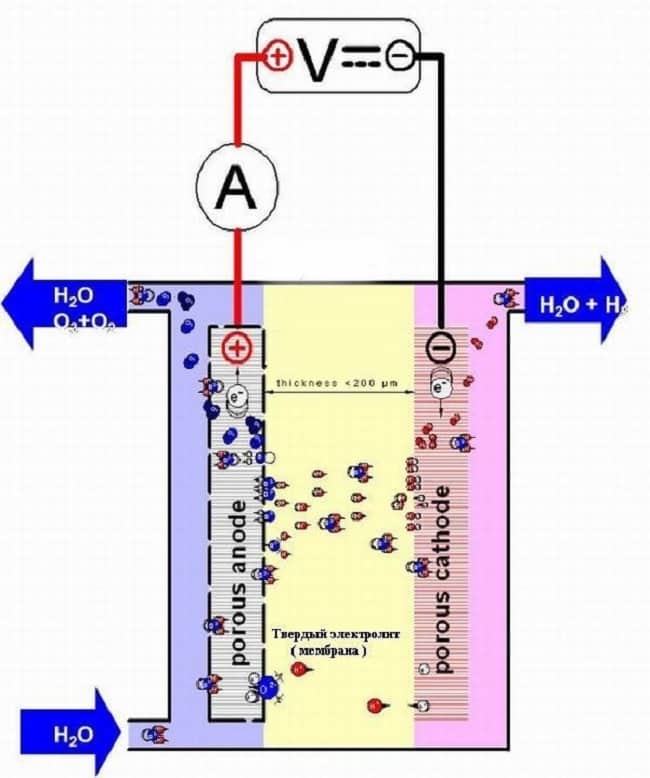
Figure 6. Membrane-type electrolyzer
The main feature of such devices is the dual purpose of the membrane; it not only transports protons and ions, but also separates both the electrodes and the products of the electrochemical process at the physical level.
Diaphragm
In those cases where the diffusion of electrolysis products between the electrode chambers is not allowed, a porous diaphragm is used (which gave the name to such devices). The material for it can be ceramic, asbestos or glass. In some cases, polymer fibers or glass wool can be used to create such a diaphragm.Figure 7 shows the simplest version of a diaphragm device for electrochemical processes.
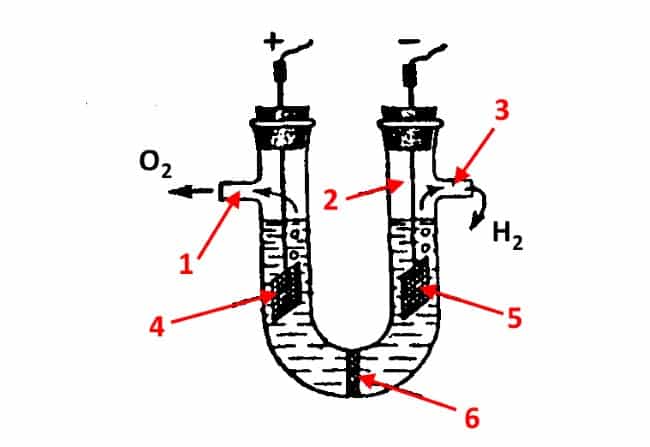
Diaphragm cell design
Explanation:
- outlet for oxygen.
- U-shaped flask.
- Output for hydrogen.
- Anode.
- Cathode.
- Diaphragm.
alkaline
An electrochemical process is not possible in distilled water; a concentrated alkali solution is used as a catalyst (the use of salt is undesirable, since chlorine is released in this case). Based on this, most of the electrochemical devices for water splitting can be called alkaline.
On thematic forums, it is advised to use sodium hydroxide (NaOH), which, unlike baking soda (NaHCO3), does not corrode the electrode. Note that the latter has two significant advantages:
- You can use iron electrodes.
- No harmful substances are emitted.
But, one significant drawback negates all the advantages of baking soda as a catalyst. Its concentration in water is not more than 80 grams per liter. This reduces the frost resistance of the electrolyte and its current conductivity. If the former can still be tolerated in the warm season, the latter requires an increase in the area of the electrode plates, which in turn increases the size of the structure.
What is needed to make a fuel cell at home
Starting to manufacture a hydrogen fuel cell, it is necessary to study the theory of the process of formation of detonating gas. This will give an understanding of what is happening in the generator, will help in setting up and operating the equipment. In addition, you will have to stock up on the necessary materials, most of which will not be difficult to find in the distribution network. As for the drawings and instructions, we will try to cover these issues in full.
Designing a hydrogen generator: diagrams and drawings
A self-made installation for producing Brown's gas consists of a reactor with installed electrodes, a PWM generator to power them, a water seal and connecting wires and hoses. Currently, there are several schemes of electrolyzers using plates or tubes as electrodes. In addition, the installation of the so-called dry electrolysis can also be found on the Web. Unlike the traditional design, in such an apparatus, not the plates are installed in a container with water, but the liquid is fed into the gap between the flat electrodes. The rejection of the traditional scheme allows to significantly reduce the dimensions of the fuel cell.
In the work, you can use drawings and diagrams of working electrolyzers, which can be adapted to your own conditions.
The choice of materials for the construction of a hydrogen generator
For the manufacture of a fuel cell, practically no specific materials are required. The only thing that can be difficult is the electrodes. So, what you need to prepare before starting work.
- If the design you choose is a "wet" type generator, then you will need a sealed water tank, which will also serve as the reactor pressure vessel. You can take any suitable container, the main requirement is sufficient strength and gas tightness. Of course, when using metal plates as electrodes, it is better to use a rectangular structure, for example, a carefully sealed case from an old-style car battery (black). If tubes are used to obtain HHO, then a capacious container from a household water filter will also do. The best option would be to manufacture the generator case from stainless steel, for example, brand 304 SSL.
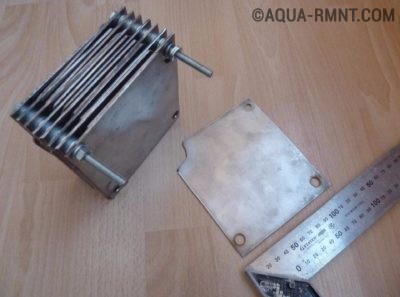
Electrode Assembly for Wet Type Hydrogen Generator
When choosing a “dry” fuel cell, you will need a sheet of plexiglass or other transparent plastic up to 10 mm thick and technical silicone o-rings.
Tubes or plates made of "stainless steel".Of course, you can also take the usual “ferrous” metal, however, during the operation of the electrolyzer, simple carbonaceous iron quickly corrodes and the electrodes will often have to be changed. The use of high-carbon metal alloyed with chromium will give the generator the ability to work for a long time. Craftsmen involved in the manufacture of fuel cells have been selecting material for electrodes for a long time and settled on 316 L stainless steel. in the other there was a gap of no more than 1 mm between them. For perfectionists, here are the exact dimensions: - diameter of the outer tube - 25.317 mm; — the diameter of the inner tube depends on the thickness of the outer tube. In any case, it should provide a gap between these elements equal to 0.67 mm.
Its performance depends on how accurately the parameters of the parts of the hydrogen generator are selected.
Note that polished tubes are not recommended. On the contrary, experts recommend sanding the parts to obtain a matte surface. In the future, this will help increase the productivity of the installation.
Tools that will be required in the process of work
Before you start building a fuel cell, prepare the following tools:
- hacksaw for metal;
- drill with a set of drills;
- set of wrenches;
- flat and slotted screwdrivers;
- angle grinder ("grinder") with a set circle for cutting metal;
- multimeter and flowmeter;
- ruler;
- marker.
In addition, if you build a PWM generator yourself, you will need an oscilloscope and a frequency counter to set it up. Within the framework of this article, we will not raise this issue, since the manufacture and configuration of a switching power supply is best considered by experts in specialized forums.
Do-it-yourself electrolyser for a car
On the Internet you can find many diagrams of HHO systems, which, according to the authors, allow you to save from 30% to 50% of fuel. Such claims are overly optimistic and are generally not supported by any evidence. A simplified diagram of such a system is shown in Figure 11.
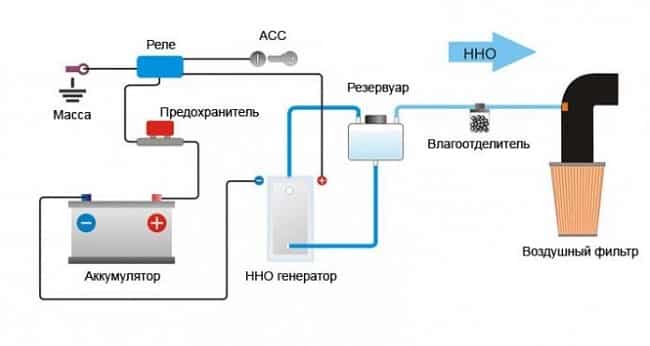
Simplified diagram of an electrolyzer for a car
In theory, such a device should reduce fuel consumption due to its complete burnout. To do this, Brown's mixture is fed into the air filter of the fuel system. This is hydrogen and oxygen obtained from an electrolyser powered by the car's internal network, which increases fuel consumption. Vicious circle.
Of course, a PWM current regulator circuit can be used, a more efficient switching power supply, or other tricks can be used to reduce energy consumption. Sometimes on the Internet there are offers to purchase a low-amperage PSU for an electrolyzer, which is generally nonsense, since the performance of the process directly depends on the current strength.
It's like the Kuznetsov system, the water activator of which is lost, and there is no patent, etc. In the above videos, where they talk about the undeniable advantages of such systems, there are practically no reasoned arguments. This does not mean that the idea has no right to exist, but the claimed savings are "slightly" exaggerated.