Wiring diagram
The development, drawing, design and approval of a heating scheme for a new building, or at least the transfer of a radiator to another place, is the subject of a separate article, not even an article, but several articles. Therefore, we believe that we are talking only about the reconstruction of heating in a city apartment and all the batteries remain in their places.
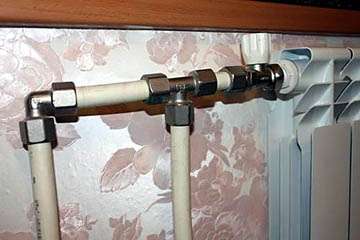
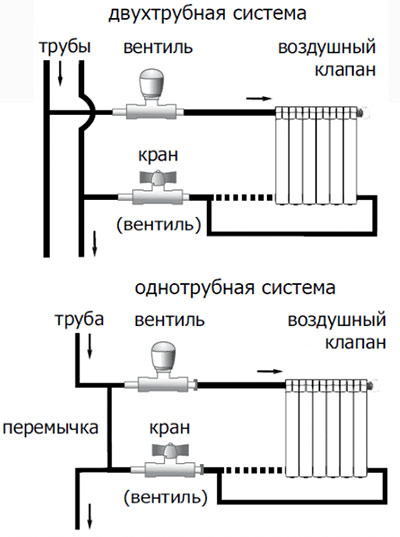
Ways to connect heating radiators
In this case, the general scheme for heating the house remains as it is, and we only need to choose a way to connect the radiators to the riser. There are four options, see fig. Bottom connection - for concealed wiring
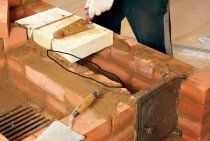
It is important not to forget about TWO ball shut-off valves for each radiator, for supply and return; they are highlighted in color on the left picture. In the event of a leak, this will allow you to disconnect one battery without touching the entire system.
For steel and metal-plastic with aluminum radiators, do not forget about propylene inserts to avoid electrocorrosion. They are also highlighted and labeled on the left.
Floor insulation for concealed wiring
It is seductive from the point of view of aesthetics to remove heating pipes from sight. So that hidden heating wiring does not subsequently cause the righteous wrath of heat engineers with the accompanying sanctions, it is advisable to prepare the floor accordingly. If the decorative flooring is laid on the logs and additional floor insulation is not required, then the pipes are simply laid between the logs, and removable access hatches are arranged above their connections.
Otherwise pipes must be laid in the floor. The methods of floor insulation are described in the corresponding article. and for this case, we can recommend the following:
- We lay pipes.
- We form an additional warm screed from foam concrete. We enclose the pipe connections until the concrete hardens with planks according to the required dimensions (see at the end).
- We lay plywood flooring 12-18 mm directly on a warm screed with gluing the joints with liquid nails or mounting glue. We cut openings in plywood over the pipe joints.
- Restoring clean flooring. We cut hatches for access to pipes larger than openings in plywood - they will simply be removed.
Note: It is preferable to use tongue-and-groove plywood boards. But if there are no violent parties in the apartment, you can also lay a simple one - it is much cheaper.
The second method is somewhat more expensive, but easier to work with and provides access to the pipes along their entire length. To do this, we use foam concrete or aerated concrete slabs on a cement-sand mortar as a warm screed. The rest is the same.
Installation of polypropylene pipes
Main stages
The following stages of work can be distinguished:
- Before starting installation work, it is necessary to cut segments of polypropylene pipes of the desired size. If a pipe with a foil coating is used during installation, then it will be necessary to remove the outer and inner layers of foil at the junction with the fitting.
- Removal of burrs at the end of the pipe.
- Make a mark with a marker at the fitting entry point to the depth of the fitting entry. At the same time, a small gap must be left, which will avoid narrowing at the junction of two pipe segments using a fitting.
- Set marks at the junction of the pipe and fitting. This will help to avoid skew during the connection.
- The fitting and the end of the pipe are put on the heated nozzle at the same time for their uniform heating. Thick parts need to be heated at the very beginning.
When connecting, it is necessary to monitor how the segments are mounted. If one of them fits too loose, it must be replaced with a new one.Otherwise, it will not be possible to achieve good tightness of the pipe, and in the near future a leak will form in this place.
After the parts have warmed up in the right way, they are connected to each other. In this case, you need to use the marks made earlier and try to combine them with each other. Parts must not be rotated during mounting. The hardening of the heated material is no more than 10-30 seconds. Therefore, in the first seconds of the connection, you must be very careful. After the parts are properly connected, they must be fixed to cool for the manufacturer's recommended period of time.
Connection of heated pipes
But how to do it
But leaving aside for now the questions of who should do what, what to be responsible for, we will consider purely technically how it is possible, for example, to change old pipes for plastic ones. This will allow you to remove worn-out and clogged pipes by installing new ones, and thus help to solve the problem of how to increase the heat transfer of the heating pipe - due to the passage of more coolant.
In this case, what is at your neighbors will be critical for the performance of work. If the neighbors from above have already changed the metal pipe of the riser to polypropylene, then you need to install the same one.
It is best if you manage to agree with them on the possibility of connecting to their junction. In this case, you are dismantling the heating in the apartment, i.e. cut out all the old pipes, cut out an adapter from plastic to metal from a neighbor, determine in place the desired length of pipes that need to be laid. Then a metal piece is pulled out of the ceiling, a propylene pipe is inserted in its place and soldered through the propylene sleeve to the neighbors' one.
Connection of a metal and polypropylene pipe using a special coupling
In those cases, if the neighbors have metal left, and they do not allow to make a joint at home in order to pass the ceiling, then you will have to cut your pipe under the ceiling, and cut the thread on its remains. A transition sleeve for polypropylene is placed on it, but the corresponding pipe is already connected to it.
If you want the replacement of heating in the apartment to be complete, i.e. If you plan to replace radiators, then you need to start work with them.
There are quite a lot of them, and of various types, but regardless of this, there are general rules, the implementation of which will allow you to get a good result:
- all radiators in the apartment must be located in the same way, on the same level;
- the battery must be located strictly vertically;
- its top should be five cm below the windowsill and six cm above the floor;
- when mounting a radiator, one mounting bracket must fall on one square meter of its surface;
- the front surface of the battery should protrude beyond the edge of the window sill.
Proper installation of a heating radiator
How to choose polypropylene pipes for heating diameters and assortment
When planning polypropylene heating, the main criterion for choosing pipes is their diameter. The choice of pipes according to this parameter is justified because each diameter is designed for a certain pressure in the system and its purpose. Let's take a look at the variations:
- up to 16 mm. Small diameter PPR pipes are a good choice for building underfloor heating systems. The lack of flexibility in polypropylene makes it somewhat difficult to connect floor heating, but adapters can be used to correct this shortcoming.
- 20-25 mm. This type of polypropylene products is optimal for heating a private house or a network in an apartment. A simple system is mounted using pipes with a diameter of 20 mm, pipes of 25 mm are needed for risers.
- 25-32 mm. They are used when connection of central heating is required in apartment buildings.
- from 200 mm.Such polypropylene pipes are used for heating crowded places: hospitals, hotels, university and school buildings, large stores.
Another item in the range of polypropylene pipes for heating will be their marking. It has the form PN**, where ** are the technical characteristics of the pressure that these products can withstand:
- PN10. A pressure of 1 MPa is allowed, the constant water temperature should not exceed 45 degrees when used in a floor heating system and 20 degrees for hot water supply systems. The most inexpensive type of polypropylene for heating, which is better not to use for the main system in an apartment or heating a private house. Such pipes are produced only with a thin wall (1.9-10 mm);
- PN16. They carry pressure up to 1.6 MPa, the temperature rise is allowed up to 60 degrees. With sudden temperature fluctuations, the service life of such PPR pipes can be minimized. Whether it is possible to put such polypropylene pipes for heating is up to you, but for reinsurance it is better to turn your choice to more durable models. The thickness of their wall starts from 3.4 mm;
- PN20. Universal option: they withstand a working pressure of 2 MPa, the heating temperature of the coolant is 80 degrees. It is better to choose this variety for hot water supply, provided that the wall thickness is in the range of 16-18.5 mm;
- PN25. The most efficient polypropylene pipes for heating with excellent technical characteristics. They withstand pressures up to 2.5 MPa and are only available with reinforcement.
Pipe diameter is an important selection criterion when planning a heating system
The choice of pipes and the method of their installation
Before you install the pipeline in the apartment with your own hands, you need to decide on the material. This is necessary in order to select the necessary connecting elements, as well as choose the installation method.
- Polypropylene pipes occupy a leading position in terms of installing water pipes in an apartment or house. This is due to their technical features, as well as low price. Only one drawback sometimes raises doubts about the advisability of carrying out installation work with this material. This disadvantage lies in the impossibility of disconnecting the pipeline after its installation. Polypropylene material is soldered together using special couplings and a soldering iron.
- Metal-plastic tubes are not inferior to polypropylene in all respects except for the cost. For the installation of metal-plastic, special threaded type couplings are used. This allows, if necessary, to disassemble the plumbing for changes. Suitable for those cases when there is no finance to purchase a soldering iron for soldering polypropylene.
- Polyethylene or HDPE pipes have an even lower cost than polypropylene, and special plastic fittings are used for their installation. This type of material is easy to install, but not acceptable to high temperatures, so often if you perform installation with such material, then only for supplying cold water.
When the best material option is chosen for the installation of a water supply system, you need to figure out the method of connecting pipes. For polypropylene, the solder connection method is used. To carry out work with a soldering iron, it is not necessary to buy it, as you can borrow it from familiar craftsmen.
The soldering method is based on the connection of two polypropylene products using special plastic fittings or couplings. The principle of connection or soldering is based on heating the outer and inner parts of the products, after which they are joined.
Do-it-yourself polypropylene heating in a private house
For a private house, the best choice would be a two-pipe system scheme. From the point of view of aesthetics, it is better to make a closed version of the location of the system, but technically it is quite difficult to hide the pipes in the wall.
The development of a heating scheme from polypropylene pipes also includes a heat source for a private house. The boiler can be solid fuel, gas or electric. It is the electric ones that are considered the safest - if you plan to install a heating circuit from polypropylene pipes with your own hands, it is better to choose this option. A solid fuel boiler is difficult to maintain, and connecting heating pipes to it requires special skills - for this it is better to invite professionals. And connecting to a gas boiler makes sense if gas is supplied to the house.
What matters is which circulation method is chosen for the home heating system. There is a pumping and gravity circulation system. In the first case, the supply and circulation of water in the system will occur due to the operation of the pump. If gravity (natural) circulation is used, it is imperative to install an air vent and an expansion tank that serves to protect against pressure surges. If the heating scheme implies an upper wiring, these elements of the system are installed in the attic of the house.
Important! The correct arrangement of the accelerating manifold (pipe) is important for the operation of the heating system - a vertical section of the pipe connected to the heating boiler. Which polypropylene pipe should be chosen for the accelerating heating manifold will determine the diameter of the rest of the structure: with a main pipe of 32 mm, the diameter of the pipe will be at least 40 mm
The gravitational (natural) heating system made of durable polypropylene is very simple and quite durable, its device does not require additional costs for pumping equipment. But the gravitational system also has some disadvantages, including a limited range (does not exceed 30 m) and a long time to start working.
For a house with a large area, you need to install a system with forced circulation, but it will require more consumables
A gravity system can be chosen for a small private house, provided that the expansion tank is located in a relatively warm room (to prevent the water from freezing in it).
The heating system radiator is connected to polypropylene pipes in the following ways:
The diagonal scheme involves connecting the supply pipe to the upper pipe, connecting the outlet pipe to the lower radiator pipe. It is noteworthy that heat loss with this method does not exceed 2%. Diagonal connection is used for extended circuits (10-12 radiators). With a side connection type, both the supply and discharge pipes are on the same side of the radiator: the inlet is located at the top and the outlet is at the bottom. This method is very effective and is often used in apartment buildings. The lower scheme (“Leningradka”), in which the radiator is connected according to the “bottom-bottom” principle, is not recommended for multi-storey buildings, but is acceptable for autonomous ones. The lower wiring can be hidden in the floor if necessary.
Based on the information provided, the answer to the question "Is it possible to use polypropylene pipes for installing a heating system" will be quite unambiguous. Products from PPR are not only a budgetary, but also quite a reliable option. In the ranking of polypropylene pipes for modern heating systems, reinforced products occupy a special place, and such structures will be the best choice.
Do-it-yourself heating from polypropylene pipes in an apartment
For residents of apartment buildings, the situation is familiar when it is necessary to replace the old cast-iron pipeline. Replacing heating pipes in an apartment is a rather complicated undertaking, but even here it is quite possible to do without the help of professionals.
A self-designed new heating system in an apartment can have good performance if the procedure and safety rules are followed.Replacing old heating pipes in an apartment with polypropylene ones will look something like this:
- coordination of work with municipal services. The first and very important stage, which will give you permission to shut off the water supply and discharge it from the system;
- coordination of work with the tenants of the apartment above and below yours. Replacing the risers will be needed not only in the apartment where the repair is being carried out. However, if dismantling the riser is not possible, you can choose special adapters from cast-iron pipes to plastic ones;
- dismantling of old heating. Old cast-iron pipes lend themselves well to dismantling, but this procedure requires compliance with some safety rules. The brittleness of cast iron depends on how long the system has been in operation. Old pipes break very quickly, breaking into small pieces. When struck with a metal hammer, fragments fly off from the cast iron, which can fall into the pipeline: the water supply system may become clogged. Therefore, for such purposes, it is better to choose a rubber or wooden butt, which everyone will surely find at home. Dismantling work should be carried out by wearing a respirator and goggles;
- a scheme of a new system is formed, a radiator is hung along a given perimeter;
- assembly of polypropylene heating pipes and connection of a radiator;
- checking the system for leaks. The test procedure is carried out under high pressure - 1.5 times higher than the normal working pressure. If the old system was replaced with a new two-pipe system, the water should be let in the opposite direction when checking.
In apartment buildings, it is possible to replace metal heating pipes with polypropylene pipes both completely and partially
The first step is to choose the optimal type of system. The heating system can be one-pipe or two-pipe. The number of radiators and, accordingly, the cost of work will depend on this. A two-pipe system requires more radiators: if there are more than 8, then a polypropylene pipe with a diameter of 32 mm will be used for such heating. If you choose a single-pipe home heating system made of polypropylene pipes, the cost of its arrangement will decrease, but the heat will not be distributed evenly. Each subsequent radiator will be cooler than the previous one. The circuit can be supplemented with thermostat valves that regulate the power of each radiator.
Whatever heating system is planned, it is necessary to place an air release valve in the upper part of the radiator - a Mayevsky tap. In the lower parts, the holes are clogged with a cork.
Important! When screwing the plug into the radiator inlet, it is necessary to clean it with a knife blade from influxes of paint and any other contaminants. This applies even to new radiators.
Also, do-it-yourself replacement of a heating system from polypropylene pipes is done using fittings. clamps, couplings (plugs, corners, tees). Which fasteners and connecting elements will require the replacement of pipes depends on which heating scheme was chosen. Replacement of polypropylene pipes is carried out using a welding machine. The heating time for each type of PPR pipe will be different. The most common 25mm and 32mm polypropylene pipes require 7-8 seconds to fuse. If replacing with aluminium-reinforced PPR pipes, be sure to strip the foil before soldering.
The number of pipes for heating a private house depends on the type of heating system
Replacement of plumbing systems
Step-by-step instructions for replacing with polypropylene pipes:
- Make marks on the tubes in the places where the fittings are attached.
- Fasten the new radiators to the walls with brackets.
- Preheat the soldering iron for polypropylene to 260 degrees Celsius.
- Clean the connected ends from dirt, dust, degrease with gasoline or alcohol.
- Put the ends of the pipes with fittings on heated Teflon nozzles located on both sides of the soldering iron.
- Remove the heated parts from the soldering iron, connect them together. Any bend will lead to operational problems.
It is strictly forbidden to turn the tubes in the fittings, otherwise this will violate the integrity of the fastening. In addition to using a soldering iron, individual elements can be connected using a special adhesive composition.
Switching from an iron pipe to polypropylene, replacement of a pipe section
After assembling the pipeline, you need to conduct a test run. To do this, water is slowly supplied. The pressure gradually increases
It is important to check the connections. We must not forget that self-replacement of metal tubes of risers in high-rise buildings cannot be carried out without permission from the housing and communal services
Otherwise, you can get a fine.
Installation of pipes in the bathroom and in the kitchen. The horrors of dismantling cast-iron sewer pipes in my grandmother's apartment
 Watch this video on YouTube
Polypropylene pipes are considered an actual analogue when replacing old metal pipelines. They cost less, surpass metal in technical characteristics. However, we must not forget that the finished connections are one-piece. The finished circuit cannot be carefully disassembled, which will lead to additional costs.
Secrets of the installation of polypropylene pipes. Master class for beginners
 Watch this video on YouTube
About HMS
HMS (hydromagnetic system, magnetic antiscale apparatus) has nothing to do with "living" and "dead" water and other esoteric curiosities. The principle of its operation is simple: an insert with strong magnets is mounted in the pipe; pipe material does not matter.
Household hydromagnetic systems
Water is a conductor of electricity, and in a pipe it moves, flows. An electromotive force (EMF) is induced in a conductor moving in a magnetic field. In the lumen of the HMS, it is only a few volts or fractions of a volt, depending on the flow velocity, but this is enough for the impurities contained in the water (they are either in the form of ions or their molecules are polarized) not to settle on the walls of the pipes, but to stick together and form a thin suspension, which will precipitate in the sump at the heating unit, and the sludge will be removed.
Corrosion when using GMS is nothing to be afraid of: electrically neutral and therefore the most persistent components of impurities form a thin dense layer of sediment on the inner surface of the pipe, resembling corundum in properties. After an increase of approximately 20–60 µm, the layering stops: the surface polarization intensifies and pushes the next “candidates” back into suspension.
HMS has long been widely and successfully used in industry; most often to prepare water for purification and filtration. In recent years, household HMS have appeared on sale for installation on water supply and heating pipes.
At home, HMS provides, in addition to the reliability of heating and savings, another important advantage: a warm floor in a system with HMS almost never requires a bulkhead, and an additional circulation pump is most often not needed for it.
HMS should be installed on the supply pipe at the very beginning of the system, before wiring. If there are several risers, then for each riser. HMS does not break, does not require maintenance, its validity period is unlimited.
Features of replacing pipes and risers of the heating system
Tip: when replacing heating pipes, it is necessary to enlist the support of neighbors both above and below. Because there will be no sense if the risers remain old in the ceilings.
Replacing the heating riser in the apartment includes the following steps:
- block the risers and release water from them (you need to contact the ZhEK);
- cut the old pipes with a grinder and dismantle them by pulling them out of the floor slabs;
- mark the place of installation of the battery;
- using a level and a perforator, install the battery;
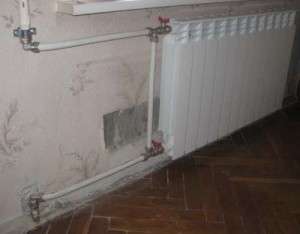
Installation of heating pipes
Tip: it is necessary to install the battery only in level, because in the event of a skew, air will collect in the heating radiator and it will not function well.
Tip: the battery must be equipped with shut-off valves, in the event of a battery leak, this area will be blocked and this will not affect the operation of the entire heating system.
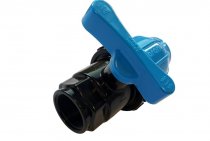
Shut-off valves on the heating radiator
after installing the batteries, connect the pipes;
Important: do not narrow the diameter of pipes that have been installed before
- connect the top and bottom of the battery to the neighbors;
- replacement of heating risers in the apartment provides for the installation of a jumper (if the taps to the batteries are closed, the entire heating riser will not work without a jumper);
- heating risers have been replaced, it is necessary to run water into the riser.
Tip: for central heating, cast-iron or bimetallic heating radiators are the best, they have a large enough flow for water, and they will rarely become clogged.
Do-it-yourself installation of heating pipes, if you know how to tinker a little, is definitely justified:
- The cost of replacing the heating system by hired craftsmen is no less than 12,000 rubles, of which no more than 5,000 are for materials.
- The work requires a reasonable approach, but technically and technologically it is not difficult.
- If the radiators remain in place, no special permits and paperwork are required.
Note: a corrosive inspector may find fault with hidden wiring. In this case, you need to refer to the list of signs of redevelopment of the apartment, see for example the article on connecting a balcony to a room. It says only about the transfer of RADIATORS, and not a word about pipes. In general, “What guys? Who saw them?
Installation of propylene heating
Heating with polypropylene pipes is not mounted "in a plumbing" way: it is carried out mainly by fittings; soldering is permissible only for connecting straight pipe sections to size. Both soldering and fittings for heating pipes are also needed special, more on that below.
Such requirements are explained by considerations of reliability: any malfunction will be revealed at best when the system is pressure tested before the start of the heating season, or even in its midst in severe cold.
Soldering
Polypropylene soldering technology is described in detail in the relevant article.
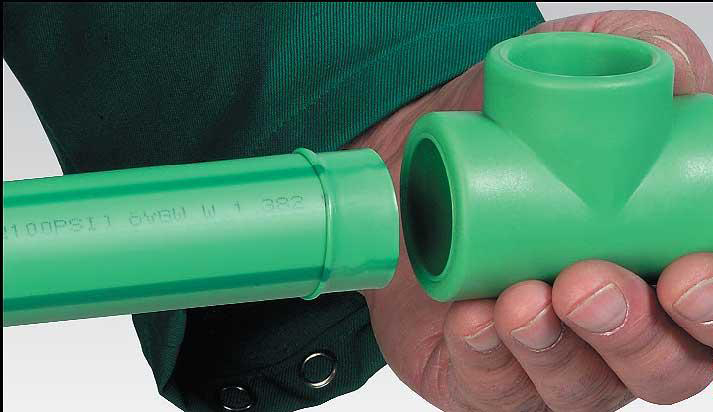
To assemble the heating system, it is important to know that butt-soldered pipe joints are unacceptable. The ends of the pipe sections must be soldered into a special coupling: a larger diameter pipe with a stepped inner profile
Accordingly, you need a suitable soldering iron, an ordinary “iron” will not work.
Fitting
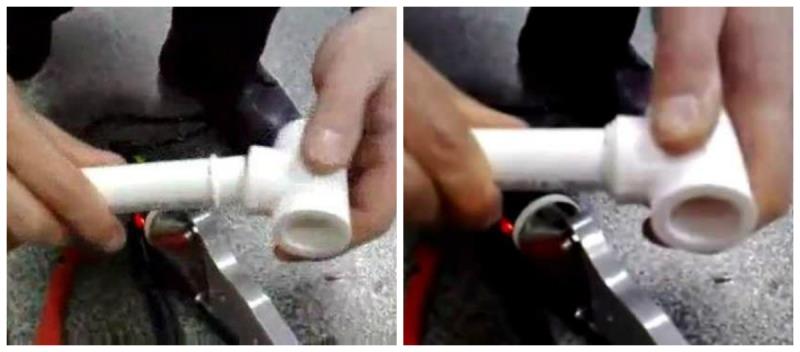
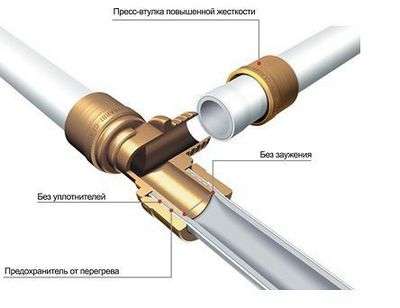
Heating pipe connection
All corners and tees of propylene heating are assembled only on fittings, and metal fittings are “American”, see fig. Shut-off valves are also exclusively metal. A pressed or fused metal clip in metal-plastic connectors with a constant long-term supply of hot water with a temperature above the maximum allowable for hot water supply of 70 degrees will gradually crawl out of the plastic frame, which can lead to a sudden breakthrough.
With hidden wiring, all detachable connections must be available for inspection and repair. That is, it is necessary that they can be unscrewed and tightened to the norm with a gas wrench of the appropriate size. In practice, this means that the minimum distance from any connection point to the wall of the recess under it was at least 15 cm, to the bottom of the recess - at least 2 cm, and to the top of the recess NOT MORE THAN 3 cm. fittings when immuring pipes into the floor.
Do-it-yourself reconstruction of the heating system in an apartment is not difficult, not difficult and does not require documentation, provided that the radiators are not transferred. The main task in its implementation is to carefully consider the choice of pipes, radiators and the possibility of combining it with the insulation of the apartment, and especially the floor.
How to choose by marking
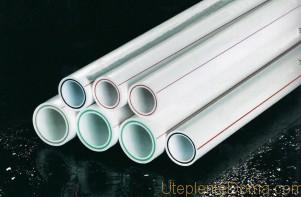
Reinforced polypropylene pipes
Polypropylene pipes are widely used for water supply and heating systems. This material is easy to work with and does not require expensive tools for installation. Before choosing polypropylene pipes for heating, you need to know what they are and how they are marked. Each product has an inscription, marking, in which information with characteristics is encrypted. Knowing the interpretation of the designations, you can easily determine the scope of application with just one glance at the product. For their manufacture, different plastics are used, which are suitable for various purposes. To answer the question of which polypropylene pipes are best for heating, consider the types of plastic used:
- products with the PPH marking are made from homopolymers - this is a material whose smallest particles consist of the same structural units. Such plastic is suitable only for cold water and ventilation systems;
- PPB products are made from block copolymers. This is a more complex component, its molecules consist of alternating simple structural units (homopolymers), which differ from each other. The alternation has a systemic character, that is, it is ordered. Such polypropylene pipes are applicable for the "warm floor" heating system and water supply;
- products with the PPR marking are made from a random copolymer, which has a high degree of crystallization. This makes it strong enough to use such polypropylene pipes for heating.
The common question of whether polypropylene pipes can be used for heating can be answered in the affirmative with 100% certainty. Now this material is one of the most common, despite some shortcomings.
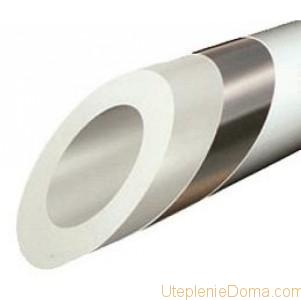
Solid aluminum layer
Polypropylene pipes can be cast from a monolithic continuous layer of plastic, or consist of several layers. Single-layer products can only be used for the installation of systems with a low temperature of the transported substance. For example, for cold water supply and ventilation. In other cases, when the circuit operates at elevated temperatures, reinforced products must be used. The reinforcement layer of the heating pipe made of polypropylene is:
- solid;
- perforated - with holes like a sieve.
Reinforcement of a heating pipe made of polypropylene is carried out with aluminum or fiberglass, the main task of which is to compensate for linear expansion. For comparison, consider the difference in coefficients. For non-reinforced products, the coefficient of linear expansion is 0.15%, and for products with an aluminum layer - 0.03%. As you can see, the values differ by a factor of five. For clarity, we will calculate based on the formula:
Elongation (mm) = coefficient of linear elongation (%) x section length (m) x difference between max and min water temperatures.
For ten meters of a heating system made of reinforced polypropylene pipes, the linear expansion will be 18 mm (0.03 * 10 * (80-20)), and reinforced, respectively, 90 mm. The difference is 72 mm at ten meters of the contour, which is significant.
When choosing polypropylene pipes for heating, in addition to the material for manufacture, an important characteristic is the marginal pressure, which is referred to as PN20. The numerical value indicates the number of atmospheres that the product can withstand at a coolant temperature of twenty degrees during the warranty period
Also, what you should pay attention to is the diameter and thickness of the walls. It is noteworthy that the marking does not indicate the internal, but the external size of the product.
The rest of the values, such as the batch number and certificates, are useless to the layman. Unless the manufacturer matters, this is if you are at least a little familiar with the market for polypropylene pipes.
Types of heating by the number of pipes and risers
Allocate one- and two-pipe systems.In the first option, the heating of a private building is gradually connected to radiators.
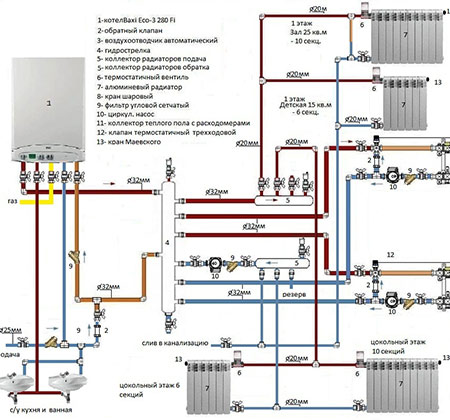
An example of a two-pipe heating system for a cottage
And this means that hot water (liquid) passing through all devices loses temperature, and therefore the last batteries are much colder. This system is suitable for residential buildings with a small area, and then the rooms are first connected, and then the technical rooms. If we consider a two-pipe system, then it can be noted that here the flows are separated, since the return and supply pipelines run in parallel.
In this embodiment, a coolant with the same high temperature is suitable for each radiator, since an extensive system is used. The advantage of this wiring is that, if necessary, you can turn off one battery or riser, and the rest will continue to function.
The device of a two-pipe heating system
According to the number of risers, vertical and horizontal wiring are distinguished. In the first version, the installation of heating from polypropylene pipes looks like this: risers carry the coolant from one floor to another. With horizontal wiring, there is one central riser and horizontal branches (one or two pipes) are distributed over the floors.
In turn, it is divided into:
Stop warming up the street
Whether or not the radiators will change during the reconstruction of the heating, but since they will still have to be removed for some time, it is highly desirable to cut off the outflow of heat to the outside. To do this, you need to close the wall behind the batteries with heat-insulating mats aluminized on both sides. How such a litter works for heat can be found in the article on floor insulation; here it suffices to note that in a block Khrushchev with radiators in niches, double heat shields behind the radiators are equivalent to wall cladding with 20 mm plywood.
In an alternative version of wall insulation behind the radiator, heat-insulating material (1) and aluminum foil (2) are used separately.
The shielding mat is installed simply: we cut holes in it for the hooks of the battery suspension, on the side adjacent to the wall we apply thin “sausages” of building silicone or mounting glue with an “envelope”, put it on the hooks and press it against the wall.
Indispensable condition: the mat must be organic, synthetic or natural fibers. The use of open mineral wool mats in residential premises is unacceptable - it is harmful to health.