The deterioration of water communications has affected the quality of water supplied to apartments and private houses. Its use for cooking and drinking is impossible without the use of filters. The best degree of purification is ensured by a reverse osmosis system - the most advanced filtration system to date. Do-it-yourself installation does not require any special skills or special tools.

How does a reverse osmosis filter work
Initially, plants of this type were used to desalinate sea water. But as soon as technology allowed the production of such devices in a smaller and more expensive version, they firmly occupied their niche in the household filter market.
The operating principle of the device is based on reverse osmosis phenomenon – forcing water through a membrane with microscopic holes, the same size as H2O molecules. Larger particles are retained, so the output is almost demineralized water. Impurities that have not passed through the membrane filter in the form of a concentrated salt composition are drained into the sewer.

Distilled water is harmless to the body, but it is also devoid of useful salts that are vital for it. Therefore, after the final purification, it is recommended to subject the water to additional mineralization, increasing its usefulness and improving taste.
INTERESTING FACTS!
- The purest water, devoid of impurities, does not freeze at 0 ° C, but goes into a state called supercooling. It does not turn into ice until -38 °C and remains liquid. Scientists have found that for the appearance of ice crystals, a point of formation is needed, a foreign body in the water - an air bubble, a mote. If you shake a bottle of super-cooled water, bubbles will appear in it and it will instantly freeze.
- Water is an excellent conductor of electricity. But only not distilled, because electricity is carried by molecules of impurities and ions of substances dissolved in it.
- Everyone is familiar with the three states of aggregation of water - liquid, solid and gaseous. Scientists distinguish five phases of liquid water and as many as 14 phases of ice.
- At -120 °C, frozen pure water becomes viscous and viscous, and at -135 °C it becomes vitreous - solid, but without a crystalline structure.
For durable operation of the membrane, water is first passed through filters that remove mechanical suspensions and other impurities from it. Thus, the reverse osmosis water purification system consists of 4-5 stages, to which additional elements are optionally connected.

Water purification steps
Water preparation is carried out in the pre-treatment unit. These are three different types of filters:
- Coarse cleaning - retains particles of sand, rust and other mechanical suspensions.
- Carbon - removes chlorine, phenol and other dissolved substances.
- Fine cleaning - captures particles up to one micron in size.
Prepared water seeps through the membrane into the storage tank. The concentrated brine, containing all the impurities, goes through the pipes into the sewer.

Before use, one more final stage of cleaning is provided - a carbon post-filter or a mineralizer.
The subtleties of choosing an osmotic filter and additional elements
Before going to the store, several measurements are taken. They will help you make the right choice.
- measured pressure in pipes. At least 2.8 bar is required to force liquid through the membrane and normal operation of the reverse osmosis system. If it is less, you can not do without a booster pump - a pressure booster pump with a transformer.

- Estimated household water consumption is calculated.Focusing on this indicator, determine the desired performance of the cleaning system. First of all, it depends on the membrane used. For domestic use, a 50G (8 l/h) or 75G (12 l/h) membrane is sufficient. Gallon (G) per day is a measure of membrane performance adopted by global manufacturers. 1 G=3.785 liters.
- Focusing on the throughput of the membrane, they acquire a water flow restrictor. This is a calibrated tube through which liquid is discharged into the sewer. For a 50G membrane, a flow restrictor with a value of 300 is suitable, for a 75G - 450, for a 100G - 550. With a low pressure in the water supply, you can take a restrictor with a lower value.

- It is also recommended to measure the place under the sink to be sure that the selected model will fit there.
- For proper sealing of the joints, an FUM tape is purchased.
Do-it-yourself installation and connection of reverse osmosis
The preparatory work is simple:
- Blocking water access to the apartment.
- We relieve the pressure in the pipes by opening one of the taps for 1 minute.
The installation procedure is indicated in the instructions included in the delivery. In most cases, the appliance is placed under the sink: this arrangement allows easy access for preventive maintenance and hides it from sunlight.

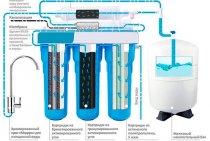
The connection diagram can be seen in the following image.

Drinking tap installation
On the sink or on the countertop a separate faucet for clean drinking water is installed.
- Drill a hole at the attachment point. We choose it so as to avoid kinks or twisting of the eyeliner.
Some masters paste over the surface of the countertop around the future hole with a plaster: this avoids chipping. Drilled in two stages: first with a 6 mm drill, and then expanded to 12. The torn edges are trimmed with a needle file.
- Having equipped the tap with a decorative trim and a rubber washer, we insert it into the hole. From below we put on a smaller rubber washer, a plastic ring and other elements indicated in the diagram, and tighten the threaded connections.

Chips and other contaminants should be carefully removed from under the rubber gasket to ensure tightness.
In the future, it remains only to connect a drinking tap to the outlet tube from the reverse osmosis filter.
Water connection
The connection with the water supply is carried out by means of a coupling (adapter, tee), into which the water supply tap from the kit is inserted. Typically, a tee is mounted at the junction of the water pipe with a flexible hose leading to the mixer.

Procedure:
- Disconnect the cold water faucet from the water supply.
- We connect the eyeliner to the adapter, checking for the presence of a rubber gasket.
- We screw the water supply tap into the adapter coupling.
- We unscrew the nut from the water supply fitting and put it on the plastic tube from the filter kit (see photo).
- We pull the tube itself onto the fitting and tighten the nut by hand without using a wrench, with a little effort.
- The water supply tap can be equipped with a quick-release collet connection, in which case you just need to insert the tube until it stops.

- Close the water supply tap and check the joints for leaks.
The tightness of the connections is ensured by the use of FUM tape.
The booster pump, if necessary, is placed between the pre-filters and the osmotic membrane. This will extend the life of the pump: it will not wear out due to sand and rust. The pump control relay must be located between the membrane and the storage tank.
Three-way valves are used for the installation of measuring instruments, such as a pressure gauge.
A four-way bypass valve is located in the same area. It will shut off the water when filling the storage tank.

Installation is simplified if all devices are placed by the manufacturer in a single housing.It is these models that are easiest to install on your own.
Sewer connection
To drain dirty water into the sewer, a hole with a diameter of 7–8 mm is made in the drain pipe of the sink. Then the order will be like this:
- On the part of the clamp with a hole, we glue the gasket.
- We fix the clamp so that its fitting coincides with the drilled hole in the drain pipe.
- Tighten the nuts on the clamp with a wrench.
- We insert a silicone-lubricated outlet tube into the clamp fitting, which is usually black. All these parts are included in the delivery. The tube should be directed downwards, and not rest against the wall of the siphon. So the water discharged into the sewer will make less noise.

Important! Do not place a drain hole at the bottom bend point of the siphon. It is advisable to do it above the water seal. The area on which the clamp will be fixed must be flat, without bending: this is the only way to achieve tightness of the joint.

Installation of filter elements and storage tank
The modules of the filtration system must be compactly and conveniently arranged under the sink. We select the wall on which the filter unit will hang, and screw the screws into it. Then we proceed according to the following scheme:
- We install the cartridges in the filter flasks, strictly following the sequence prescribed in the instructions.
- Insert the membrane into the housing.

- We lubricate the tubes for connecting the parts of the filter with silicone and connect them in the correct order.
Tube connection scheme:
- The water supply pipe is the inlet of the first filter.
- The storage tank is the inlet of the 5th stage filter.
- The output of the 5th stage is a drinking tap.
- The outlet of the membrane filter (4th stage) is a drainage hole (clamp).

How tubes are connected:
- We cut the tube to size at a right angle (there should be a small margin, the tube will be deepened by 1–1.5 cm on each side).
- We press our fingers on the collet - a plastic ring that protrudes from the flask - and carefully remove the plug. If it does not come out, you need to press a little harder so that the pressure is even.
- Again we press on the collet and insert the tube so that it enters as far as it will go.
- We put on the locking clip-half ring on the collet.
- We check the quality of the connection by pulling the tube towards you.

To connect the storage tank, we twist the tap from the kit onto the thread of the pipe, sealed with FUM tape, and insert the desired tube into it.

Many manufacturers do not separate the mineralizer into an additional step. As a rule, the mineralizer combines the functions of a carbon post-filter and a mineralizing one.

Assembly and installation of systems of popular brands: video
The principle of installing reverse osmosis systems is the same, but the products of different companies have their own differences. Filters from the following manufacturers are widely known on the Russian market:
- Atoll is the very first reverse osmosis system in Russia. He has vast experience in developing, supporting and improving reverse osmosis technology in Russia for 25 years. A wide range of models will not leave even the most demanding customer without a choice. It is supplied both as a set of filter cartridges and as a compact ready-made unit. Such a module is easy to connect yourself. There are budget and advanced modifications.
We will consider the installation process using the example of the reverse osmosis system Atoll A-575 Box STD (Sailboat)

- "Geyser" - systems of osmotic cleaning of the "Prestige" series. They come with a storage tank that allows you to draw water for drinking at any time. Models with the letter “P” in the name are equipped with a pump that increases the pressure in the system and are more expensive. The letter "M" indicates the presence of a mineralization module.
- Aquaphor. One of the leaders in the production of filter systems. Each model comes with a 5 liter expansion tank.Osmotic membranes from Aquaphor work well even at low pressure in the water supply system without installing an additional pump: just 1.5 atmospheres is enough. Another distinguishing feature is the economical use of liquid: no more than 20% of the total volume of water is spent on removing impurities from the membrane.
- "Barrier". The best model according to reviews is Osmo 100. Has 5 stages of cleaning, 8-liter storage tank. It is cheaper than analogues of other companies, while not inferior to them in quality. Of the shortcomings - the lack of a mineralizer.
- Aquapro. Proven filter systems with a good price/performance ratio. A popular model is AQUAPRO AP 600 with a large storage tank of 12 liters and 5-stage filtration.
Startup and flushing
Before starting operation, it is necessary to flush and check the system. This is done like this:
- Rinse the filter elements by running water with the valve of the storage tank closed. Drains about 10 liters of water. Simultaneously with flushing, air is expelled from the system.
- Stop the flow of fluid to the filter. Check for leaks. If necessary, correct errors when connecting.
- Fill the system with the valve of the storage tank open. This will take several hours. After all the liquid is drained.
- For drinking and cooking, use water only after refilling the container.
Maintenance and replacement of cartridges
An operating osmosis treatment plant always contains water. If it stagnates, an unpleasant musty smell appears. It is easy to avoid this: every day you need to update the water, draining at least 0.5 liters from the system.
Replacement of cartridges or osmotic membrane is carried out, focusing on the terms specified by the manufacturer, or on the deterioration of the quality of cleaning.
- Prefilters are operated no more than 6 months.
- The carbon post-filter, which completes water purification, is designed for 1 year of operation.
- The osmotic membrane will last up to 2.5 years.

Replacing cleaning elements is easy:
- Shut off the water supply to the inlet system.
- We open the drinking tap and drain the liquid from the system to the maximum.
It is impossible to completely remove water from the device, so rags are laid on the floor so as not to flood the neighbors.
- If the location of the cartridges does not allow removing the filter elements, disconnect the tubes and remove the equipment from under the sink.
ibuilder.decorexpro.com/en/ recommends: label or photograph tubes so you don't mix them up during assembly. Also take a photo of the removed cartridges, which is convenient to navigate when installing new replacement parts.

- We unscrew the lids of the flasks and extract the contents of the filters.
- We wash the mesh of the filter from mechanical impurities with a jet of water, we replace the contents of other cartridges. We also thoroughly wash the flasks inside.
- We twist the lids of the flasks, paying special attention to the condition of the rubber seal. We assemble the system and test for leaks.
Proper selection, installation and proper maintenance will allow you to operate the reverse osmosis system for a long time without losing the quality of the treated water.