The air valve plays a key role in the ventilation of the apartment. If the ventilation installed in the apartment does not function well, then part of the air flow returns from the common house channel back to the living quarters. Accordingly, an unpleasant smell is clearly felt in the apartment. This phenomenon is typical for bathrooms, bathrooms and kitchens. You can solve the problem by installing a check valve in the ventilation system. You can purchase a factory product or make a design with your own hands.

What is a check valve
A device that is installed in the ventilation system to prevent the return of air flow is called a check valve. In other words, reverse thrust is eliminated. In addition, this design prevents insects from entering the apartment, protects living quarters from dust and drafts. Regardless of the type and design features, the check valve operates automatically and does not require additional settings.

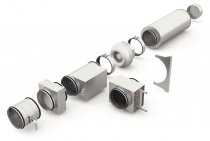
The principle of operation of such devices is quite simple. In the center of the valve is an axis on which the damper is mounted. When the hood is operating, the damper opens slightly, and the air flow from the apartment goes into the common house ventilation shaft. When the fan is turned off, the damper closes the duct flow by gravity, preventing backdraft. In apartment buildings, check valves in the form of a "butterfly" are widely used. This double-leaf design can be from 100 to 315 millimeters in diameter.
Varieties
These devices may differ in shape, principle of operation and method of installation. Let's look at each type in more detail.
- Installation. The air damper can be installed both vertically and horizontally. It depends on the location of the duct. For example, if the duct is vertical, a horizontal check valve must be installed. This will ensure more efficient operation of the device.

- Form. Valves can be round or rectangular. The recommended throughput of such a device can vary from 4 to 6 m / s. The design can be purchased separately or paired with a hood.

- Operating principle. The damper plays a key role in the operation of the check valve. It can be of two types: spool or disk. The first type is designed to work with liquids, so it is not suitable for ventilation. We are more interested in the second option - a disk or plate to prevent reverse thrust.

The non-return valve for ventilation can have a heating function. This option prevents ice and condensation. The effectiveness of this design in apartment buildings is questionable.
The ventilation in the apartments does not come into contact with the outside air, so you are unlikely to need heating. In addition, such devices are more expensive and more difficult to install with your own hands. Therefore, do not succumb to the persuasion of sellers and purchase regular models.
How to choose the right check valve
The functionality of the entire ventilation system will depend on the choice of the check valve. Therefore, the choice of these devices must be approached very responsibly. The first thing you should pay attention to is the mobility of the damper. It should rotate freely on the transverse axis. Thus, the non-return valve will operate even from a slight movement of air.
The second parameter worthy of attention is the cost of the product. Usually the price consists of the following points:
- Valve size and section type;
- Material;
- manufacturer popularity.
Almost 30% of the price depends on the last parameter. It is worth considering that valves made by eminent manufacturers differ in workmanship.Therefore, saving when choosing is not worth it. In addition, more expensive models usually come with an exhaust fan.

The efficiency of the check valve depends on the fan power. If the draft of the air flow is insufficient, the check valve will perform the function of a conventional damper. The power of the hood should be commensurate with the internal volume of the room. For example, an exhaust fan with a power factor of 10 is suitable for the kitchen, and “sevens” can be used for the bathroom and toilet.
We make a non-return valve with our own hands
If you do not have the desire to spend money on purchasing a check valve, you can do it yourself. It’s worth clarifying right away that you won’t be able to completely avoid costs, you still have to buy an exhaust fan. So, the check valve manufacturing scheme is as follows:
- For the base, you will need durable material. You can use thick plastic or textolite. A plate is cut out of this material, which fits in size to the ventilation hole. The thickness of the plate can vary from 3 to 5 millimeters.
- Holes are drilled at the corners of the base for attaching the plate to the wall. In addition, you will need four more holes for mounting the exhaust fan. Holes are drilled in the center through which air will flow. The number of these holes and their size are up to you. It is worth noting that the more cells there are, the higher the ventilation throughput.
- The fan is attached to the main plate. To make the structure airtight, it is recommended to install a rubber gasket at the junction. In addition, small rubber pads can be installed under the mounting bolts. This will reduce noise and vibration when the fan is running.
- Now you can start installing the shutters. To do this, you can use a thick plastic film (at least 0.1 mm) or thin plastic. The film is glued to the base in such a way that it completely covers the ventilation holes. Plastic sashes are installed on the base with a solid square. Dividing the square into two equal halves is necessary only after the completion of all work. If you are using plastic wrap, it must be absolutely smooth. Any fold will lead to a violation of the tightness of the structure, respectively, there will be no sense from such an air valve.
- The finished structure is installed in the air duct, and attached to the wall with self-tapping screws or dowel-nails. The gaps between the valve and the wall are sealed with sealant. After installation, the plastic film is cut into two equal parts, these will be the flaps of the check valve. To make the cut perfectly even, you can use a mounting knife.
Thus, we have a home-made membrane with a check valve function. The structure works like this:
- With natural circulation, under the influence of the air flow, the flaps open slightly. Thus, the air from the apartment freely enters the ventilation shaft.
- When the effect of reverse thrust occurs, the sashes are hermetically slammed shut without letting air from the general house ventilation into the apartment.
- For forced ventilation of the room, the fan is turned on.
Such a design can last for several years, not inferior in performance to factory models.
It is worth noting that not only unpleasant odors, but also small insects can penetrate into the apartment from the ventilation. To prevent this phenomenon, it is recommended to glue a fine-mesh plastic mesh or a piece of nylon before installing the sashes. The latter option is preferable. Capron is easier to clean and easier to replace if necessary.
In fact, it is not so important which version of the check valve you install: purchased or homemade.The main thing is that it provides reliable protection of the apartment from unpleasant odors.