The effect of presence has ceased to be the prerogative of films, gradually three-dimensional images penetrate more and more densely into all spheres of our life. You will no longer surprise anyone with such things as photo wallpapers and photo curtains, stretch ceilings with a sky pattern identical to the real one, and recently self-leveling 3D floors have increasingly begun to appear in the offices of large companies and the apartments of advanced fashionistas. They are valued not only for their aesthetic appeal, but also for their reliability, safety and quality. According to the manufacturing technology, they are not too different from ordinary self-leveling floors, but in order to achieve the desired effect, you need to know a few tricks.

Self-leveling 3D floor - a masterpiece under your feet
Having delved a little into the historical jungle, we note that the 3D self-leveling floor came into our everyday life right from the street. After all, it was streetarters who first began to use three-dimensional graphic pictures, causing interest and admiration among the audience. When you look at their creations, it seems that your own eyes are deceiving you and under your feet is not at all banal asphalt, but, say, a tropical coast, the jaws of a monster or the mouth of a volcano.

Unfortunately, the name of the first creative who thought of creating a photo masterpiece - 3D floor - by transferring street technology to living quarters, remains shrouded in darkness. We only note that the Western world has been using this idea with might and main for more than five decades. While in Russia, she found a place for herself relatively recently, gaining more and more popularity every year.
Bulk 3D coatings: varieties and features
There are 3 types of self-leveling floors with a three-dimensional pattern:
- Self-leveling 3d floors with photos are the most common type of this technology. For its implementation, a primer solution and a leveling layer are applied to the concrete screed-base, directly onto which a photograph of the required size is laid. It is already in turn filled with a finishing polymer composition. It is he who, refracting the sun's rays, creates the necessary volume.
- A 3D pattern on a self-leveling floor is created in approximately the same way, but instead of a photograph, a picture created on a PC is used.

- Self-leveling 3d filled floors are obtained by mixing the polymer mixture with various additives, such as foil or colored sand. All this beauty is filled with a transparent polymer, after which the flooring never ceases to delight you with its depth, transparency and color tints.
The main operational characteristics of this type of flooring design follow from the properties of the material used for the 3D floor. It is a polymer mixed with epoxy or methyl methacrylic resins. They provide:
- Long service life (more than half a century).
- Resistant to sunlight, moisture and pollution.
- No seams.
- Reliability even with intensive use.

How are self-leveling 3D floors made
We suggest considering how 3d floors are made and what should be considered in order to complete them yourself.
We remind you that any type of finish has both positive and negative sides. 3D self-leveling floors are no exception in this matter. Their advantages were described by us in the previous paragraph, it's time to mention the disadvantages:
- making 3D floors on your own is quite difficult, this process is quite long and laborious;
- the amount that a professional will have to pay will be quite impressive;
- dismantling this type of bulk coating will be extremely difficult.
If, after weighing all the aspects and finding out how much a 3d self-leveling floor costs, you nevertheless made a positive decision, be prepared to go through several basic steps.

Stages of creating self-leveling floors with a three-dimensional image
Before you yourself make the interior of your apartment extraordinary and unforgettable, you have to choose the right image. You can do this with the help of a graphic designer or on your own.
Selecting a 3D image
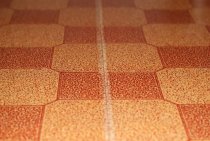
Calm natural motifs, marine, forest or graphic themes, in calm and eye-pleasing colors are ideal for the design of self-leveling floors.
Even if you prefer catchy, bright and aggressive paintings, you still should not choose such a floor ornament. It will negatively affect the psyche, over time it will become boring and boring.

Having chosen the desired pattern, adjusting it to size in Photoshop, you can order printing on banner fabric in any of the companies providing such services.
Installation steps
After the manufacture of the future drawing for the self-leveling coating is completed, you can begin to understand, how to make a 3d floor.
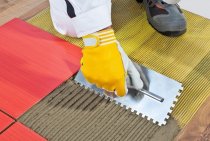
- Carefully prepare the surface. The ideal basis for self-leveling floors with an image is a concrete screed, pre-made and completely dried.
- When the screed is ready, the surface should be leveled completely. Small irregularities are cleaned with a grinder, and large ones with a perforator. Cracks are sealed with epoxy.
- Using a brush and a roller, we prime our base surface, wait until it is completely dry.
- Next, fill in the self-leveling base layer of the self-leveling floor. It is applied in stripes from the side of the window, trimmed with a special rule and a spiked roller that removes formed air bubbles.

- When the base layer dries, its surface is primed again with a mixture of a transparent polymer intended for a finishing self-leveling floor with a solvent.
- It's time to start applying the image prepared by us, it is glued as accurately as possible onto the base layer.
- Next, the final filling with a transparent polymer is carried out.
Advice. Calculate in advance how much material you will need. To fill 1 m2 of the surface of the self-leveling floor with a layer of approximately 3 mm, about 4 kg of polymer mixture will be required. The process of its complete drying takes about 1 week.
- The surface of the self-leveling floor will be protected by a layer of anti-slip transparent varnish.

How to make self-leveling 3D floors: video
To finally explain for yourself how self-leveling floors are made, how complicated and accessible this process is for you personally, we recommend that you watch a video tutorial on the Internet.
Self-leveling 3d floors video:
You can also look at other materials, fortunately, now there are a great many of them available.
How much does a self-leveling 3D floor cost
The advantages of finishing floor coverings created using this technology are undeniable, however, the cost of self-leveling 3D floors makes many people refuse to put the idea into practice. Depending on the materials used, the region of residence and other factors, the spread in price ranges from 3 to 7.5 thousand rubles. per m2.
If you personally put self-leveling floors 3d, you will be able to significantly save on work. However, this process is very time-consuming, requires patience and specific skills. Having made the slightest mistake, you risk irrevocably spoiling the whole result.

We also note that one should not save on workers. Often, specialists who require a minimum payment have correspondingly low qualifications, which means that the work they have done will have to be redone. Then the answer to the question, how much do 3d floors cost, increases significantly.
Despite the impressive costs, this finishing option fully justifies the investment.Unlike the laminate flooring that is now popular, self-leveling floors with a pattern will last a long period of time, remaining immune to temperature fluctuations, sunlight and mechanical damage.