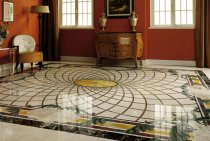
Stunning three-dimensional paintings on the floor, which have gained immense popularity around the world, appeared thanks to the development of 3D self-leveling floor technology. You can decorate the floors in an unusual style with the help of specialists, but not everyone can afford such expenses, since the wages of qualified craftsmen should be added to the prices of materials and tools. The question of how to make 3D floors with your own hands worries many adherents of self-repair of their homes, and professionals have begun to train those who wish with the help of detailed lessons in which they willingly share their secrets of craftsmanship.

It is rather difficult to achieve the desired effect: you need to buy building mixtures, finishing materials and tools according to the list, choose a three-dimensional drawing or make it, process it in a graphics editor and print a photo, carefully study each stage of work, see how experts make 3D floors with their own hands (video ).
Step-by-step instructions for making self-leveling 3D floors with your own hands from a to z with drawings and a video lesson will help beginners complete all the steps without any problems.
Tools and materials for self-leveling floor 3D
When installing self-leveling floor, you will need:
- wide spatula;
- rule;
- needle roller;
- ordinary roller;
- wide brush;
- grinder or grinder with a disc with a diameter of 18 cm;
- sand;
- cement;
- water;
- construction mixer;
- perforator;
- respirator;
- gloves;
- protective glasses;
- paint shoes (shoes with spikes);
- construction laser level;
- water level;
- primer;
- wallpaper knife;
- drill with a nozzle;
- containers for mixing the composition;
- two-component polymer composition;
- photo or drawing in 3D format on a vinyl basis;
- colorless varnish;
- industrial vacuum cleaner.

What is a self-leveling floor and how to make it
Self-leveling floors are seamless floor coverings made of polymer compounds - cement-acrylic, polyurethane, methymethacrylate, epoxy. Filling technology consists of several stages.

Stage one - preparing the foundation
How to make a self-leveling floor? First you need to prepare the base for it:
- remove all furniture, remove skirting boards, doors with boxes, dismantle the old floor covering to the screed, remove dust and debris;
- lay down waterproofing material in rooms with high humidity;
- on top of the waterproofing layer, make a concrete screed or cover the surface with a mixture of cement and sand;
- completely dry base to process with a grinder or grinder;
- remove notches and irregularities with a perforator;
- fill cracks with a mixture of cement and sand;
- check the horizontalness of the screed surface with a rule or a laser level;
- after drying, thoroughly clean the room - it is advisable to use a construction vacuum cleaner. Particular attention should be paid to greasy stains, which must be removed with a solvent and acetone.
You can start further work on the design of the self-leveling floor with your own hands only after the concrete screed has completely dried, which can last up to 30 days.

Stage two - primer
For high-quality adhesion of the polymer bulk coating to the base, it is necessary to cover the surface of the screed primer in two layers:
- pour the primer and evenly distribute it over the entire surface with a spatula, roller or brush, leaving no gaps at the joints of the floor with the walls;
- apply the second layer of primer when the first one dries, and smooth it thoroughly;
- leave for at least 24 hours for the last coat of primer to dry.

Stage three - pouring the base layer
At this stage of the installation of the self-leveling floor, you must perform the following steps:
- Prepare the polymer composition for the base layer by mixing the components with the solvent in a container in a ratio of 2:1. It is necessary to use a construction mixer, since manually mixing the composition to a homogeneous consistency is almost impossible due to the many small lumps and the rapid solidification of the polymer.
Important! You can not immediately mix the composition in one large portion, as it will harden and become unusable. It is better to cook in small batches alternately.
- Pour the ready mix for the self-leveling floor onto the base, quickly and very carefully distribute a thin even layer over the surface with a spiked roller. Make sure there are no bubbles.
Advice. In a large room, the self-leveling floor should be poured in strips, starting from the corner opposite the entrance. Smooth the borders with a wide spatula. Ensure that there are no overlaps during pouring. We must try to spend no more than 10 minutes processing each strip.

Stage four - installation of a 3D image
When the base layer of the self-leveling floor hardens, you can start laying the decorative layer:
- dilute the polymer composition with a solvent and apply a thin layer on a dry surface;
- place a pre-prepared drawing or photo on a vinyl basis on the treated surface, align the edges, which should protrude beyond the perimeter of the base and lie on the walls;
- press the image element to the self-leveling floor with a dry roller and, starting from the center of the room, roll it out over the surface so that there are no air bubbles between the base and decorative layers, which will subsequently lead to cracking of the decorative layer;
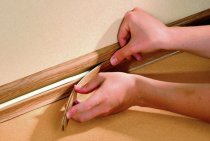
- when the decorative layer sticks to the base layer, carefully cut off the excess with a sharp wallpaper knife;
- Carefully clean the treated surface from dust and grout residues.

Stage four - finishing the self-leveling floor
The last step in the design of the 3D self-leveling floor is the application of a finishing layer, which will help emphasize the effect of a three-dimensional image and keep the coating from scratches, dents, and deformation for a long time. To fully comply with the technology will require:
- using a construction mixer, mix a transparent polymer composition with a solvent in the same proportion that was when connecting the components of the base layer of the self-leveling floor;
- pour the composition and carefully spread it over the surface with a roller so that the layer thickness does not exceed 0.3 mm;
- the polymerization process will take about 30 minutes, after which it is necessary to cover the self-leveling floor twice with a colorless varnish.

It is not necessary immediately after finishing the finishing to actively use the room, drag furniture there and put it on the newly made self-leveling floor. It is necessary to wait until all layers dry evenly, the polymerization processes will end, which depends on the temperature and humidity of the air, season, weather. If you managed to make 3d self-leveling floors in the apartment with your own hands in all rooms, you will have to ask to live for one or two weeks with relatives, friends or go to the country. It is better to make a self-leveling floor in stages - first in one room, then in another, and so on.
Important! At each stage of work with a bulk coating, a respirator, gloves and goggles should not be neglected, since dispersed dust and vapors of polymer compounds settle on the skin of the mucous membrane of the nose and mouth, get into the eyes and throat, causing skin irritation, a feeling of sand in the eyes, runny nose, cough.
The technology for manufacturing a self-leveling floor in 3D format with your own hands involves the use of spiked shoes from the moment the polymer composition is poured until the end of work.

Variants of decorative design of self-leveling floor
How to make self-leveling floors original and unique? The 3d flooring technology provides many opportunities to bring your own ideas to life. It is extremely popular to use it as a decorative layer instead of photos and three-dimensional images of natural objects and materials:
- decorative pebbles;
- multi-colored sand;
- decor made of wood and stone;
- coins and bills.

Cost of work
The price of a self-leveling floor with a 3D image in Moscow ranges from 5,000 to 7,000 rubles. for 1 m2, in St. Petersburg from 4,500 to 6,500 rubles. for 1 m2. This cost, as a rule, includes material and payment for work, and depends on the footage of the room in which the self-leveling floor is made: the larger it is, the lower the price.
To finally understand how to make self-leveling 3D floors with your own hands, the video presented on the site will help.