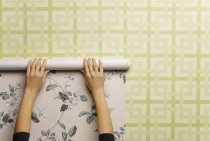
Wallpaper is a universal finishing material, the main advantage of which is the relative ease of working with it. You can successfully cope with their sticking on your own, without resorting to the help of specialists. But if the decision is made to transform the appearance of the room on its own, it is important to understand how to properly glue the wallpaper in the corners. It is this part of the work that is the most difficult.

Preparatory activities
Before the beginning wallpapering you need to pay attention to the surface of the walls and the condition of the corners. Ideally, they should be leveled with putty. After it dries, you need to go over the layer with sandpaper, achieving maximum smoothness. The surface must be applied primer and wait for it to dry completely. These works will simplify the gluing process and improve the quality of the result.

Criteria for choosing wallpaper for uneven walls and corners
If there is no desire or opportunity to engage in leveling the base, you need to more carefully approach wallpaper selection.
- The material for curved surfaces should be loose so that the joints where the overlapping strips will have to be glued are not conspicuous. Non-woven fabrics are well suited.
- The drawing should be small and frequent or completely absent.
- The unevenness of the walls will help hide the material with a relief structure.
- For heavily damaged surfaces, fiberglass wallpaper is suitable for painting.
Work materials
Regardless of the type of canvas chosen, before gluing, it is necessary to prepare the following tools and materials:
- rolls in the right quantity;
- wallpaper glue suitable for the selected type of wallpaper;
- roulette;
- a long ruler made of metal or a piece of profile;
- plumb;
- pencil;
- construction knife or sharp paper blade;
- rubber roller, brush or clean cloth.
Work order
It is best to start wallpapering from the least visible point. With the help of a plumb line and a pencil, we mark the line of gluing perpendicular to the floor. We set the first strip as accurately as possible, because most modern materials are fastened end-to-end, without overlap. If you glue the first sheet unevenly, all subsequent canvases will lie skewed. In order to avoid mistakes, it is recommended to draw reference lines on the walls for each lane.

Tip: do not start gluing wallpaper from the corner, to start work, select a flat part of the wall.
Experts have their own secrets for pasting corner elements.
- I glue it on. When gluing wallpaper in a butt corner, there is a risk of the canvases diverge after drying and the appearance of a gap that cannot be quietly removed.
- We do not glue the whole canvas, even if the corner is perfectly even. Otherwise, after drying, folds and distortions are almost inevitably formed.
- Coat the wall with glue. It is in the corners that the probability of material lagging is especially high, therefore this rule applies to all types of canvases: paper, non-woven, vinyl.
Wallpapering inside corners
For pasting the inner corner, follow the following procedure.

- We measure the distance from the edge of the strip that was last pasted on the wall to the corner. We add 2 cm to the obtained value. We cut the canvas, bend it according to the added allowance and transfer it to the wall smeared with glue. The excess must go to the adjacent side. The glued sheet must be smoothed with a roller or a rag so that all the air comes out from under it.

- We also bend the second sheet by 2 cm and glue it on the other side of the corner so that the allowance overlaps on the previously glued sheet. The correctness of gluing this canvas must be checked with a plumb line.While smoothing the sheet, we try not to press those very few centimeters of the allowance.

- We don’t need two layers of wallpaper, they will stand out, so we apply a long ruler to the corner and cut the layers along it with a construction knife. Then remove the excess top coat.
- Raising the top layer, remove the lower segments, coat its edge again with glue and press it tightly against the wall, squeezing out the air. This method allows you to get a very even butt joint.
Wallpapering in outer corners
To wallpaper the outer corner with wallpaper, you need to calculate the width of the canvas so that the sheet, bending around the ledge, passes to the adjacent wall by 2–5 cm. Having measured the required width of the canvas, cut off the excess part. Remember that when using too wide a strip, we will inevitably get folds and wrinkles.
- We apply glue both on the wallpaper and on the wall. We apply the sheet to the ledge so that the canvas wraps around it, as in the next photo. If the material is dense, you need to make small cuts for good contact with the corner.

- We press the sheet in its upper part. At the bottom of the excess canvas we make an incision. If the material for gluing is smooth, smooth it with a roller, press the embossed one with a cloth. The part of the strip that has gone around the turn can be cut off, leaving a small edge.

- We take the next sheet or the remainder of the previous one and paste it in the same way on the adjacent wall. The canvas should overlap on the first layer. Using a plumb line, we check the verticality of this strip, if necessary, we combine the pattern. Carefully smooth out the fabric.

- In order to remove the overlap of sheets, cut off the top layer. We apply a ruler or a metal profile to the edge of the ledge and cut through the layers with a knife. We remove the upper strip, remove the lower allowances. The outer corner is ready.
In the same way, wallpaper is glued on the corners of the slopes of windows and doors. Beams and other corner elements are glued separately from the wall according to the same principle, using the scraps left over from the rolls.
If, after studying the step-by-step instructions with a photo, some points remain incomprehensible, we recommend that you watch a video on the topic.