One of the main conditions for comfort in an apartment is peace and quiet. To reduce the level of noise coming from the lower floors, you can use the arrangement of soundproofing the floor. In addition to muffling the background noise coming from the neighbors below, high-quality floor sound insulation allows you to lower the volume level of indoor and indoor sounds: steps, slamming doors, falling objects. Traditionally, in apartment buildings with concrete floor slabs, the base for flooring is made in the form of a cement screed or wooden flooring, and each of these options uses different materials and its own soundproofing technology.

Arrangement of soundproof floating screed
Noise isolation of the floor in the apartment can be carried out using the so-called floating screed. Its design assumes the presence of several layers, one of which is a soundproof material. At the same time, none of the layers comes into contact with the surface of the walls and the concrete floor, which means that it does not receive sound waves from them and does not transmit its own to them.
In the design of the floor screed with sound insulation, which you are going to make with your own hands, materials from different manufacturers can be used, differing in technical characteristics and cost, the main thing is to follow the order of laying the layers.
The first layer is waterproofing
A rolled waterproofing material is laid on the prepared concrete floor (garbage is swept away, all holes and cracks are sealed with cement mortar). The best option is a dense polyethylene film, the edges of which overlap each other by 10–15 cm and are glued together with construction tape.

The second layer is a soundproof barrier
As a soundproofing material under a floating screed, you can use:


MaxForte EcoSlab Floor
Density 110 kg/m³, dimensions 1000 x 600 x 30 mm, quantity per package 3 m²/0.09 m³/5 pieces, package weight 10 kg. Does not contain binding volatile resins and phenol-formaldehydes. It has no smell (conclusion on the use in residential premises from the SEZ). Hydrophobicity: the plates are resistant to moisture. Not subject to decay. Completely non-combustible material. Increased fire resistance.
- expanded polystyrene with a thickness of 30 mm;
- foam - must have a maximum density to prevent cracking of the screed and a thickness of at least 50 mm;
- rolled soundproofing material based on fiberglass and bitumen ("Shumanet 100");
- elastic plates made of hydrophobized fiberglass ("Shumostop");
- fibreboard 2.5 cm thick (“Softboard Izoplat”);
- soundproofing membrane made of argonite 3.7 mm thick (“Texound”).

In addition to having soundproofing properties, materials such as polystyrene foam and polystyrene foam act as a heater.
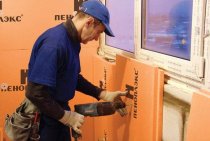
Laying soundproofing boards
Installation of material in the form of plates - polystyrene foam and expanded polystyrene - is carried out by tightly fitting the elements to each other in a run: the joints are not located in one straight line. After preliminary adjustment, the slabs are glued to the base - a waterproofed interfloor overlap.
During installation, it is important to make sure that the soundproofing material does not come into direct contact with the walls, but only through a damper tape, which must be glued along the perimeter of the walls of the room. The width of the damper tape should be selected taking into account the height of the entire structure, plus a small margin for safety net. After finishing the work, the tape protruding beyond the screed will need to be cut off.


Laying a rolled sound insulator
Maxforte ShumoIzol:
The material is rolled out on the floor. Joints are smeared MaxForte HydroStop. The edges of the canvases are wound onto the walls to a height slightly higher than the height of the future screed - this will prevent it from coming into contact with the walls.
MAXFORTE ShumoIzol is used for effective protection against vibrations, impact and structural noise. Impact noise reduction index ∆Lnw = 24 dB, which allows the material to be successfully used. Who chooses soundproofing for their apartment, as well as for craftsmen, we recommend ShumoIzol PRO. The material will provide the maximum level of sound insulation ∆Lnw = 27 dB (in buildings of all comfort categories (including class A “Luxury housing”) and, due to its greater thickness of 5 mm, is resistant to possible mechanical damage during installation.


Third layer - vapor barrier
This layer cuts off the wet screed from the soundproofing material. For these purposes, a polyethylene film is suitable, which is laid in the same way as with the first layer.
The fourth layer is reinforcing
The layer is represented by a reinforcing mesh, which is made of 3 mm thick wire and 50 x 50 mm cells. The mesh is laid on a waterproofing material for subsequent pouring of a cement screed on it. Designed to protect the future subfloor from cracking.
Fifth layer - cement-sand filling
The screed is poured onto the reinforcing mesh with a layer of at least 5 cm according to pre-set beacons. In order to avoid damage to the soundproofing layer, you need to use U-shaped products or beacons-benchmarks. Beacons are removed after 3 days, the remaining recesses are sealed with a cement-sand mortar.
Important! To obtain a high-quality result, you need to pay attention to the drying process of the screed. Before the final hardening of the material, it is forbidden to walk on the floor, since under the weight of a person, the foam or polystyrene foam plate may crack.
If desired, soundproofing the floor under the screed can be done by hand, but if in doubt, it is better to hire a specialist. Although here you can save money by doing all the work, with the exception of the most laborious stage of pouring the screed, with your own hands.

Soundproofing the floor on the logs
Soundproofing the floor, which is a wooden flooring, is a fairly simple process that is available for do-it-yourself work. The sequence of work in this case will be as follows:
- Dismantling of wooden flooring. If the boards are in good condition, they must be dismantled carefully so that you can then put them back in place. In the event that a decision is made to lay a new floor, you can tear off the old boards without much ceremony.
- Processing of wooden floor elements with antiseptic type "SENEG OGNEBIO".
- Floor waterproofing. The surface of the concrete floor is impregnated with a waterproofing compound.
- Reinstall and fix. You can fix the logs on the floor using the U-shaped brackets used when installing drywall boards. With the help of rails, the logs are aligned horizontally, and are attached to the ceiling with brackets. The lags must be rigidly fixed, they must be pressed to the base with considerable effort.
- Sound absorbing material. The space between the joists must be filled with a mineral-based fibrous material. It can be ordinary mineral wool of the MaxForte EcoPlitaPro type, ecowool, glass wool, plates of the Izover type based on mineral wool and fiberglass. Despite the excellent soundproofing ability, foam boards are not suitable for these purposes, since they are vapor-tight material, which means they will not allow the wooden floor to “breathe”. After some time, this situation will lead to decay of the boards and damage to the structure.

- Installation of wooden flooring. The boards are tightly pressed with the ends to each other and fixed with self-tapping screws on the logs. As an alternative to floor boards, you can use an easy-to-install and reliable material - OSB boards.When installing flooring from plates, they must be laid in two layers so that the joints between the plates in the second layer are located in the middle of the elements of the first layer.
Tip: for better soundproofing of the floor, instead of wooden linings used to adjust the height of the log and located between the boards and the concrete base, you can use pieces of felt of different thicknesses.
Fighting noise with a dry screed
Dry floor screed, used as an anti-noise barrier, has an important advantage over wet - you can start operation immediately after its installation. Any homogeneous dry mix can be used as a soundproofing layer for such a floor:
- expanded clay;
- perlite sand;
- fine-grained slag;
- ready-made dry mix ("Knauf").

The sequence for arranging a dry soundproofing screed will be as follows:
- A layer of waterproofing is laid on the concrete floor in the standard manner.
- A damper tape is attached along the perimeter of the walls.
- As a guideline indicating the level of backfilling of dry material, beacons are set or a cord is pulled.
- The dry mixture is distributed over the waterproofing material in accordance with the indicated level and leveled.
- Sheet material is laid on top of the granular layer: plywood, chipboard, gypsum boards, OSB, Knauf-superpol. Sheets are laid in one or two layers and fixed with glue and self-tapping screws.
Noise reduction due to flooring
If you want to make minimal sound insulation without resorting to serious work to rebuild the subfloor, you can resort to using materials that reduce sound transmission as a finishing floor:
- carpet;
- cork floor;

- thick linoleum with a base of foam or felt;
- laminate with a cork backing at least 2 mm thick.
It is possible and necessary to make soundproofing of the floor in the apartment with your own hands, the main thing is to choose the most suitable method in terms of finances and labor costs.