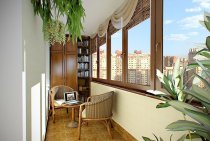
Insulation of the loggia in the apartment is a great chance to create your own winter garden or increase living space. You can turn it into a miniature gym, a cozy office, or redevelop it by adding a few square meters to the area of the room. Floor insulation on the loggia is an integral part of creating a comfortable environment in this room. Let's find out how to do it right without wasting time, money and effort.

Preparation for warming the floor on the loggia
This stage is very important: the life of the floor depends on the quality of surface preparation, as well as the ease of work. Step-by-step instructions for preparing for floor insulation will look like this:
- The first step is glazing the loggia. The most suitable are double-glazed windows. Wooden frames with one glass can only be installed if the loggia is not heated and used throughout the year.
- Thorough cleaning of the premises. There should be no dust left on the loggia.
- Sealing gaps. Small gaps are filled with mounting foam or sealant, and large gaps are filled with broken bricks or crushed stone mixed with cement mortar.
- Thinking through the location of outlets and lighting systems. Please note that the floors will rise at least a few centimeters.
- If due to the loggia there will be an increase in the area of \u200b\u200bthe room or it will be used constantly, you need to consider heating.

Important! It is forbidden to take radiators connected to central heating to a balcony or loggia. Permission for such an event can be obtained only in some regions of the country, but for this you will have to prove that the loggia is insulated with very high quality.
- If there is a ceramic tile on the floor, it must be removed together with the adhesive.
Thermal insulation of the floor should be carried out on a glazed loggia, protected from moisture penetration. The floor must be completely dry.
The choice of material and floor design
Do-it-yourself warming of the loggia floor begins with the question: Which insulation to choose?
The following thermal insulation materials are most popular:
- Styrofoam. The most popular material for thermal insulation, due to its low price and ease of use, it insulates 50% of all balconies and loggias in the country. Its advantages include low thermal conductivity, excellent moisture resistance and low weight, while fragility is a disadvantage.
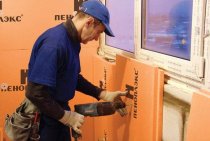
- Penoplex. Extruded polystyrene foam, a "relative" of polystyrene, which differs from it in increased strength, durability, ease of installation and, as a result, higher cost, is shown in the following photo.

- Mineral wool. It is considered one of the best heaters in terms of technical and operational characteristics. Durable, does not burn, is a vapor-permeable material. The main disadvantage is the fear of moisture, due to which the mineral wool loses its properties, therefore, when using it, high-quality vapor and waterproofing is required.
- Expanded clay. Loose insulation with good thermal insulation properties and affordable cost. For high-quality insulation, a large layer is required - from 15 cm. The disadvantages include high hygroscopicity.
- Penofol (isolon). Foamed polyethylene coated with foil (photo). Its thickness will not be enough to insulate a balcony, but it is successfully used as a heat reflector and vapor barrier in combination with other insulation, such as mineral wool, making it ideal for thermal insulation.

There are two ways to insulate the floor on the loggia with your own hands:
- Lag insulation. A simple and quick method of installing a floor with insulation, any of the above heaters can be used for its implementation.The heat-insulating material is laid in the gaps between the lags, a flooring of boards or plywood sheets is placed on top, as in the next photo.

- Laying insulation under the screed. When choosing this method, it is possible to insulate the floor on the loggia with expanded polystyrene (polystyrene foam, foam plastic) or expanded clay. A screed is the best choice when installing a “warm floor” on a loggia, but keep in mind that you will have to wait a long time for it to dry.

Important! Laying a heat insulator under the screed is possible when the loggia is insulated, which has a reliable overlap. In the case of a balcony, it is better to immediately choose a lag floor structure, since the balcony slab may not support the weight of the screed.
Insulation of the floor of the loggia along the logs
Step-by-step instructions for choosing a lag structure will be as follows:
- Floor level markings. It is best to make sure that the floor on the loggia is on the same level as the flooring in the rooms. The insulation together with the coating should not be higher than the level set by you. When marking, it is convenient to use a laser or water level.
- Laying a layer of waterproofing. You can use roofing material or technical polyethylene, laid in 2 layers. The material is overlapped, and an overlap of at least 50 millimeters is made on the walls.
- Installation of wooden logs, which are pine beams 50 × 50 mm. They are laid at intervals of 30–40 cm, fixed to concrete with dowels and self-tapping screws. The first element can be placed at a distance of 10-15 cm from the wall. There should be a gap of 3 cm between the ends of the log and the walls so that the bars, having absorbed moisture, do not bend and spoil the floor covering.

Important! Each timber must be treated with an antiseptic without fail.
- Insulation lining. It is necessary to insert mineral wool or polystyrene plates so that there are no gaps between the lags, as in the photo. If they nevertheless formed, they must be filled with mounting foam. Expanded clay is simply poured into the gaps of the crate, which should protrude above the level of the subfloor by at least 15 cm.

It is strictly forbidden to tamp mineral wool: this causes loss of thermal insulation properties.
- Arrangement of vapor barrier. For this layer, you can use a film or foil polyethylene insulation.
- Floor organization. You can use boards, but more often the flooring is made of plywood or OSB.
- Installation of the finish coat.

Features of foam insulation
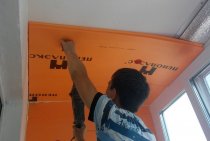
Insulation of the floor on the loggia with the help of penoplex has its own characteristics. The fact is that due to the strength of the material, when laying it under the flooring, it is not necessary to use logs; plywood sheets can be laid directly on the foam. The stages of work will be as follows:
- A leveling screed is made on the prepared floor, which is necessary to prevent deformation of the insulation boards.
- Foam boards after fitting to size are glued with special glue directly to the floor. It is convenient to use a type of insulation that has a groove connection system. If it is not there, then along the joints between the plates, as well as between them and the walls, you need to walk with mounting foam.
- To increase the effectiveness of floor insulation, you can lay penofol (izolon) on top with the foil side out, gluing the joints with reinforced tape.
The following photo shows the process of warming in this way.

Insulation under the screed
Insulation of the floor of the loggia with foam under the screed is an excellent solution for organizing a system of underfloor heating. Such insulation is done as follows:
- After removing the old coating, a thin leveling cement screed is made. Without a perfectly flat floor, foam sheets can be damaged.
- A film is laid for vapor and waterproofing, the joints are glued with adhesive tape.
- Foam sheets with a thickness of 40–60 mm are laid. Joints are sealed with mounting foam or sealant.
- The second layer of vapor barrier is placed.
- The foil heat reflector is laid with the foil up.
- The "warm floor" system of the selected type is installed.
- The screed is poured. Its thickness during the arrangement of the heating system should be at least 7 cm, without it - at least 4 cm.

To fill the screed over the underfloor heating system, you must use a special mixture designed for this purpose. Ordinary cement screed will crack under the influence of high temperatures.
The thermal insulation of the loggia floor with foam plastic is done in a similar way, but in this case the screed is reinforced:
- After pouring over the beacons of the first layer with a thickness of 2–5 cm, a reinforcing mesh is installed.
- The final screed is made with a thickness of 4 cm.
Styrofoam for the floor should have a density of 35 kg per sq. m.
If we insulate the floor with expanded clay, before pouring the screed, the surface is leveled and a lattice of metal reinforcement is laid on it, as in the next photo.

If you want to warm up your balcony or loggia, this guide will help you. After finishing the insulation work, you will only have to think over the design of the loggia: turn it into a cozy corner where you can retire, or expand the space of the living room or kitchen due to it.