How to clean the siphon under the sink in the kitchen and bathroom

There is a large selection of products on the market for cleaning products that allow you to clean the siphon and nozzle. In this case, it is not necessary to disassemble the entire system. Their main difference lies in the chemical components that make up the cleaning agent. The method of application, as a rule, they have the same. It is necessary to pour a certain amount of cleaning agent into the drain, wait a while and flush the system well.
The advantages of this method:
- low personal time spent on work;
- no need to dig into the accumulated deposits and inhale their smells.
Negative sides:
- material costs for the purchase of cleaning products;
- there is no certainty that all stuck and adhering debris particles will be removed.
If you are limited in time or are very squeamish about working with substances that have an unpleasant odor, then it is better to use one of the cleaning products. If you have about one hour of free time, which you are ready to spend on "acquaintance" with the wonderful world of sewer systems, the variety of forms of stuck and stuck debris, then we recommend that you clean the siphon manually.
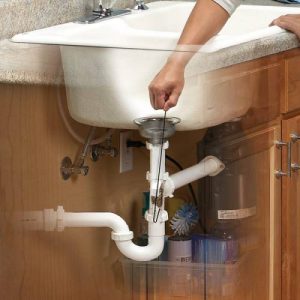
Siphon cleaning
If you look closely, you can see that the siphon is designed in such a way that large and heavy particles accumulate in its lower part. And the siphon itself is a collapsible device, just so that it can be cleaned mechanically with a brush or other tools
To remove settled particles in many models of the device, it is necessary to unscrew the bottom cover and clean it. If you are more serious and want to perform a complete flush, including plaque on internal surfaces, then you will need to completely remove the siphon by disconnecting it from the sewer pipe and the outlet pipe (the pipe attached to the drain grate and mounted on the sink).
During disassembly, remember where the gaskets and o-rings are installed, as well as the direction of their installation.
Pay attention to the condition of the gaskets and o-rings. Perhaps the time has come to replace them, fortunately, buying a new one today is not a problem
If any of these elements is to be replaced, and you do not have the opportunity to replace it at the moment, you can use plumbing sealant.
Cleaning the corrugated pipe
Cleaning the corrugated pipe is also a fairly simple process. If large debris has accumulated in it, then it is removed with the help of any strong stick. The rest is washed under running water.
In fact, the assembly of the siphon is performed in the reverse order of disassembly. Be sure to install the gaskets and o-rings correctly. After installation, it is imperative to check for leaks when flushing water. To do this, wipe all the connecting nodes dry and turn on the water. If there is no leak, then these places will continue to remain dry.
On-site inspection and markup
A sink with a pedestal is commonly referred to as a "tulip". Usually, both the sink and the "leg" are made of sanitary faience. Options are available from porcelain, artificial stone, glass. First of all, we are interested in the place of attachment. Walls and floor, plumbing outlets, sewer outlet.
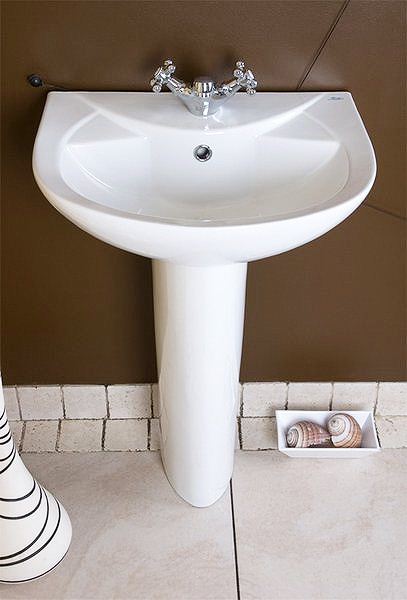
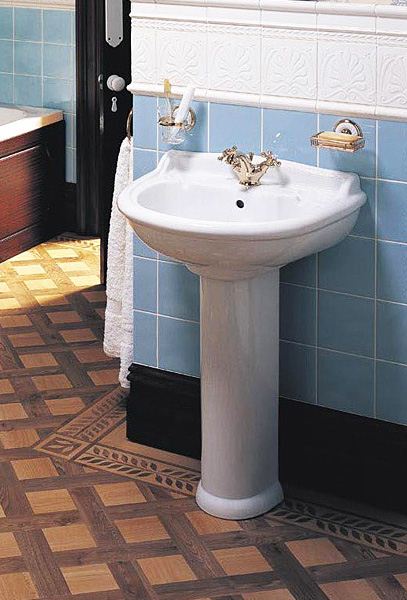
Photo: sinks with a pedestal
Even though most of the weight of the sink rests on the pedestal, it is also necessary to attach it to the wall. Therefore, the walls must be strong. Not drywall or plywood.If the drywall is properly fixed on the frame base and tiles are laid on it, this option for additional fastening is possible, although less reliable. Take care of the "helicopters" - drywall bolts with a distributed load. They will have to be used instead of self-tapping screws.
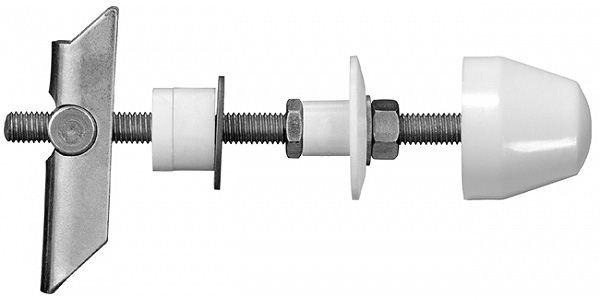
Fixing sinks to plasterboard walls
The floor must be level, the pedestal must be free and level
Try to assemble the structure without fasteners and pay attention to what might get in your way. The pedestal should not stagger, the sink should not warp
To level the pedestal, it is convenient to use silicone gaskets, they are quite dense and do not slip out. It is better if the leveling materials do not stick out from under the pedestal. If the skew is strong, you will have to level the floor with a cement mixture.
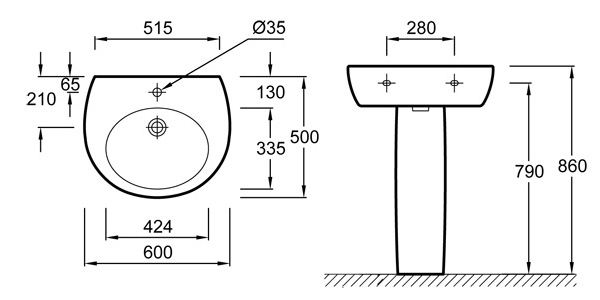
Popular Height and Width Sizes
During the trial installation of the sink, make a mark on the wall and floor, noting the location of each part. Now the structure can be disassembled and put aside.
Note! Marking lines must be straight. To align the design when trying on, use the level
Be sure to mark the attachment points.
If you got a “deep” pedestal, which should fit perfectly against a non-ideal wall, and the outlets for the sewer categorically do not match, you can, of course, try to file the “leg” with a grinder with a diamond disc. but the probability of destruction of the pedestal is quite high. To avoid problems, it is better to immediately select plumbing for existing sizes. If the plumbing does not fit, it must be returned to the store.
Replace siphon.
If the above methods do not help much, or you are tired of constantly cleaning the sewer, try changing the siphon.
Actually, it's better to call a plumber, but if you want to do it yourself, then try it. This is already an operation of medium complexity and for it you will need the following tools and equipment:
- screwdriver (plain or Phillips) to unscrew the bolt
- a container for dirty water that will pour out when you unscrew the siphon
- old rags to wipe up water that has spilled in the wrong place
Approximate operation plan:
- Substitute a container for dirty water under the siphon
- At the bottom of the siphon there is an unscrewing cup like on a thermos, or a cap like on a large bottle, unscrew it with one hand, holding the siphon with the other hand so that it does not hang out. You need to unscrew it slowly so that the water flows into the container, and not onto the floor.
- Drain the remaining water into a container.
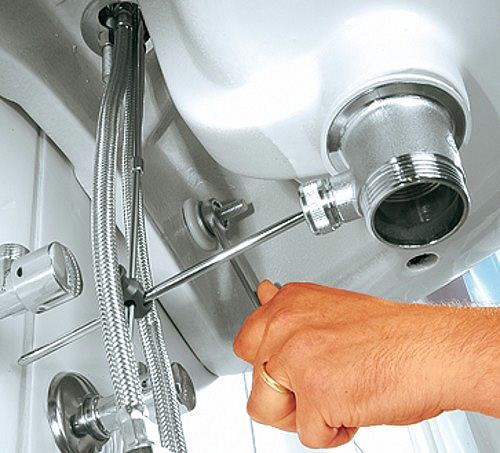
- Unscrew the bolt with one hand while holding the siphon with the other (if the bolt does not unscrew, call a plumber)
- Drain the remaining water into a container.
- Disconnect the siphon from the sewer.
- Connect a new siphon according to the attached instructions.
When choosing a new siphon, pay attention to the following details:
- if you have a clogged siphon in the “tulip” washbasin, then it is useless to change it. Only a bottle trap with a diameter of 32 mm can be connected to Tulip washbasins.
- the diameter of the pipes and the inlet and outlet openings should be as large as possible (the closer to 50 mm the better, but usually 32 or 40 mm).
- before, knee-type siphons were sold for sinks, sinks and washbasins. They work much better (in the sense that they clog less often) than bottle-type siphons. But lately I have not seen such siphons for sale.
- ask the seller if it is possible to return or change the siphon if it does not suit you
- take a magnet with you and check the bolt and nut. The bolt must be made of stainless steel and, accordingly, will not stick to the magnet, the nut must be made of non-ferrous metal or stainless steel, respectively, and will not react to the magnet either. Siphons are often equipped with chrome-plated or nickel-plated iron bolts and iron nuts coated with non-ferrous metal.After 1-2 years, such bolts or nuts are completely corroded by rust and a new problem will appear for you - water leaks, but not into the sewer, but onto the floor. But that's a completely different story.
If you cleaned or changed the siphon, and the water still goes badly, then the sewer pipes are clogged. This can happen for several reasons, but it usually happens if the sewer pipes are laid with an insufficient slope. In this case, you will have to clean the pipes quite often with a cable or a cleaning machine, but it is better to redo the sewer.
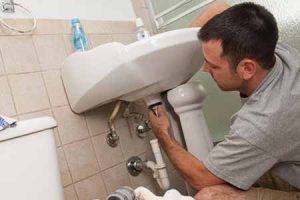
How to dismantle the sink
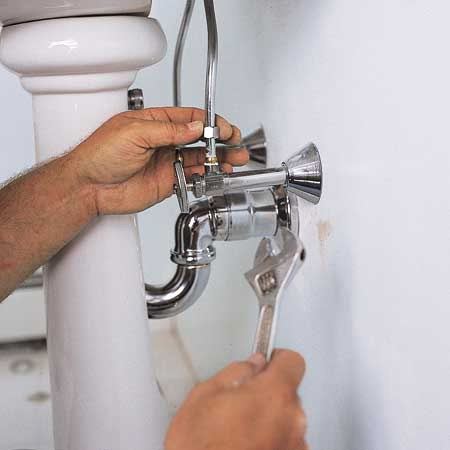
First of all, turn off the hot and cold water valves. Turn on the mixer, drain the remaining water. Make sure there is no water left. We take a bucket so as not to make puddles, climb under the sink, put it under the siphon. Having unscrewed the glass of the siphon, pour the water into the bucket and fasten the glass again, plugging it with a rag.
Now you need to disconnect the sink from the sewer. We unscrew the nut located under the bottom of the sink counterclockwise, while holding the siphon glass.
Next, disconnect the drain pipe from the siphon by unscrewing the nut at the top of the siphon. Then remove the wedge-shaped washer, nuts on both sides of the drain pipe and remove the pipe itself.
The next step is to remove the siphon from the sewer socket. The connection can be cemented, as is the case with the toilet. So we need to carefully remove this cement
We took a chisel, a hammer and carefully remove it in a circle. Then we carefully remove the siphon from the sewer hole, and plug the hole itself with a rag so that nothing spills out of this sewer to us
All difficulties behind. Now we unscrew the nut under the mixer, disconnect it from hot and cold water, remove it from the sink.
And here you can remove the sink. To do this, unscrew the mount, holding the sink so that it does not fall, or simply remove it from the stand, if any.
For subsequent installation, you need to prepare the sewer socket as follows: completely clean off the cement with a hammer and chisel, sand the surface, wipe it with a rag. Now it's ready.
Expert answers
Chairman:
Did you get it right? The sink IS HANGED on the wall, and the pedestal IS ATTACHED freely and the sink does not lie on it
Oleg Zhestov:
The sink is on a pedestal. The third point of support, two on the wall. It is necessary so as not to break off the shell by accidentally leaning. the pedestal itself is not attached, with rare exceptions.
Nikolay Ryaposov:
attach only to silicone (((and no nails
Scrapmaster Honored:
Gotta fix it! Brackets 250x250. Self-tapping screws - weaving, right through!
Yuri Protskiv:
It is necessary to attach the sink to the wall, there are holes for fastening at the back, and the pedestal can be glued to the floor with silicone sealant ....
Val Franco:
Silicone should be enough - on the back of the leg, you can have a couple of points on top so that it doesn’t creak and more on the bottom, so that it’s convenient to cut off with a blade if necessary. Fix after the plumber connects everything and checks for leaks.
Anatoly Gorbachenko:
first you need to make a silicone pad 2-3 mm thick along the bottom of the pedestal, wait until it hardens. the sink is hung on the wall on two mounts. between the sink and the wall, the sink and the leg, there is a layer of silicone. remove excess with either a rubber spatula or a sponge with soap. with normal dexterity - with a finger. the seam is the most aesthetic.
Beebooboo:
She pulls herself out, you can
EVIL CLOWN:
The stand is designed to hold the sink. You can remove it, but it can fall at any time.
ip:
Of course, you can use it if you remove it. For example, you can chop nuts ... And how to remove it has already been written)))
Vladimir Petrov:
It is easily removed and the sink will hang without a pedestal. It is needed to hide all communications and for beauty
Sergey Dmitriev:
If the sink is not large, then the “leg” can be removed.But I suspect that it’s not for nothing that you have a “leg” - this is an additional support for the sink. If you still decide to remove the support, then you need to put additional brackets to support the sink. Without support, the sink will fall, okay, you won’t be there, but if you wash your face and a sink of 3-4 kg falls on your fingers, what will happen? Well, if there is a fracture, what if he cuts off his fingers? Shards of ceramic - cut no worse than glass
Trahenskauskas:
the sink rests on 2 bolts removed the leg leaned on it and the ears will break off there are special sinks without a leg there are iron fasteners
Washbasin installation wall mount
The set of sinks must have special fasteners. If they are not available, dowels and plumbing gaskets for installing the sink must be purchased, having previously made accurate measurements of the holes for the fasteners. Be sure to also buy plumbing gaskets for mounting the sink. Mounting kits are usually sold as a set. 2 dowels, 2 screws, 2 gaskets.

Steel brackets - the most reliable mount for the sink
There are also models in which the sink is mounted like a regular, hinged one, on brackets, and the pedestal performs decorative functions, covering the siphon. You can read about this in the article on installing a sink on brackets.
The preparatory work has been done, the markup has been verified, now let's proceed with the installation. Drill holes in the wall and, adding a drop of glue for strength, insert the dowels.
Install the sink, insert plumbing screws with gaskets into the holes for the fasteners and carefully screw the fasteners into the dowels, evenly tightening the bolts. Be careful not to overtighten the bolts to avoid cracking the sink. The sink should fit snugly against the wall, without gaps.
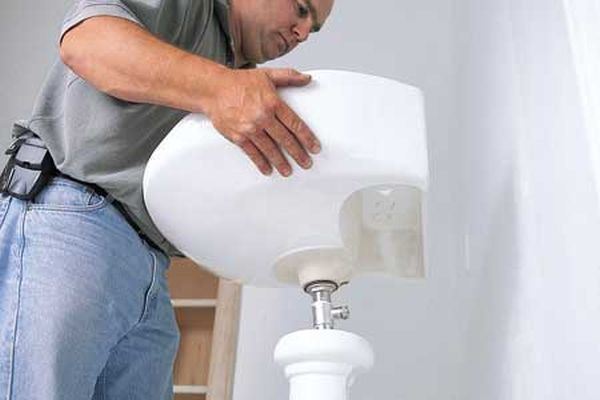
Installing a sink on a pedestal
Use a level to make sure the sink is level. If the sink cannot be installed without a gap and the wall is uneven, after installation is complete, you can fill the gaps with sealant. Not needed now. The sink should “walk” a little, do not twist it all the way.
Connect the faucet using flexible hoses. Tighten fittings using duct tape to prevent leaks. If possible, try to immediately check the tightness of the system.
Carefully tighten the fixing screws
Now we mount the sink drain
It is very important not to forget to connect the overflow hole to the system. There should be a special mount with a tube leading to a common drain and it is more convenient to fix it with sealant
We place a mesh in the drain hole of the sink, a screw for mounting the siphon, place the gaskets and carefully tighten the screw, attach the siphon. Silicone gaskets are usually quite reliable and do not let water through.
We connect the mixer taps to pipes with water, and the siphon to the sewer
Bend the sewer pipe with the letter S and bring the descent into the sewer.
There is very little left, slightly raise the sink, move the pedestal in accordance with the markings on the floor that you made before starting work, place the siphon and pipes inside the pedestal. If the plinth has partitions inside, this may not be the easiest task.
The pedestal is installed, the mixer is connected. the sewerage is removed, it remains to tighten the bolts a little, aligning the sink in accordance with the level. Turn on the water, alternately hot and cold, make sure everything is working properly, nothing is leaking.
With a certain patience and care, any person can handle the installation of the sink
Important. Do not forget the gaskets when installing the sink, do not forget the plumbing gaskets inside and outside the sink when installing the siphon, be sure to perform waterproofing when installing the piping to the taps
Sealant will help, but having a small bundle of tow will not hurt.
Features of the design and installation of communications in a private house and apartment
Best Answers
Sergey Dmitriev:
Get a specialist.He will install the sink and redo the pipes.
BANNED:
not all sinks fit a pedestal, you need to take the sink to the store and try it on there.
Crab:
The shell "on the leg" is called Tulip and is sold in stores. There, the sink is mounted on brackets, and the pipes are closed with a “leg”
Alex Mishin:
I don’t advise. “Tulip” is, of course, beautiful (they don’t argue about tastes - I don’t like it). But the sewer siphon requires maintenance - it becomes clogged, you have to disassemble and clean it. When it is hidden inside the "leg", this simple operation becomes very difficult. By the way, the “tulip” sink is not mounted on brackets, but with special studs to the wall - the sink from the “tulip”, if you remove the “leg” from under it, can collapse under its own weight. But what really would be very advisable to do is put a separate mixer on the washbasin: the quality of your life immediately increases dramatically! If the existing sink does not have tap holes - then it is not difficult to replace it, but I would replace it with the same one as it was - lying on the existing brackets. Please note that the length of the bracket can be different - you need to choose a sink designed for brackets of the same length as yours, and located at the same distance from one another. The easiest way to connect water to a new faucet is with metal-plastic: the utmost ease of installation with quite acceptable reliability as a result. Where to branch pipes - see for yourself in place.
Drain preparation and installation
Scheme of a siphon for a sink and drain fittings.
The first step is to check the completeness and quality of the parts. If there are flaws, then it is better not to install such components and replace them with new ones. Old style plastic drains can be installed without tools. All elements are made of plastic and rubber. There is also no need to use additional materials such as adhesives and sealants. The drain grate pipe is installed first. It, together with a rubber gasket, must be threaded from above into the hole in the sink, and from below it is clamped with a nut.
All plastic parts must be clamped with little force to avoid breakage. A siphon fastening nut, a conical gasket and the siphon itself are mounted on the drain grate pipe. It is better to tighten this nut after the installation of the drain is completely completed, as height adjustment may be necessary. After that, we install a drain pipe connecting the siphon to the sewer. Its length is constant, so it is necessary to adjust the height of the siphon hole for fastening. After that, you can tighten all the nuts.
Newer plastic faucets are installed in much the same way as older ones. Only the installation of the drain grate and its pipes must be done with a screwdriver. In such plums, there are a little more details than in old-style plums. First of all, a rubber gasket is applied to the sink hole, and on top of it is a metal drain grate with a screw. From the bottom of the sink we install a pipe with a nut and a gasket. The nut is installed in the hub, which is held by 3 relatively fragile ribs. Using a screwdriver, we twist the screw into the nut and clamp it with a little force, otherwise the ribs may crack. Gaskets at the bottom and top should be set exactly relative to the hole so that the contact area with the sink is the largest, in order to avoid leaks. Then we fix the siphon. In such drains, it can be immediately clamped in the position you need. The last to be installed is a corrugated drain pipe, 1 end of which is attached to the siphon, and the 2nd end is inserted into the hole in the sewer pipe.
The advantage of corrugations is that they can be brought to the siphon at any point.For convenience, the ends of the corrugated pipe have different diameters: a smaller one for a siphon, a larger one for outlet to the sewer. And the disadvantage of such pipes can be called the fact that a lot of dirt and grease settles on the breaks of the corrugations, which can lead to clogging of the sewer. For quick cleaning of the siphon, it has a spherical sump cover, which is located at the bottom and can be easily unscrewed if necessary. All conical gaskets must be installed with a cone away from the nut, otherwise the connections will leak.
Installing a more modern kitchen sink drain with a food waste disposer is best left to the experts. After all, installing a grinder to which an electric current is supplied requires professional skills and special knowledge. Installation of mixers made of stainless or chrome steel is almost the same as installation of plastic mixers. Their nuts must be tightened with a wrench or adjustable wrench, using backing material so as not to leave marks on the surface. Some drains have a special plug that allows you to close the hole and is attached to the drain grate. If you want to save time and money, you can do the installation of the drain yourself without the involvement of specialists.
Traditional methods of clearing blockages in the sink
Traditional cleaners include:
- cleaning with a plunger;
- cleaning with a plumbing cable;
- cleaning with folk remedies.
This is a fairly simple method, and there is a plunger in every home, so there will be no problems with this. The plunger needs to be taken and installed in the sink, and then pumped several times. The pressure exerted by the plunger will travel through the system and press down on the blockage, causing it to move further through the system. Once in a wider pipe, the blockage will calmly pass further and go into the sewer.
If the use of a plunger was not enough, you can use a metal cable. The use of this device will be justified, especially in situations where the cause of the blockage is not in the siphon, but further in the system, in the area of the riser branch. It is not possible to use a metal cable in every sink, so before you remove the blockage in the sink in the kitchen, you need to disassemble the siphon and run the cable into the system through the pipe.
Of course, a plunger, a plumbing cable, and chemical cleaners can work, but still, sometimes all these cleaning methods are powerless in the face of severe clogging. For example, if a pipe is completely covered with fat in the area of a corrugated pipe, then it will not work to break the blockage: the fat will not stick off the walls, and when a part of it is removed, another one will immediately become clogged, and the problem will be unresolved.
If all the above methods do not help, then you will have to get down to business seriously and clean the pipelines manually by disassembling the structure.
To do this, you will need the following tools:
- plunger;
- plumbing cable;
- soda;
- boiling water;
- sewer cleaner.
How to remove the faucet from the kitchen sink
Consider the sequence of operations.
Turn off the water supply valve to the mixer. The rest of the liquid flowing from the pipelines will be poured into a bucket. We put rags on the floor - they will come in handy if an accidental leak occurs.
To stabilize the pressure in the pipes, open the valve.
We dismantle the old device. To do this, unscrew the nut located at the bottom of the sink and fixing its body. Alternatively, plumbing can be attached using 2 side studs, we work with them with a screwdriver.
We remove 2 hoses - hot and cold water supply, leading to the mixer, using wrenches 22, 24, and unfastening the union nuts.
There are nuances for working with a washbasin built into a kitchen cabinet. The structure will have to be dismantled (in cases of poor visibility, we use a flashlight):
- inside the cabinet, unscrew the nut that fixes the tap on the countertop;
- remove the siphon - these structurally different devices have a nut - we unscrew it, freeing the lower part of the plumbing;
- an alternative to the previous action would be to remove a corrugated pipe from the sewer pipe, which is less convenient to do;
- disconnect the water hoses;
- if there is a layer of sealant on the sink, remove with a knife blade that part of it that prevents manipulation;
- inside the cabinet there are bolts that fasten the countertop and the washstand together, we separate these elements (to find them, consider the inner surface of the cabinet);
- lift and turn the washbasin - a fixing nut will be found, we work with it with 2 adjustable wrenches, on both sides.
We strictly follow the order of work, in order to avoid unpleasant consequences, for example, flooding of neighbors.
Disassembling a kitchen faucet is not a difficult task. To carry out the work, you must first prepare the tools and materials, then sequentially perform the dismantling steps. Difficulties can arise with parts covered with rust, but this is a solvable problem. Remember that a practical knowledge of the basics of plumbing will save you unnecessary expenses.