What are eccentrics and is it possible to do without them when installing a faucet in the bathroom
Basically, a universal type of eccentric is used for mixers with dimensions not exceeding 50 mm. in length, on one side 3/4 inch thread, on the other 1/2. The offset of cents is 10 mm, which, when installing the mixer, gives a very wide adjustment range from 130 ± 1-2 mm. up to 170 ± 1-2 mm., while the standard center-to-center distance of mixers is 150 ± 1-2 mm. It was to compensate for the difference in the distance of water outlets and attachment points of the mixer that they were invented.
For "exclusive-local" applications, the eccentrics can be both shorter and longer, and their center-to-center space can be greater than 10 mm. The selection of the required eccentric shapes depends on the specific installation conditions.
In the photo below, ordinary, universal eccentrics, with a center distance of 10-12 mm. —
These are the eccentrics, in addition to having a fairly large center-to-center distance, along with this, they also perform a decorative function that excludes the use of chrome-plated cups.
With eccentrics of this type, you can not only install the faucet on water outlets that are too wide, but even raise the faucet, for example, above the sink if it works simultaneously on the bathtub and sink. Such eccentrics can be one of the solutions to the problem of a faucet low to the sink.
Yes, you can do without eccentrics. Especially if it is possible to move or expand the outlets of the hot and cold water pipes (at least one of them) along the width of the mixer connecting nuts. You can use a conventional adapter (nipple or "barrel") of the appropriate thread diameters on the mixer and on the pipes.
It is also possible at the installation stage, having a mixer, to install pipes with couplings, having screwed on the nuts, and in this position to tighten, through bronze nipples, and in this position to “freeze” (weld the pipes) However, be prepared for the fact that the maintainability of such a design is sharply reduced, since even about TU and GOST, the center-to-center distance for mixers can be 150 plus or minus 1 - 2 millimeters. During the subsequent replacement, if the new mixer fits perfectly, then it means you are lucky, and if not, then again you can remember all the same eccentrics. The barrels are turned out and the eccentrics are screwed into the couplings.
I myself installed mixers directly on polypropylene couplings through 3/4 x 1/2 nipples, but not in such important places as, for example, a room for year-round use. At the dacha - please. So if the water station is at a pressure of 2.5 atmospheres, I think such a mount is quite suitable.
Installing the faucet cups close to the wall
In the sanitary area (in the bathroom or shower), everything must be brought to perfection - the absence of seams and significant gaps here plays not so much an aesthetic as a protective function. The less significant the seams and gaps are, the less moisture can linger in them and the less likely it is that a black fungus, familiar to many, will appear in these areas, which is almost impossible to remove.
In order to prevent water from entering the areas where faucets, heated towel rails and other plumbing fixtures are connected to the water supply system, special decorative cups (reflectors) are used - round metal plates that are screwed onto the eccentric fitting until it stops against the surface of the tiled lining.
Cause of the seam
When performing the correct installation of communications and high-quality tiling, the reflectors are in close contact with the surface, leaving no seam.However, such installation can only be carried out if the calculation is correct, made at the stage of pipe installation and consistent with the thickness of the future tiled cladding. If you completed the bathroom decoration by third-party hired forces and, at the same time, the plumbers could not agree with the tilers - most likely the reflectors will be located at a considerable distance from the wall - without knowing the thickness of the cladding, plumbing, for insurance, they simply push the fittings away, and, subsequently, they cannot be properly covered by the cladding.
incorrect installation correct installation
Defect elimination methods
Is it possible to solve this problem and correct the position of the cups? In certain cases it is possible. There are two methods to solve this problem:
- Using taller cups
This method makes it easy to eliminate the gap by removing the mixer and replacing the original cup with a higher reflector. The most widely used cups are 20, 25, 35 mm high. Thus, if your cup has a height of 20 mm, it will not be difficult to purchase a reflector with a height of 25 or 35 mm.
Be careful - reflectors also have several sizes of diameters (1/2, 3/4, 1 inch). Select the diameter according to the standard size of the eccentrics.
The most commonly used cups with hole diameters - 1/2 inch. It’s not scary if the height of the cup turns out to be a little more than necessary for fixing the thread section (by 1-2 mm) - it will be pressed by the mixer’s fixing nut. However, significant deviations cannot be compensated.
2. Trimming eccentrics
Very often, the first method fails, as, for example, in the case of a small gap between the cup and the wall. Your faucet may also already be equipped with decorative cups (this is very common when buying high-quality imported faucets), in which case it will be almost impossible to choose a higher reflector of the appropriate quality and design.
You can solve the problem in such a situation using a more time-consuming, but at the same time, the most effective method - direct correction of the length of the eccentrics. Using an angle grinder and a cutting disc for metal, the eccentric thread is cut to the desired size on the side of the mixer attachment. At the same time, the eccentrics themselves can not be unscrewed. If necessary, undercutting can be done on both sides of the eccentric. To fix and ensure tightness, 5-7 mm of thread on both sides is enough - the rest can theoretically be trimmed.
Installing mixer cups
1 way
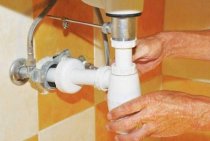
Shut off the water supply, then briefly open the taps to release the residual pressure. Remove the mixer: using an adjustable wrench or a regular open-end wrench, loosen both fixing nuts one by one, then unscrew them completely.
IMPORTANT: To avoid damage to the surfaces of chrome-plated elements, wrap the working surface of the key with masking tape. Remove the cups and screw the reflectors of the desired height onto the fittings until they stop against the wall surface
Remove the cups and screw the reflectors of the desired height onto the fittings until they stop against the wall surface.
Install the mixer by tightening the nuts alternately.
2 way
Determine how much of the thread to cut off, and also whether to trim both sides of the eccentric.
Remove the mixer in the manner described above.
If possible, it is better, after all, to remove the eccentrics - this way it will be more convenient and safer to cut. Mark the contour of the cut by wrapping the threads with masking tape.
Using the angle grinder, cut the eccentrics.
Install the eccentrics, pre-sealing the threads and align them horizontally (see mixer installation).
Install the cups on the eccentrics, screwing them all the way against the wall.