Best Answers
Wicked:
Either break the “lamb”, or grab it with an adjustable wrench and unscrew (counterclockwise) the entire crane box, buy another one along with the “lamb”. Well, if I understand you correctly.
Nikolai Mogilko:
drill out the bolt or at least its head
K-GOLEM:
only experienced managers or merchandisers can handle this problem... :)))
dZen:
A household drill can cut a new slot. Or she just drill out.
Alexey from Russia:
if the valve is no longer needed, cut it off with a grinder. there is an option to unscrew the valve itself from the mixer. but first turn off the water completely - both cold and hot.
Grandfather Au:
I would have posted a photo, but from where we know. white while spray on the bolt for half an hour. If copper plated - should turn away
researcher:
It's easier to find a man than to master the technology of repair. Just don't say that it was the husband who wrote it, because it's not a husband, but a boy!!!!
Alexander:
You cannot even imagine what a nightmarish mixer the imagination draws on your question. The valve is unscrewed from the mixer with an adjustable wrench and is not attached to it with any bolts. The head of the bolt is for a wrench and does not have a slot for a screwdriver. If you can’t remove the valve because of the flywheel, break it, drill a screw, etc., whatever you like. If anything, a set of new flywheels for the mixer is not so expensive.
uncle Ivan:
Throw a photo in a personal, then you can tell something. Valves and mixers are different now, and it’s so easy not to tell. I understand that you need to first remove the lamb, and then unscrew the axle box.
The tool you need
You will need the right tool to get the job done. It is advisable to prepare it in advance in order to reduce the time interval for restoration work, during which the house remains without water. Preparing the necessary tools in advance will make it possible to make repairs calmly and without fuss.
Tool set
Definitely, it is imperative to have a spare part available. This is necessary if it is revealed that the obsolete component cannot be repaired
But in the same way, it will turn out to quickly install a new one in its place.
To immediately eliminate the breakdowns that have occurred, you will need the following tools:
pliers;
adjustable or pipe wrench;
open-end or ring wrenches for faces of various sizes;
flat, curly screwdriver;
electric drill with a milling cutter and drills for metal. Please pay attention! A wide range of spare parts from China on the market very often leads to the fact that when you do not expect it at all, there is a discrepancy between keys and materials from the Middle Kingdom. Thanks to this, it is better to play it safe, having a set of keys of various sizes nearby.
Preparation work
Before proceeding with the dismantling process, it is required to close the water supply on the riser, and then find out the reason why the water drips spontaneously. Sometimes this may be due to wear on the valve seal.
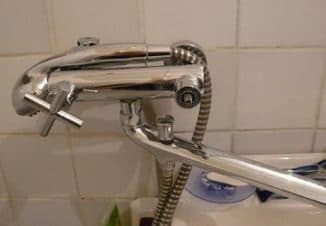
Leaking faucet
If it turns out that the valve head is still leaking, then you need to proceed specifically to the procedure for disassembling the valve. On the side of the lever, remove the cap, carefully prying it with a knife, trying not to damage its coating. If the handle is continuous, without a plug, then just unscrew it. After that, it is worth removing the plastic rings and the valves themselves. To do this, unscrew the bolts with a flat screwdriver.
But sometimes the question arises: what to do if the faucet lever does not scroll? With this method, it is recommended to fill the side that is inside the armature with vinegar or smear with a solution of WD-40, which can be purchased at any automotive store. This simple procedure will soften hardened deposits for several hours.After that, the valve should be easily dismantled, and then proceed to the next step.
Spectacular recommendations on how to unscrew the stuck axle box crane
You can dismantle the bushing of the crane using one of several options. Such a variety makes it possible to choose the most wonderful option based on a specific situation:
Chemical. Implementation is simple as the world. The part is well lubricated with an acid solution (WD-40, Cilit plumbing or vinegar), and after a couple of hours you can try to dismantle it. In problematic situations, it is necessary to try to pour the chemical into the problematic compound (for example, with a syringe). Moreover, experts advise trying to boil a completely removed device for 20 minutes in a soda solution - this often helps to turn a stuck valve.
WD-40
Thermal. It should be used when the method described above did not bring the desired result. It is built on the fact that specifically the valve head and the parts of the faucet with which it touches are in most cases different. Based on this, they have different degrees of magnification. Processing is carried out with a building blow dryer, with which the thread is thoroughly heated until the bolt moves.
Tapping. In most cases, it helps with the dismantling of a light-alloy grand axle box that is leaking. It is performed with light multiple hammer blows or a mallet on the body along the fastening connection in the form of a thread. Limescale and corrosion should go away, and the jammed part should be easy to dismantle.
Jumper swinging. It is used in those situations when the edges of the jumper are "slicked off". It is necessary to tightly grasp the bolt with a pipe wrench and try to break it by swinging
In this case, it is important not to use excessive force - this is dangerous by breaking the thread and malfunctioning the part.
Drilling a sticky grand axle box
Drilling. Is the most cardinal way; used when others have failed
The protruding part of the jumper is cut off with a metal file, after which the parts remaining in the middle are drilled with a suitable drill. Instead of a drill, you can use a milling cutter. Then the thread will have to be cut in a new way.
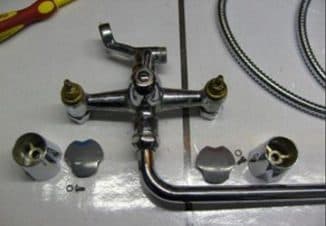
Replacing the faucet box in the mixer.
Step 1. We stop the water supply directly to the mixer by closing the valves. They may be somewhere on the water pipes that lead to the mixer. How to make plumbing in the country, read this article.
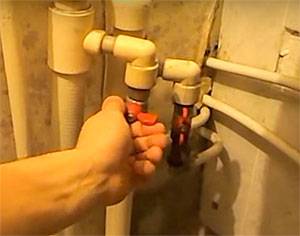
fig.1 Turn off the water
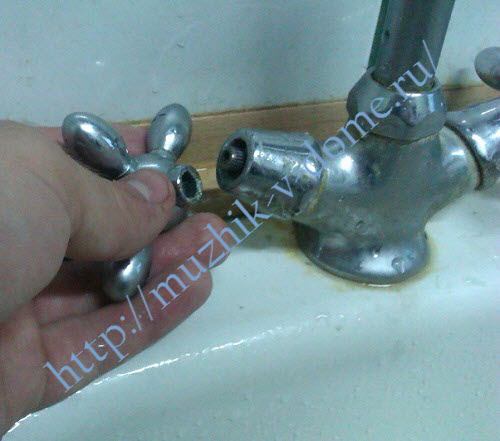
Step 2. With a screwdriver, carefully, so as not to damage the flywheel, remove the plug from it, which indicates the temperature of the water from this tap.
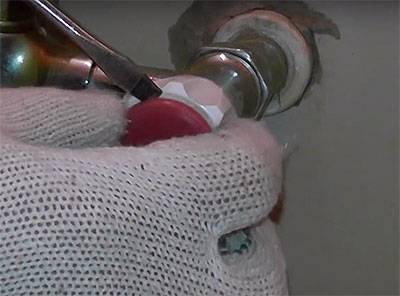
fig.2 Remove the plug
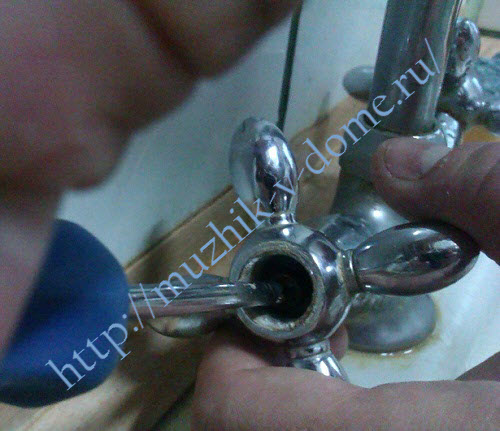
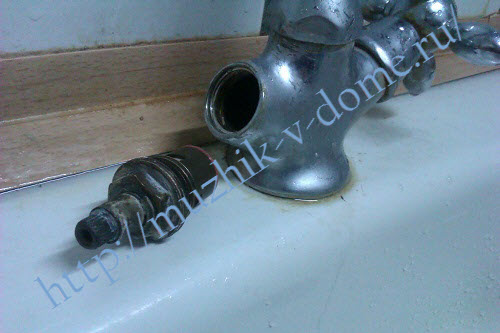
Step 3. Under it you will see a bolt that needs to be unscrewed.
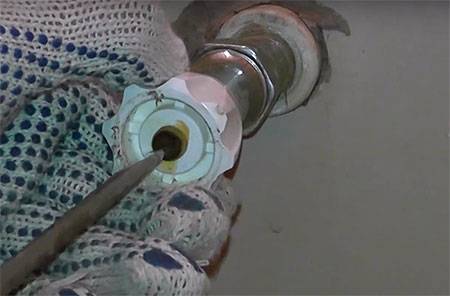
Fig. 3 Unscrew the bolt
Step 4. Having turned it out, we remove the flywheel itself.
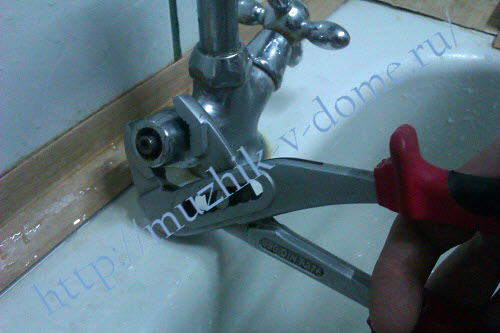
Step 5. Now we take either an open-end wrench or sliding pliers, or an adjustable or gas wrench and unscrew the retaining ring.
Step 6. After that, using the same tool, carefully unscrew the crane box itself.
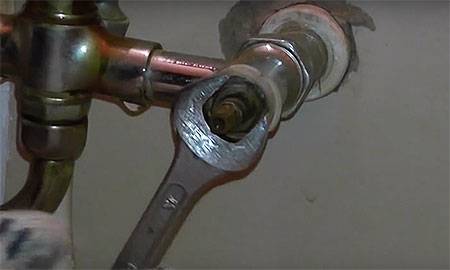
fig.4 We unscrew the faucet-box Of course, you can fix the mixer by replacing the gasket or ceramic plates, depending on the device of the mechanism. But it is better to make a complete replacement of the crane box. Moreover, the cost of this part is very low.
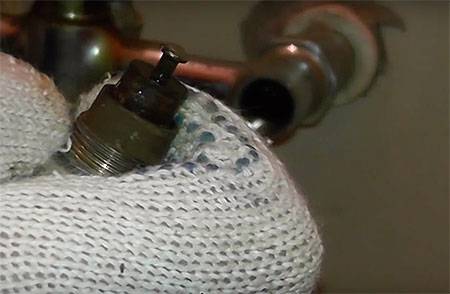
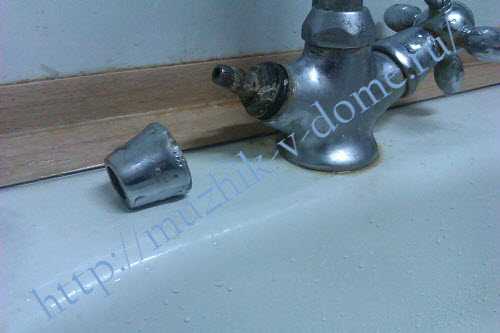
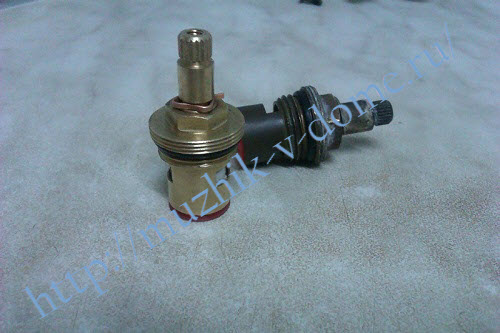
Fig. 5 We take out the crane box
Step 7. Regardless of which path you decide to take, the next step is your trip to the store to purchase the required part. Be sure to take it with you bush crane. as a sample, since there are a huge number of options.
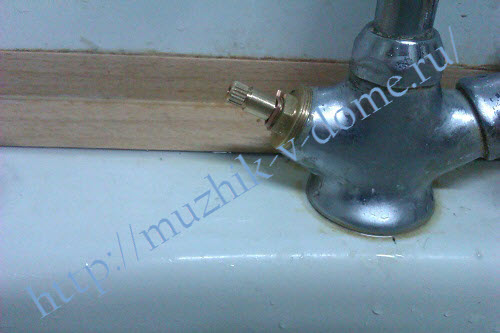
Step 8. After acquiring everything you need, we screw in a new one bush crane on its seat, after cleaning the thread from rust and various deposits. If you still decide to get by with the method of replacing the gaskets, then before screwing, respectively, we first replace them.
Screw the bushing carefully.Do not overdo it, as you can ruin the rubber bands if you overtighten it.
Step 9. We wind the retaining ring.
Step 10. We put on the valve and fix it with a bolt.
Step 11. Install the cap.
How to prevent possible damage in the future
No matter how expensive a two-valve mixer is, without proper care and careful handling, breakdowns cannot be avoided.
Basic rules that can extend the life of your crane:
- You need to open and close the valves calmly, without sudden movements, so as not to disrupt the tap.
- It is better to install a silicone gasket, since it is characterized by increased wear resistance compared to rubber.
- Check connections regularly for leaks.
- At the first sign of leaks, it is necessary to immediately replace the gasket, so that later you do not have to change the entire plumbing fixture, which will cost much more.
- When disassembling the structure, it is necessary to clean the parts from contamination.
By following these simple rules, you can extend the performance of your crane for several years.
In the event of a malfunction of the faucet in the bathroom, it is recommended to make repairs in a timely manner so that in the future you do not have to buy a new device. The repair process is shown in the video:
It is better to replace it yourself, since this option is much cheaper than calling a plumber. And let you have to spend a little time and effort, but you will be sure of the reliability of the design.
How to unscrew the faucet nut if it is stuck
The easiest way to get a stuck nut to unscrew is to knock it down with a chisel or hammer. You can use the grinder. But in most cases, this option is not suitable. You just need to unscrew it so that later it can be screwed back. It would seem that the situation is hopeless, but this is somewhat untrue. There are several ways to help "re-stubborn" a rusted nut.
Dissolving rust
Many people know such a liquid as WD-40. In the common people it is called "Vedeshka". The essence of this tool is that it dissolves rusty deposits and, as a result, reduces friction. As a result, the mount gradually begins to give in.
If this tool was not at hand, then you can find a replacement for it. Kerosene, carburetor cleaner, gasoline, and brake fluid are good for this. In addition, vinegar, iodine or alcohol are suitable for the same purposes.
Guide to action:
- Thoroughly pour liquid over the nut and wait about thirty minutes. As soon as the time has passed, you can take the key and try to turn it off. If the mount does not give in or gives in, but is very tight, then the liquid has not soaked the rust enough. We moisten again, only this time a piece of rag, and wrap it around the nut. So the liquid will be more likely to corrode the rust.
- After such a lotion, the fastening element should begin to move. To make the movement easier, you can tap it a little with a hammer. And only then, with the help of a key, you can try to rip it off. To make the jerk stronger, you can lengthen the handle of the key. Any piece of pipe will do.
We heat the nut
Exposure to high temperatures leads to the expansion of metals, and, accordingly, the rust will collapse. After such an execution, any, even completely sour connection, will cease to be so strong. For heating, you can use any heat source. You can use a building hair dryer, a burner, a blowtorch or a regular lighter.
Guide to action:
Thoroughly warm up the nut and screw itself. After that, we try to turn it with a key. Sometimes the edges of the mount are damaged, which makes it impossible to use the key. In this case, we put on the socket head on the nut and warm it up with it. Then we unscrew the collar.
We destroy the nut
You can destroy the connection with an ordinary chisel, you can cut it with a hacksaw or a grinder, or you can use a drill.
Guide to action:
- By hitting the chisel with a hammer, we make grooves on the edges of the nut. The blows must be strong so that the chisel goes deep. This increases the inner diameter. Gradually we will destroy the fastening element. The same effect will be obtained if you drill holes on the edges with a drill. When the nut is destroyed, it can be easily removed.
- Things will move much faster if you cut off the nut with a hacksaw or an electric grinder. The main thing is to make a cut along the axis.
As you can see, even the most rusty nut can be unscrewed (if you really want to). However, it is much better not to bring the situation to such a result. It is better to initially use a mount that is not subject to corrosion. Then you certainly won’t have to puzzle over how to unscrew the “stubborn” and at the same time not break it.
How to replace a crane box with your own hands
1. Remove the top cap from the flywheel. It may not be easy to do this during a long operation, so pliers will help in this case. Under the cap inside the flywheel is a bolt that must be unscrewed to remove the faucet valve.
2. Often, to unscrew the valve, it takes a lot of effort, because the metal, under the constant influence of water, forms an oxide, which, sometimes, tightly fastens the parts of the mixer to each other. After the valve is removed, it is necessary to clean the thread to which the bolt was attached - during the period of operation, debris could probably accumulate there. The flywheel itself must also be cleaned from the inside.
3. Next, you should start unscrewing the fittings of the crane, which may also not succumb the first time. For convenience, you need to take sliding pliers, and in order not to scratch the glossy surface with them, you can put a piece of dense matter under them.
4. After removing the fittings, you can see the axle box screwed into the mixer. Before you unscrew it, be sure to check whether the supply of hot or cold water is shut off (depending on which water was regulated by the failed faucet box).
If the water is not shut off, then it will gush immediately after removing the axle box from the mixer.
5. When the axle box is unscrewed, it is necessary to carefully clean the thread of the mixer. This is necessary so that the new axle box fits tightly along the thread, otherwise, if debris remains there, water will leak not only from the gander nose, but also at the base of the flywheel. For stripping, a card brush is suitable.
6. For each mixer, a certain type of crane box is suitable. It is necessary to select this part in such a way that it matches in thread, size and material (ceramic or rubber). For convenience, a box that is out of order can simply be taken with you to the store.
7. We screw the new bushing into the place where its predecessor stood. If the thread of the mixer is cleaned normally, then there should be no problems with the further assembly of the flywheel.
Since the faucet is often used in the bathroom and in the kitchen, it will be useful to have the skills to replace the faucet box, because most often it is she who is the cause of water leakage. And, thanks to step-by-step instructions with a photo, not only a man can cope with this, but also a housewife who does not have the opportunity to turn to a plumber.
I also suggest watching a video on replacing the mixer tap with your own hands.
3 comments on Replacing the faucet box in a two-valve mixer - step by step instructions
And yesterday I had to go to the plumbing store twice, because at first I was too lazy to take the unscrewed handle with me. It turned out that there are different numbers of splines on the same-looking crane boxes. They gave two samples and then had to trudge a second time to return the extra one?
Some say that crane boxes with a rubber gasket are much easier to maintain (repair) - I changed the rubber band, and that's it.Others say that ceramic bushings are more durable. What is the best option for a crane box in your opinion?
Ceramic faucet boxes begin to leak water over time, the faucet begins to drip, sometimes after a few months of use. It is necessary, for example, not to fully tighten the valve in order to stop the flow. It's about durability. For whom it is easier to throw it away and buy a new one - the best option. You can repair ceramic faucets with your own hands, but this is no longer as easy as in the case of simple rubber gaskets.
Crane boxes
Differences
To understand how to change the faucet box in the mixer, or even better, repair it, you need to understand what it consists of and how it works, that is, how the water flow is regulated with its help.
The entire repair kit is divided into movable and fixed parts, where the first includes a retaining ring or bracket, a rod with a fork, a silencer and an upper ceramic plate with a hole. The fixed parts include the case itself, the bottom ceramic plate with a hole and the rubber ring for sealing. (See also the article Flexible faucet hoses: features.)
You have probably already noticed that the holes in the ceramics are not located in the center and it is this factor that allows you to regulate the flow of water. That is, when the holes match, a full passage opens, but when the top plate rotates around its axis, the holes gradually shift relative to each other, which reduces the passage until it is completely closed.
The rubber seal does not allow water to break through to the sides, but it flattens over time and then the question arises of how to change the axle box faucet in the mixer.
In the case when, when closing and opening the valve, you need to make many turns (from 5 to 10), then this indicates that there is a shut-off valve with a worm gear. Despite the fact that the replacement of the crane box in a mixer of this type is almost the same as the ceramic version, however, its device is somewhat different.
In this case, the rod serves as a piston that is raised and lowered using a worm gear, but in order to prevent water from flowing through this assembly, there is a fat chamber.
Occasionally, the reason for the failure of such a mechanism is the wear of the “worm” thread, but in most cases, this is the wear of the rubber gasket on the piston, so replacing the faucet box in the mixer is not needed here - just change the gasket (valve).
Repair work
We first need to remove the valve, how to unscrew the crane box on the mixer is possible only after its dismantling (it interferes). To do this, we hook a decorative plug in the center of the lamb with a knife or a screwdriver and remove it, under the bottom there is a bolt that needs to be unscrewed and then we will remove the valve
If you have handles, then such a bolt is usually located under the lever on the handle body (it is also closed with a plug).
Now we need to remove the locknut by turning it counterclockwise, but this must be done carefully so as not to scratch the body. Often there may be another, decorative nut above the locknut, which in most cases can be unscrewed by hand
Now you can simply pull out the stop valves, but sometimes there is still a retaining ring for additional fastening - dismantle it, since it will be possible to remove the bushing valve from the mixer only after that.
Now you can just go to the store with the locking mechanism removed and buy the same one, fortunately, its price is low, but you can save yourself from buying if you disassemble and repair it. To do this, remove the retaining ring from the stem and squeeze the ceramic pair with the gasket out of the body with its rod. If there is plaque on the body, then you will need to hit the end of the rod with a screwdriver or pliers.
- In order to eliminate the leak, we need to increase the thickness of the flattened ring, but since this is not possible, we will simply increase the length of the inner box set. To do this, look at the photo above - there you can see where to stick two or three layers of electrical tape to increase the thickness of the upper ceramic plate. In addition, a home-made washer made of copper wire can be substituted under the rubber sealing ring, as if increasing the thickness of the gasket. (See also the article How to choose a sink: features.)
- Replacing the rubber valve in a crane box with a worm gear will not cause any problems at all. To do this, unscrew the bolt with a washer and change the valve (you can even make it homemade, made of thick rubber).
How to replace a faucet
It is necessary to change the part in the mixer for an identical one.
To replace, in addition to screwdrivers and keys, it is necessary to arm yourself with pliers - a multifunctional tool that can act both as wire cutters and pliers and tongs.
How to remove and disassemble the part?
- Shut off the faucet with the valve. Pipeline fittings related to shut-off and control products are located in front of the mixer.
- Look for a small shut-off faucet if there is no valve on the supply pipe. This is a large diameter ball valve in the form of a metal ball with a hole in the top.
- In the absence of such an element, turn off the water on the riser.
- Remove decorative caps. Apply a screwdriver.
- Loosen and remove the screw. It is easy to "calculate". The part fixes the flywheel.
- Remove bushings. They are located at the top of the crane box.
- Open the box. Apply the key.
The nuances of work
When unscrewing the old crane box, you may encounter some problems. If it is thoroughly stuck to the body and it is impossible to disconnect it with handy tools, the following must be applied:
Grasp the bolt edges with a pipe wrench. Try to rip it off by moving it from side to side, as if swinging
It is important not to overdo it here, namely not to harm the thread and not break the mixer as a result.
Use chemicals. They will help loosen the threaded connection.
Take some vinegar, Cillit-type detergent, or other acidic products. If they did not help, then try to fashion a small container of plasticine around the jumper. After that, pour in the liquid again.
Move the thread by thermal method. Use a building hair dryer to warm up the threaded part. It is necessary to achieve complete loosening of the bolt.
If the tried methods did not help, the crane box should be removed by drilling. To do this, cut off the protruding part of the bolt, and drill the remaining elements. The drill can be replaced with a cutter.
Installing a new
Installation of a newly purchased or repaired part does not require anything complicated. The same steps are performed as when unscrewing, only in reverse order:
- Check if the water is turned off.
- Screw in the bushing with your hands and only then use a wrench or pliers to make sure that it fits snugly against the rest of the structure. Do not press hard on the product, as the gasket may be deformed. Violation of the integrity of the element leads to the blocking of the water supply channel.
- Take care not to damage the sealing gasket on the valve seat with the tool.
- Tighten the locknut and secure the entire body of the part from turning.
- Open the water. The absence of smudges indicates that everything is done correctly.
How to disassemble a faucet in a two-valve bathroom
Before you start disassembling the mixer, you need to find out the cause of the breakdown. To do this, you need to find where the water flows. Having identified the problem area, you can begin to repair.
Disassembly of the mixer may be necessary in several cases:
- faucet leakage due to gasket wear;
- dripping water from the valve, due to wear of the sealing insert on the stuffing box;
- marriage in the device (an emergency breakdown of the mixer after purchase indicates its malfunction).
If none of the reasons fits, and the tap is still faulty, most likely there was a breakdown in the design of the mixer. In this case, a complete replacement of the device will be required.
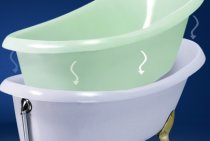
Before starting work, in order to protect the bathtub from chips and cracks, it is recommended to lay a sheet of foam rubber or a piece of soft thick material in it in a place under the mixer.
Shower cabin in a private house - installation secrets
Mixer disassembly procedure:
Remove the decorative cap from the valve. In case the valve is difficult to influence, grease must be used. Work should be carried out very carefully so as not to damage the crane.
Using a Phillips screwdriver, unscrew the screw located in the place where the plug was (inside the flywheel).
Carefully remove the valve.
Unscrew the core. Don't forget to remove the cover first. For this stage, we use an adjustable wrench, on which we independently set the size.
If necessary, unscrew the second valve head in the same way. After disassembling the crane, check if the mount is loosened. Tighten if necessary.
Removed parts are carefully checked. We are interested in the integrity of threaded connections and rubber gaskets, the presence of blockages and mineral deposits.
If dirt and lime deposits are detected, they must be cleaned
To facilitate the washing of parts, you should use a special tool.
Particular attention should be paid to the gasket. since it is she who most often causes a malfunction of the mixer
In case of complete wear (cracked, deformed), it must be replaced with a new one. If it is in a satisfactory condition, but there was still a leak, then it is enough just to tighten the fastening bolt until it stops.
It is not necessary to buy a gasket in a store; you can cut it yourself from a piece of rubber. If at the moment there is nowhere to make a purchase, this option will serve quite well for some time.
We take the FUM tape and wind it on a threaded connection with a thick layer.
We collect all the details in reverse order.
We install a decorative cap.
If water drips from the valve, use a screwdriver to unscrew the nut on the stuffing box. Screw a new insert onto the valve stem and tighten the nut.
To check the correctness of the work performed, you need to turn the valve. Smooth running and no leakage is a sign that everything is done correctly.
If the shower hose is leaking, you just need to unscrew it and replace the old gasket. Then screw it back on and check if the leak has been fixed by turning on the water in the shower. Before carrying out plumbing work, it is advisable to turn off the water using a special valve, which should be turned counterclockwise by 90 degrees. This is necessary so that a flood does not occur during the replacement.
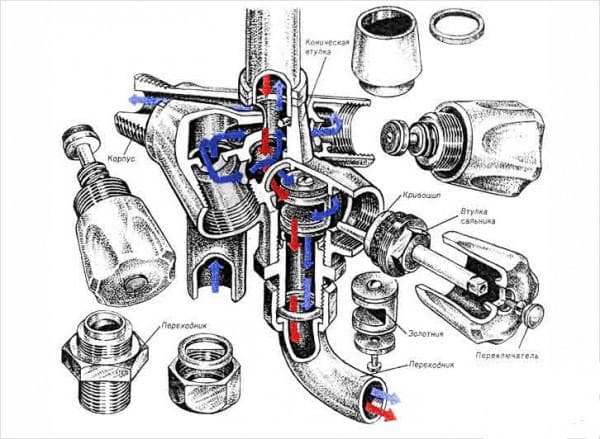 The diagram shows the design of a standard two-valve mixer