We raise the ceilings
It's time to take a closer look at all the options.
We change the device of overlaps
The ceiling height in a wooden house can be increased by an additional option. It is used in the case when it is required to raise the ceiling by 150 - 250 mm and at the same time the ceiling does not have important distortions.
Any ceiling of a wooden house is made up of floor beams, a heat insulator and a filing. The use of beams 50 thick and 150 - 180 mm high is considered a very economical option.
But this indicator can significantly differ, the larger the span of the floor, the stronger the beams are placed. For any less than 150 mm, they will not.
The ceiling lining is attached to the beams from below. In this version, everything is also personal, but in any case, by removing the filing, we will win in height.
So:
- The first step is to clean the attic.
- Further, if the material for insulation was laid on top, we remove it.
- As soon as the beams are exposed on top, you can remove the filing.
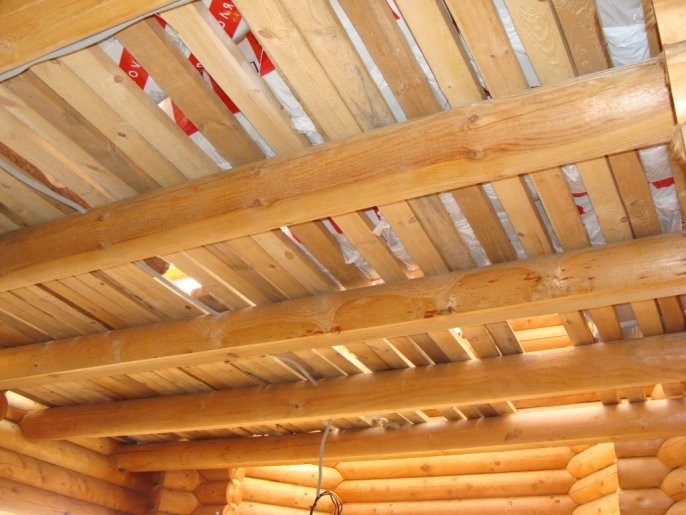
Beams - what to look for
Beams on the ceiling
It's time to put on a new roof. Beams in this case will perform 2 functions in parallel, work for their intended purpose and play the role of decor.
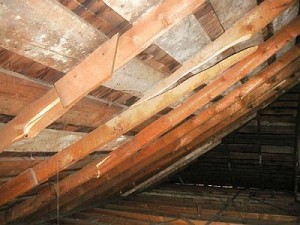
Our advice - Carefully look at all the beams. Those that have become rotten need to be replaced.
Sometimes the floor beams have an unattractive appearance, they were previously hidden by filing, this was not displayed on the appearance of the room, in this case their appearance is extremely important.
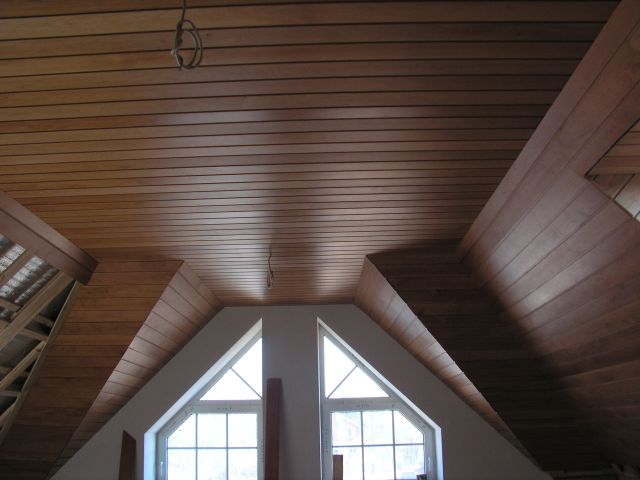
False beam
If it is not possible to give the existing beams a beautiful appearance, cover them with false ceiling beams. With a specific imagination and skill, false beams can be made with your own hands.
Finishing the ceiling
Next, you need to arrange a ceiling covering and thermal insulation on top of the beams.
How to do this is described on our pages and we will not focus our own attention on this.
So:
- By doing this operation, you will raise your own ceiling without rebuilding the whole house, and in the visual project it will rise a long distance.
- Beautifully lined floor beams will add a specific flavor to the entire home interior.
Raising, descending
But sometimes the best option to raise the ceiling is to lower the floor. To do this operation, you need to carefully analyze how the floor beams are laid.
https://youtube.com/watch?v=CJJy3veQcFA
Sometimes the floor beams, during construction, were laid only when one or even two rows of crowns were laid. If this is the case, then by lowering them to the foundation level, you can gain a lot in height.
So:
- Remove a few floor boards from the edge and see how the beams lie.
- If they lie as we told you before, you need to completely remove the flooring.
- Beams are cut from the crown and lie straight on the foundation itself.
Our advice - put pieces of roofing material under the bars to save you from dampness.
Now you can lay the floor in a new way.
This option makes it possible to greatly increase the ceiling height in the room of a wooden house.
What should be the height of the ceilings in the house
In almost every old house, the ceiling height is slightly over 2 meters. The modern standard is 2.4 meters. However, more and more often the standard height is increasing up to 3 meters. But you need to remember that in those houses that are located outside the city, too high a ceiling will create a whole lot of inconvenience. For example, it will be much more difficult to heat such a room with a stove. That is why a comfortable height is considered to be the same 2.4 meters.
Based on all this, the optimal heights are:
- 2.1 meters - for houses that are heated by stoves;
- 2.4 - for gasified houses;
- 3 meters - if the ceiling is created in a monolithic structure (but they are still extremely rare).
Solution first color
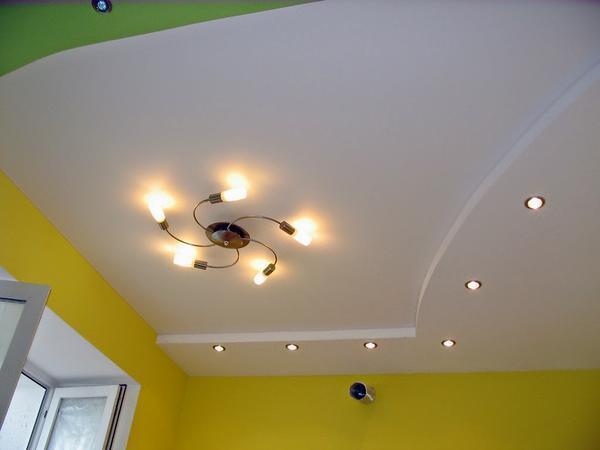
Based on the ability of the human eye to perceive different colors differently, it is possible to “deceive” ourselves. In this case, you need to use the effect of removing objects and surfaces painted in cold colors. This means that if the ceiling is painted or wallpapered in pale green, blue, gray-blue, gray or pearl tones, then visually it will appear higher.
Another solution could be to create "infinity" on the ceiling, that is, the sky. There are three options here: you can stick wallpaper on the ceiling that imitates a blue sky with small light clouds, you can order art painting in the same style, or you can install a stretch ceiling that will convey heavenly purity and spaciousness as naturally as possible.
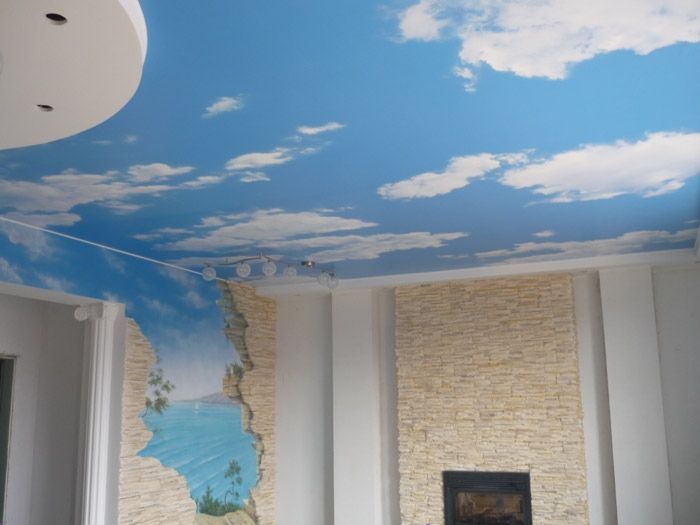
The ceiling in the form of the sky allows you to visually increase the height of the room
When simulating the sky on the ceiling, the boundaries of the vault of heaven can also be lowered onto the walls. If the walls and ceiling are pasted over with the same wallpaper, then the eye will not catch where the walls end and where the ceiling begins. This solution to the problem of a low ceiling is best suited for the bedroom and children's room.
A laborious but effective way
More difficult, but certainly more attractive in terms of performance, is lifting the roof with jacks.
Sequence of work:
First of all, the base of the roof is reinforced with a metal frame made of channels.
Supports are installed, also made of channels. Since the load at the stop will be large, it is necessary that there is a supporting structure under the support
When calculating, it is important not to forget about the wind load. In order to avoid damage to things in the house, it is better to choose good weather to raise the rafters with a roof.
After strengthening, the lifting of the roof begins
The corner is raised with the help of a hydraulic jack to a height not exceeding five centimeters - then there is an alternate movement in a circle.
Transverse metal beams are fixed to the supports by welding. You can use other structural elements that meet the requirements for strength as a lining.
The support for the jack is the metal support of the roof.
Brickwork should be increased after rising to the required height.
The roof is fixed on the walls: an armored belt is poured on top of the load-bearing walls, a Mauerlat is laid. on which the truss frame is attached.
Work is underway on additional hydro and thermal insulation - it is especially important to complete this item if the ceilings were increased to equip the attic.
An important point: the number of lifting mechanisms
Some builders recommend using several hydraulic jacks with a lifting capacity of five tons each.
There is a separate issue with their acquisition - it is not advisable to buy, and it is difficult to rent more than two.
In addition, theoretical calculations do not take into account possible errors in the operation of the devices themselves.
That is, it is unlikely that it will be possible to provide ideal conditions, and it is not worth relying on the well-coordinated work of even two such mechanisms.
The risk of the roof tilting or shifting to the side is too great: with two anchor points, there is more chance of losing stability.
Weighted decision
 Note that work should be started only after a comprehensive and detailed inspection of the state of the truss system. If some beams are rotten, it is impossible to predict how the frame will behave when exposed to it.
It is impossible to achieve an effective effect without a certain risk. However, with proper calculations, the probability of success is very high.
And if the roof is strong, reliable - for example, folded - it will last for many more years, covering a room with high ceilings.
Visual lifting of the ceiling
The answer to the question of how to visually raise the ceiling in a wooden house is needed if none of the above methods is suitable, or the room is located in an apartment building.
In this case, the following methods of visual expansion of space are used:
- If ceiling plinths are installed around the perimeter, then they are painted in the color of the walls or dismantled completely. So the ceiling surface seems higher.
- Glossy light ceiling coverings and mirror surfaces visually expand the space. That is why when choosing a ceiling finish, consider this nuance.
- Low pieces of furniture visually raise the ceiling, so decorate the interior in an oriental style.
- If part of the ceiling surface along the perimeter is painted in the color of the walls, then the border between the planes will smooth out and it will seem that the ceiling is higher. To do this, at a short distance from the walls (15-25 cm), masking tape is glued to the ceiling, after which the area from the tape to the wall is painted with the same paint as the walls. After that, the adhesive tape is removed, and the ceiling decor (fillet or baseboard) is glued along the border of the color difference.
Rules for the visual expansion of space
In addition to knowing how to visually enlarge the ceiling in a wooden house, you need to know the rules for visually expanding the space of a room:
- Choose the right color finish. Light pastel colors expand the space, while dark and saturated colors narrow it.
- Match the coating to the color of other finishes, textiles and furniture. The more color spots that differ in tone and color, the more squeezed the space seems.
- Do not clutter up the interior with small items, things and decor. Remove from your eyes everything that is rarely used.
- A well-lit room feels more spacious. Do not cover the windows with thick curtains and install additional sources of artificial light in the room.
- The traditional opinion that small-sized furniture is placed in a small room is erroneous. Narrow high furniture up to the ceiling, a large sofa or wardrobe will make the room more spacious.
- A large mirror on the closet door, a mirror table or a wall - all this makes the room taller and wider.
When choosing wall decor, give preference not to one large picture, but to several small framed images. So you will give a visual volume to the room. High furniture allows you not to lose its functionality and save additional space.
The old buildings are low ceilings. If you are the owner of such a house and want to increase the height of the ceilings, it is not necessary to disassemble the roof - you can raise it on your own. Our master class will help you with this.
standard height
For typical high-rise buildings, the minimum ceiling height is determined by the type of building, as well as the time of its construction. Apartments located in different parts of the country are identical to each other not only in terms of layout, but also in the standard ceiling height, which may differ slightly by several centimeters.
Stalinki

This is perhaps the only version of buildings that are distinguished by a large scale. The ceiling height in such houses is approximately 3-3.5 m. Previously, ceiling spaces were often decorated with stucco elements to give the room additional comfort and harmony.
Khrushchev
From the name it is clear that these residential buildings were built in the time of Khrushchev. They are represented by standard five-story buildings in which Russian families have been living for several decades.
These apartments have the following characteristics:
- the height from the floor to the ceiling space is small (a person with a large stature can easily reach the surface of the ceiling with his hand);
- The area of the apartment is also small. So, the kitchen is 6 m², rooms - 12-14 m².
The standard height in Khrushchev is 2.5 m, but due to the low ceilings, such apartments have some advantages:
- less money spent on heating bills;
- ceiling structures are represented by reinforced concrete floor slabs, therefore they are durable.
Brezhnevka
Similar apartment buildings began to be built in the 70s of the 20th century. The average ceiling height in the rooms of such apartments is 2.5-2.7 m, and the total area of \u200b\u200bthe entire housing reaches 80 m.
These values make it possible to implement many design solutions without having to spend large sums of money on repairs and decoration. With a floor-to-ceiling distance of 2.7 meters, the ceiling space can be lowered by no more than 20 cm. Therefore, even complex suspension systems or two-level tension structures can be installed in such rooms.
Panel and block houses
Their initial construction took place in the 80s of the 20th century. Such houses are characterized by the presence of a large number of floors, spacious rooms and kitchens. The height of the ceilings in block buildings is 2.65-2.75 m.
Ceiling decoration allows you to use many different techniques.
Modern apartments
In modern new buildings, apartments are distinguished by a variety of layouts. In the real estate market, you can find both luxury and economy class apartments. The main differences between them are the area and the degree of comfort, which are directly related to the height indicator. For example, if this is a small studio apartment, then in order to save money, when determining the height of the ceiling surface, its permissible minimum in the living room is used. As a rule, it does not exceed 2.7 m. Large luxury apartments boast ceilings of 2.8-3.2 meters high.
Repair of apartments with high ceilings is best left to designers. They will help you choose the optimal distance from the floor to the surface of the decorative structure, which will express the advantages of the finish and hide the disadvantages of the layout.
If you have a low ceiling, then here are solutions to visually increase the height of the ceiling.
Houses of private development
Your home provides endless possibilities for the development of fantasy. Here you can already choose absolutely any layout and height of the rooms. Usually, the architect helps to decide on the last indicator.
In order not to create a feeling of emptiness, and the room was cozy and comfortable, ceilings should be made no higher than 2.9-3.2 m.
Finishing the ceilings in private homes can be done in various ways. Under wooden beams, stretch fabrics or suspended ceiling structures are most often installed. Often combined options are used. With reinforced concrete ceilings, it is allowed to use almost any method of finishing - from traditional painting to the installation of complex systems.
On a note! It is necessary to decide on the type of decorative finish in advance, then it will be easier to choose the optimal ceiling height.
Outbuildings and premises
For such premises, there are no strict restrictions on h. It is determined by the functional purpose of the building. For example, for a sauna or bath, it is better to make the distance from the floor to the top smaller in order to reduce the time to warm up the room.
For a garage, h must be such that the transport for which the building is intended fits freely in it.
Visual lifting of the ceiling
One of the problems of small Soviet-built houses is the low ceiling height. In some cases, it barely reaches 2.6 meters, which, along with the small area of \u200b\u200bthe room, can cause a feeling of some discomfort. Naturally, repair does not always solve this problem. However, if it is physically impossible to do this, then it is quite possible to create the illusion of a high ceiling in the room, without making much effort.
Methods for visually lifting the ceiling:
- One of the most popular design techniques that will allow you to visually raise the ceiling is sticking wallpaper right next to it. The fact is that a wide baguette, which is now quite popular in the repair of premises, significantly underestimates the ceiling.This is especially noticeable if the ceiling and baguette are painted in the same color. With a low ceiling, you should abandon this idea and paint the wall (or wallpaper) closely. It should be noted that this method is the simplest.
- A more complicated method of visually raising the ceiling is the use of mirrors. Mirrors are considered one of the best items that can expand the space. True, the installation of a mirrored ceiling will not be cheap, because it requires the construction of a special supporting structure to hold the weight of the glass. So, doing it yourself will be problematic. And the cost of the material itself is not too democratic.
- You can try to equip the interior in an oriental style. It involves the use of low pieces of furniture and interior. Oriental low sofas, as well as decorative pillows, can visually increase the height of the room.
- Another design trick that can “raise” the ceiling is painting its peripheral part in the color of the wall. This technique creates the effect of the influx of the wall on the ceiling, which, as it were, moves it away from the eyes. This is done very simply. After the surface of the ceiling and walls is plastered with finishing putty and primed, masking tape is glued along the perimeter of the ceiling at a certain distance from the corners. Next, the wall and part of the ceiling up to the masking tape are painted in a certain color. When the painting is finished, the adhesive tape is removed and glued to the painted surface, after which the ceiling is painted.
- Another technique that designers successfully use is the installation of a “fabric tent”. It is done as follows:
- decorative beams are stuffed around the perimeter of the room;
- small lamps are installed behind them;
- a large lantern is hung in the center of the room, covered with a glass ceiling;
- between the center and the side beams, a light, light fabric is stretched, imitating the sun's rays. Once the lighting is turned on, the direction of the light from the periphery to the center and back will create a beautiful picture that will visually increase the height of the ceiling. However, this technique should fit into the overall design of the room. You don't have to do it separately.
If you can not raise the ceiling
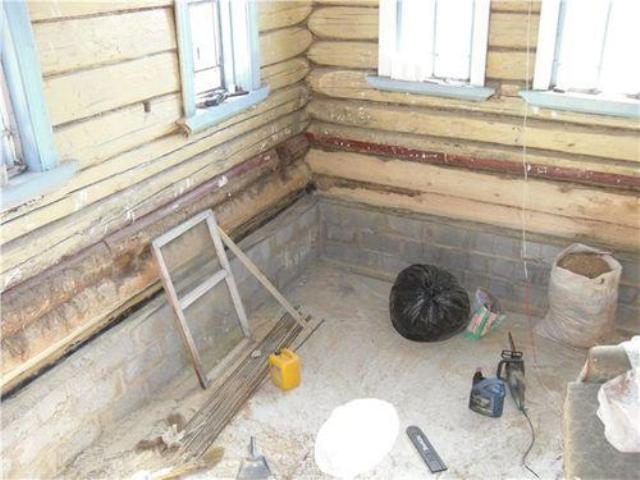
Sometimes, you have to do not the way you want, but the way it turns out. In old buildings, it is often not possible to raise the ceiling surface and you have to be content with not the most popular methods. In the case of the height of the walls, this will be the lowering of the floor.
Of course, you can lower the floor. Here, the owner of the old house will benefit from the fact that in old houses the floor was made at the junction of the first two crowns. This means that there is approximately 25 - 30 centimeters of unused space in stock under the floor.
You will have to completely cut off the old logs that were used to build the old floor. After their removal, a new floor is mounted, along the logs installed directly on the foundation. If the height is not enough, there is a more difficult option to increase the free space.
In such a situation, you will have to remove the beams completely, to the point where the house rests almost exclusively on the walls, under which the entire foundation remains. In the resulting space, the floor level deepens until the lower edge of the supporting foundation appears - you should not go further. If this is done, you can deprive the house of support, which will lead to deformation of the walls and destruction of the building. When the required depth is obtained, the entire range of work is carried out related to the construction of the insulating layer and preparation for the installation of floor beams.
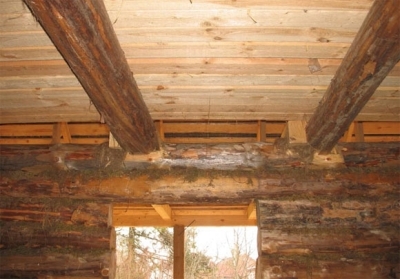
In order to figure out how to raise the ceiling in a wooden house, it is important to consider the basic methods of the process. Based on the general parameters of the finished structure, you can choose the best option .. If the ceiling beams do not protrude, the ceiling is hemmed to them from the bottom
The attic side can provide decking at the top of the beams
If the ceiling beams do not protrude, the ceiling is hemmed to them from the bottom. The attic side can provide decking at the top of the beams.
You can raise the ceiling in a wooden house by 10-20 cm by removing the filing at the bottom. At the top, you need a good flooring without gaps.
Tinted beams combined with glossy transitions in the form of suspended ceilings will look quite attractive. If there is an incorrect geometry of the beams, it is possible to make ceiling cladding using lining in darker shades.
In order to visually study the technique of how to raise the ceiling in a wooden house, you can watch the video at the preparatory stage.
The positive aspects of the process are that there is no violation of the walls of the building. The visual expansion is noticeable, but in fact, the height of the upper beam does not change.
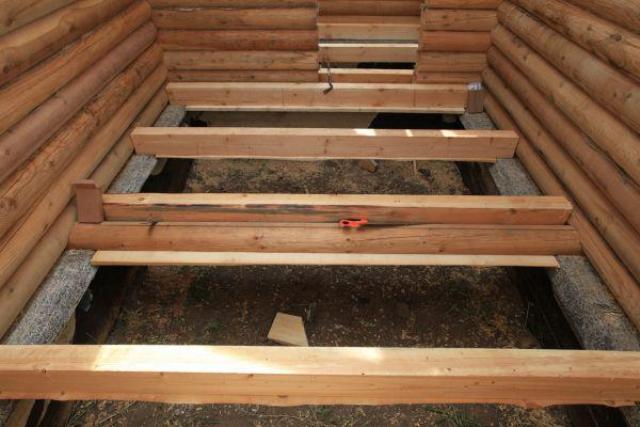
How to lower floor beams
Many designs provide for the presence of cut beams between the first and second crowns. To ensure the expansion of space, you can carry out a number of works:
- Remove the flooring;
- Cut beams along the walls;
- Place the lag on the foundation;
- Lay board, plywood or OSB.
More time and money will be required to ensure the process. With this, the floor will be placed on the crown below. Windows and doors will be higher than usual.
Removing ceiling beams and filing the floor
In the presence of truss and additional beams to them, you can take advantage of the difference in accommodation level:
- The ceiling surface is embroidered;
- Ceiling beams are cut along the wall ceilings;
- The ceiling surface is hemmed along the rafter beams.
At the same time, the volume of space is noticeably increased. The height of the ceiling surface in a wooden structure is increased by the difference between the two sets of beams. This will not affect the deterioration of thermal insulation.
To insulate the attic surface, it is enough to make a layer of mineral wool.
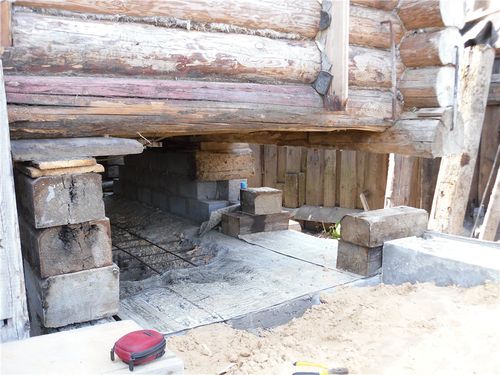
Lowering the floor below the strip foundation
- The floor covering is removed.
- Supports in the form of floor beams are cut off.
- Excess soil and backfill are removed.
- The crushed stone backfill is placed again, a new base is reinforced and poured under a given level of floor beams.
- Beams with a floor covering keep within.
Free space in the inside of the tape base provides additional insulation and increased height. The increase in free space is provided by the height of the foundation of the building. At the same time, it is necessary to tune in to a large amount of work and the ability to move the soil under the building.
Almost all wooden houses that were built in the last century have very low ceilings. This is due to the fact that then there was no such wide access to various building materials. In addition, over the past years, the houses have given serious shrinkage, which affected the height of the ceilings in them.
An old wooden house, the ceilings in which are most likely very low
The last way
It is used in cases where none of the above is suitable. This decision is quite risky, since a mistake when lifting can lead to a displacement of the house to the side and damage to the latter.
First, it is necessary to correctly estimate the weight of the building, based on the thickness of the walls and the type of wood, since the difference in the density of wood can be quite significant. Also, if a furnace is built in the building, then it is necessary to disassemble the chimney before lifting.
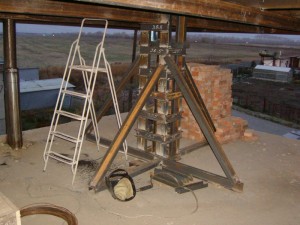
It is recommended to use several jacks with a lifting capacity of 5 tons when lifting. You can also raise the building with the help of one device, but the first method is somewhat faster. The process is reduced to a gradual - no more than 50 mm at a time, raising a wooden house to the required height. When lifting, fix with wedges or props, as shown in the photo.
After the desired height is reached, in the formation
crowns are added to the opening - you can use both logs and timber, but be sure to use the same type of wood as the rest of the wall material, or the foundation is built up. Then the house is raised again, the props are removed and the building is lowered. Walls, interior finishes, and roofs do not change at all. However, the amount of work is significant, and window and door openings are at an unusually high level.
The old buildings are low ceilings. If you are the owner of such a house and want to increase the height of the ceilings, it is not necessary to disassemble the roof - you can raise it on your own. Our master class will help you with this.
How to raise the ceiling
But we will not dismantle the issue of the correct selection of building materials now. The topic of our note is completely different, in this case we will try to improve the situation in which the owners of these houses are.
Now we will dismantle the question - how to raise a low ceiling with our own hands. The issue is complex and should be approached with all seriousness.
Feature - Highlight
Sometimes you can find advice and various recommendations on this issue, which directly show how to implement it.
We seriously say that this kind of instruction can ideally force you to do a lot of unnecessary work, and at worst lead to the complete collapse of the house. And all because each specific building has its own nuances in the device and a specific working period.
Wrong decision
For example, consider the question of when, in order to raise the ceiling in a building, it is advised to raise the ceiling ceilings using specialized tools. At the same time, there is not a word about the fact that the first thing to do is to sensitively analyze the state of the beams themselves.
So:
- The action of lifting mechanisms leads to the complete collapse of the roof due to the poor condition of the beams.
- If the beams are placed in perfect condition, this procedure causes the roof to simply move out of the way and cannot be put back in place.
- It will definitely have to be completely dismantled and mounted in a new way.
- A broken roof can cause irreparable damage to the building itself.
- As a result, the complete destruction of the house.
We heal one thing - we cripple another
When it is not possible to raise the ceiling with your own hands due to the structural properties of the structure, it is easier to do it, lower the floor.
Again, everything is entirely personal and where for one building it is a panacea, for another it is a completely unnecessary waste of time. Let's imagine that a house with a low ceiling has well-placed windows.
So:
- There are no hard indicators for the height of the window sill from the floor, but perhaps a comfortable height will be no higher than 900 mm.
- You will lower the floor by 300 - 400 mm.
- In the end, the window sill will be at a height of 1200 - 1300 mm.
- If for industrial buildings such a distance is allowed, then for a living room it is not at all a comfortable height.
Design specificity is important
Foundation inspection
When asked whether or not to lower the floor, the device and the height of the foundation also apply. And therefore, in addition to the windows, it is worth carefully looking at it.
In another case, a strong decrease in the level of the floor may adversely affect the condition of the entire building. For any, if the floor in the room turns out to be too low from the ground, nothing good can be expected from this.
In general, when designing and building houses made of wood, it is worth considering this opportunity as a replacement for some beams and parts of the crown of the house.
Our reference: In antiquity, constructing buildings from wood, architects and workers, understanding the relative short-term durability of wood structures, built them in a similar way, that if necessary, parts that had become rotten could be changed without dismantling the main structure.
Benefits of lifting a building
Lifting with jacks
If it is not possible to raise the roof or lower the floor level, the entire structure of the house made of wood is raised. In this option, it turns out to achieve 2 good nuances at once.
First, by raising the height of the ceiling and secondly, by raising the building, you can successfully level the floor and ceiling.
Rise at home where to start
But if none of the above methods suits you according to the design features of the house, all that remains is to raise the whole house and then lower the floor level.
This type of work needs to be taken quite seriously:
Explore the whole house system.
If a furnace is installed in the house, pay great attention to cutting the pipe. When you raise the house, you simultaneously raise the entire ceiling, and therefore the cutting needs to be disassembled.
Next, you need to determine the approximate weight of the entire structure.
When calculating the weight of a wooden house, look at the moisture content of the wood.
It is also very important what kind of wood your house is built from.
We calculate the weight
Below we present the important values for the m3 weight of different types of wood.
Wood
Weight m3 kg.
Oak
1020
Maple
862
Aspen
793
Larch
833
Aspen
762
Ash
924
Alder
800
But since pine and spruce are considered important building materials, we separately give their weight per m3. At the same time, we give two indicators at once according to these materials with different degrees of drying.
№
Name
Weight m3 per kilogram.
1
raw pine
890
2
raw spruce
790
3
dry pine
470
4
dry spruce
450
As can be seen from the above data, the difference is significant.
Our advice - if you doubt to understand the degree of drying of the wood, it is better to take into account the weight limits. In this variant, you will definitely not have problems when lifting.
Jacks - a lot is not always good
hydraulic jacks
Next we need jacks. Sometimes it is recommended to use several jacks with a lifting capacity of 5 tons.
The use of several jacks in parallel will greatly increase the lifting speed and eliminate permissible damage to the facing part of the structure.
But we recommend that you do otherwise, and here's why.
Knowing the reality of our life, we doubt that infrequently someone will find 4 or 5 similar, serviceable jacks at once, and acquiring them will be unjustified financial costs. Also, they are not that cheap.
Raising a house in the same way, you expect that they will all work very reliably and will not let you down at the most serious moment.
But if your hopes are not justified, this leads to sad consequences. In addition, the installation of several lifting devices in parallel increases the option at which the house on jacks can move to the side.
One jack - the right lift
Lifting with one jack
Unfortunately, this is the reality of life.
And so we recommend that you take one, but a powerful jack:
- Of course, a jack with a lifting capacity of 10 tons would be an excellent option, but if this is not possible, a five-ton one can also be used.
- The most important thing is not to rush and raise the building as equally as possible no more than 50 mm per pass.
- In this option, there will be no violations that are associated with deformation.
- After lifting one side, insert wood wedges of appropriate thickness and move on to the next side.
- When you have made the first pass on all sides, continue the ascent further.
Installing wedges - we do it exactly
Just do not put loose wedges under the raised system.
Better do it like this:
- Immediately determine how high you are going to raise your house
- Set the number of points at which you will make the ascent.
- Set a specific distance that will be lifted in one pass.
- Divide this value by the total lift height.
- Make the correct number of wedges for any pass of suitable thickness.
- If the wedges are made up of some parts, they must be firmly knocked together.
- If during the work a leak of the jack is detected, the work must be stopped and continued only after replacing the defective tool.
ATTENTION! - Remember, the implementation of these tips is considered a guarantee of the safety of persons and your safety of those present next to you. As soon as the house is raised to the required height, you can add the required number of crowns and lower the house
As soon as the house is raised to the required height, you can add the required number of crowns and lower the house.
After ascent - descent
We raised the house, but the space inside the premises did not become higher. For this, it simply remains to lower the floor, exactly the distance that the rise was made. Now everything can be said.
It remains to be added, when creating all the work, follow the safety precautions.
Good luck to you!