Which foundation scheme for the barn to choose
Of course, the design and type of foundation for the barn depends, first of all, on the project of the barn itself, more precisely, on the degree of its “capitality”, the heavier the building, the more and deeper you will have to dig a foundation pit for the foundation for the barn with your own hands. Four building schemes are commonly used:
- The classic columnar version of the foundation is used for lightweight structures made of boards, plywood, siding with a simple pitched roof. This is the simplest foundation for a barn in the country;
- A pile foundation can be called a universal structure; it can be used for light sheds made of timber or a frame house;
- The tape version of the foundation base is used either for a box of blocks and bricks, or for arranging a basement.
Often, a barn is set up without any arrangement of support and binding to the ground. For example, if the site has a heavy rocky soil with a high content of crushed limestone or an exit to the surface of limestone, marl-dolomite "tongues". In this case, it is easier and faster to build a foundation on one sand cushion with your own hands.
Advice! It is enough to make the correct drainage of rain streams and compact the sandy backfill. On this basis, a barn without a foundation will last longer than on a shallow concrete strip laid on quicksand or loamy soil.
Building a barn without arranging a foundation is faster and without serious costs. But the results of such construction are poorly predictable, especially if the shed needs to be built on virgin lands, where there are no neighbors and there is no way to clarify the composition of the soil.
This is interesting: How to beautifully combine wallpaper for the hall and living room: we analyze the question
How to choose the best foundation option
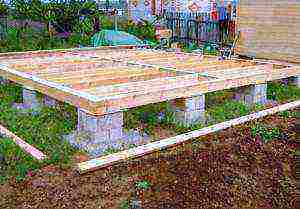
Before analyzing possible options for a suitable foundation, you should decide on the tasks that the barn will perform and the conditions for its operation. For a small building in a warm region, a pile foundation with several supporting rods will suffice. It is desirable to build objects of a large area on a monolithic basis - for example, from a solid concrete screed or in the form of a block platform. These techniques will allow you to build a durable and well-protected foundation for the barn at the bottom. Do-it-yourself monolith is implemented with a standard set of tools, but requires more physical effort. For example, laying a block may require the help of at least one partner.
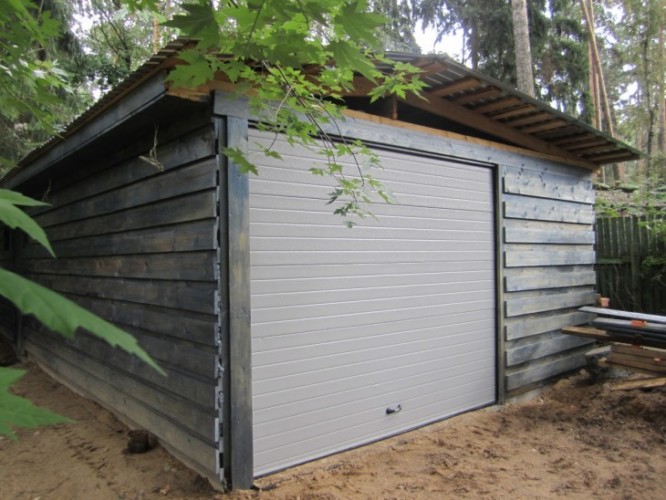
How to build a garage from sleepers yourself step by step instructions
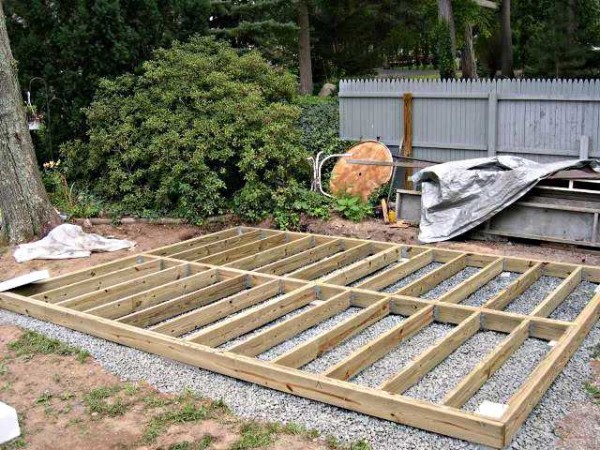
The sleeper garage is a lightweight construction, so you can install the simplest shallowly buried strip foundation under it (depth 30 - 40 cm, for soft soils - 50 cm, width 3 cm more than the width of the sleeper).
Stage one - the device of the foundation
We dig a trench according to the size of the garage and arrange a sand and gravel cushion, 10 cm thick. On wet soils, expanded clay or broken red brick can be added to the cushion for better waterproofing.
Now lay out the first row of sleepers in the foundation
An important rule - the ends should not touch - you need a gap of 2 - 3 mm. We fasten the sleepers with metal staples
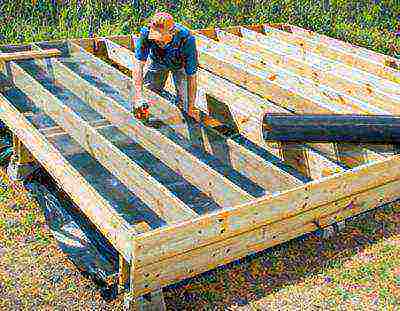
We fill in the standard tape of a shallowly buried foundation, but there is one caveat. You will need to fix the fastening bolts (40 mm diameter) in the foundation, they are cemented directly into the screed in increments of one meter around the entire perimeter, excluding the gate opening.
We install columnar supports, which are also embedded in the foundation. We install supports at the corners of the structure, in the garage door frame and in the center of each long side of the structure.
Stage two - we prepare the sleepers for installation
The first row of sleepers is attached to the foundation strip with bolts embedded in it. Therefore, it is necessary to drill holes in each sleeper so that they coincide with the pitch of the already installed bolted joints.
The bottom row of sleepers must be treated with bitumen for waterproofing, and a rolled roofing material should be laid on top of the first row in two layers. This will protect the walls from high humidity.
Stage three - installation of the first row
We install the first row of sleepers and for the reliability of the structure we fasten them with metal brackets at the junction of two sleepers and at the corners
It is important for each row to select sleepers of equal length so that the building looks neat
Important rule. Sleepers should be laid flat, this will give stability to the structure, although it will increase material consumption.
Stage four - installation of walls
Building a garage from sleepers is not difficult, but it is important to follow a certain technology:
- we connect adjacent sleepers in a row into a spike, but for this it is necessary to cut out the desired shape of the ends, so it is easier to fasten the ends together with metal brackets;
- the rows are also fastened together with brackets or metal plates, which are attached to self-tapping screws. The step between the brackets is 50 cm.

Important. Vertical fastening from the end of the sleeper should be at a distance of 50 cm, no less
- every three rows it is necessary to fix the structure in the corners with metal corners - this will stiffen the entire structure of such a garage;
- for window openings, it is necessary to install a box of timber - we mount it on self-tapping screws, strictly according to the level. The gaps can then be sealed with mounting foam or silicone putty.
To give the structure rigidity, you can additionally fix the sleepers diagonally with a metal strip - 10 cm wide, 3 - 4 mm thick.
Stage five - roofing
For a garage of sleepers, you can choose any roof option, but for a garage, a shed roof is simpler, less material consumption for rafters and coating.
You can lay out the walls with sleepers not horizontally, but vertically. Material consumption will remain the same. For a standard 6x4 m garage, you will need 150 class A-1 sleepers or 170 class A-2 sleepers.
We perform the foundation and the first row of the building in the same way as a horizontal layout, and we mount the remaining sleepers vertically, fastening them together with brackets, a step of 50 cm. On top we mount a box of horizontal sleepers for installing roof slabs or cut them to the desired level.
Additionally, it is possible to isolate the roof by installing a layer of roofing material, which is laid out under the upper box for the frame or right on top of the ends.
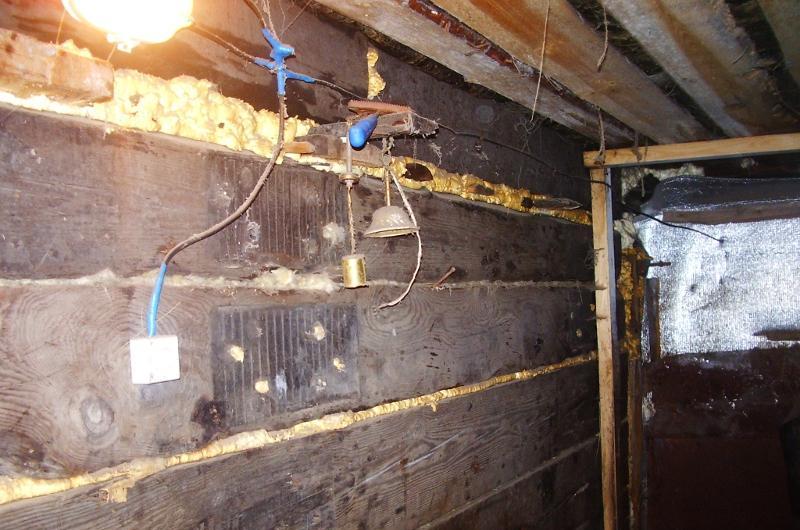
Is it possible to build a barn without a foundation
Of course, it will not be possible to do without a supporting base completely, but the optimization of this structural part of the barn in some cases justifies itself. So, if there are no strict requirements for thermal insulation, then it is quite possible to confine ourselves to installing the frame on four concrete blocks dispersed in the corners of the future building. You can make a barn without a foundation and on cleared soil. Such projects are usually implemented using prefabricated structures, which provide a rigid wood or metal platform that replaces the foundation.
But it is important not to forget that the classic foundation also guarantees the horizontalness of the surface. Therefore, it is important to initially adjust the rough coating so that it does not have serious deviations in heights over the entire area.
How to make a foundation for a barn from foam blocks
There are two common ways to build a platform for a foam block barn. In the first case, it is supposed to create contour bearing lines according to the type of strip foundation. That is, a trench is made around the perimeter, which is filled with a combination of sand and gravel, after which blocks are laid on the cement mortar. Next, a connecting structure is formed for metal flooring or durable logs. The second method is used when working with objects that are demanding in terms of resistance to high loads.In this scheme, the contractor lays the foundation in blocks all over the site. The foam block itself is distinguished by low thermal conductivity, insulating qualities, ease of processing and low price. Therefore, from the point of view of obtaining high performance qualities of the shed as a storage of materials that are demanding on the content, this foundation option may be the best.
1 Foundation for a barn economy and practicality
Light wooden structures that will be designed to store lightweight gardening utensils, or will be reserved for poultry, for example, a shed for geese or small cattle, do not need a monolithic foundation. For such structures, a columnar foundation made of different materials is quite suitable. The most important advantage of such a foundation is its low cost compared to the monolithic version, and even a beginner in construction can build it! At the same time, such a foundation retains high performance characteristics.
The foundation on pillars can be arranged on any landscape, even on moving soils. Carrying out hydro- and thermal insulation work when arranging such a foundation is not a necessary measure, installation is carried out even without outside help. As a bearing base, pillars of concrete, brick, natural stone, foam blocks are most often created, sometimes wooden pillars are also used. True, in the latter case, the posts must be burned and treated with special solutions that will reduce the degree of decay, otherwise the structure on such a foundation will not stand idle for a long time.
The simplest barn without a foundation
A typical situation is a new site, there are no buildings, there is nowhere to just put the inventory. It is irrational to carry a tool with you, a great way out is to build a shed from prepared boards with your own hands. A simple temporary structure without a foundation is perfect here.
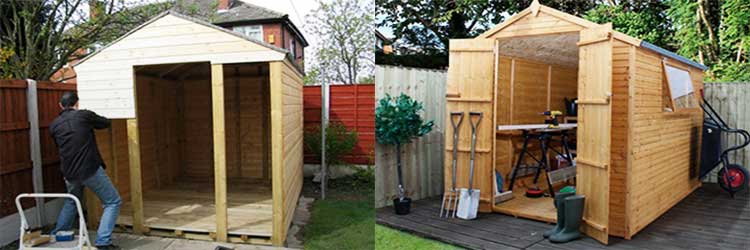
The basis of such a structure is a bar rack. Since the foundation is not provided, the bearing racks must be buried in the ground. To protect the tree from moisture, it must be treated with a protective impregnation. As such, you can use used motor oil or drying oil.
Horizontal strips are attached to vertical racks using self-tapping screws and metal corners. The material for them will be trimming rails of suitable length. For a small shed, it is enough to lay the slats at the top and bottom. The place of the door and, if necessary, the windows are additionally strengthened. The resulting frame is sheathed with boards or wood boards. The roof is made from the same material. To provide sufficient protection from moisture, the roof is covered with roofing material.
Roof options and material
The task of the roof is to protect the interior from atmospheric influences. The roof should not let water in and ensure its outflow. The roof of a wooden shed is not as important as the roof of a house, but it must still fulfill its function.
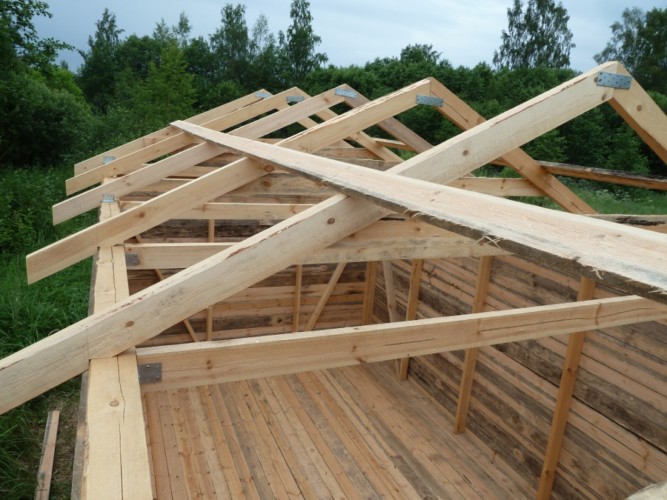
The roof of a small building can be single-pitched or double-pitched. The first option compares favorably with ease of manufacture, but it is applicable only for sheds of small width. Creating a gable roof will require more material and time, but it drains water better, which will affect the durability of the structure as a whole.
Roofing material and other roll materials can be used as roofing material for a small shed. You can form a full-fledged roof using classic slate or modern sheet materials.
2 How to make a foundation from pillars step by step process
The process of building a foundation on pillars should be carried out in a few simple steps. The first stage is the preparation of the territory, which includes clearing the area of debris, leveling irregularities and pouring a pillow of gravel if the soil is clayey.Then you need to make a markup, noting where which column will be located. Depending on how soft and mobile the soil in your area is, it is recommended to dig the posts from half a meter to a meter deep.
On hard soils, the recesses may not be strengthened, but on soft soils, a layer of reinforced concrete should be made at the bottom of each pit to protect the structure from possible subsidence. After that, we proceed to the second step - we make the formwork. For this purpose, boards 15 cm wide and 4 cm thick are best suited. If you do not want to fiddle with the formwork for a long time, make it from asbestos-cement or iron pipes, but these options will not be removed after pouring. After installing the formwork, reinforce with iron bars installed longitudinally.
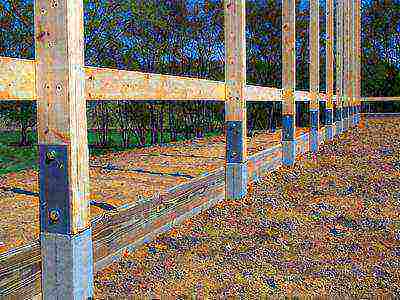
Then we proceed to the construction of the grillage - that part of the foundation on the pillars, which distributes the load evenly between all parts. Again, with the help of wire and reinforcement we connect the jumpers, we make a frame from the same reinforcement and mount the formwork. We fill everything with concrete and wait until it hardens completely. If everything is done neatly and evenly, then on the resulting foundation it is possible to build a structure for a barn.
Pile-grillage foundations for sheds
 Pile-grillage foundations for sheds
In some cases, there is a difficult terrain on the construction site, and it is difficult to level it, then a columnar structure with grillages justifies itself.
In such cases, it is possible to build a foundation from ready-made screw piles, but this is expensive. And you can make asbestos piles with your own hands right on the site and install them in the wells. The advantages of such a foundation are obvious:
- A barn can be erected even on difficult terrain;
- No need to use complex waterproofing of the basement, because it does not touch the ground surface;
- Wells and piles can be made by hand;
- The technology is simple and accessible to everyone, it uses a minimum of mechanized equipment;
- The cost of building foundations of this type is small.
The grillages, on which the barn will then be built, can be made from foam blocks, wood or metal sheets. It is necessary to immediately provide for the thermal insulation of the space under the grillage, and it is better to pour the piles into asbestos pipes or pipes twisted from the roofing material. This design will be more durable.
Thus, it is not difficult to build almost any type of foundation for a barn on heaving soils with your own hands. Even pile-grillage foundations are made in a matter of days, and immediately after pouring the piles with concrete, a grillage can be erected.
It is clear that the monolithic slab will be the most time-consuming, and it must be poured from several concrete mixers at the same time. And the tape design will be optimal, you can make it yourself with any improvised building materials.
Material selection
Capital buildings, built, as they say, for centuries, are built of stone or brick. Cinder blocks or foam concrete blocks are also often used. It is reliable, durable, but expensive, and when creating such a structure, one cannot do without the skills of a builder, otherwise it will simply fall apart. In most cases, for a barn in the country, wood or material based on it is chosen.
Sleepers
A sleeper barn is an excellent budget solution, especially for villages located near the railway. Wooden sleepers are gradually being taken out of service, and this is a very reliable and durable material. A sleeper, even if it has served for decades, can be an excellent choice for the walls of a small shed.
The advantages of this material are obvious: a sleeper is cheap, due to its shape, even a beginner can fold a wall out of it, thanks to the impregnation, the sleeper will last for more than one decade. True, it is in the impregnation that the main drawback of this material lies - a characteristic smell plus an unsightly appearance.
Log
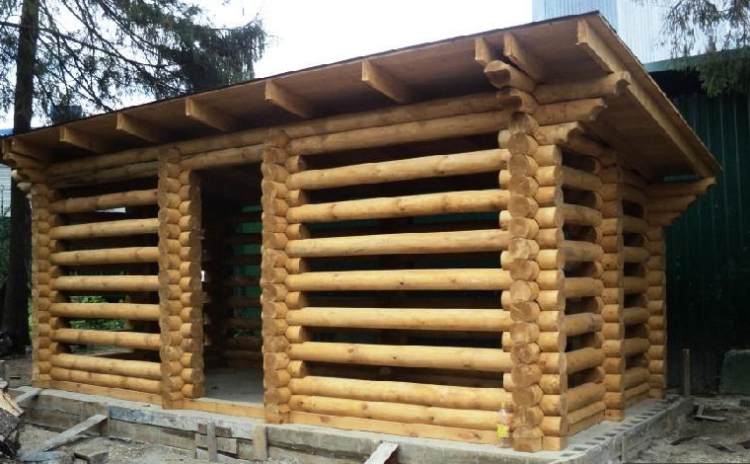
Since ancient times, the log has been used as a building material. This is an excellent choice for building a wooden shed, especially in wooded areas where this material is not in the scarce category. A log shed has a great look, it can be built in an ensemble, for example, with a bathhouse, it will be a good addition to a wooden house. The only significant drawback is that the work will require specific skills.
bar
An excellent building material for the construction of any building. The characteristics of a beam are comparable to a log, but thanks to a rectangular profile, it is much easier to work with it. A barn made of timber will perfectly fit into a wooden courtyard, a skillfully built structure, few people turn their tongues to dismissively call it a barn.

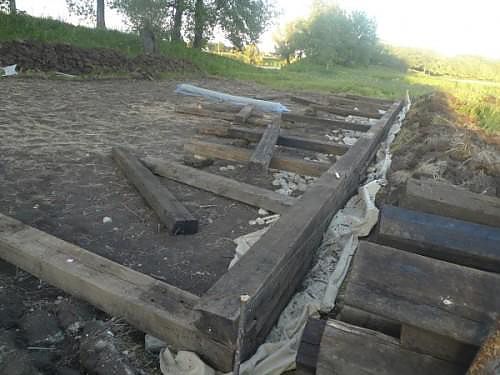
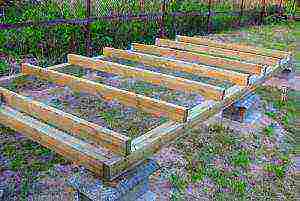
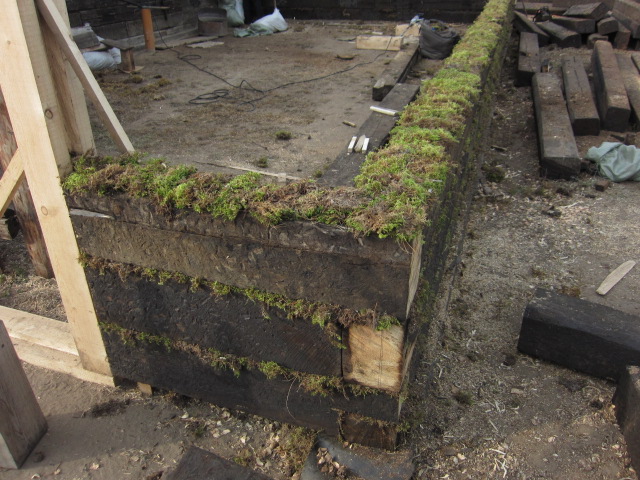
Sleeper foundation
The sleeper foundation is a strong and durable structure. The sleepers are usually made of high quality reinforced concrete and can be replaced if damaged.
The disadvantages include:
- Size limitation. The sleepers have a standard size of 2.7 meters, so the foundation will be assembled from similar segments.
- Inaccessibility of used sleepers. Enough of them is difficult to find on sale.
- The smell of sleepers is specific, it will not fade for a long time.
- Transportation problems.
- The material is not environmentally friendly.
During the construction of the base of the sleepers, they are used as a material for the grillage. When the supports under the base are ready and completely dry, the ends of the sleepers are laid on them. For the construction of a barn, it is better to use a step of 135 cm, then one sleeper rests on three supports.
Shed sleeper foundation example
The grillage for the foundation can be assembled using wooden sleepers. If you use sleepers under the base for a building that will be built of bricks or blocks, you can perform work not only on the technology of mounting a grillage from sleepers on filler pillars, but also a slightly different construction option, which involves the construction of a complete strip foundation.
The steps in this process are as follows:
At the construction site, a ditch is dug for the installation of a strip foundation, the width of which must be made equal to twice the width of the sleepers.
After the end of the earthworks, a pillow of a 10-cm layer of gravel and a 30-cm layer of sand is poured onto the bottom of the ditch. After that, the depth of the ditch should be half a meter: this is quite enough for a three- or two-layer laying of sleepers.
The bottom and walls of the ditch are lined with a film for waterproofing, sleepers are stacked on top of it one on top of the other.
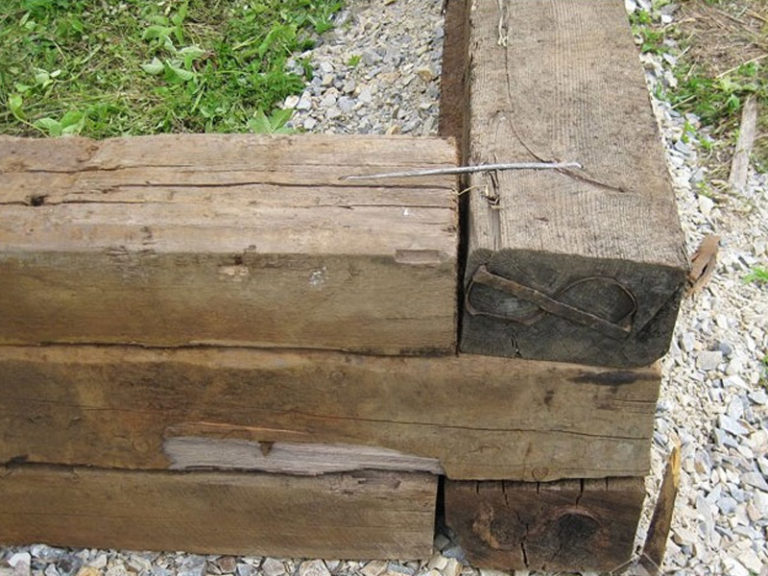
Important! When laying the sleepers, we must not forget to do the strapping. It is carried out by placing the sleeper located in the upper row on a pair of lower adjacent elements (the sleeper must cover the gap of the vertical joint).
After the laying of the sleepers is completed, a cement-sand mixture is poured into the resulting empty space.
In such cases, the part of the foundation intended for the basement (basement) floor is made of brick or concrete blocks. This technology allows the use of exclusively reinforced concrete sleepers for laying. Wooden products in this option are allowed for the construction of walls or the installation of a basement floor.
As a result, it turns out that the sleepers serve as a reinforcing layer, which enhances the strength characteristics of the foundation, increases the rigidity of the base and makes it possible to save costs for concrete and reinforcement. Shed on a strip foundation
A barn is a classic outbuilding that can be found in almost any rural area. Such a structure is small in size, often built from light improvised materials, but it must be strong and durable.
Indeed, given the small mass and large dimensions of the walls, it must stand on a solid foundation that can withstand wind, rain and groundwater.Often sheds are made on heaving soils or those where the groundwater level is high and the terrain is uneven.
Therefore, in order to build this building with your own hands correctly, you need to choose the foundation that is optimal for such purposes.
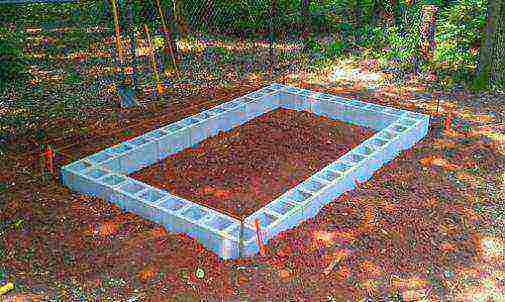
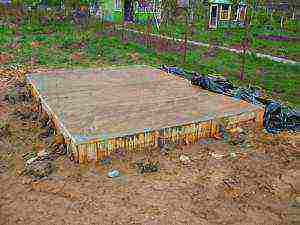
The device of a monolithic foundation

This is a simple technique, but a fairly voluminous way to make a foundation. Its use is justified when it comes to the construction of a brick outbuilding. The essence of the technology lies in the construction of a solid sand cushion with the inclusion of the same gravel. Approximately 10-15 cm, a foundation should be laid, on which a cement screed will be organized in the future. But before that, a continuous formwork is formed around the perimeter of the working area, on which it is planned to install the foundation for the barn. Do-it-yourself restrictive barriers are made, within which the cement mortar will be poured. They can be made from plastic or wooden slats with panels - the main thing is that they can hold the poured mass. After that, you can proceed to the installation of reinforcing bars and the direct screed device. It should be borne in mind that the full acquisition of the strength of such a foundation may take about 2-3 weeks, depending on the working area.
Expert answers
Raspberry Malinina:
There would be hands and money
Shroedinger `s cat:
Well, why not? Count only everything is good if special alterations are not needed .. Well, you will also probably need insulation ... Communications ..
BellaRom:
can. but it will be necessary to re-register to do all the same. and it is quite possible that BEFORE the start of the "alterations". if you remake it and not notify anyone about it, you can live there all your life and never have problems. and not pay money (tax on residential property, because the barn is not a RESIDENTIAL area).
Alexei:
You can live in a wooden change house, and the sleepers will not stink.
You will be much more interested in frost damage to the foundation that is not loaded with the weight of the house. It is likely that by the spring it will have to be demolished and rebuilt.
Alex Mishin:
It is absolutely impossible to live in a barn or any other room made of sleepers: cancer is guaranteed, the possible localization of the primary tumor is different. s otvet.mail /question/64053236 (my answer). It’s better to bungle something like a change house, only with more decently insulated walls: we are in an ordinary cheap change house, 5 cm of mineral wool between two layers of flimsy lining, in frost up to 7 degrees with a wood-burning steel stove was worn more than once.
Vladimir Petrov:
As for the sleepers, I will say this. My uncle made a house out of spar at 80. He bought it for demolition. The house has no warm smell. .And you need to look at the foundation on the spot.
Viktorij Lashhehova:
Previously, people built temporary huts in which they lived during the construction of the house. After the construction of houses, these sheds were converted into summer kitchens or utility rooms. Your barn is such a temporary hut, but it has 50 square meters and a ceiling of 3 meters, this is at the level of a kopeck piece, it’s quite possible to live.
Dragon:
you can ... sheathe inside
Lisin.68:
Well, in some sheds there are more boors than in a residential building. Including weight. Dig outside the side of the foundation for the thickness of at least ...
Olga:
You can’t live in sleepers Creosote is very harmful
Varieties of barns and soil features
 Barn "temporary"
There are several types of foundation for a barn, which are advisable to fill, given the nature and structure of the soil. It is customary to distinguish the following types of buildings:
- Construction of the type "chest". It is a light and low structure, where it is convenient to store garden tools. The area of \u200b\u200bthe "chest" is small, so pouring the foundation does not require a serious organization of labor.
- Barn with double pitched roof. One of the preferred types of economic facilities in the country. The floor of the building is made of a grooved floorboard, the door structure is attached to three hinges.Construction involves pouring the foundation of any kind. Also suitable here and pile.
- Shed with single pitched roof. The roof of such a building has a holistic flat view with a slight slope on one side. The area during the construction of a barn building with a pitched roof is somewhat limited. The building may have windows, several doors. For the construction of a barn, it is preferable to fill in the foundation of a tape type.
- Greenhouse combined structure. It is used when places in the allotted territory are in short supply. The barn is ideal for growing indoor potted plants, germinating seeds during the season of their planting in the country. The foundation for a combined greenhouse is suitable for both tape and columnar.
- Temporary type. It is a full-fledged living space without amenities. The structure is used in holiday villages for seasonal use: in summer - living quarters, in winter - a place to store tools, equipment for cultivating the land. To create amenities, electricity and other engineering communications are supplied to the temporary hut. As a base, it is better to use a strip foundation, or make a columnar or foam block foundation.
 Soil quality assessment
When organizing construction, it is recommended to take into account the following characteristics of the soil:
- soil compressibility index;
- the level of groundwater rise;
- the presence of quicksand in the soil;
- deep freezing of the soil in winter;
- geographical features of the area (marshy, arid);
- the type of soil itself (for example, sandy, clayey).
For example, on loamy or sandy soil, which freezes more than 2 meters and can "float", it is recommended to build only a tape base. Sandy soil, which reacts to an increase in humidity, freezes strongly, but does not shrink at the same time, requires pouring a screw, monolithic or tape type foundation.