Installation is the basis of competent operation
Of course, you can call specialists who will install the shower cabin. But if you want to save on the services of plumbers, it is better to try to make a good installation yourself. The installation instructions will also come in handy if you decide to control the work of hired employees in order to be savvy in this matter and be able to defend your point of view if any of their actions make you suspicious.
It must be said right away that if you are going to install in the bathroom shower cabinall repairs should be completed by now.
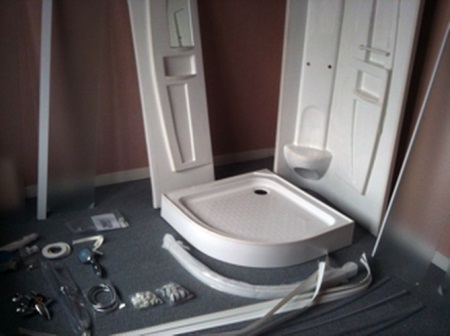
After the hydrobox has been delivered to your apartment, you should remove it from the box. There are not so many shower accessories and they depend on the purchased model. If you have a classic shower cabin, then in the box you will find a pallet, moreover, acrylic will come with special legs. Also in the box will be a roof, a rear wall, a front panel, doors with guides, various fittings, shelves, hoses and other devices for supplying water. However, you can easily purchase a cab without a pallet, roof or rear wall.
Be sure to note that you will need filters to connect and activate the cabin equipment. Opt for mechanical cleaning. Also note that the water pressure should not be too low or too high. Ideally, from 2 to 5 atm. If the pressure is higher, you need to install a reduction gear.
The box must be connected to the electrical network with a special three-core cable, which is laid to the product from the electrical panel.

Directly instructions for the installation of shower cabins are as follows:
- Put the pallet in the place chosen under the cab. Next, adjust the legs and fix with nuts. After that, the pallet should be moved away from the walls by 30 cm;
- Put the back wall on the pallet and fix the position with the bolts that come with the kit. Do the same with the second wall;
- Work continues with the installation between the walls of the panel on which the control will be located. Fix it with screws;
- After that, work on the installation of the roof should be carried out. This is done with the help of bolts and holes that are on the roof and on the walls;
- When the cabin body is mounted, it is time to connect the electrical equipment;
- Next, you should attach the shower and watering can to the switch;
- Attach the existing attachments, then take care of the doors. Install the rollers, screw the handles;
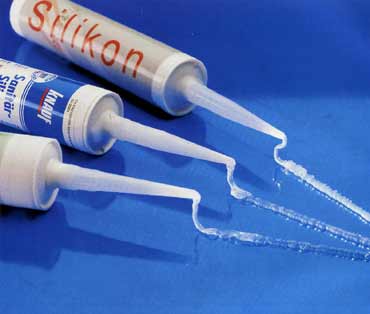
- When the cabin is assembled, you need to check the hot and cold water supply system, make sure that the product functions correctly and process all seams. To do this, you will need silicone sealant;
- After the work, after 20 minutes, you must check whether the cabin is airtight. At the slightest leak, you need to wait until the product dries out and apply the sealant again, applying it to the problem area;
- If you are sure of the tightness of the cabin, leave the product for a day so that the sealant is completely dry;
- If you think that the installation was carried out correctly, but the appearance of the cabin makes you suspicious, contact the service center.
The operation of the shower can be started immediately, as soon as the sealant dries, and the product is fully connected and ready for use. Be sure to check if the wiring is grounded.
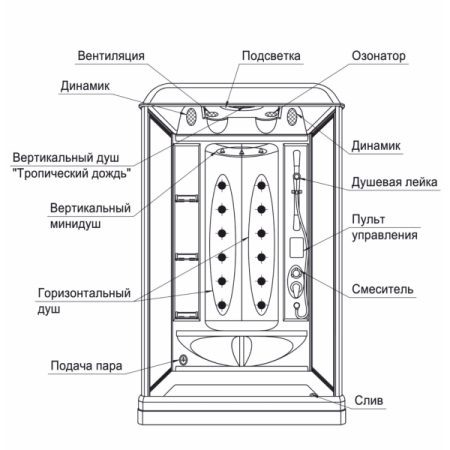
How to use the functionality

The electronic control panel is a very convenient way to set up equipment options. It is she who allows you to turn on and regulate such utilities as hydromassage, Turkish bath, steam and radio. A convenient way to control using the keys controls the pressure of water and its temperature, backlight, fan.In a word, all the electronics of the shower cabin.
The control panel is equipped with keys that allow you to adjust the volume. So, by pressing the vol, + - key, you can select the desired volume.
Using the FM keys, you can turn on the radio and tune in to the desired wave. How does this device work? You need to press the FM key, after that the display will show the station that was selected last. By pressing the TUN key and the plus and minus keys, you can change the settings. If you want to search for a radio station, press the + or – key and hold until the automatic search starts. To memorize a radio station, press the M key, select the desired channel and activate the memorization mode by pressing the key again.
If your cabin has an ozone function, then that's just fine. After all, it is she who can destroy all the bacteria inside. To activate it, you need to press the function key on the control panel and close the cab after leaving it. Cabin operation can continue normally after a quarter of an hour.
If you have purchased an expensive and spacious shower cabin model, then it definitely must have a steam generator. What does he give? This device turns the shower into a steam room. Look at the control panel and find the key that is responsible for the steam generator. Click on it. When the indicator is activated, the steam generator will fill with water and begin to fill the cabin with steam. Its output will be provided thanks to the flask that the pallet has. By the way, the steam generator can also easily get the function of aromatherapy, if you put various kinds of herbs in the flask or pour fragrant oil.
A fan is an indispensable device that will allow you to feel fresh during hygiene procedures. It is also necessary to evenly distribute the steam when the “Turkish bath” function is activated. The fan turns on simply: press the corresponding button. If during operation you want to disable the function, press the button again.
On the control panel of some shower cabins there is a “telephone” function. It is set to receive incoming calls. The function is very convenient, since few will risk taking the phone with them to the bathroom. When a call comes into the cab, a characteristic sound is heard. In this case, the operation of the radio becomes quieter. To receive a call, you must press the "phone" key. You can cancel the call by pressing again.
So, we figured out the functionality. But you need to know some general points of operation so that the cabin lasts a long time, and the electronics do not fail after a week.
Sources
- https://delaemvannuu.ru/dushevaya-kabina/kak-vklyuchit-dushevuyu-kabinu.html
- http://vashavanya.ru/ustroystvo-dushevoy-kabiny.html
- https://dvhard.ru/teoriya/96-ukhod-za-pnevmaticheskim-oruzhiem.html
- http://dushevayak.ru/obsluzhivanie/instruktciya_po_xekspluatatcii_dushevoj_kabinii.html
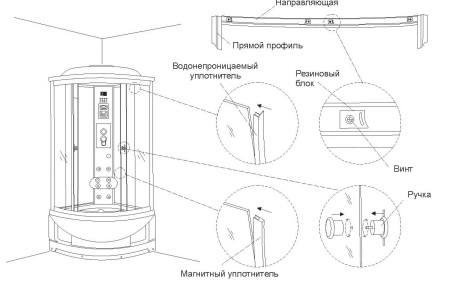
Closed and open types
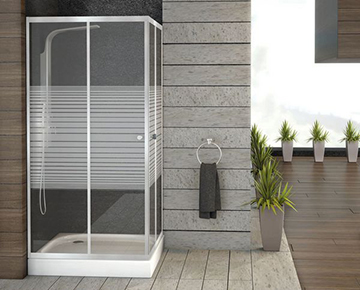
When choosing a place for your cabin, proceed from whether you prefer a closed model or an open one. If you want to place it in a corner, then opt for an open option. However, in this case, make sure that the walls are fully tiled, which will protect them from contact with water. If open-type models consist only of a pallet, a watering can and doors, then closed-type shower cabins, or as they are called, monoblock cabins, are also equipped with side walls, a roof and a shower panel. In closed models, the required temperature is very well maintained.
Shower cabins are also built-in. Such a model is installed in a recess in the wall, since only internal panels are provided in it. The shower cabin of this type is closed with a sliding, transparent door.
Onsite check
Next comes the stage of checking weapons on the spot: charging and trial shots. Here, the operations for air rifles and pistols differ. The main rule is that we act according to the weapon's passport - everything should be described there: in what order it is correct to load, how to shoot, what to shoot, etc. We read everything, while reading we ignore the clause SHOOTING AT PEOPLE AND ANIMALS IS STRICTLY FORBIDDEN.This inscription is apparently highlighted specifically for visually impaired people, hardball players, as a rule, are sighted people, so this rule can be circumvented. During the check, you can also carry out zeroing, with a "slanting" barrel in the team you will not be welcome (if only in the enemy).
So, some useful tips on how to properly clean the shower
Tip 1: It is necessary to reduce the aggressive effect of water on the integrated mixers in the cab! Special filters that are installed on all water pipes will help improve the quality. Fine and coarse filters perfectly clean water from unwanted impurities that clog nozzles and mixers. In order for them to serve properly, clean them regularly under running water or replace them at least once every 2-3 months.
Tip 2: Take good care of the outside of the cabin too! The acrylic surface of the pallet, doors, walls and ceiling are very sensitive to aggressive water. It is necessary to process the pallet, walls and doors of the cabin with a special tool, without the content of abrasive particles. Wipe surfaces dry with a sponge so that there is no residue left after chlorinated water. As a rule, such plaque is more and more difficult to remove each time, so clean the cabin regularly. It is best to clean after each visit.
Tip 3: Forget hard sponges, brushes and powder products! They scratch the surface, and over time it becomes noticeable. Rubber scrapers, synthetic sponges or a special steam cleaner are best suited.
Tip 4: If you are planning to leave, prepare your cabin! Clean it and wipe it dry, as the left drops of water form a hard-to-remove plaque, and when the water stagnates, an unpleasant odor may appear.
Tip 5: Periodically check the power cords, wiring parts for integrity, and with them the operation of the leakage current fuse. If you do not use the cab for a while, unplug it from the mains.
By knowing how to clean and care for your shower enclosure, you can prolong its lifespan.
How to turn on

Separately, you will need to pay attention to some options and modes of the most expensive equipment, including a steam generator, hydromassage and aromatherapy. Basic rules of touch control:
Basic rules of touch control:
- activation of any function is accompanied by a green indication;
- when the function is disabled, the button becomes red;
- to turn on the system, just press the touch zone for a few seconds.
It is strictly forbidden to expose the touch screen to direct exposure to water, which is due to the risk of triggering the system for switching on individual functions or modes.
Careless or improper handling of any functions of the shower cabin very often becomes the main reason for their premature failure.
How to turn on the watering can
If a single-lever mixer is used in the shower stall, then water is supplied by moving its handle to the “pull” position. Turning clockwise provides hot water, and in the opposite direction - cold, which allows you to set the optimum temperature.
shower head
The deviator, which is a water flow distributor, helps to choose the optimal shower cabin mode. The mixer handle is responsible for increasing the pressure of the water flow. You can reduce the pressure if you lower this handle down, and lifting it to the top position helps to increase the flow of water.
It should be noted that narrow shower heads are less comfortable to use, and devices that are too wide will take a long time for water to drain after the tap is closed or the hand shower is switched over.
How to turn on the overhead shower
A rain or overhead shower resembles a traditional watering can in appearance, and the main difference is its large dimensions and higher location. Turning on the function - allows you to create the impression of a real rain, which is due to a special system responsible for the supply and distribution of water through a special ceiling grid.

rain shower
In addition, as a result of mixing water with air, you can feel the fall of "real" raindrops, and the built-in LEDs make the adoption of such water procedures especially pleasant. The Tropical Rain function is activated on the touch panel by pressing the button with a special symbol.
How to turn on hydromassage
The hydromassage function is a rather useful thing, but it cannot completely replace traditional massage.
After turning on the system, it is necessary to press the “Jets” button, which will allow you to activate the upper elements, and by pressing it again, the operation of the middle nozzles is ensured. When you press this button for the third and fourth time, the lower nozzles and all elements are activated, respectively, at the same time.
Weapon storage
The weapon must be in perfect condition so as not to let you down in battle. One of the important points in the care of airguns is their storage.
You need to store:
- away from people, especially children;
- in a case / box / case - they come with a weapon, and if not, then they are bought separately;
- in the supine position - especially applies to rifles, because. if you put the rifle in a corner, there is a risk that sooner or later someone will bend it;
- not under the bath - well, he doesn’t like water for weapons;
- not on the balcony - and changing weather conditions;
- in a discharged state - especially applies to gas cylinders, which like to store from game to game with an equipped cylinder, we also discharge stores, extra pressure on the spring is also not needed.
Shower enclosure installation
If you study the device of the shower enclosure, then remember that in this case the installation process will not be difficult. The shower installation process will consist of the following steps:
- First, prepare the place where the shower enclosure will be installed in the future. The corner of the bathroom must be tiled.
- If you have chosen a shower cabin device with a tray, then it must first be installed on the floor.
- Most pallets can have special feet that can be adjusted if necessary.
- Now you can connect the watering can or shower panel. The shower panel will have all the necessary functionality.
- After that, the installation of shower doors will have to be carried out. Doors can be moved apart on the sides or be wide open. During the manufacture of doors, a variety of materials can be used.
 Closed shower view
Advantages and disadvantages
By choosing an open shower cabin, the user benefits from the following:
- Purchase costs are minimal. In comparison with a closed shower, the cost of an open one will seem purely symbolic, not to mention a spacious bath.
- The cabin takes up very little space. This is exactly what the wall-mounted version is designed for: a cabin installed close to the wall will take up much less space than a closed box. And the corner model - so it will harmoniously fit even into the smallest bathroom: the corner is the least demanded area of \u200b\u200bthe room, so the cabin placed here, even with absolute tightness, will hardly interfere.
But at the same time, it is necessary to take into account the disadvantages inherent in such products:
- Unlike a closed one, an open cabin cannot be moved, because, firstly, the mixer is not connected to it in any way, and secondly, the gap between the cabin and the wall is sealed with sealant.A closed cabin, as you know, can be moved without problems within the length of a flexible hose and a corrugated sewer hose.
- The wall near which the open cabin is installed must necessarily have a waterproof coating. This is either plastic, which looks very “budget”, or expensive tiles.
- Minimum functionality. An open shower cabin usually involves the simplest washing - without a Charcot shower, foot massage, and even more so without a radio, multi-colored lighting and other delights that closed cabins are stuffed with. True, no one interferes with installing a shower rack with a “tropical shower” in an open cabin instead of a conventional mixer, but even with such equipment, it will still be very far from closed cabins.
- To get pipes into an open cabin, they have to be laid in the wall. It is possible, of course, from the outside, but for this you will have to cut a hole in the cabin wall, then somehow compact it. It is clear that all this will not look very aesthetically pleasing. There are no such problems with a closed cabin: on the outside it has two fittings, to which you just need to connect flexible hot and cold water pipes.
- During bathing, steam enters the room. This means that the bathroom must be finished with materials resistant to high humidity, and capital building structures must be treated with special antibacterial impregnations. To remove steam as soon as possible, it is advisable to install a fan in the ventilation exhaust duct.
A closed cabin can be safely placed in any room: the steam remains inside and after the procedure is pumped out directly into the hood through a special duct.
Note that there are open cabins surrounded by walls on all sides (they differ from closed cabins only in the absence of a roof), but they are extremely rare on sale. However, for a house with wooden walls, you will have to look for just such a model.
We assemble the shower cabin in parts
It is not difficult to assemble a shower cabin on your own, the main thing is to follow the instructions clearly. If you decide to take this bold step, then you need to know the procedure. The most important thing is to position the cabin close to the sewer drain.
We start from the very bottom. We adjust the pallet at the right angle and connect it to the drain. The pallet can be on legs, bricks or a cement screed.
Next, with the help of bolts, we firmly install the side walls using sealing gaskets. Using self-tapping screws we attach the shower panel. Then we attach the frame to the pallet.
We fix the back walls of the shower cabin to the walls of the bathroom. The final step is to install the roof with bolts. Finally, we put the doors in place and your cabin is ready for operation. This whole process is best done in an open space so that there are no difficulties during work.
If you have any doubts that you will be able to cope with the installation of the cabin yourself, it is best to entrust this matter to experienced professionals.
Interesting in the section "Shower cabins"
Rules for the installation of shower cabins
For direct installation in the shower bathroom, the following points should be taken into account:

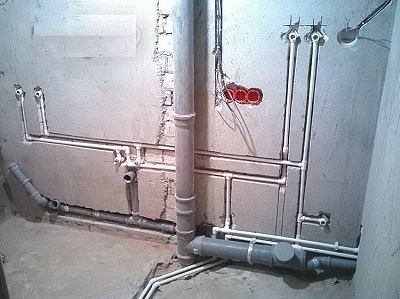
Shower cabin wiring diagram.
- There must be a separate outlet or a separate electrical wiring so that moisture from the bathroom does not get into it. In some cases, it is necessary to install an RCD.
- Forced ventilation should be present in the bathroom, which will provide a good extract of steam and moisture after taking a shower.
- In order to install the shower tray in the bathroom, you should make sure that there is a slope and good water drainage. If the drain is difficult, you can build some elevation - a podium. A pallet will rise on it, and the slope for draining will be sufficient.
Tray installation:
- The pallet is installed in the place where it will stand. The walls should be located strictly at 90 ° to each other. If the walls are finished with ceramic tiles, a waterproofing layer should be provided under it. We installed the pallet, checked the slope, if everything is fine, continue to work.
- Side walls and guides for shower doors should be installed on the pallet. Fasten all elements with bolts or other fasteners and apply sealant. The structure should be left for the specified time for the sealant to dry.
- Next, install the dome on the shower cabin, secure with hardware and sealant. Once again at this stage, you should check the operation of the electrical wiring and other functions of the shower cabin.
- After waiting for the required time, proceed with the further assembly of the cabin: it is necessary to properly install the doors, check the tightness of the drain and the hot and cold water supply.
- If all the rules for installing shower cabins are followed, then there will be no problems at this stage. And the assembled booth will work and bring joy.
- The final stage in the assembly and installation of the shower cabin is fixing the "skirt" - the front or front side on the pallet. It should be fixed hermetically, but in such a way that, if necessary, it can be removed and the sewer drain cleaned or the water leakage at the joints of the joints adjusted.
To install a shower cabin in the bathroom, a tool and the following material are useful:
Shower tray layout.
- drill or screwdriver with the ability to change the nozzle for a drill;
- crosshead screwdriver;
- Adjustable wrench;
- small building level;
- several flexible hoses for connecting water;
- silicone sealant for sealing joints in contact with water, and acrylic sealant for waterproofing the exterior walls and rear of the cab;
- sealing tape or fum-tape for better sealing of threaded connections on the water connection line.
When following the above recommendations, any shower stall will bring joy and pleasure, regardless of whether it has the ability to accompany bathing with music or not.
Shower enclosure assembly recommendations
Scheme of the assembly of the shower cabin.
- You should first proceed with the assembly of the shower cabin in a draft version, without the use of sealants and strong tightening of the bolts. It is better to do this in a free room, and not in the cramped circumstances of the bathroom.
- On a flat surface, the pallet is installed and leveled with a level strictly in the horizon.
- Connect the sewer drain hose to the shower tray and carry out test work: pour some water into the tray. This is necessary in order to know if the drain hose is connected correctly. At the same stage, you can also try on the distance from the existing sewer drain to the drain from the pallet, whether the length of the hose is enough. If the distance is insufficient, you should purchase a new hose and replace the one that came with the kit. If the hydraulic hoses pass the test, then you can use the sealant to lubricate all connections and leave for a while (according to the instructions for the sealant).
- If the cabin has a more complex structure: the walls are illuminated, music plays, etc., then at the initial stage it is necessary to assemble and install all electrical parts and check their performance. It is at the preparatory stage that the performance of all parts of the cab should be checked, then it will be easier to replace them. And you can conveniently fix all the wiring from the back of the cab.
- At the same time, the remaining fasteners are also checked, it sometimes happens that they are either not enough, or their length is not enough to securely fix the supporting elements of the pallet or shower cabin.
- On the rear side, in the preparatory phase, the performance and compatibility of the sealant and the cabin material can be checked. Acrylic sealant is not suitable for interaction with water, it is needed only to stiffen the structure of the side walls and cover. Only silicone is suitable for sealing the joints of the pallet and walls. It can only be used after the final installation of the cabin in the bathroom.
Connecting the shower cabin to the water supply
To connect a shower cabin that does not have electrical components, you must have two special adapters. One each for cold and hot water, respectively. But today there are improved booths that have some additional functions. Naturally, there is a need to connect the shower to the sewer and water supply in another way. Namely so that the supply of electricity and water would be separated for safe purposes. To do this, you need to do a few simple steps, which are described below.
First of all, you need to check the working pressure of the water supply. If the shower cabin has functions where water supply is required under strong pressure (for example, a hydromassage or a steam generator), then the water supply pressure should not exceed 3 bar. But the pressure in the pipes should not be allowed to drop below 1.5 bar, because in this case the water supply will not be supplied with the necessary force. Therefore, it will not be possible to use additional functions.
Next, you need to decide on a suitable place where the shower cabin will be installed. Ensure that sufficient size and quantity of flexible hoses are available. It is better to bring water to the cabin directly from under the sink. The layout of the pipeline to the cabin should look like this:
The main work - connecting the shower to the water supply, usually takes only a couple of minutes, since it only consists in the correct connection of the hoses. True, there is an important point - the sealant. It contributes to a high tightness of the equipment, which will help to avoid unexpected leaks from the pipes. The material is usually linen or fum tape.
And the last moment in the correct connection - equipment check. As a rule, the work is not at all dusty if the provided instructions are followed correctly. Turn on the water and check the pipe joints. Here it is only necessary to note leaks, if any, of course. When determining leaky connections, it is necessary to treat the pipe joint with sealant.
Switching on ventilation
Any shower cabins, regardless of the set of functions, are a closed space, therefore, in such plumbing fixtures, humidity indicators increase quite quickly. Lack of effective ventilation greatly increases the risk of mold and mildew, so a forced air blowing system is very important.
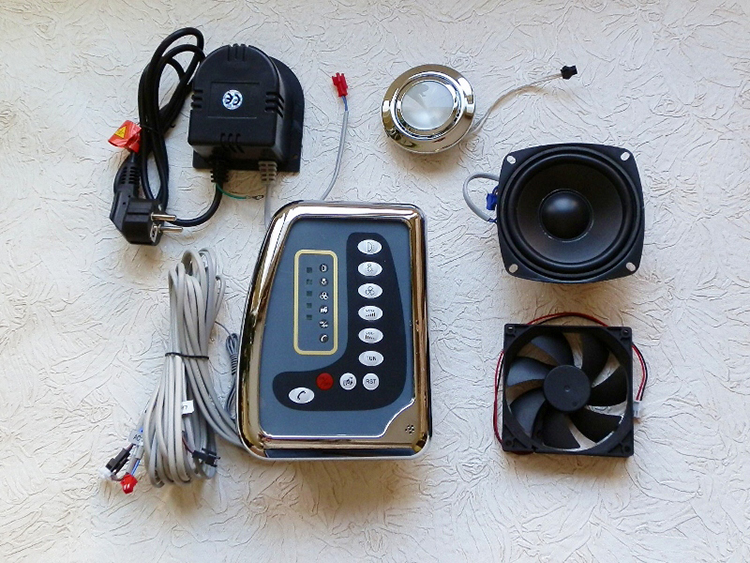
Set for shower cabin AM 11 remote control, speaker, fan, lamp, power supply
Among other things, the presence of a forced removal of moist air masses helps to avoid fogging of the mirrors. Activating the "Fan" button starts the system, and when pressed again, the ventilator turns off. Also, many models have the option of ozonation. The function not only prevents the formation of mold, but also gives freshness, and also cleans the air of any unpleasant odors.
Turning on the "Turkish bath" mode
The presence of an electric steam generator in the shower cabin ensures the operation of such a plumbing device in the Turkish bath mode. In the process of heating and evaporation of water, the internal space of the shower cabin or hydrobox is saturated with steam.
In this mode, the humidity inside the cabin reaches 100%, and the temperature index is about 50-65oC.
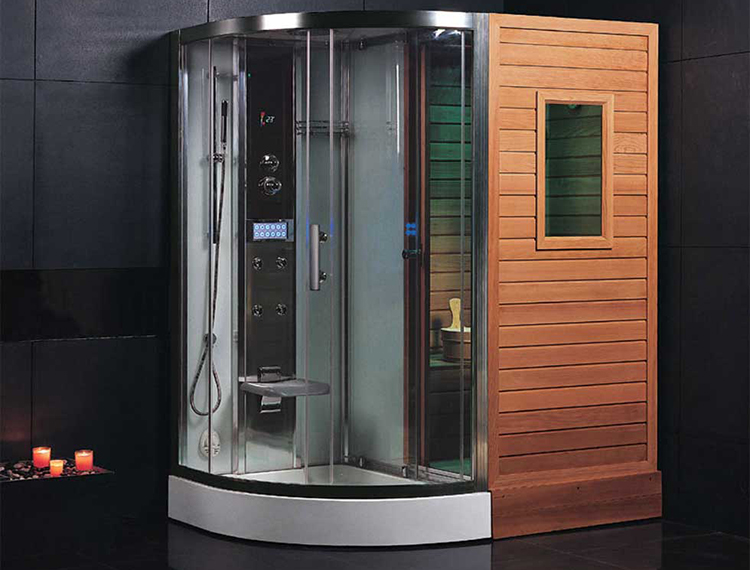
Shower cabin with Turkish bath
Enabling and disabling such a useful and pleasant feature is carried out from the control panel. After filling the steam generator with water, pressing the "Steam" button activates the steam supply. When there is no water inside the steam generator, the indicator on the button flashes red.