Laying tiles
There is almost no difference on which floor the tiles are laid. The only difference is that for a warm water floor it is necessary to choose a smooth tile, without a relief pattern.
The tile laying technology is as follows:
- Glue intended for warm floors is applied to the surface.
- Using a notched trowel, the adhesive is applied to the tile. Then it is applied to the floor and pressed in the middle.
- To form even seams, plastic crosses are inserted into them.
- After laying 2-3 rows, it is necessary to check the surface for level. Crosses must be removed before the glue hardens. In this way, the entire surface is laid.
- When the glue hardens, it will take 1-2 days, the seams are rubbed.
Tiles can only be laid when the floor heating is switched off. Only after completion of all work with tiles is it allowed to use the system.
It is not quite easy to install a water-heated floor on your own, but if you have a desire, then you can cope with this task.
Especially if you take into account the fact that for the work of the master you will need to pay approximately the same amount as for all the material.
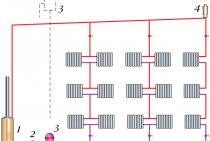
Materials, equipment and procedure for draining water
To perform the necessary work, you will need a compressor, and of good performance, with a receiver for accumulating compressed air.
As you already understood, a car is not suitable for these purposes.
If you plan to drain the spent antifreeze, then you yourself understand that you should not drain it where you don’t need it.
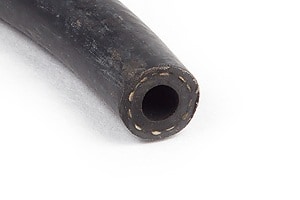
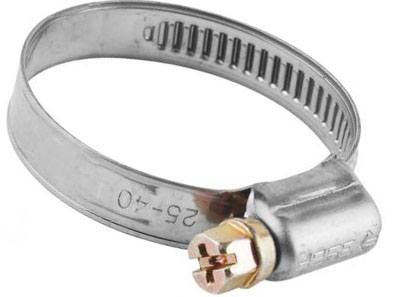
Clamps of the right size for a secure hose connection will also be needed.
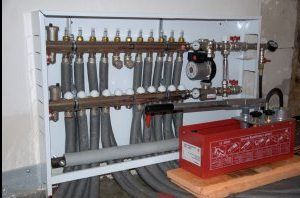
Connect the hose from the compressor to the underfloor heating supply manifold.
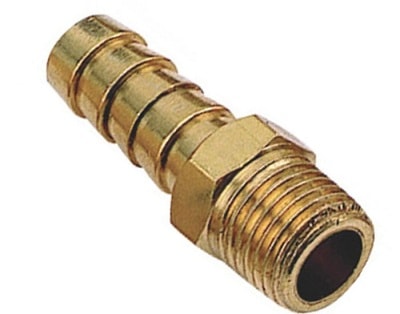
The supply manifold may or may not have a special fitting for filling the system under the hose. Therefore, an automatic air vent is unscrewed on the supply comb and a hose is connected through a suitable adapter and tightened with a clamp.
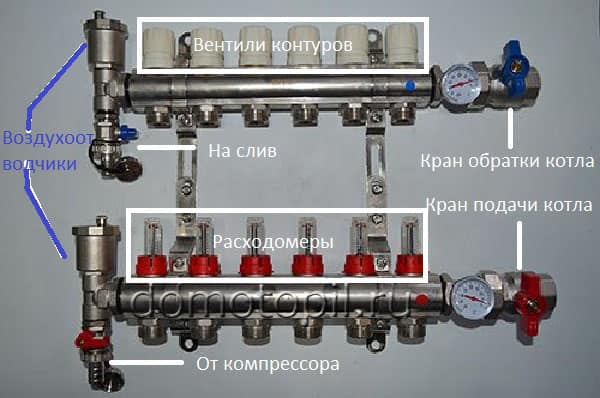
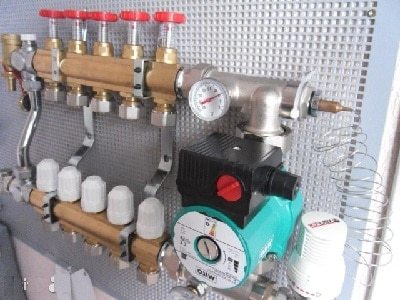
Arrangement of elements on the drain manifold
- In the same way, connect the hose to the return manifold and lead it to the drain point.
- Close the supply and return valves coming from the boiler in the collector area.
- Using flow meters or valves (depending on your collector), close all the underfloor heating circuits, except for one, which, on the contrary, must be opened to the maximum.
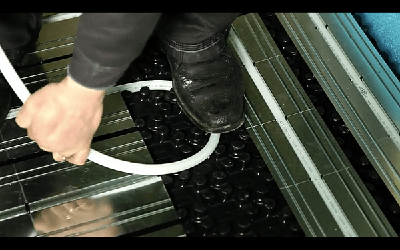
- Turn on the compressor, open the taps or tap (depending on the type of comb) that are designed to fill and drain the system (those on which hoses are worn). At this point, the coolant will begin to flow out of the drain hose under pressure. Wait until the water runs out and the air comes out. At this point, look at the pressure gauge on the compressor. If the pressure in the receiver at this moment is not large (1-3 atm.), Then close one of the taps on which the hose is attached (it is desirable that it be a tap on the supply manifold, or if the pump is equipped with its own shut-off device, use it better) . Wait for the pressure to rise to 5 atm. (no more) and blow the floor loop under this pressure.
- Close the purged circuit and open the next one. Repeat the same procedure with him.
- Thus, drain the water from all the contours of the warm floor.
- For best efficiency, repeat the procedure after half an hour, as the remaining water droplets in the pipe can connect with each other and eventually block the pipe section in a certain place.
Adhering to this method, you will decide how to drain the water from the warm floor. The only problem is getting a compressor that can do the job.
 Self-testing underfloor heating system
 The first launch of a warm water floor
 Rules for installing a warm water floor based on a concrete screed
 How to flush the heating system underfloor heating and how to flush the heating system in a private house with your own hands completely
 Installation of a water-heated floor without a concrete screed
 Underfloor heating technology
Preparing to complete the installation
 You can fix the pipes to the reinforcing mesh with plastic ties.
It should be borne in mind that pipes under the influence of hot water can expand, therefore, it is not necessary to attach them very tightly to the fittings so that they do not deform.
It is necessary to beware of pinching of polyethylene pipes, white stripes - creases.
With such a defect, the pipe cannot be laid, as there is a risk of a breakthrough at the place of the kink.
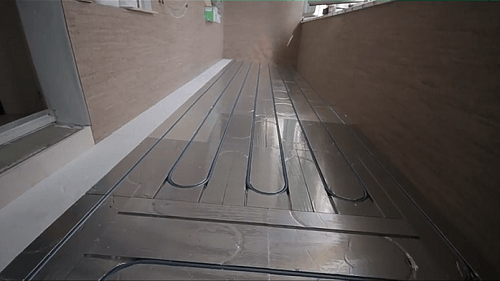
The system will work efficiently, without leaks, if the circuit is laid in a single whole loop, without joints and clamps on the pipes. We attach the circuit to the manifold with a compression fitting.
System pressure test
When the system is mounted, it must be pressure tested (hydraulic tested) under operating pressure to detect damage.
Water is poured into the system and a pressure of 5-6 bar is applied within 24 hours. You can check the pipes for leaks by filling the system with water, and you can also check with an air compressor. If there are no leaks and pipe expansions, then you can fill in the screed.
Under ceramic tiles, the screed should be 3-5 cm thick. Laying tiles on a concrete screed is possible only after a month.
Sometimes, if you need to speed up the drying process, you can connect the system, but the water temperature in the pipes should not exceed 30 ° C.
You can turn on underfloor heating if necessary, while the first warm-up may take several days.
High pressure test
Quite often, after flushing, small leaks open at pipe joints. To make sure that they are absent, the system is tested with high pressure. Usually it is 0.4-0.6 MPa. A plunger pump is used to pump an incompressible fluid into the system.

The test pressure is held for at least 20 minutes, during which time joints and welds are examined, hidden pipelines are checked by ear. If during the test the pressure has not dropped by more than 0.01 MPa, the system meets the tightness standards.
Hydraulic tests are carried out immediately after flushing with additional equipment disconnected from the system.
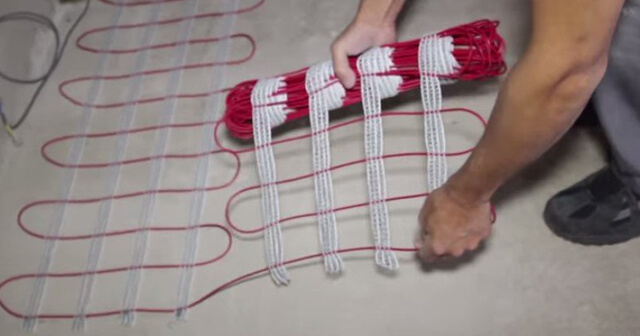
Electric floor installation
First you need to check the resistance of the wire. It is allowed to continue work if the discrepancy with the passport data does not exceed 10%. Installation can be carried out by fixing the heating elements in the reinforcing mesh with puffs or with special fastening tapes. Infrared warm floor you just need to spread on the heater. The maximum action that may be needed in this case is to secure it with tape.
Where the wire goes over the dividing line of adjacent floor slabs, it must be laid in a corrugated pipe up to 15 cm long. With thermal expansion of the slabs, this will save the cable from breaking. It is necessary to connect the heating cable with the wire 10–15 cm from the strobe, with the expectation that, as a result, the clips will be recessed into the screed.
After placing all the elements, you need to check the resistance of the cable again. With minor deviations from previous measurements, you can proceed to testing the warm electric floor.
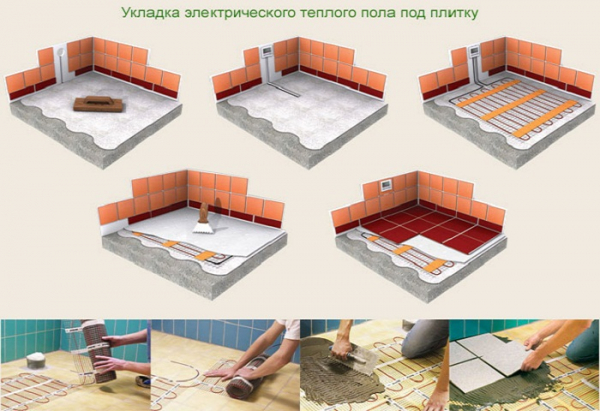
We place the corrugated pipe between the regulator and the nearest strip of heating cable. Through it we push the temperature sensor. Make sure it's easy to remove if you need to replace it.
After the final check, de-energize the system and remove the regulator. Now we can make a screed with our own hands. After it is completely dry, check the device again. With a positive result, we can lay tiles or other flooring.
https://youtube.com/watch?v=_LzZ_2kdDTY
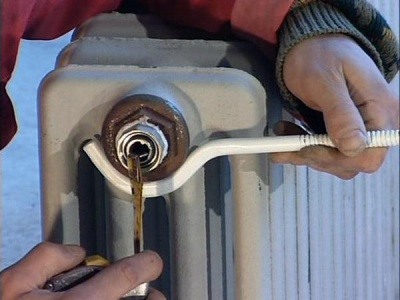
Preparation and replacement of the coolant
In most autonomous heating systems, tap water acts as a coolant, and this is not entirely correct. Untreated water contains a large amount of salts and oxygen, which causes scale deposits and metal corrosion.
The best option for heating systems is collected rainwater. It is possible to use water after treatment by reverse osmosis or boiling. Also on sale you can find special inhibitors that block the effects of salts and oxygen, but such products are very specific in use with certain materials of pipes, seals and radiators. In the general case, a good solution would be to install a simple filtering system on the heating feed.
The presence of a hydraulic accumulator in the water supply system of a private house or cottage helps to have an additional supply of water in case of a breakdown of the electric pump or a power outage. The specialization of this device is aimed at increasing the pressure of the liquid in the pipes and protecting the pump from water hammer.
Seasonal draining of water from the accumulator maintains the correct operation of the device
To create the right conditions for the operation of the accumulator, a seasonal drain of water is carried out in its tank. The performance of such work is associated with the protection of the device from freezing, followed by ensuring the integrity of the hydraulic tank
It is important to follow a certain sequence of actions when carrying out protective work.
Bathroom insulation
The process of warming a plumbing unit can be divided into two main stages:
- floor insulation;
- Wall insulation.
It is this sequence of work that must be observed without fail. Now we will talk about each of the stages in more detail, but let's start with the walls.
Walls
Proper wall insulation includes several steps:
- Cleaning surfaces, coating them with the use of antifungal compounds;
- Pasting on the walls of extruded foam or penofol;
- Laying drywall over insulation materials;
- Laying ceramic tiles on drywall.
You can also go the other way by installing a metal frame, using a couple of layers of insulation, two layers of moisture-resistant drywall, after which the tile is mounted. This option is not relevant for all rooms, since it requires a lot of space.
If you don’t want to fiddle with frames for a long time, you can mount drywall on the ceiling, you can go the easier way. It consists in using moisture-resistant wallpaper or tiles made of foam. Efficiency in terms of thermal insulation will be lower, but ten hours less work.
https://youtube.com/watch?v=Wmp2j9TgTGo
Shafts and ventilation
As we have already said, through ventilation and shafts, not only exhaust air is removed from the premises, but also cold gets inside. This also needs to be fought. Only here it is impossible to block the ventilation in any case.
In order for ventilation to work efficiently, but at the same time not to let cold air in from the street, install a grill with a fan that removes vapors from the room, but at the same time prevents the reverse process when air from the street enters your bathroom.
Subfloor preparation
The base for a warm floor should always be perfectly flat. If you already have a screed ready, or the old concrete floor is fairly even, then you just need to vacuum and wash it.
If there is absolutely no time to wait, then you can use quick-drying mixes sold in the store, but their quality is usually much lower than that of a cement-sand mortar with crushed stone. If you are willing to wait two weeks, and sometimes a whole month, then it is better to use the second option. You can read more about the organization of concrete screed on our website.
If you think that a cable underfloor heating under a tile does not require a quality base, then you are greatly mistaken, because any bend in the cable can lead to the failure of the entire system, and in order to fix such a malfunction, you will have to disassemble the floor again. Therefore, it is better to do everything qualitatively at once and play it safe.
The role of the accumulator in the water supply system
The hydraulic accumulator reduces the indicator of the frequency of switching on an important unit of the water supply system - the hydraulic pump. The electric motor is subject to minimal wear, thereby increasing its service life.
Another important property is the volume of the hydraulic tank.
It has a supply of liquid when the pump is turned off, electricity is turned off, and when the water supply system breaks down. This function is convenient for its use in suburban areas where there are problems with the power supply. The hydraulic accumulator protects the water supply system from water hammer that occurs when the pump is turned on and maintains the required pressure level in the pipes.
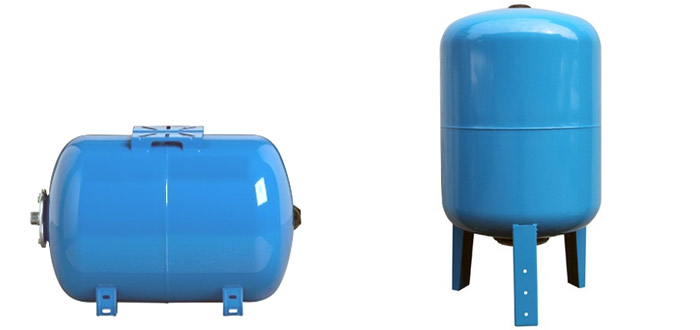
Hydraulic tank - a vacuum reservoir required for liquid
A hydraulic tank is a vacuum reservoir for liquid. When it is taken from the system, the pressure in the device drops. At this point, the pump automatically turns on. It works until the required pressure indicator in the system is reached. During operation, some parts of the accumulator require replacement and scheduled repairs. Therefore, a regular inspection of the surface of the hydraulic tank for problems is carried out. If faults are found, corrective action is taken.
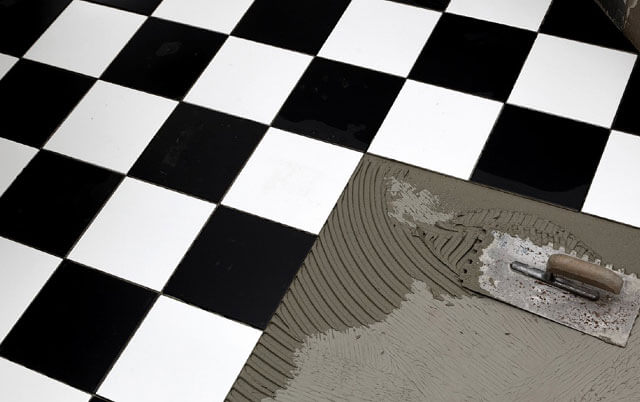
How to prepare tiles for floor heating
Before you start laying the tiled layer, you need to make sure that the “warm floor” system is working. All wires and communications must be completely hidden.
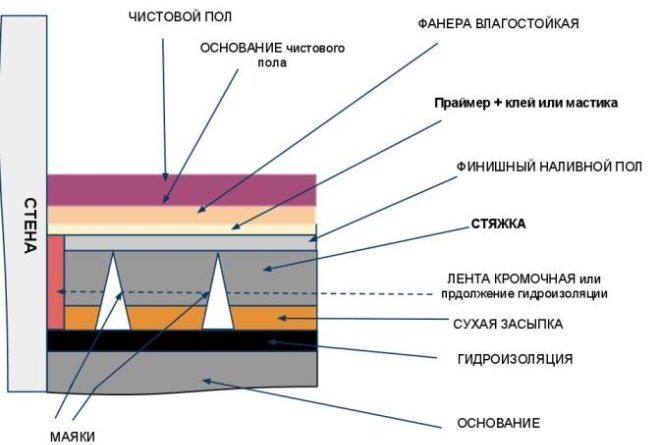 Floor cement screed
Usually, a cement-sand screed is used to hide the elements. It should be smooth, even and completely dry.
Any contamination from the surface is removed, the irregularities are overwritten. The main thing is that the screed is filled in level, then laying the tiles will be much easier.
The screed must be covered with a deep penetration primer or concrete contact. It takes two hours to dry the compositions. Then the procedure should be repeated, this will ensure better adhesion of the tiles.
All attention to thermal insulation
At the beginning of the installation, thermal insulation is laid under the pipes, thanks to which all the heat will go up.
Polystyrene boards are often chosen for thermal insulation.
The thickness of the layer is determined as needed: the greater the heat loss, the thicker the plate should be taken. In addition to polystyrene, you can take another insulation.
Its choice depends on several factors: where the room is located, what type of floor, what is the main heating system.
If the room is well enough heated by the central heating system, and warm floors are laid under the tiles as additional heating, then you can take foamed polyethylene with a foil coating (penofol).
If under the floors there is an unheated basement or soil in general, then the insulation can be chosen more seriously: expanded clay and expanded polystyrene (sheets 50-100 mm thick).
Now heaters for underfloor heating are already being produced with special cells for laying pipes already laid on them, such material is convenient to use.
On top of the heat-insulating materials around the perimeter of the room, along the walls, damper tape is laid.
Its application is mandatory. It compensates for the thermal expansion that occurs in the concrete screed.
- A polyethylene film is spread on top for waterproofing.
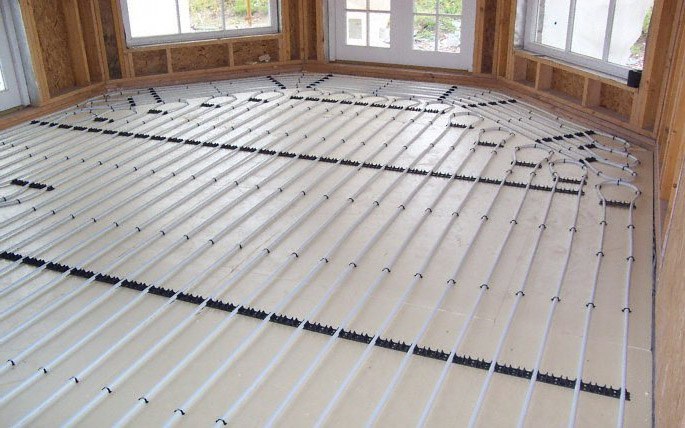
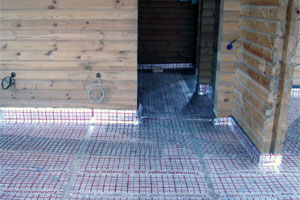
- Then the reinforcing mesh is laid. Reinforcing mesh rods can be 4-5 mm thick, its cells are 10 by 10 or 15 by 15 cm.
With the help of plastic clamps, the pipes are attached to the reinforcing mesh. Expansion joints are additionally protected by a corrugated pipe. For stronger fastening, sometimes another layer of reinforcing mesh is placed over the pipes.
Which pipes are best
Pipes for such a system are often chosen from polypropylene or polyethylene. Polypropylene expands significantly when heated, so it is better to take them with fiberglass reinforcement.
Polyethylene pipes expand less, so they are chosen more often. Suitable for diameter 16-20mm.
The main thing is that the pipe can withstand heating up to 95 degrees and a pressure of 10 bar.
Other parameters (oxygen protection, additional layers) are optional. In small rooms, metal-plastic pipes are suitable.When choosing them, give preference to seamless or those where there is no “overlap” seam. They can be bent many times without fear of creases.
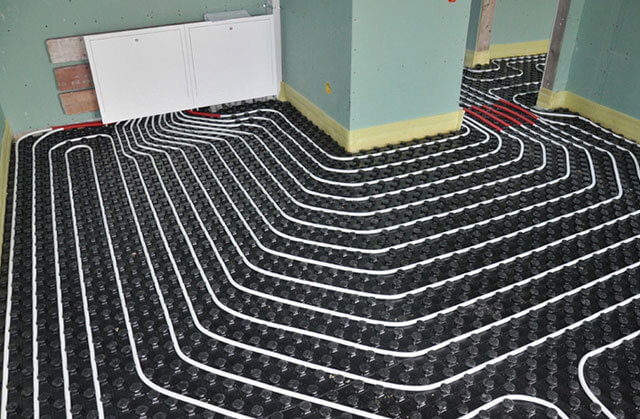
Laying methods
The most common styling methods:
 Pipes are laid from the outer walls of the room, as they are colder.
If the pipes are laid in a “snake”, then the floors from the outer walls will be warmer, and the heating will decrease towards the inner ones.
To use this method of laying, you need a certain skill, knowledge and skills.
Often it is not possible to bend the pipe for a small pitch (especially if the pipe is not the thinnest in diameter) and you have to take a step larger than you might like or need. Making rings at the ends of the loop is also very difficult.
Double snake
 The method is similar to the previous one, but more complicated.
In this way, it is possible to achieve that the temperature difference on the surface becomes smaller, but the installation is just as laborious.
It is not convenient to lay pipes in the bathroom with a snake, where you need to bypass the toilet, bidet, etc.
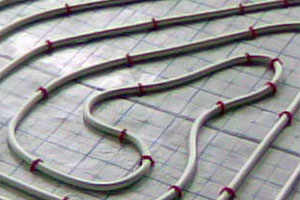
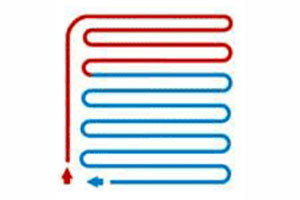
 Pipes begin to lead along the perimeter of the room, heading towards the center.
It is necessary to lead, leaving a wide gap between the pipes, and then along it from the center the pipe is returned to the outer perimeter of the room.
This method among many experts is considered the most reliable and easy to install.
And for users, it gives an even distribution of heat and, therefore, comfort.
If you need to strengthen the insulation of some zones, you can lay the pipes in a spiral, reduce the step in the desired zone, and then - with the usual calculated step.
The laying method may also depend on the “geometry” of the room: in an elongated, narrow room it is better to use a “snake”, and in a small square room, a “spiral” is suitable.
The methods can be combined.
The right step
The laying step (the distance between the pipes) determines the heat load that the system can provide and how evenly the surface will be warm.
The step is chosen differently: the smallest is 50 mm, the largest is allowed is 600 mm. Often a step of 150, 200 and 300 mm is used. You need to retreat 8-10 cm from the walls. There may be laying with variable and constant steps.
- When the heating load is less than 50 W/m², laying with a constant 300 mm spacing can be applied.
- When the heating load is high (more than 80 W / m²), then the laying step can be 150 mm.
Often a variable step is used, when the laying step is smaller along the edges of the room (along the outer walls, where it is coldest) and larger indoors.
When laying a water-heated floor under a tile, it is often recommended to distribute pipes at least 15 cm apart. Otherwise, the areas between them may not warm up enough and a “thermal zebra” may appear. The alternation of stripes will be clearly felt under your feet.
Use of flooring
In this case, in order to install a water-heated floor under a tile, it is necessary to use polystyrene plates, which are equipped with plates with grooves for installing pipes. These plates are made of aluminium.
This method is the fastest and easiest. It applies in the following situations:
- when the room has a low ceiling and a cement screed will hide usable space;
- when the subfloor is not strong enough to withstand the cement screed;
- when it is very difficult or not possible to pour a concrete screed.
A coating such as laminate or parquet is laid directly on polystyrene. This cannot be done with tiles, it is necessary to lay gypsum-fiber sheets (GVL) or other suitable moisture-resistant material under it (for more details: “How GVL is laid on the floor - examples from practice“).
Polystyrene plates should be laid on a perfectly flat surface, otherwise the material may change its shape, and this will lead to lower heat transfer.
Warm floor
Like it or not, but it is ceramic tiles that are the optimal material for flooring for the bathroom. Its only, perhaps, disadvantage is that the floor becomes cold.
You can get rid of this drawback by laying an electric mat that can warm up the surface and reach the required, comfortable temperature. This system is logically called "warm floor". It is used not only in sanitary facilities, but even here it comes in handy.
The system includes heating mats, which can be of various sizes. Mats act as a textile base for heating elements, due to which the floor is heated.
However, the system can use more than just electricity. Recently, the popularity of a water heated floor has grown significantly, for which hot water is used as a coolant.
For a water-heated floor, pipes from the following materials are used:
- Plastic;
- Metal-plastic;
- Copper;
- Steel.
The process of making a warm floor with a water coolant is as follows:
- First, the floor is leveled, old coatings are cleaned, and a full cleaning is carried out.
- This is followed by mandatory waterproofing of the surface, which will avoid unpleasant consequences from water leaks.
- After waterproofing, a rough screed follows - from a solution of expanded clay and cement. The level of the screed should be about 5-7 centimeters below the final tiling. During the week, the screed must be watered with water so that it does not crack.
- The next step is laying the heat-reflecting foil. All joints are glued with aluminum tape.
- Now you can proceed with the installation of a warm floor. To do this, install the pipes in accordance with the scheme of laying the system. Observe the pitch between the turns, which should be at least 15 centimeters.
- The system is connected to the water supply risers, to the return line through the control valve.
- Do not start finishing coat until the system has been tested in operation. Turn on the water to make sure everything is working properly.
- Now pour another layer of screed, after which the final coating begins.
In fact, it is not difficult to install a floor heating system using hot water as a heat carrier.
https://youtube.com/watch?v=JRz4fJerPg8
Do not forget that in order to achieve an optimal result, it is important not only to perform well at each of the stages of work, but also to use high quality materials. It is from them that the efficiency, productivity, and also the durability of the entire system called underfloor heating will largely depend.
By the way, also consider all the main points before installing a water-heated floor. Given the far from the highest quality water treatment that gets to our homes, as well as the condition of the pipelines, it is far from always appropriate to use this type of floor insulation. A number of cases suggest that it is more correct and rational to use electrical systems. Especially if the bathroom is small in size, then you will not encounter serious costs for paying for electricity, but you will get a reliable and efficient heated floor.