5 steps for installing a faucet in the kitchen with your own hands
An adjustable wrench can also be attributed to universal: it is useful when tightening hex nuts and locknuts. However, no adjustable wrench can be compared in terms of ease of use with conventional open-end wrenches. The table will help you choose the right size:
Note:1. According to the manufacturer's catalog - General Fittings (for fittings) and Bugatti (for ball valves).
I would be grateful if one of the respected readers would clarify or supplement the information in this section by reporting through the feedback form at least those marked with the sign “?» missing key sizes.
And about the dimensions of plumbing pipes:
| Cylindrical pipe thread (G) | Metal pipe (including galvanized) | plastic pipe (including polypropylene) |
| measured by the inner diameter (the outer diameter of the pipe will be larger than its size) | measured by outside diameter | |
| 1 /2« | 15 mm | 20 mm |
| 3 /4« | 20 mm | 25 mm |
| 1″ | 25 mm | 32 mm |
| 1 1 /4« | 32 mm | 40 mm |
| 1 1 /2« | 40 mm | 50 mm |
On a note.
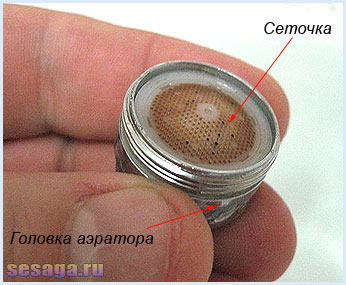
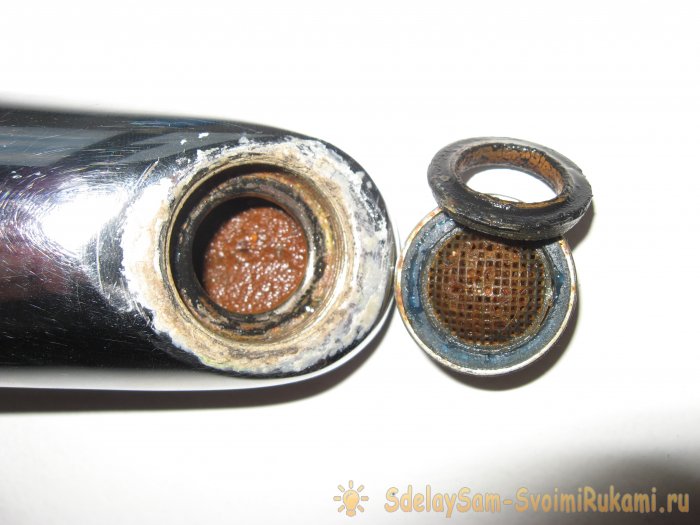
Not always with a weak pressure of water from the mixer, or water leaks from under its handle, the cartridge is to blame. As a rule, with a weak pressure of water from the mixer, eighty percent is to blame for the aerator. Inside the aerator head are meshes designed to mix water with air so that the jet from the faucet comes out soft and even.
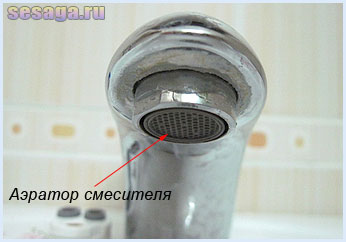
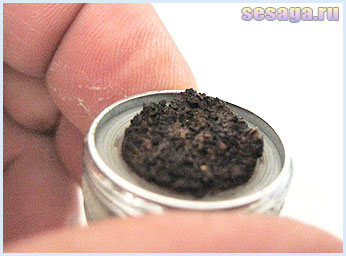
And so on these grids the dirt which passes together with water accumulates. And if you have not cleaned the aerator and when you unscrew it for the first time, you will see a lot of interesting things: sand, scale, rust.
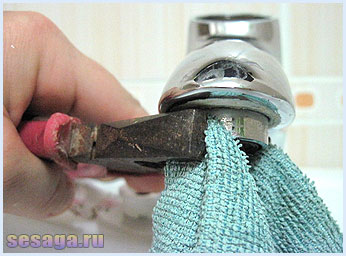
The head is unscrewed by hand, but if it goes tight, then this can be done with a wrench or pliers. Just for these purposes, it has edges. But this must be done carefully so as not to damage the nickel-plated coating on the metal. I prefer to twist with pliers, after placing a dishcloth under the sponges of the pliers.
This is approximately how clean the aerator mesh should be.
And if you have never cleaned the faucet aerator, then read this article, in which I tried to describe in detail how to clean the faucet aerator.
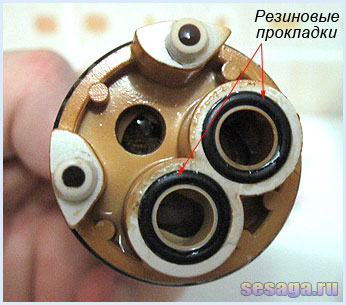
Well, the second common malfunction due to the fault of the cartridge is a leak from under the faucet handles. Try tightening the clamping nut one or two turns. Perhaps its pressure on the cartridge has weakened and water seeps between the rubber gaskets and the mixer body.
Now I think that you can easily disassemble the mixer and replace the cartridge, and at the same time, eliminate the most common malfunctions. Good luck!
6 comments
When the mixer stopped “obeying”, I disassembled it and saw that the antennae had broken off, which fix the cartridge lever and the moving part. I glued it with superglue and put everything back together. The mixer worked for another two years, and then it was replaced anyway. (just in case )
In Faucets with high racks NewForm T-Trend 2400.21.018, if the water is too hard, lime deposits quickly accumulate, due to which the seals in the spout assembly are erased, and the top part of the mixer cannot be unscrewed. Most users in such cases simply replace the mixer with a new one, which is not right! It is more profitable to try to do the following: 1. Using a 2.5 mm hexagonal screwdriver, unscrew the locking screw on the cartridge lever, and then insert WD40 aerosol under the threaded coupling of the mixer. The mixer must remain in this state for at least 30 minutes. 2. Make a “key” for unscrewing the sleeve: place 2 M4.5 screws at a distance of 32mm from each other on a steel plate with a cutout for the cartridge rod. After inserting the protruding ends of the screws into the holes of the mixer sleeve, unscrew the sleeve by turning it counterclockwise (if necessary, repeat wetting the threads with WD40). 3.After removing the threaded sleeve, remove the cartridge (Ø 35x27mm). 4. Pull up on the body of the swivel spout and remove it from the brass base of the faucet together with the rubber washer located above it. 5. Next, you should release the lower part of the brass base from the supply hoses and from the mounting stud (M8x1.25), then pull the mixer out of the mounting hole in the countertop. 6. Unscrew the lower part of the faucet from the brass base using the “key” made. 7. Place all metal structural elements in a container with a 5% solution of vinegar or citric acid and use a hard toothbrush to remove all traces of limescale. 8. Rinse the cleaned parts of the mixer in running water and wipe with a dry cloth (you can use a hair dryer). 9. If necessary, replace the cartridge and seals. 10. Lubricate all threaded and rubbing elements of the mixer with SHRUS grease and assemble the mixer in the reverse order.
The BLANCO Alta Compact faucet has a similar design, similar steps can be found on YouTube.
Periodically, the taps in the kitchen need to be changed. They are operated in a hard mode, detergents get on them in large quantities, because of which they become unusable or simply lose their appearance. Therefore, many come to the need to change the kitchen faucet. But calling a plumber for this is not necessary at all. Replacing a faucet in the kitchen is a simple job, you can do it yourself, and they will ask for a decent amount of money for it. We save money and do everything ourselves.

Replacing a faucet in the kitchen - you can handle it yourself
Kitchen faucet installation
Replacing the faucet in the kitchen is nearing completion. Now we assemble the crane and install it in place. It is much more convenient if the work can be carried out on a removed sink. If this is not possible, all manipulations will have to be carried out reclining in the closet. Approximately as in the photo.
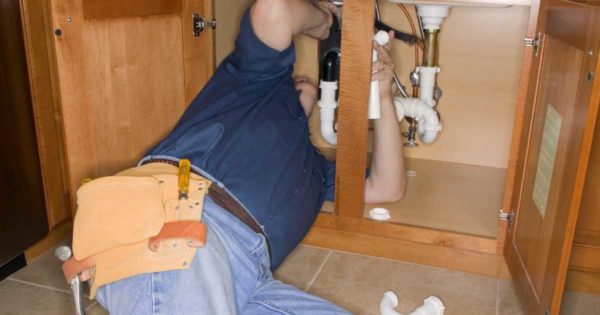
Not the most comfortable position
Assembly
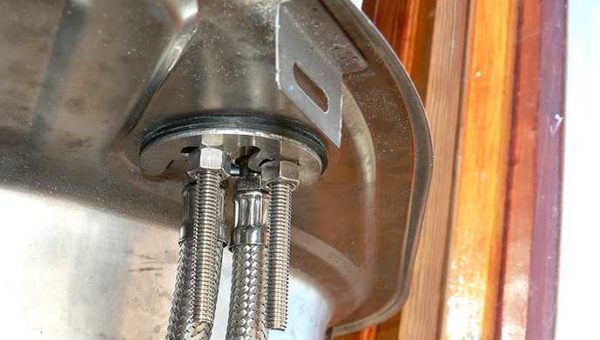
First, we fasten flexible hoses to the mixer. They are screwed in by hand, then tightened a little with a key - no more than 2 turns.
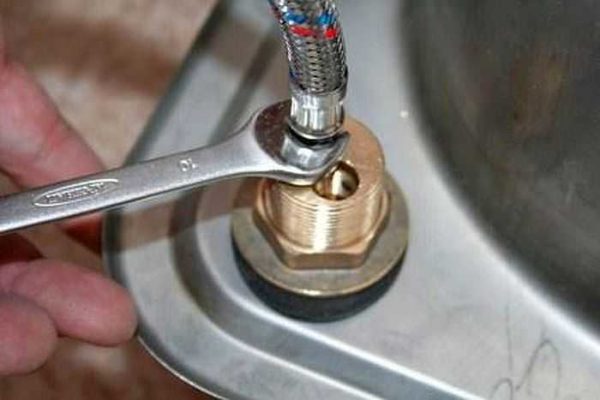
We screw the flexible hose into the holes on the mixer body, tighten it slightly with a wrench
Now you need to pull a rubber gasket onto the body, which seals the junction of the mixer and the sink surface. This rubber ring of decent diameter is included in the kit. It is pulled through the installed supply hoses, placed on the body.
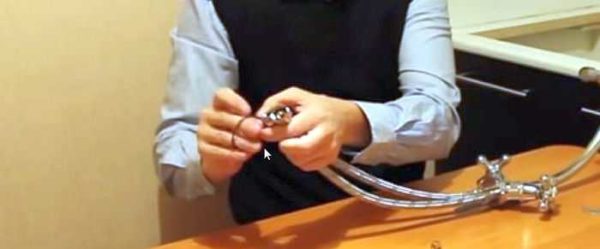
Install gasket on body
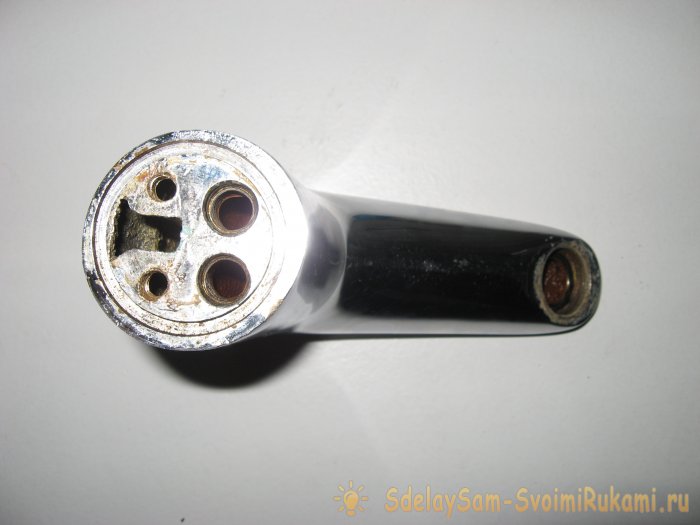
In modern kitchen faucets, there are two different forms of attachment to the sink. The first - with the help of a nut - you saw in the part where it was about dismantling the mixer. It's just an "older" system. The second provides for the presence of rods and spacers-clamps in the form of a horseshoe. The rod is usually one, but there may be two. If there are such rods, they are screwed into the appropriate socket. If a nut is screwed on it, it is removed.
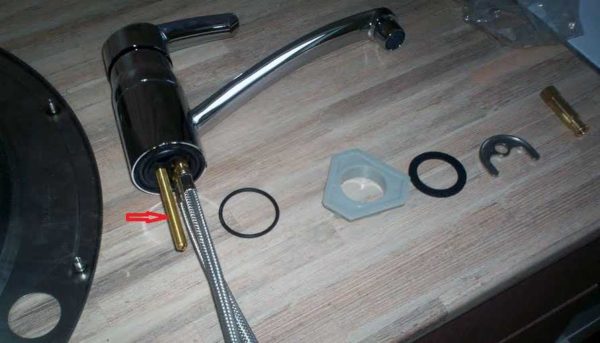
Rod for additional fixation
Installation on the sink
Now the kitchen faucet can be installed on the sink. First, flexible hoses are inserted into the hole, then the body is placed in the center of the hole. Further actions depend on the type of fastener. If this is an ordinary nut, they simply tighten it, trying not to overtighten it.
The nut is screwed onto the body
If it is a model with rods, the appearance is different, although the meaning is the same. First, the gasket is put on (it is also in the shape of a horseshoe), then the pressure plate. Next, the nuts are screwed onto the rods. The nuts are slightly tightened with a wrench. TODE nothing complicated.
Faucet attachment with rods
Turn the sink over and turn on the faucet. He must be dead. There shouldn't be any loopholes. If there is movement, tighten the mount.
Washing installation
Now the sink with the mixer installed on it is placed in the prepared place. First, silicone sealant (not acrylic - it quickly turns yellow) is applied from the back of the sink around the perimeter.Then the sink is installed in place, the fixing bolts are tightened.
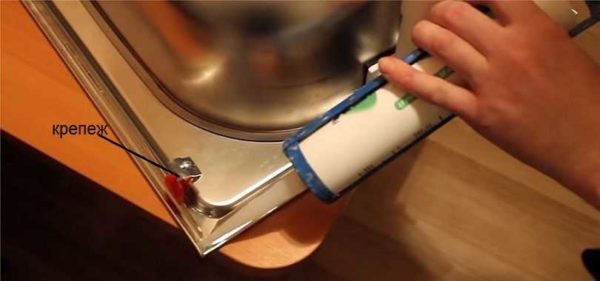
Preparing the sink for installation
Then everything is simple: put in place, align with the edges of the table, tighten the fasteners. It is made in the form of petals that attract the sink to the countertop when you tighten the nuts. The sink must stand firmly, without shifts.
Connecting hoses and siphon
With a siphon, everything is simple - they pulled the corrugated hose to the nozzle, tightened the nut by hand until it stops. Everything. Do not use the keys - everything is made of plastic.
With the connection of the water supply is not much more difficult. Just be sure not to confuse the place of connection of cold water. Its entrance is on the right. After making sure that there is a rubber gasket in the union nut of the flexible liner, we bring it to the pipe, tighten the nut as much as possible with our fingers. Then we take the key and tighten it one or two turns. Do not pull hard - you can cut through the gasket and then the connection will flow.
But what about tow, winding and paste? If normal quality hoses are used, they are not needed. Connection without them is reliable and tight. It will be possible to rewind a lot if, after a test run, drops of water appear from under the nuts. But this shouldn't be. There is no need to wind tow or fum-tape just like that. Extra time and extra pressure on the union nut.
After connecting to the hot pipeline, we can assume that the independent replacement of the faucet in the kitchen is over. It remains to turn on the water and check if everything is working properly and if the connections are leaking. To do this, the joints are wiped with a dry cloth, and then carried out several times by hand.
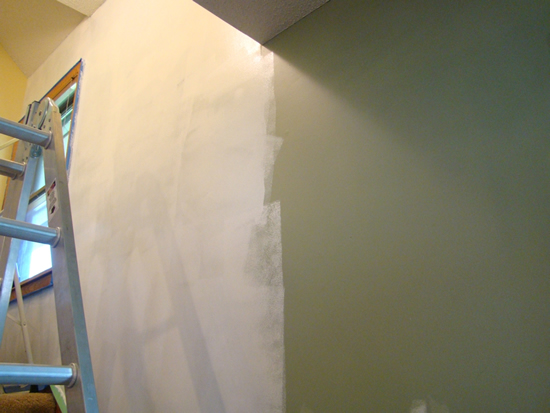
How to install a faucet in the bathroom
Choose the right sealant, it will be needed for each threaded connection. Buy a tape of the desired length and width and wind it around the thread so that it is even. After that, install the mixer, check that the water does not leak and the temperature when turning is functioning correctly.
The faucet can be connected to the water supply by different types of wiring, such as rigid or flexible. Flexible eyeliner will cost less, it is much more convenient to carry it out than a rigid one. Do not save on any materials so that you do not have to buy again later. The most difficult installation may be to connect the plumbing to the faucet. For hard wiring, it is necessary to use adapters, the nuts should be tightened very carefully, adjusting first with your hands, and then with a wrench. The installation of the faucet in the bathroom is ready, now we check how the shower works, how water flows from the nozzles and when the tap is turned, how the temperature is regulated. If something does not work as it should, check again all connections to the water pipe and, if necessary, disassemble the faucet to make sure that it is fully working. In the kitchen, the meaning of the installation remains the same as in the bathroom, only a little less work.
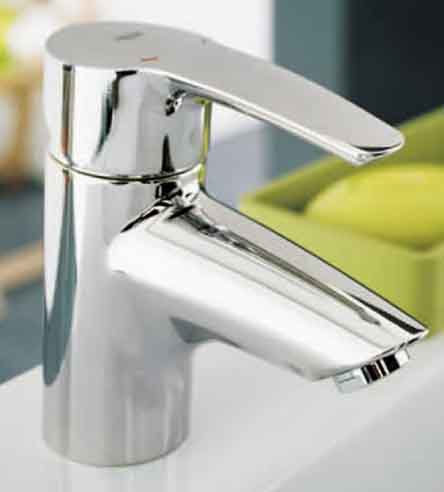
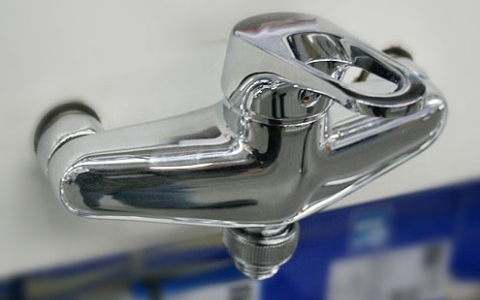
Choosing a mixer

Faucets are: single-lever, valve, touch, non-contact. All mixers perform the same function, but the principle of their operation is different. Single-lever faucets are quite convenient, with just one touch of the hand, the water turns on the way you need it. It is especially convenient if the hand is dirty, then you can turn on the mixer with the other hand and adjust it as your heart desires. It should be borne in mind that the pressure of the water supply may not be the same, the hot one has a weaker pressure, and the cold one has a strong one. In this case, the water will not be quite heated to the temperature that we would like.
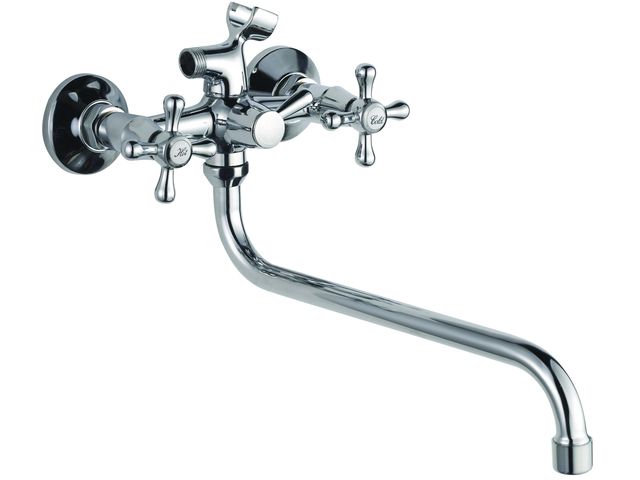
The next type of valve mixer, it works with two valves at once, alternately turns on cold water first, then hot. So the type of mixer is often installed in the apartments of the city and it has quite good endurance and service life, wear-resistant, rubs less, a lot depends on the manufacturer.A touch faucet is a modern device that reacts to the touch of hands or a place where touch sensitivity is specially designed. The most expensive is a contactless or remote faucet that reacts to a person at a distance of one meter and water is automatically supplied. In such a mixer there are no handles, no levers, no buttons and valves, it works completely in automatic mode.
In addition to what types of mixers are, it is important to know what they are made of. Basically, faucets are made of brass and bronze, and then plated with chrome to prevent corrosion and discoloration of the metal.
The best material for the faucet is brass, it is the most reliable. Faucet handles and valves can be made of wood, glass, crystal, stone, and are also most often made of plastic.

Do-it-yourself mixer replacement.
Before replacing the faucet, the previous faucet, which is already installed, must be dismantled.
If you have not changed the faucet for a long time, problems may arise, due to a small amount of precipitation, your faucet may stick to the pipes.

Here you need to be very careful, since the pipe, especially the plastic one, can generally break. In this situation, use brake fluid or kerosene, put a couple of drops on the joint where the mixer is stuck, and wait for 15 minutes. Then proceed to replace the mixer, you should succeed.


Faucet maintenance.
It is worth remembering that each product requires careful care if you want your faucet to serve you for a considerable number of years.
It is also important to know with what means to care for him, so as not to harm
There are different types of detergents and cleaners. Do not use agents that will harm the coating, such as agents such as phosphoric acid, formic, chlorine. Read the instructions carefully when using the products and about the time of their use.
The best way is to wipe it with a sponge with soap or shampoo, after each use of the faucet, if necessary, do not apply funds to the faucet, it is better to use a sponge. How you take care of your faucet will determine how long it will last. A common cause of failure is poor-quality water, which spoils the coating and clogs debris in the mixer. In this case, we recommend that you use a water filter, then the mixer will work without failures and delight you with its reliability.
Faucet cartridge replacement.
The cartridge replacement procedure itself is very simple and does not require a super duper tool. As a rule, the most common tool is used, which is always in the house of any owner. The only exception can be a hexagon, which, due to its rare use in everyday life, cannot always be found at home.
But the hexagon can also be replaced with a flat or Phillips screwdriver. Everything will depend on the type of screw head that secures the handle to the cartridge lever.
So. 1. Shut off cold and hot water inlet valves. 2. Remove the plastic plug that covers the screw hole in the handle. As a rule, red and blue colors are applied on it, symbolically denoting cold and hot water. You can remove it with the tip of a knife or a flathead screwdriver.
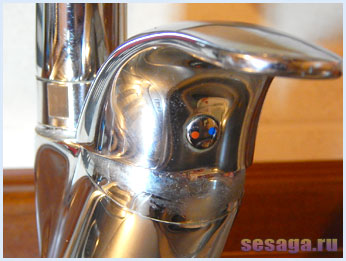
There are also plugs and other designs. In the photo below, the cap is made in the form of a semicircular strip.
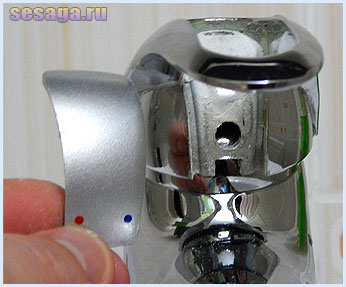
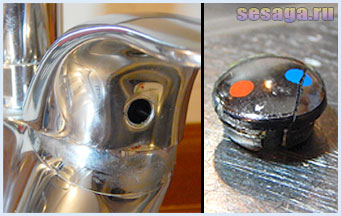
3. Using a screwdriver or hexagon, unscrew the locking screw and remove the mixer handle by pulling it up. The handle will go with some effort, so you don’t need to be scared, but you shouldn’t pull too hard either, so as not to break the seat on the handle.
4. We unscrew the decorative cover, which is located under the mixer lever, and then unscrew the clamping nut with a wrench.
5. We take out the cartridge and inspect the place where it was installed.If grains of sand or dirt are visible, then all this must be washed off.
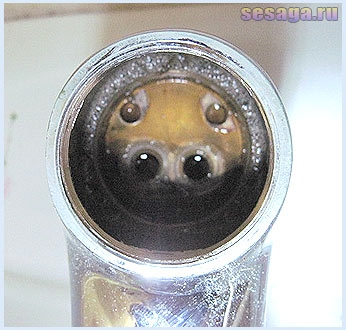
Then we take the old cartridge as a sample and go to the store with it to buy a new one. Install the cartridge in reverse order.
Crane disassembly
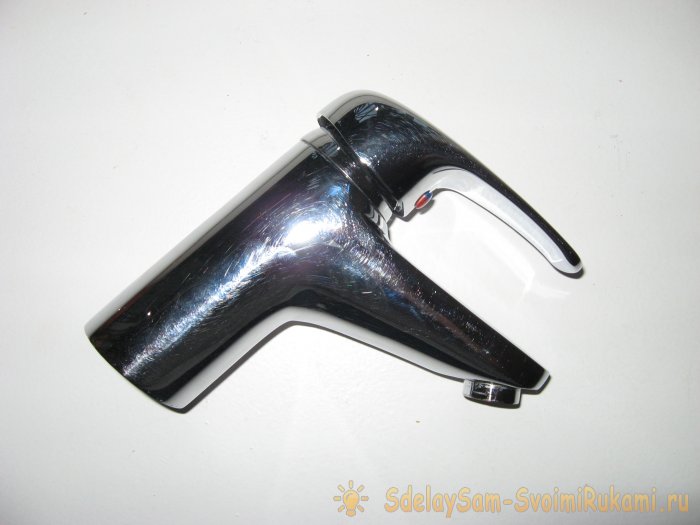
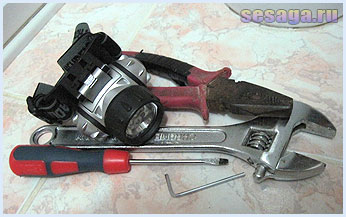
To begin with, we need to disassemble the product in order to understand the degree of its suitability and the reasonableness of replacing some of its parts if necessary. But before that, it will not be superfluous to connect it to the existing plumbing in the house: we must make sure that it holds water pressure or not. Based on the result, it will be possible to conclude whether we will have to change the cartridge or will only clean it. The list of tools that we will need:
- - flat screwdriver
- - hex key (in this case 2.5 mm),
- - locksmith's beard,
- - hammer,
- - wrench
- — WD-40.
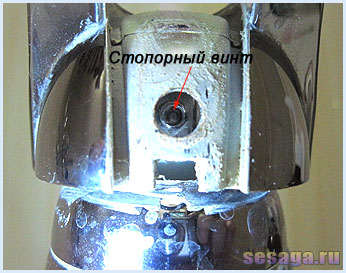
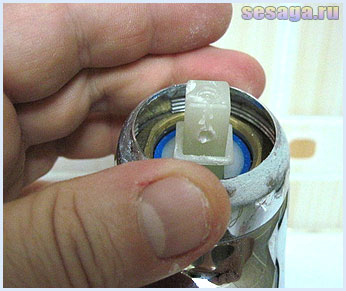
Let's get started. First we need to remove the lever - we hook it with a screwdriver and remove the technical plug of the red-blue color.
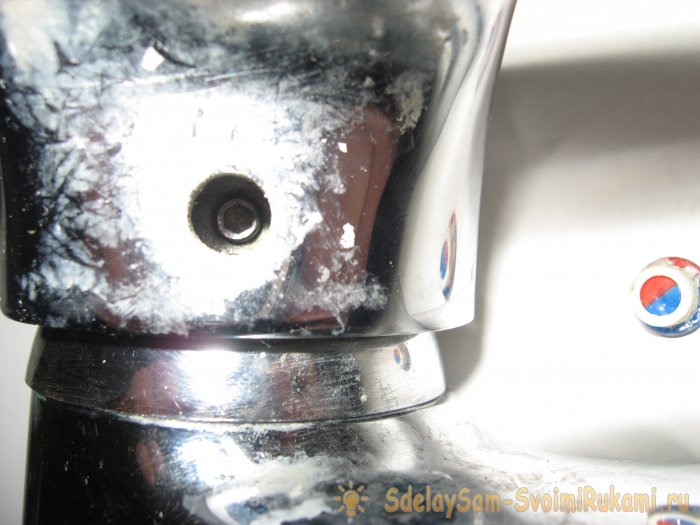
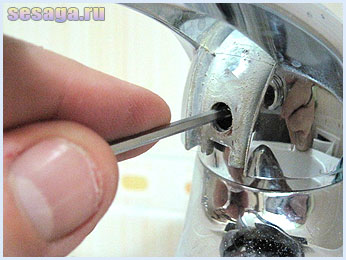
Removing it, we get access to the hex screw. It holds the handle on the cartridge.
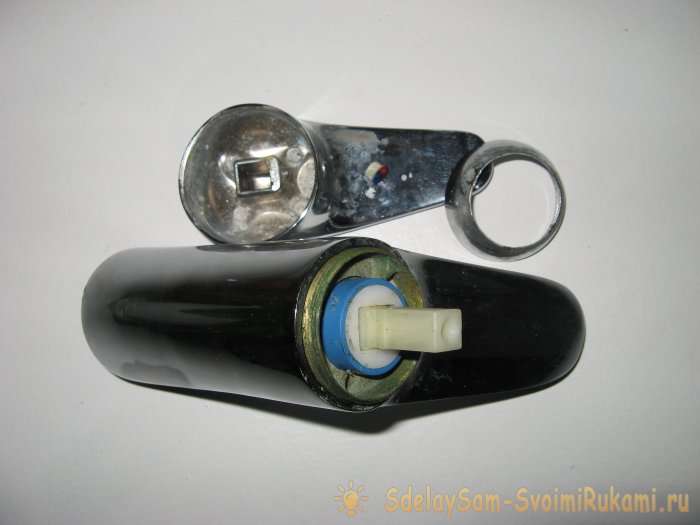
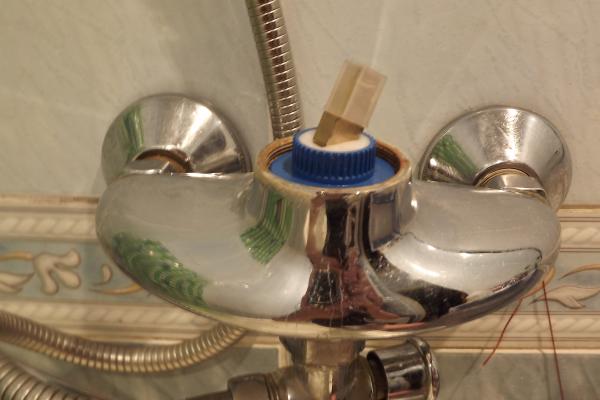
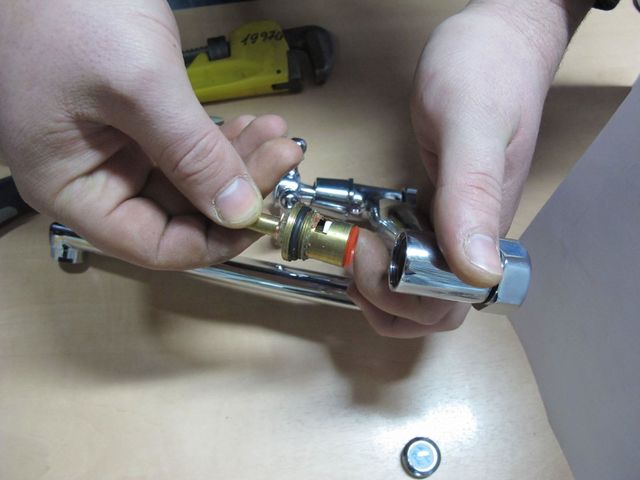
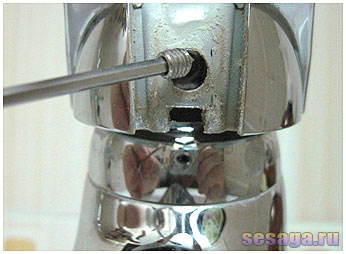
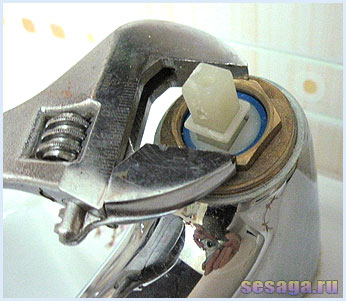
Having unscrewed it, we remove the upper part and screw the cap. Now we have to remove the threaded connection. It is yellow (brass). Most likely, over the years of service, it has boiled over, so it’s not easy to unscrew it like that. But it does not matter: we take WD-40 and lubricate the gap between the body and the joint with it. We leave it for a while. After that, we try to unscrew it. In general, there is a special key for this operation, but, as you yourself understand, it is difficult to find it. We can do without it - an ordinary locksmith's beard or an impact screwdriver and a hammer will help us out. We put the mixer on the floor or table (after laying the fabric), point the tool on one of the ledges and, gently tapping, move it in the direction of unscrewing. Do not forget that the chrome-plated surface of the mixers easily scratched, so during all operations with them, try not to allow the mixer to come into contact with materials that can damage it!
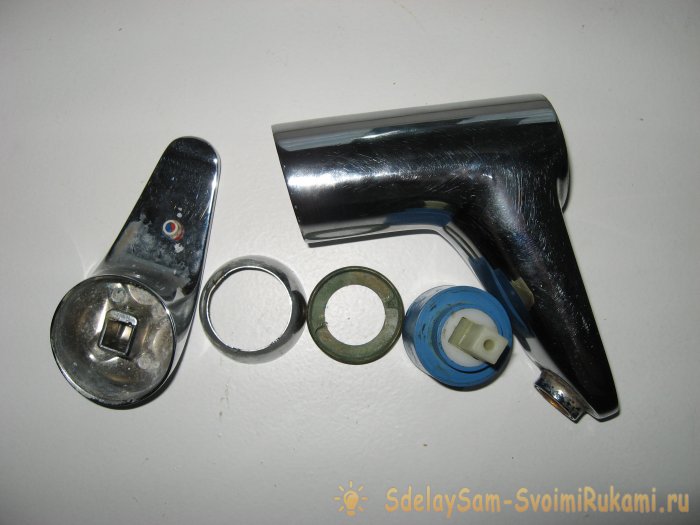
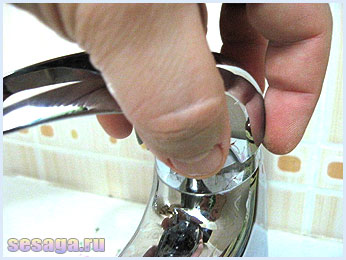
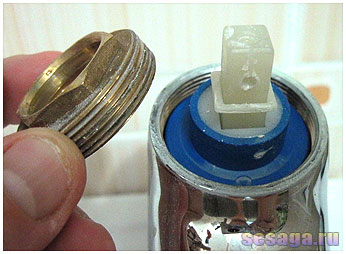
Having unscrewed the connection, we take out the cartridge, it is blue here. We carefully examine it for damage. If the cartridge is intact and in good condition, then we continue to work. Remove and clean the aerator. Despite the unsightly appearance, it will still serve, although it can be replaced with a new one - the price of a new (simple) one is only about 50 rubles.
Disassembly completed. We wash all the parts, if possible, remove the layers inside the case.
Do-it-yourself faucet repair
If during the check it turned out that the cartridge does not hold water (it drips or runs), then it will need to be replaced. This is the most expensive part in the mixer (after the body), so we take this part and go to the plumbing store - we find out their availability (they differ from different manufacturers) and the cost. Having received the information, we conclude whether it is worth buying or is it easier to throw away the crane. Here, of course, the initial price of this model plays a big role: if, for example, such a new mixer costs 2 thousand rubles, and the cartridge costs 700 rubles, then it’s worth considering whether the game is worth the candle. In addition, it may well turn out that the studs, with the help of which the faucet is screwed to the sink, they simply rotted and there is no way to unscrew them. This situation is possible with inexpensive models, for high-quality faucets these elements are made of brass! It's okay, we can handle this problem. True, for this we need additional tools: a hacksaw and a drill for metal, a drill, a tap, a crank. We cut the studs with a hacksaw. Do not rush to throw them away: you will use them to pick up new ones, knowing their diameter and thread pitch. Then we drill out the remaining tips of the studs with a drill or screwdriver. We select the drill so as not to touch the walls of the holes. If they are still damaged, you will have to re-thread.
To find out what kind of tap you need, you need to measure the hole diameter with a caliper and measure the thread pitch with a special metric thread gauge (M60). You probably don't have either. This is where the old stud comes in handy - if you come with it to any tool store, they will pick it all up for you. At the same time, do not forget to buy two bolts with the required dimensions and nuts for them. Why bolts? Because the studs are sold only by the meter, and we will cut the heads with a hacksaw and get what we need.
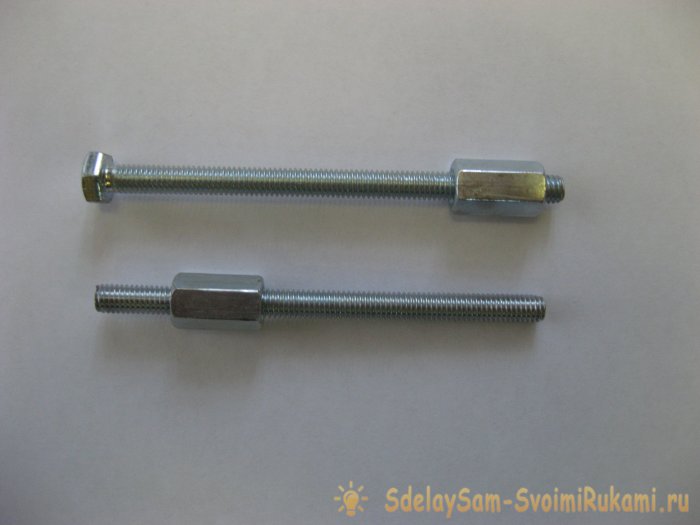
In our case, it was also not possible to drill accurately, so I had to update the thread with an M6x1 tap. The bodies of the mixers are made of non-ferrous metals, i.e. not solid, so the cheapest tap will fit. Having done this, we screw in new studs, and that's it, in fact, that's it. It remains only to put the mixer in order: clean it from dirt and lime deposits.

Thanks to a good cartridge and aerator, the repair of this faucet cost only 100 rubles. is the cost of two bolts and nuts, plus an M6 hand tap.
How to remove the old
Before starting work, turn off the water supply to the tap, drain the remnants that are in the pipes. Now you can start replacing the faucet in the kitchen. To remove the old faucet from the sink, unscrew the nut that is screwed onto its body from the bottom of the sink. If the sink is installed in a kitchen cabinet, it is very inconvenient to work. It's better to remove the washer. For this you will have to:
- Open the siphon. There are many designs of siphons, but each has a nut that must be unscrewed. It is hard to confuse it - it has protrusions for a better grip. Unscrew the nut, remove the lower part of the siphon.
- Unscrew the hot and cold water hoses that go to the mixer. The cap nuts are usually removed. To do this, you need a key for 22 or 24.
- Cut the sealant around the perimeter of the sink, if any.
- Loosen the screws securing the sink to the countertop. You will see the bolts if you "dive" into the table.
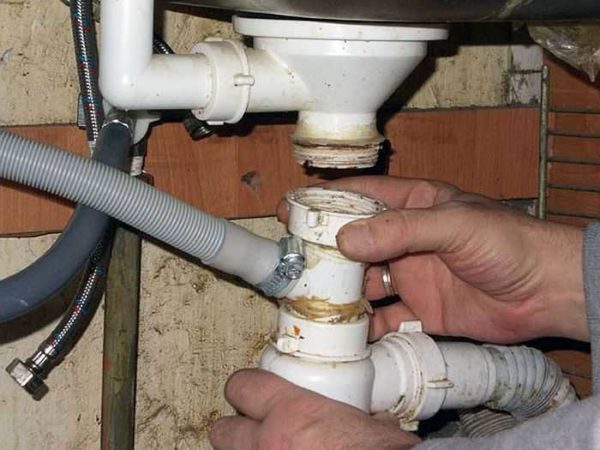
One of the siphon options and a nut that needs to be twisted
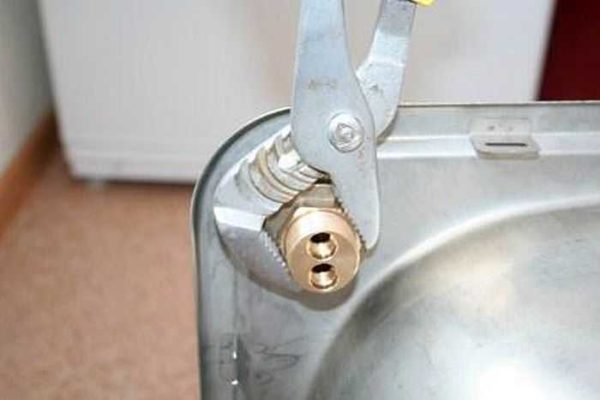
Now you can lift and turn the sink. Here you will see a nut that needs to be unscrewed. You will need two wrenches for this job. One is holding the body from the “front” side of the sink, the second is unscrewing the nut.
Sometimes it is very difficult to remove the old faucet in the kitchen: it “sticks”. For this case, kerosene or universal grease in cans of WD-40 is suitable. Both substances have a low density and are able to seep into microscopic cracks. The composition or kerosene is applied to the connection that needs to be disassembled, they wait 10-15 minutes, they try to unscrew it.
If all the tricks did not help, there is a simple method that is suitable if the old mixer is not going to be used anywhere else: you can cut the body along with the nut with a grinder. The method is tough, but after suffering for an hour in an attempt to remove the nut, they resort to it.
If the faucet is installed on the countertop, you will have to work “from the inside” - crawl into the closet with a flashlight, and unscrew the nut in this way.