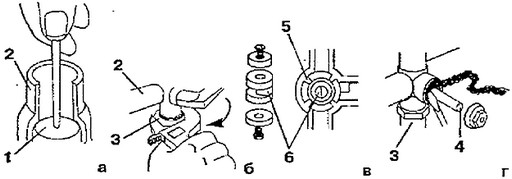
Crane box stuck to the body, we select the appropriate method of dismantling
After removing the valve and plugs, you need to unscrew the faucet box, but it has become stuck and it is impossible to remove it in the usual way using an adjustable wrench. We offer you four methods, from less to more labor-intensive.
Let's start with the chemical method. Here we use the already familiar WD-40 solution, Sillit plumbing fluid or table vinegar. After using any of the above products, especially WD-40, the mixer must be thoroughly rinsed with water. We generously lubricate the connection with liquid and leave it overnight. The next morning, the thread weakens, the crane box is easily removed.
If chemistry does not help, use the thermal dismantling method. Since the mixer body and the faucet box have different expansions, we heat the junction with a building hair dryer at a minimum temperature and a remote distance from the threaded part. We achieve that the bolt and the upper part of the crane box are unscrewed by hand. An open flame, such as a gas burner, will speed up the process, but this method is unsafe due to the high risk of burns and melting of plastic parts.
The next step is tapping the mixer around the threads. If the axle box is made of light alloy, this method should work for you. Armed with a hammer, preferably a mallet, we begin to tap the threaded connection from all sides. This action must be performed at least 15-20 times. The departed limescale and rust will weaken the connection, we take out the crane box.
If the proposed methods did not bring the desired result, we use the complete dismantling of the fittings, reaming the hole. We cut off the protruding part of the crane box with a hacksaw for metal. With a drill or cutter of the desired diameter, we drill out the rest in the mixer. When you get to the ceramic plates, break them out with a screwdriver so as not to damage the drill tip. Now we take the pliers, insert them into the resulting recess and unscrew the edge of the crane box. To prevent slipping during operation, we work with pliers with one hand, and with the other we hold the mixer base with a large key.
To change the crane box, we get a new part and screw it into place. Having bought locking fittings with a worm-type rubber gasket, we first twist the stem so that it is as short as possible. When installing a ceramic bushing, do not tighten it too tightly so as not to damage the ceramic parts. It is enough to insert the fittings into the hole and tighten the nut.
After twisting the crane box, we assemble the parts in the reverse order, put on plastic rings, twist the handles, fix the plugs in place.
Plumbing repair
Bath/shower spool taps
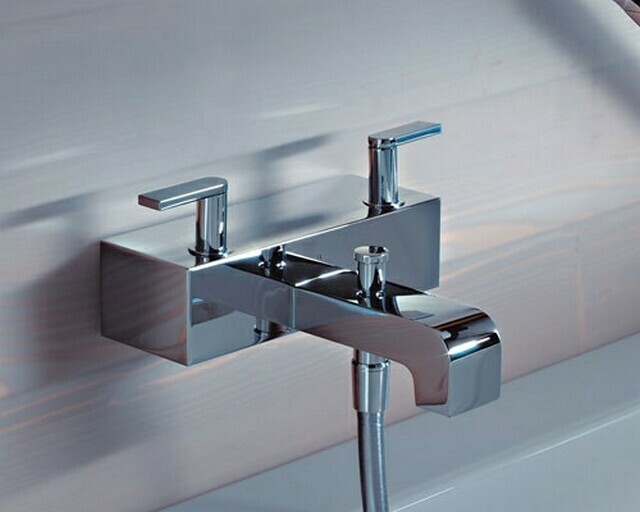
These are faucets with a shower screen on a flexible hose, a rod and a clamp, common for a bathtub and a washbasin (Fig. 17). The metal rod is attached to the wall. Switching the water jet from the spout to the hose and back is carried out by turning the handle, while the spool moves up or down. Gaskets on the ends of the spool block the holes for the passage of the jet in the body or adapter.
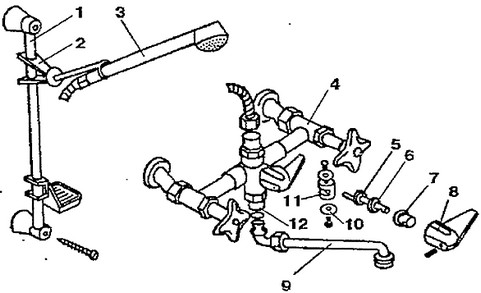
Rice. 17. Mixer with a spool switch having rubber rings and a rod:
1 - rod; 2 - holder; 3 - shower grid; 4 - body; 5 - crank; 6 - thread seal; 7 - special screw; 8 - handle; 9 - spout; 10 - spool gasket; 11 - spool; 12 - adapter
When the gaskets are worn, the switch is disassembled. The special screw is turned out, the crank and spool are removed, rubber gaskets 3-4 mm thick of medium hardness are installed. If necessary, supplement the stuffing box with a thread strand.
Instead of gaskets, spools can be equipped with rubber rings stretched over their side surfaces. Two new rubber rings are included with the faucet. It will be many months before they are needed. New rings are not sold separately. Do-it-yourself high-quality production of such rings is difficult.
In faucets with a shower screen holder on the body, a defect is possible when water flows continuously into the spout. It is necessary to check the rings on the spool. Disconnect the flexible shower, then the adapter, remove the crank, after removing the pointer, handle, union nut. The spool is pushed out through the hole for the crank or from below (after unscrewing the spout).
Rubber rings are removed from the spool with an awl or screwdriver. New rings stretched over the spool are moistened with water to facilitate the entry of the spool into the body.
The condition of the top gasket of the spool is easy to determine when the union nut of the flexible hose is unscrewed and removed.
When assembling, the groove with a cast recess on the spool is directed in the direction in which the crank pin is led. Failure to follow these rules will result in the crank becoming stuck in the housing and the switch inoperable.
Rice. 18. Repair faucet with spool switch:
a - only the removal of the defective gasket; b - unscrewing the adapter; c - replacement of spool gaskets; g - refilling of the sealant; 1 - spool gasket; 2 - body; 3 - adapter; 4 - crank; 5 - guide edge of the body; 6 - spool
Leakage from under the crank handle is eliminated by further tightening the union nut. In case this does not work, you can put a thread seal (hemp, etc.) between the rubber and the crank retainer rings, which will also stop the leak.
The aerator is usually screwed onto the outlet of the spout. In order not to damage the decorative coating of the sleeve, it is wrapped with one or two layers of tape and turned away with pliers. When washing the mesh and other parts of the aerator from clogging particles, the counterflow principle is used.
Removing the crane box
Before starting any repair work on the faucet. including the replacement of the faucet box, you must first completely shut off the water. If there are no (or do not work) shut-off valves in your home, you need to turn off the entire riser in the entire entrance. Before starting work, make sure that the water is actually turned off by opening the tap.
To replace the crane box, you will need: an adjustable wrench and a flat screwdriver.
- We dismantle the valve from the faucet box, for this a colored plastic plug is removed with a screwdriver, the fixing bolt is unscrewed, thereby accessing the stem and the faucet box itself;
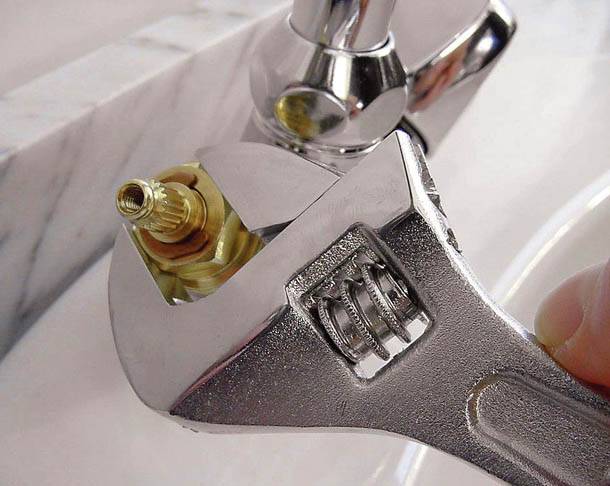
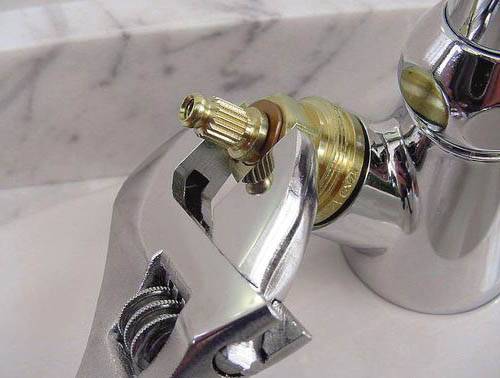
To dismantle the crane box, sometimes it is enough to have the key of the seventeenth number. Ceramic bushings are usually equipped with lock nuts, which first need to be loosened using an adjustable wrench. It is possible to dismantle the axle box with a square-shaped stem head using a number seven wrench, turning the stem in the opposite direction.
Crane replacement process
The question of how to remove the faucet box from the mixer may arise unexpectedly. Before disassembling the mixer, you need to make sure that there is no water in the pipe. To do this, open any other mixer or tap on the line. If the water does not flow, you can get to work. In order to change the parts in the mixer, you need to do a few simple operations:
Replacing the axle box crane - Photo 04
- Remove decorative caps or trims with a screwdriver or knife. They are made of plastic or can be metal and fit into the hole with a slight interference.
- Loosen the screw that secures the flywheel and remove it.
- On top of the axle box crane there can be decorative bushings. Take them off too.
- Using the wrench, unscrew the bushing and inspect it.
- If the rubber gasket in it is worn out, then replace it with a new one.To do this, unscrew the screw that holds it.
- Replace the faucet box in the mixer and insert decorative bushings, flywheel, screw, decorative caps in reverse order.
- Open the taps on the pipe and check the mixer for water leakage. When installed correctly, the mixer works immediately.
- before replacing the mixer parts, it is necessary to drain the water from the pipe,
- all parts must be folded in the order of their dismantling, so that later after assembly there are no “extra” spare parts,
- it is necessary to tighten the details of the mixer "with a sense of proportion" so as not to break the thread,
- if we install an old bushing crane after replacing the gasket, then we clean the thread, if necessary, from deposits.
The mixer leaked. Causes.
It happens that at the most unexpected moment the mixer starts to leak. Moreover, it can flow both directly from the tap, and from the locations of the valves. If something like this happens, don't get too upset. To do this, in most cases, it is not necessary to call a plumber and buy a new faucet. Here we will talk about how to make a faucet with your own hands if it drips.
There are two main types of mixers:
With two flywheels. Here, as a rule, rubber gaskets or ceramic plates wear out.
Single lever. Here, basically, moving plastic plates become unusable.
Let's take the same look at how to fix the mixer with your own hands in each of the cases.
Repair of a single-lever mixer.
Step 1. We also turn off the water supply.
Step 2. Remove the plug.
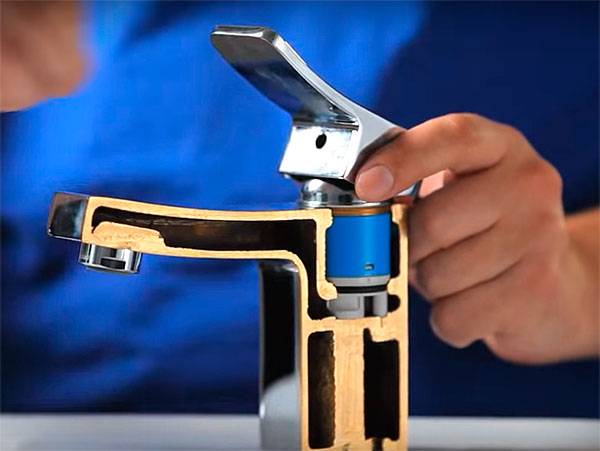
fig.6 Remove the cap
Step 3. Either with a screwdriver or a hex wrench, unscrew the fixing bolt.
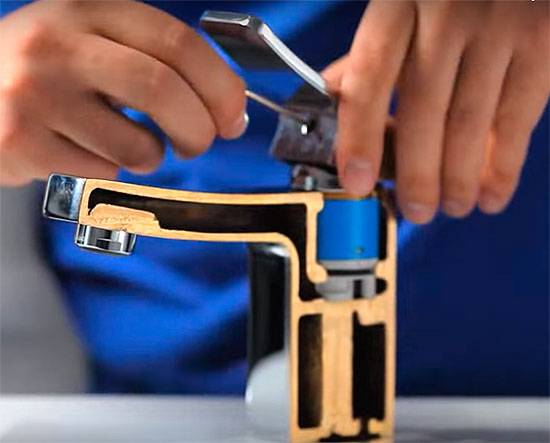
Fig. 7 Unscrew the bolt
Step 4 Gently swaying the lever, remove it from the seat.
Step 5. Hands unscrew the retaining ring.
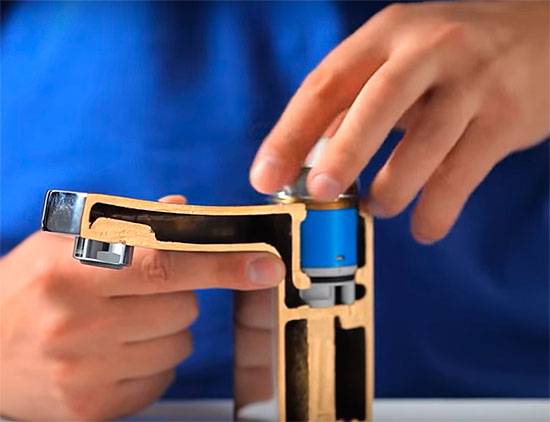
Fig. 9 Unscrew the retaining ring
Step 6. If there is a fixing nut, unscrew it.
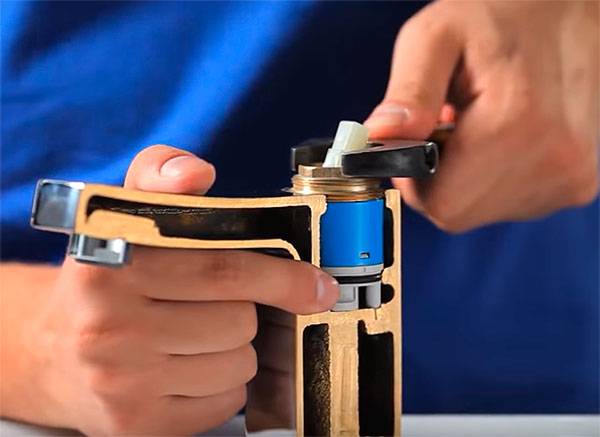
Fig. 10 Unscrew the fixing nut
Step 7. We take out the cartridge itself.
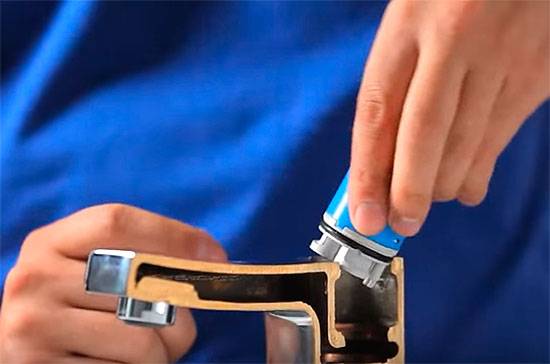
fig.11 We take out the cartridge itself Here you can also try to replace the moving plates themselves, which are located below, or change the entire mechanism.
Step 8. We go to the store along with the sample.
Step 9. Install a new or repaired mechanism.
Step 10. We screw in the fixing nut.
Step 11. We wind the retaining ring.
Step 12. We dress the lever and fix it with a bolt.
Step 13. Install the cap.
It happens that the handle began to turn tightly to the sides. In this case, put a few drops of acid-containing detergent into the slots of the cartridge, move the lever in different directions and leave it in this state for a while. After the mechanism, rinse and reinstall. Should help. The main thing is not to use products designed to eliminate rust. Like WD.
Here, in principle, is the whole step-by-step instruction. Now you know how to repair any type of faucet with your own hands without involving plumbers. And it will certainly save you money. Moreover, as you already understood, repairing the mixer is not at all difficult and does not take long.
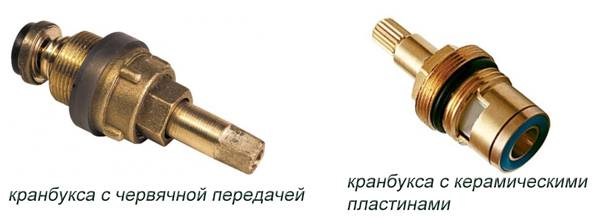
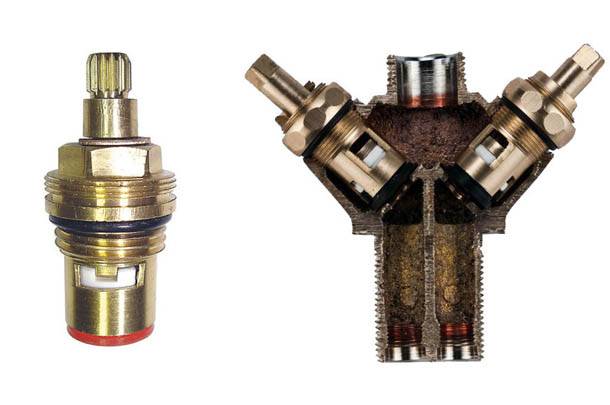
Types of crane boxes
In faucets for bathrooms and kitchens, faucet boxes of 2 types are used: with moving ceramic plates that block the flow of water, and with a rubber gasket and a stem.
To replace the crane box, you must first purchase a new one. To avoid mistakes, it is preferable to remove in advance and take with you to the plumbing department the one that needs to be replaced, since the faucet bushings in the faucets can differ in a set of characteristics, for example, the length and pitch of the thread, the seating area for the valve. Most often, managers in departments that sell plumbing are able to select the right model according to the standard.
The main differences between the bushings with rubber gasket and worm gear and the model with ceramic moving discs are as follows.
- The first category has a stem in its design, and a rubber plug that closes the valve opening by means of a worm gear. In case of corrosion, this gasket can be quite simply replaced, since it has a small price. The disadvantages include the fact that the gasket is replaced quite often;
- The faucet box with ceramic discs does not provide for the rotation of the valve to fully open the mixer. All you have to do is turn the handle. The design of a ceramic faucet box is not difficult: a ceramic disc with a hole is attached to the rod, another disc (with an identical hole) is installed permanently. A slight turn of the mixer and the coincidence of the holes removes all obstacles to the flow of water.
 how to remove the faucet
Theoretically, the ceramic discs inside the structure could be replaced when worn. But they rarely fail, and replacing the assembled product is much easier. Compared with the first option, replacing a ceramic faucet box will be somewhat more expensive, but the comfort of frequent use of the faucet pays for this price, in addition, the service life of these products is quite long. The disadvantages include the fact that this type of faucet box does not work well with hard tap water, which has a lot of solid particles that have an abrasive effect on ceramic discs, thereby increasing their wear, which leads to leaks.
Causes of failure of a ceramic crane box
- Wear of ceramic plates. Occurs rarely and requires replacement of elements. The work is laborious, so it is easier to purchase a new part.
- Foreign objects between plates. For the future, so that such defects do not appear, it is advisable to install a device for purifying water from impurities.
- The appearance of a thread between the stem and the body of the crane box. In this case, it is necessary to change the entire part.
Before repairing any complexity, it is necessary to turn off the water and prepare the tools for work. The minimum set should include a flat and Phillips screwdriver, pliers, a gas wrench and a box wrench.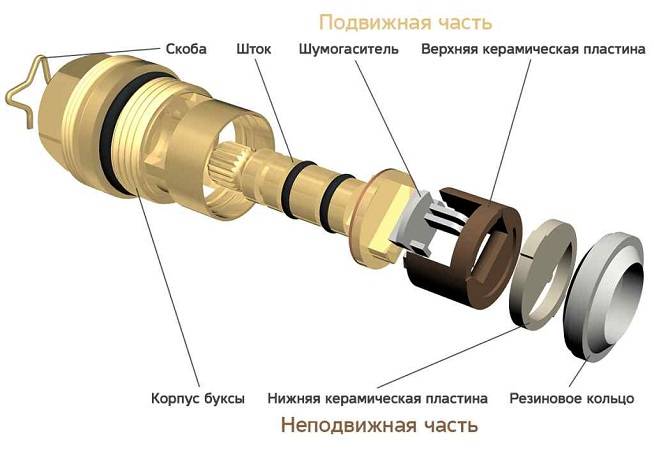
You can choose a team of builders on the website www.stroitel.od.ua
Preparation for repair
In order to correctly perform operations to restore the mixer's performance, everything must be done in stages. The repair plan is as follows:
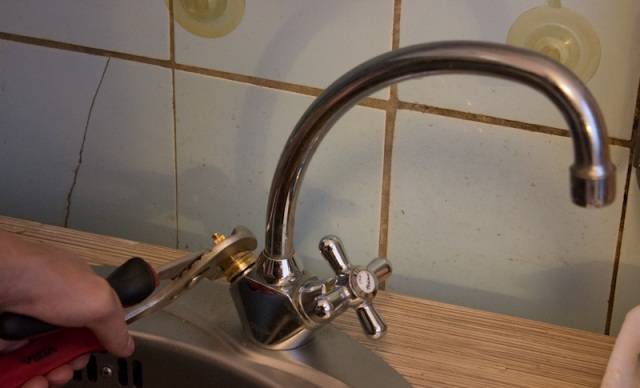
- Remove the flywheel from the crane box. To do this, remove the colored decorative cap from the valve. Next, pull the flywheel up. There should be a bolt underneath. Unscrew it, remove the valve.
- Clean threads and flywheel. Under water skip the details a couple of times, use cotton buds or other similar items.
- Unscrew the decorative insert of the tap. At this stage, use a box wrench with a head of 17.
How and how to unscrew the faucet box from the mixer? Adjustable wrench counterclockwise. The main thing is to hold the mixer. Then clean the thread with a brush.
Operating procedure:
- unscrew the crane box;
- put some silicone on the gasket;
- put the part back.
Removal of foreign particles stuck between the plates
Grains of sand contribute to the violation of the tightness of the axle box, its failure. Foreign objects cause leakage. The order of work in this case is as follows:
- unscrew the crane box and disassemble;
- clean the plates, treat them with waterproof grease;
- put the item back in place.
Important! Plates cannot be flipped
Possible malfunctions
If water flows synchronously in the two positions “shower” and “spout”, then the reason is that the spool gaskets have worn out and no longer perform their functions.
It is necessary to replace them with new ones:
- shut off the water supply;
- disconnect the hose;
- disconnect the gander;
- unscrew the adapter;
- remove the valve handle;
- remove the spool;
- remove old rubber rings;
- new rings should be wetted with plain water;
- put the rings in place;
- assemble the faucet valve.
If water leaked when using the pushbutton switch, the reason may also be the unsuitability of the rubber rings.
To replace rubber rings, you need:
- shut off the water supply;
- unscrew the spout;
- disconnect the adapter using a hex wrench;
- remove the cap;
- get screw
- remove button;
- take out the valve;
- remove the old rings from the valve
- install new rings;
- assemble the switch.
If a push-button switch is installed in the bathroom and its button does not return to its original position when the water is turned off or when the mixer mode is switched, then the breakdown is most likely due to a weak or broken spring.
The process of installing or replacing the spring:
- shut off the water;
- unscrew the spout and hose;
- disconnect the adapter from the switch using an open-end wrench;
- remove the cap of the product;
- remove the screw
- unscrew the button;
- pull out the stem along with the spring;
- replace a broken spring;
- assemble the switch.
If you hear turbulent noises when you turn on the faucet, the reason is the wear of the rubber gasket. You need to unscrew the head and cut off the frayed edge from the gasket.
If water flows continuously from the tap, then the reason may be that the brass valve has become unusable or extraneous small particles have clogged the gap between the valve and the gasket. It is necessary to replace the valve or clean the contamination inside the mixer.
If no water comes out when you open the faucet, the reason may be that the rubber gasket has dried out. First, you can try a simple way - open the faucet and hit it with a wooden object. Otherwise, it is necessary to block the access of water, remove the valve head and slightly tuck or turn the gasket itself over.
If it is not possible to open the valve through its scrolling, then the reason lies in the fact that the thread of the stem has become unusable. It is necessary to replace the stem or wind the wire if the thread is not completely worn out.
Crane box with rubber inserts
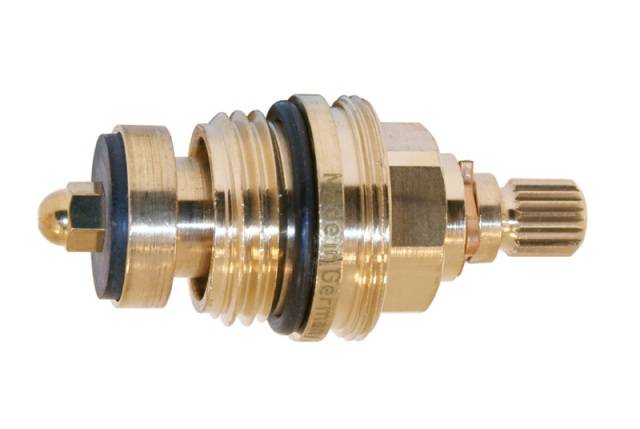
Fig.1 Crane axle box rubber
On fig. 1 we see the bushing crane assembly. This is a bushing crane for an old design mixer. At the bottom you can see the rubber insert. That is what needs to be changed. In addition to the lower insert (gasket), there is also a rubber sealing ring on the thread at the top. It should be borne in mind that if two pipes with hot and cold water are connected to the mixer, then there will be two bushings in the mixer, and it is necessary to change the one that is out of order. The figure shows a box faucet for a "square" faucet. Its stem in the upper part has the shape of a square. In case of emergency, a rubber gasket can be made by yourself from improvised materials.
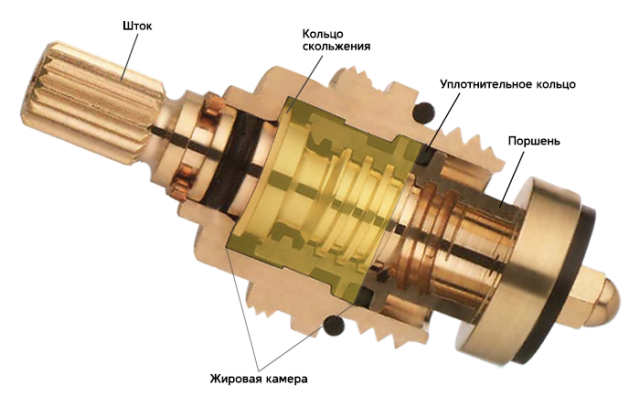
Fig. 2 Bush crane in section
Home repair faucet box in the mixer will not be a problem if you know its device. The section shows its basic design. The shutoff of water in the pipeline occurs when the "lamb" of the valve is rotated to the right or left. The rod with a rubber insert lowers and blocks the movement of water. In this figure, an imported product with a splined stem. All threads in the faucet boxes are right handed. That is, close to the right, open to the left.
Rubber inserts are cheap, but quickly fail and require frequent replacement.
Varieties
Crane box deformations occur for many reasons. This part of the mixer is used daily, therefore it is often subject to breakdowns. The design is based on a metal rod and sealed gaskets. The latter are available in rubber or with movable ceramic plates. Based on this, a ceramic faucet box and a model with rubber inserts are distinguished.
Ceramic options are reliable. Allow to open water for half a turn of a mixer flywheel. Options with rubber inserts (also called worm gears) wear out quickly. To supply water, it is necessary to make several turns of the valve.