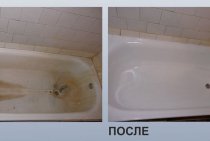
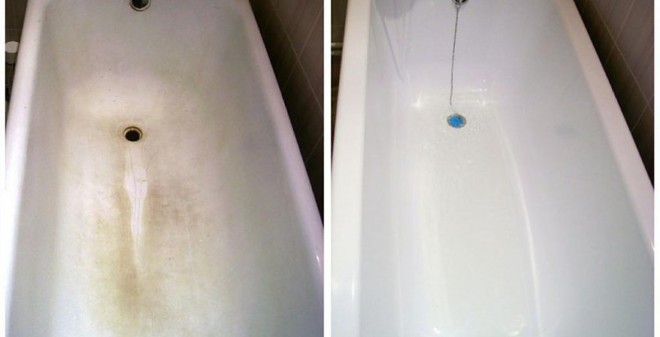
Enamel bath
The cheapest way to give an old bathtub a more beautiful look is to revet it with enamel. After restoration, such a bath in appearance will not differ in any way from new plumbing. Its surface will become just as smooth and shiny, without any flaws. The advantages of enameling a bathtub are primarily cost-effectiveness, as well as resistance to chemicals and quick restoration work.
Preparatory work
Before the procedure, it is necessary to completely remove the old layer of enamel from the bath. To do this, an abrasive powder is taken, applied to a household sponge and carefully rubbed into the surface of the bath. Then you should use sandpaper and once again clean the bath from the enamel. Some craftsmen at this stage use a drill with an abrasive wheel, this greatly speeds up the preparatory process. But at the same time, it should be borne in mind that small particles of enamel will scatter throughout the room, and you will have to wear a respirator
It is very important to remove rust from the bath and clean the chipped places well. After cleaning the bath from old enamel, a degreasing agent is applied to its surface.
It can be a specialized fat dissolver or regular baking soda. Then the bath must be thoroughly washed and filled with hot water. In this state, plumbing should be left for 10-15 minutes. After draining the water and dry the surface with a cotton cloth. Now the bath is ready for restoration work. Cleaning the bath from old enamel is also required for acrylic coating.
Enamel technology
The second stage of restoration work begins with mixing the hardener with enamel
The resulting mixture is applied with a roller in an even layer on the surface, while it is important to start from the top edge, heading down to the drain. Thus, the appearance of bubbles and irregularities is excluded.
The first layer of enamel is a preliminary primer, it must be given time to dry. When the primer is completely dry, the second layer of enamel is applied in the same way. Another advantage of enamel coating is the possibility of applying several layers. Only after a week the bath will be ready for its intended use.
Bath Care
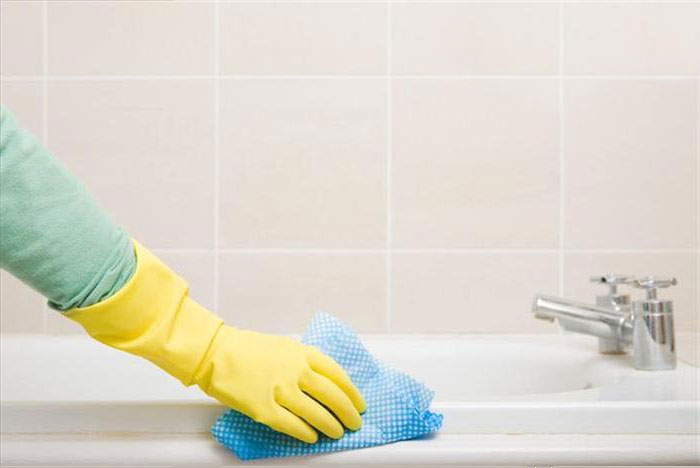
The restored enameled surface of the bathtub requires careful care, because the service life of sanitary ware depends on it. Do not allow metal objects to enter the bath, clean it with powdered and chemical detergents, soak linen with bleach. Enamel damage can also occur from various products that contain alcohol or acetone. Therefore, you should not spray hair with fixing varnish in the bathroom, and remove manicure from nails. It is better to remove dirt with a soft sponge soaked in a special gel.
What materials are used to restore enamel
To date, compositions for restoration are offered by many manufacturers. However, it is often the wealth of choice that confuses a person who does not understand this issue.
According to experts, the championship here belongs to the well-known brand "TIKKURILA". The composition of the Finnish production dries perfectly, does not form bubbles and smudges. According to experienced craftsmen, even a beginner can paint a bathtub with liquid acrylic using the Tikkurila composition. The only argument against is the high cost of the material.
Russian-made liquid acrylic "Eco Bath" is quite popular with craftsmen. It does not have a pronounced chemical smell, it has good plasticity and fluidity. Mixes without formation of bubbles, quickly hardens. A full cycle of work takes no more than two days.
Bulk or flowing glass is famous for its durability and low price. However, this is where its advantages end. Stakryl is not suitable for self-restoration of a bathtub. Due to the strong chemical smell, it is necessary to work with this material in a respirator. The composition is difficult to mix, when applied, it forms smudges and bubbles. The coating completely hardens only after 4 days.
Acrylic coating "Plastal" is a novelty on the Russian market. The material has excellent fluidity and plasticity, mixes well without forming bubbles. When applied, it lays down in an even layer, practically odorless. The only disadvantage of the finished coating, experts consider its low impact resistance. Even a bottle of bath foam can leave a dent.
Note: In the cold season, do not rush to prepare the mixture immediately after purchase. It is better to leave the components indoors for at least a day.
Runs and flows
In cases with epoxy enamel and liquid acrylic, streaks or sags may form. Therefore, it is worth monitoring these coatings, when enameling after 15 minutes, and when coated with acrylic after 5 minutes.
It is very easy to remove streaks, you need to smear them with a brush in an upward motion. The influxes are cut off after drying with a mounting or painting knife. Sometimes it is necessary to install new cuffs or gaskets in the drain trims, because the drain holes become narrower and the wall thickness increases.
In conclusion, we can say that in appearance, the acrylic liner wins the advantage. But, in terms of practicality, if it is installed in a steel bath, it will last 2 times less than the prescribed period.
Therefore, when restoring a steel bath, it is better to choose enamel or liquid acrylic. This method of updating the bath will cost you many times cheaper.
Bathtub restoration with enamel pros and cons
The coating applied to a metal or cast iron bowl at the factory wears out quickly. And after a couple of years, the bath becomes rough and loses its luster and snow-white appearance. Cast iron and metal bathtubs are often restored independently with the help of special enamel. This method of restoring plumbing also has several advantages:
- economy;
- chemical resistance;
- low level of wear;
- the possibility of applying several layers;
- fast work completion.
The disadvantages of enameling a bath include:
short service life of the bath - no more than 5 years;
the need for special precautions and protection when painting, since the enamel has a very pungent odor.
How to enamel a bathtub?
First you need to prepare a set of materials and tools:
- brushes 6 to 8 cm wide;
- roller;
- acetone;
- hardener;
- measuring glass;
- primer for metal;
- acetic or oxalic acid;
- gas mask or respirator;
- protective glasses.
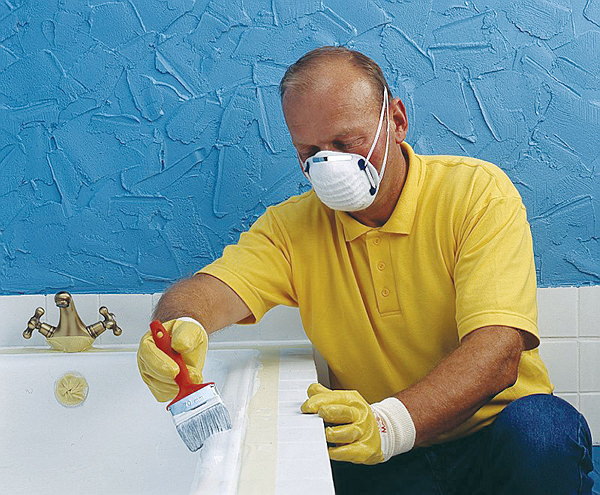
The technology of coating the inner surface of the bathtub with enamel is more complicated than the technology of applying acrylic. The difficulty lies in the fact that before applying the enamel, the surface must be as smooth as possible, so it must be thoroughly polished in advance. In addition, you should try to do the work very carefully, avoiding the formation of smudges, and quickly, until the enamel has had time to dry.
The process of restoring an old bathtub with enamel includes 4 stages:
- Thorough cleaning of the base of the bowl and applying a primer to it.
- Preparation of all components intended for applying the first layer of enamel by brush or roller.
- Complete drying of the material and subsequent application of enamel in several layers.
- The final polymerization of the enamel takes about 24 hours.
These are the methods of restoration of bathtubs that exist today, and which one to choose is up to you.
Restoration with liquid acrylic
If your bathroom does not fit into the standard dimensions, then installing an insert on it will not work.In this case, you can use the method of restoration with liquid acrylic, or as it is also called - glass. And the method itself is called - the method of the bulk bath.
Many people think that this is the same as enameling a bathtub, but this is not the case. According to the manufacturers, the material used is the same as for the manufacture of the acrylic liner, only in liquid form, and it is distributed over the bath using the “pouring” method, and not with a brush: acrylic is applied to the walls by even dripping.
Restoration with liquid acrylic - the advantages of the method
- No adhesive backing.
- High-quality liquid acrylic does not turn yellow.
- Resistance to household chemicals.
- Both cast iron and metal bathtubs can be restored.
- There is no need to dismantle the tile, even if it is adjacent to the bath.
Restoration with liquid acrylic - cons of the method
- The need to dismantle the drain devices.
- If the bath has factory irregularities, acrylic will completely repeat them.
- The time for complete drying of the layer can be significant.
The reliability of such a restoration, like any finishing work, largely depends on the quality of the materials and the technology of the work. If mistakes were made during application, this may result in the formation of bubbles with subsequent violation of the glass layer.
In addition, many experts point out the inadmissibility of overheating such a layer. When exposed to too high temperatures, the top layer can also be damaged.
It should be borne in mind that stacryl is a fairly new material, and manufacturers quite often adjust the formula for its manufacture in order to “improve quality”, however, according to experts, this sometimes backfires. Therefore, it is better to use already proven material that has positive reviews.
Proper preparation of the bath for painting with acrylic tips for the master
The main task at this stage is to ensure good adhesion (adhesion) of the paintwork and the metal base. With proper surface preparation, painting a bathtub with liquid acrylic gives excellent results. First of all, the bath must be thoroughly cleaned with any abrasive powder. Suitable for this purpose is the usual "Pemolux", trisodium phosphate or "Komet" (consumption - about 400 g per standard bath). The cleanser does not need to be rinsed off. You can clean the surface by powder.
If there are deep chips, use automotive putty or epoxy to seal them. The drying time of the composition is indicated in the instructions.
Before proceeding with the coating, it is necessary to dismantle the drains, since it is under it that the greatest amount of dirt accumulates. Besides, in the future, they still have to be changed.
Effective Preparing a bathtub for acrylic painting implies that the surface for applying enamel should be rough, with noticeable irregularities. To make it like this you need a special tool. It is best to use a drill with a nozzle made of waterproof sandpaper number 24 for this purpose. You can also use a grinder, but it produces too much dust, which is then difficult to remove. The risk of injury with this method increases markedly. In addition, there were cases when the masters thus damaged the body of the bath.
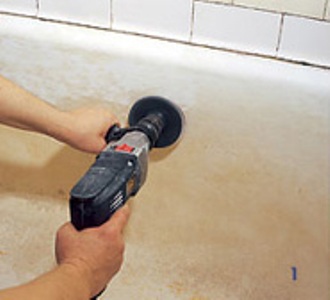
To remove the smallest particles of enamel formed during stripping, an ordinary household vacuum cleaner without attachments will help.
Note to the master: you can determine the degree of readiness of the surface simply by running your fingernail over it. Well-prepared enamel leaves a scratchy feeling. If the nail glides well, it is better to work with sandpaper.
After the surface of the bath is treated with an abrasive material, it must be degreased again. Here you can already use liquid detergents: "Sanita", "Toilet Duck" or their analogues.
Rinse off the detergent with hot water.Please note that alkaline solutions containing surfactants take longer to rinse off than scouring powders.
Before applying enamel, the surface must be thoroughly dried. Use a conventional or building hair dryer for this, a “breeze” type heater will do just fine.
In the instructions for enamels, it is recommended to degrease the surface with solvents. It is best to use acetone for this purpose. Do not use white spirit for degreasing, it has an oily texture. Apply the liquid with a piece of cotton (or any other lint-free) cloth.
Please note that careful preparation of the bath for painting with acrylic guarantees a long service life of the finished enamel. For more information on preparing the surface of the bath, see the video:
What is acrylic
Of course, you can replace the font with a new one, but this procedure is similar in complexity and cost to a full-fledged repair. To prevent it, there is one way - the restoration of the bath with liquid acrylic. Reviews of the event indicate the need to follow the instructions.
«>
Acrylic is a group of polymeric materials with methacrylic and acrylic acids with polymer additives. The material has existed for over 70 years under the name polymethyl methacrylate. It was created to replace glass. With the inclusion of additives, it is used to create sanitary fixtures. The material is lightweight and durable.
According to reviews, the restoration of the bathtub with liquid acrylic is carried out in various ways that will restore the worn surface of the product. Although different paints are used for coloring, acrylic still has the best effect. If you properly prepare the working area, acrylic will have high adhesion to the metal surface and create a protective layer 2-8 mm thick.
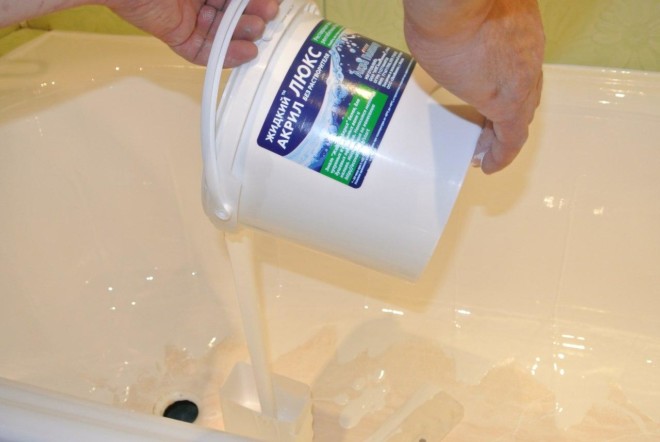
Painting the bathtub with acrylic, prepare and apply the mixture

After the surface is completely cleaned and degreased, cover the sides of the tub and the floor with paper or film to avoid getting the composition on them. After the preliminary preparation is completely over, you can start preparing the mixture.
Liquid acrylic is a two-phase material. The polymer base has a thick consistency, while the hardener is rather liquid.
Therefore, when mixing, pay special attention to the mass located on the bottom and along the walls. You need to knead the composition especially carefully, it is advisable to do it manually using a regular stick
A construction mixer can speed up the process, but it will be difficult to achieve the necessary uniformity.
Tip: Manufacturers usually indicate the enamel hardening time in the instructions, however, in practice, this interval turns out to be slightly less. Therefore, it is better for a beginner to play it safe, leaving 15 - 20 minutes in reserve.
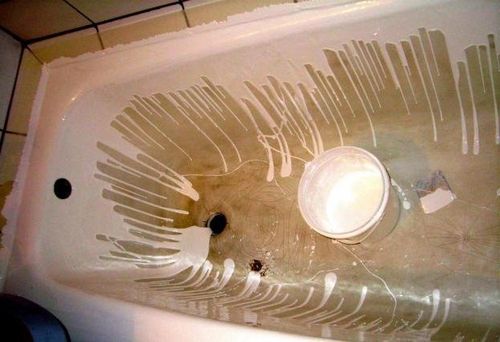
Pour the finished mixture into a plastic container for ease of application. For this purpose, a bottle of hardener, cut off from above, is quite suitable. In the language of professionals, painting a bathtub with acrylic is called a “bulk bath”. This term perfectly reflects the essence of the technological process. The composition is applied by pouring, starting from the edge of the bath. For a beginner, this stage presents a certain difficulty, since it is necessary to ensure uniform application around the entire perimeter.
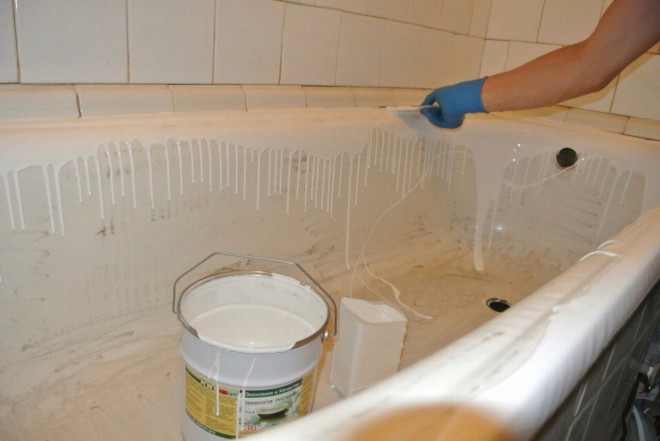
Acrylic is applied in a circle, row by row. After the sides of the bathtub are completely covered, continue to apply the composition along the upper edge of the container, gradually lowering down. The liquid mass will flow freely to the bottom of the bath. To avoid smudges and bumps, distribute the composition evenly with a wide spatula. As a result, the entire container should be covered with a layer of enamel of about 6 millimeters.
Note to the master: The drying time for each brand of enamel is determined individually and often depends on the temperature in the room. So at 17 * C, the paint can dry up to 4 days, while at 25 * C, the process will take only 48 hours.
While the enamel dries, give your bath complete rest. If there are dogs and cats in the house, block their access to the bathroom. Otherwise, pet hair may end up on a damp, sticky surface and it will be impossible to remove it from there.
In conclusion, I would like to note that painting a bathtub with acrylic is a delicate process that requires some skill. Therefore, before proceeding with the restoration yourself, think carefully. Perhaps going to a professional would be a smarter choice.
Composition and technical characteristics of enamel and acrylic
Before considering how to cover the bath with acrylic or enamel, and which is the best of these two components, it is necessary to disassemble the main components of the substances, and in addition, the characteristics of the compositions:
- It should be understood that acrylic enamel is on sale, which includes acrylic directly.
- Separately, in each composition there are auxiliary components in the form of hardeners and synthetic additives.
- Often, special components are used in the composition of substances, which impart viscosity to the composition and subsequent hardening.
If restoration or painting of the bath is required during restoration, then it is better to use enamel than another two-component composition for the bath. All this is due to the fact that, unlike acrylic, enamel is much cheaper, even though it contains acrylic components. In addition, the method of restoring bathtubs with acrylic involves the use of a special liner, the choice of which is significantly complicated by finding the appropriate size, and also a suitable shape.
Comparing these methods of bath restoration, it is important to take into account that acrylic, unlike enamel, dries much faster. Additionally, when selecting material for reconstruction, it is necessary to rely on the fact that the compositions differ significantly in consumption per square meter of bathing tank area

Consumption per 1m2
When choosing enamel or acrylic for a bath, and distinguishing which is better, it is important to take into account the material consumption per square meter. Consider the main points associated with the use of a certain amount of material:
- on average, when using a sprayer, about 150-250 grams of enamel is spent to cover a square meter;
- if enameling is carried out with a brush, then the consumption of the component can increase to 300-500 grams per square meter;
- if acrylic is used, then the average consumption is 400-600 grams per square meter of space;
- when using a ready-made acrylic liner, these parameters are not taken into account, since a one-piece liner is used here.
Given all these points, you can choose for yourself the best reconstruction option for a metal or cast-iron bath, depending on which design option is used.
This is interesting: Technologies for galvanizing metals at home
Acrylic restoration
The possibility of updating the bath with liquid acrylic appeared relatively recently, after high-quality, easy-to-use compositions entered the market. According to their characteristics, they are much better than older type composites.
Advantages
Polymer restoration with suspensions of acrylic polymers has tangible advantages compared to enamelling:
- funds have good fluidity;
- the composition is firmly fixed due to high adhesion;
- the surface has a uniform brilliant white color;
- even very neglected plumbing is subject to restoration;
- the bath does not slip after treatment;
- the sound of falling water is not felt;
- hot water keeps the temperature for a long time.
After finishing work and completely drying the coating, bathing in the bath will bring aesthetic pleasure. How best to give the interior of the room a decent look - it's hard to imagine.If you properly and regularly care for the equipment, and it is not difficult to do this, positive impressions will last for many years.
Flaws
The group of liquid acrylic polymers is diverse, contains agents that differ in some components, respectively, in consumer qualities. The range of products is constantly expanding thanks to new developments, while enamelling is carried out with well-known polymer composites.
Before starting self-restoration with liquid acrylic, you should understand the essence of the manufacturer's recommendations as best as possible, consult with professionals. It may even be worthwhile to invite them to inspect the bath, ask for advice on how to cover and which liquid polymer is better to buy.
It is necessary to carry out work with concentration, if the layer of liquid acrylic is applied poorly, it will be very difficult to eliminate flaws, it is practically impossible to do this.
Many types of polymer paint, unlike enamel, dry out for several days, so it is recommended to postpone using the bathroom for four days. Premature ingress of water will lead to the appearance of stripes, stains on the surface, spoil the external impression.
Do-it-yourself acrylic enameling

Acrylic should be applied to the surface of the bath evenly, avoiding long stops.
Usually in stores, liquid acrylic for baths is sold in plastic buckets, it is packaged in 3.5 kg plus a hardener in a 0.5 liter container. This volume is enough to create an acrylic coating in a 1.7 m long bath. It is better to choose long-drying acrylic, so the new coating will last much longer and be stronger.
For work, prepare a small container of 1-1.5 liters, from which the bath will be poured onto the surface; spatula and rubber gloves so as not to get your hands dirty; wooden stick for mixing the two-component composition.
Never use an electric drill with an attachment designed for cement mortars. The hardener is liquid, and the polymer base is thick, so it can remain on the bottom and walls. Qualitative preparation of the acrylic composition will allow only thorough manual mixing.
Don't forget to seal the tile around the edge of the tub with masking tape, and place a container under the drain hole to drain excess acrylic.
Staged coating
It will take from 1 to 4 days for the acrylic coating to dry completely.
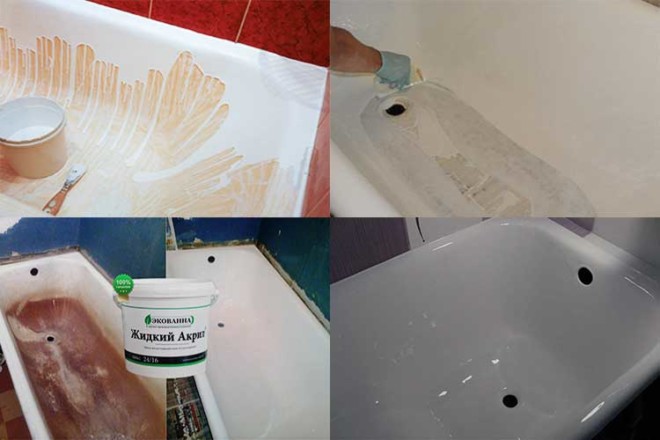
- You need to prepare liquid acrylic with your own hands, for this, add a hardener to a container with a polymer base and mix everything thoroughly. Mix the composition thoroughly for at least 10-12 minutes. Otherwise, unhardened areas of acrylic will appear on the surface.
- Pour the finished mixture into a free container with a spout. You can use a plastic bottle with a cut off neck.
- Start pouring at the corner of the tub where it meets the wall.
- Pour a layer of 4-5 cm, which should flow freely along the walls of the bath to the middle.
- Move around the perimeter of the tub, applying the mixture evenly and allowing it to drain. Avoid over pouring.
- Close the circle around the perimeter of the bath and do not top up on the already poured surface so that streaks do not form.
- The next circle should start already from the middle of the sides of the bath.
- At the end of work, a thick layer forms at the bottom, which must be leveled with a spatula towards the drain hole. Excess mixture will flow out of the tub.
Do not touch the walls of the bathtub with a spatula, as the integrity of the acrylic coating can be violated. The influxes will then disperse on their own.
All work must be done within 3-4 hours without long stops. For professionals, it takes about 2 hours to restore a bath in this way; without experience, the work takes longer.
After finishing all work, close the bathroom to prevent air fluctuations and to prevent insects and dust from entering the drying surface.
The bath should dry for at least one day (when using a long-drying composition, it will take about 4 days) at a temperature of + 17-25 degrees. When the bath is completely dry, screw the drain siphon and overflow into place, remove masking tape from the perimeter of the tile.
https://youtube.com/watch?v=Z9koxOWbZ7A
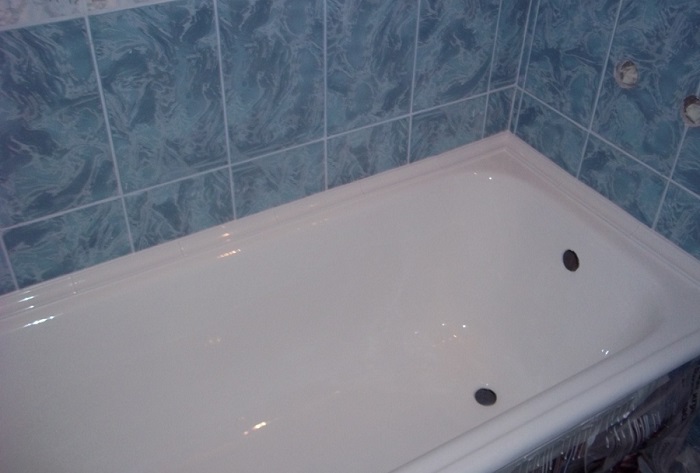
Enameling with liquid acrylic can quickly and easily turn an old bathtub into a shiny and neat one. In addition, the new coating is resistant to microorganisms and mechanical stress, has a low thermal conductivity, which allows you to keep warm water in the bath longer.
And most importantly, the restoration of the bath takes place quickly, without lengthy surface preparation, excluding completely dismantling work. In addition, the acrylic layer will have good adhesion to the old coating.
Moreover, it will exactly repeat the outlines of the bath, delighting with flawless white color.
Advantages of the method
For some 10-15 years, the restoration of old cast iron bathtubs was carried out exclusively with the help of polyester enamel, which gave a short-lived, long-drying and brittle coating. Now, to update the enamel layer, liquid acrylic is used, a composition that is unique in its properties.
It is a thick, but fluid and elastic compound, consisting of 2 components: a base and a hardener. Liquid acrylic is applied to the surface of the bath by pouring or using a roller, and it dries for 2-5 days. Restoration of the washing container by this method has the following advantages:
- Smoothness and appearance of the coating. Acrylic is smoother, shinier, more even and whiter than factory enamel. There are practically no pores on it, so it has the effect of "self-cleaning", that is, it repels pollution, remaining clean for a long time.
- Durability. The service life of the acrylic coating is, subject to the recommendations for the care and operation of the product, 10-15 years, which is 2 times longer than that of epoxy enamel.
- Wear resistance. If the restoration of enamel is carried out by pouring, the acrylic layer has a thickness of more than 6 mm, so the coating lasts a long time.
- Safety. Liquid acrylic does not have a pungent odor, does not emit toxic fumes, so you can work with it even if there are children in the room.
- Fast drying. Unlike epoxy enamel, acrylic coating dries in just 3-5 days.
- Variety of colors. If you introduce tinting paste into the acrylic compound, you can get a mixture of any shade suitable for the interior of the room.
Acrylic insert
You can become the owner of a beautiful and hygienic bath in a more accessible and simple way. Acrylic insert makes it possible to quickly and efficiently complete repairs in the bathroom. Installation of a durable acrylic coating does not take much time, and the bath can be used in a few hours
When choosing an insert, it is important to consider the quality of the material, its size, as well as the method of installation. Acrylic insert is only suitable for standard sanitary ware
Sizing
Before buying an acrylic insert, you will need to take measurements from the bath, even if it has a typical size.
- The main length of the bath is determined from the outer sides.
- The length of the bowl is an internal measurement without sides.
- Width in the area of the drain without sides.
- Back width also without sides.
- The depth of the bowl is measured directly at the drain point.
Based on these measurements, a sales assistant in a specialized store will be able to select a suitable insert copy.
Installation work
The installation of an acrylic liner in the bath can be started without special preparation of the old coating. But it is better to process the surface with sandpaper to give it a roughness - this will help improve the adhesion of the clamps.Then it is necessary to correctly mark and cut the liner, insert it into the bath and circle the places of the drain holes and the line of the sides with a marker. Using a jigsaw, the acrylic tab is cut according to the prepared marks. A non-expanding mounting foam is distributed on the old surface, it is applied in vertical and horizontal stripes at a distance of 10-12 cm. The surface of the bath should look like a kind of foam mesh. Also, stripes are applied to the sides of the bath. Around the drain holes, sealant or silicone is processed. Now you can install the acrylic liner and return the siphons to their place. Immediately after installation, it is necessary to fill the bathtub with water and leave it in this form for several hours.
Advantages and disadvantages
Acrylic liners have a structure that provides them with strength and reliability. High-quality materials in their production, and proper installation make it possible to speak with confidence about the advantages of this type of bath restoration. A refurbished bathtub with an acrylic insert increases heat capacity and aesthetic appeal. Such a coating is resistant to chemicals, and ease of installation requires only basic skills in the construction business. Some consumers are afraid to purchase an acrylic liner due to the reduction in bowl volume. But this decrease is so insignificant that it cannot bring discomfort during the bath. The disadvantages of the acrylic liner include the need for dismantling. If the liner is installed without repairing the bathroom, in some cases it is necessary to remove the wall tiles at the junction of plumbing. Failure to follow the basic rules of installation can lead to water leakage between the old and new coating. Such a bath will very soon become unusable and either its complete replacement or the installation of a new liner will be required. The top layer of acrylic in the liner, despite its excellent strength, can be damaged if basic operating rules are not followed.
Having studied all the possible ways to restore the bath, you can choose the option you like, based on personal preferences. The most inexpensive way to improve the appearance of plumbing is enameling. But he also has a lot of shortcomings. Most often, this material is used in the repair for the further sale of the apartment. Covering the surface of an old bathtub with acrylic is perhaps the most reliable and durable method. Even the high price and the likelihood of prolonged drying does not deter buyers. The main thing is to correctly fill the acrylic, using the instructions. Acrylic insert in the bathtub is a cross between these two methods. When choosing this option, you should really evaluate your construction capabilities, and if you don’t have the necessary skills, it’s better to spend some money and use the services of professionals. By the way, this also applies to the first two methods of restoration. Independent work reduces repair costs, but specialized firms will do it professionally and efficiently.
Other recovery methods
A popular method of restoration is the fastening of acrylic liners. This is a way of working that is not suitable for independent use. The procedure is performed like this:
- Cup measurements are taken.
- An acrylic liner is created according to measurements on special equipment.
- The product is delivered to your home.
- The master installs the liner in the bath bowl and seals it with a special compound.
- At the end, plumbing fixtures are connected according to new sizes.
The durability of the liners is 20 years. But the duration of use of sealants and adhesives that are used in the installation of the product is several times less.As a result, moisture gets between the bathtub and the liner, an unpleasant smell of rot appears.
«>
Prices for liners vary depending on the manufacturer - 4-5 thousand rubles. But it also happens that the price does not include the invitation of a measurer and other work, which is why the final price increases. As a result, it is equal to a complete replacement of the bathroom with a new one, since the dismantling of the tiled walls is necessary.
Thus, with the help of bathroom restoration, it will be possible to improve living conditions in a short time without performing major repairs. Since this work is simple, you can do it yourself. You just need to do it carefully.
acrylic coating
Restoration of a bathtub with acrylic is an order of magnitude more expensive than the above method. But still, this is a more reliable and durable way to improve the appearance of plumbing, as well as give it new properties. The advantages of acrylic coating can be safely attributed not only to excellent strength and smoothness. The updated bath will have a low thermal conductivity, allowing you to maintain the required water temperature. A smooth surface eliminates excessive sticking of dirt, such a bath, even after 10 years, will not acquire a yellowish tint. And the ability to choose the desired color of acrylic, ideally combined with the interior of the bathroom, will be another significant plus.
Surface preparation
Restoring a bathtub with liquid acrylic also requires cleaning the surface of the old layer of enamel. The technology is the same, but after degreasing and rinsing with warm water, it is necessary to treat large damage with a quick-drying putty. Also, before the procedure for pouring acrylic, you should remove the siphon to drain the water, and substitute a small container under the hole formed. Minor scratches can not be covered with putty, acrylic fills them in the process of pouring, creating excellent adhesion with the old coating.
Acrylic pouring method
Liquid acrylic can be used to restore both cast iron and steel bathtubs, the process technology is the same. After preparing the bath, heat the entire surface of the bath with hot water. Thus, ideal conditions are created for the effective adhesion of acrylic paint to the cleaned surface. Then prepare a solution of two components, strictly following the manufacturer's instructions. The mixture must be mixed until a homogeneous consistency. For convenience, it is recommended to pour part of the mixture into a smaller container, and process the bath from it. Acrylic pouring should be started from the sides, passing continuously the entire perimeter of the bath. A thin stream should create an approximately 4-5 mm layer of acrylic, gradually flowing down to the middle of the walls of the bath. The next step is to pour acrylic from the middle of the walls, the jet flows down to the very bottom
It is very important at this stage not to try to correct the resulting irregularities, as well as pour more acrylic on top. This material itself is able to properly spread over the surface.
The bottom of the bath, filled with acrylic, should be leveled with a soft spatula, while removing excess liquid through the drain hole.
Cons of acrylic coating
- Acrylic will not fix factory defects in an old bathtub;
- You can use the bath for its intended purpose only after the coating has completely dried (after about 1 week).
Coating service life
Acrylic coating has good strength and stability, it rarely cracks and scratches. But still, as with any plumbing, careful care is necessary. First of all, strikes on the acrylic surface of heavy objects should be excluded, otherwise serious damage will appear that is unlikely to be repaired. After taking a bath, it is recommended to immediately remove dirt from the surface, as well as wipe it dry. Severe pollution requires the use of abrasive products, and they are contraindicated for acrylic baths.For cleaning, it is better to use a regular gel-like dish detergent. Also, soaking laundry with bleaches or dyes is best done in a basin, and not in a bath.