Stage 1 we prepare fixtures for the sink
If a simple model is chosen without additional accessories, and a washing machine or other device is not installed below, then the optimal height of the sink is 850 mm. It will be convenient to use the plumbing fixture, and you can do the installation of the siphon and the connection of the sink to the sewer with your own hands, because. there will be enough space, and access to all elements of the system will remain free.
For a model with a support, the height is determined depending on the height of the leg or furniture in which it will be mounted. When it is decided where the sink will be installed, a straight horizontal line is drawn on the wall. The device is applied to the line, the attachment points are marked. It is difficult to do this alone, so you need an assistant to hold the washbasin. If plumbing is installed on a leg or piece of furniture, the task is simplified.
According to the finished markings, holes are made in the walls, dowels are hammered in and studs are installed for fasteners. The screw-in depth of the studs must be such that the device is securely fixed, but at the same time freely placed on the mounts. As a rule, all the necessary parts are included in the sink kit. When installing them, you need to use everything so that there are no extra parts left.
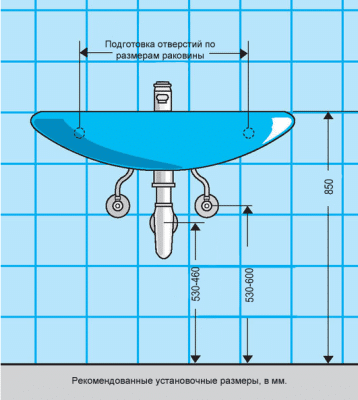
Scheme: installation height of the washbasin in the bathroom
Sink height above washing machine
If you plan to put a washing machine under the sink, then a water lily type model is best. Its drain is equipped so that there is enough space under the sink. There are two types of drain: the first is directed backwards, and the second is directed downwards.
The designs of the first type leave more space for the machine, however, due to bends, frequent blockages are possible. The downward drain is designed to allow water to flow through the pipes, but the sink will have to be placed higher above the washer. The height of the plumbing fixture is calculated individually.
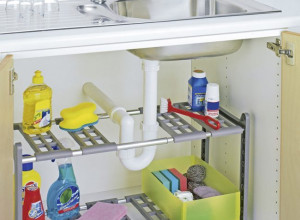
To make it more convenient to use the sink, it can be pushed a little forward from the wall. Then, when washing, a person will not rest his feet on the machine. Such a simple technique will allow you to maximize the usable area without compromising the comfort of operation.
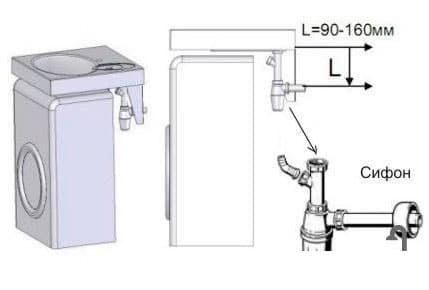
Scheme: installing a washbasin above a washing machine
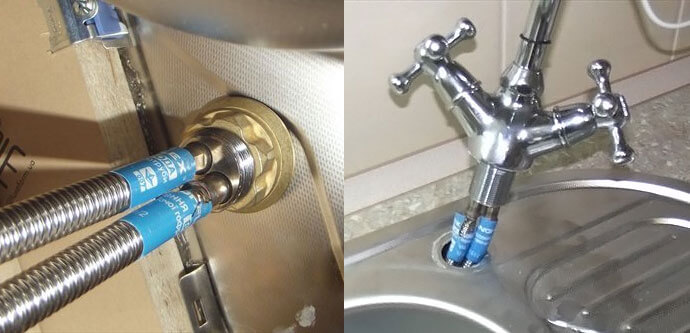
Water connection

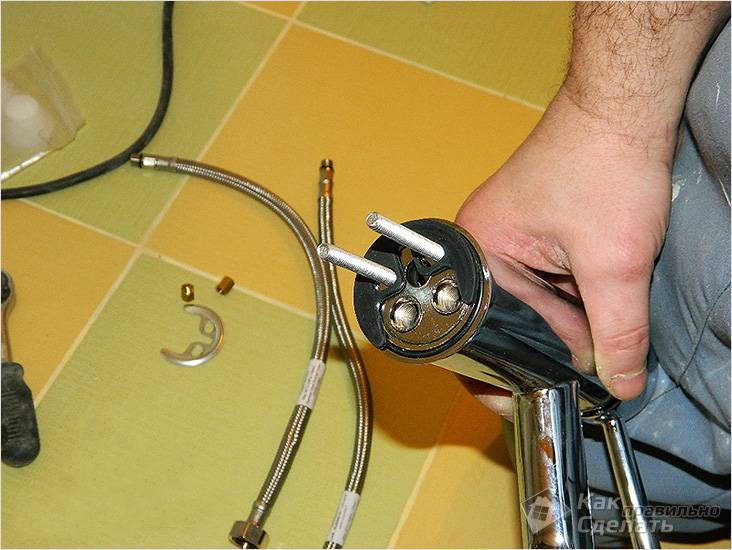
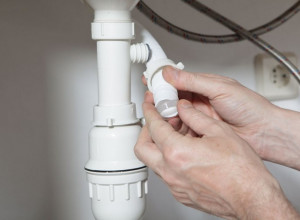
The first step is to install the mixer. It is more convenient to install it when the sink is not yet fixed to the wall. This is because all fasteners are located under the sink.
Step-by-step instructions for connecting the mixer:
- Take the stud from the faucet kit and screw it in.
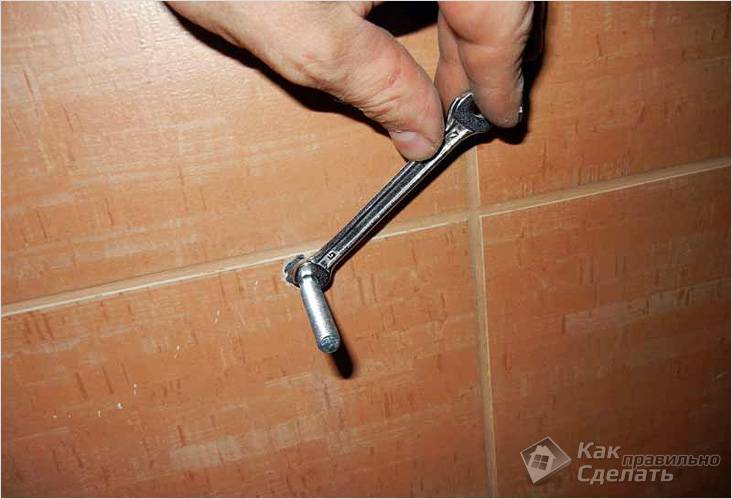
- Then connect the hose for cold / hot water. Tighten them with a wrench. Tighten carefully, as there is a risk of stripping a shallow thread.
- Next, install the faucet in the hole on the washbasin.
- On the reverse side of the mixer, put sealing gaskets and a pressure washer on the mounting studs. Now hand tighten the nut.
- At the end, it remains to tighten the nut with a wrench.
Now it's time to fix the sink to the wall. You put the sink on the mounting studs. After you put in the plastic tabs and tighten the nuts with a wrench. If the sink in the bathroom has a leg, then at the same time carry out its installation. If the sink is in the kitchen, then here it is either superimposed on the nightstand or crashes into the countertop.
After this procedure, it remains to connect the hoses to the central water supply. Make sure there are rubber seals inside the nut.
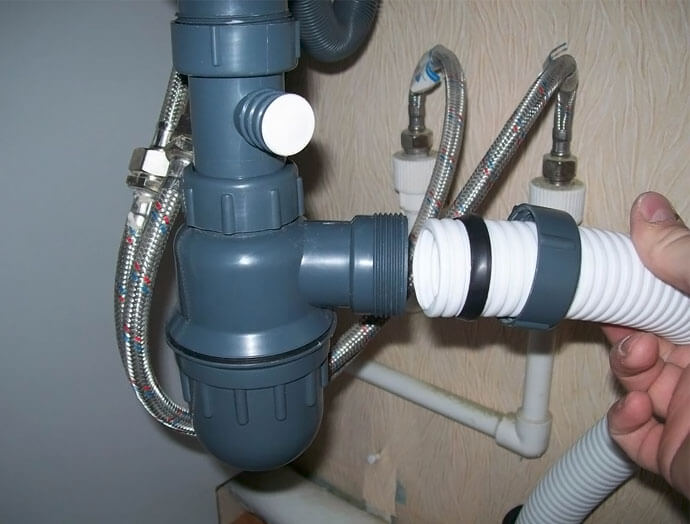
To organize the drain of the sink, it is necessary to connect it to the sewer. The connection to the sewer begins with the assembly of the siphon. A siphon, or rather a water seal, will serve as a barrier to unpleasant odors. If you are installing a sink in the kitchen, then use an S-shaped siphon.If in the bathroom, then a bottle will do. Although bottled has a number of disadvantages, for example, it clogs faster.
Connecting the sink to the sewer takes place in the following sequence.
- Insert the outlet of the siphon into the sink and fix it.
- Screw a drain pipe to the siphon under the washbasin.
- This pipe is directed to the sewer descent. Some siphons in their configuration have nozzles of a smaller diameter. Therefore, it will be necessary to use a rubber transition from a larger to a smaller diameter.
- Upon completion, it remains to check the entire system for leaks.
This is how the sink is connected. Everything is very simple. If there is ingenuity, then all the work will be done in a short period of time. Also, in addition, you can watch a useful video that will tell you about the sequence of the process of connecting the sink. If you have your own experience in this work, then write to us about it in your comments to this article.
Installation and installation of the sink
Connecting and connecting the sink in the kitchen is easier in terms of strength due to the fact that it is equipped with a reliable support as a countertop. An exception may be sinks with sinks placed under the countertop, but they are very rare in everyday life and for their installation it is necessary to seek help from professionals.
However, in terms of manufacturability, kitchen sinks are more difficult, because you have to work inside the furniture in a bent position. Naturally, the masters who perform such work take a lot of money for it. Thus, if you have some experience in this matter, it is rational to connect the sink in the kitchen with your own hands.
Implementation of sealing
Absolutely all current plumbing is completed with standard gaskets. Working with them requires mandatory compliance with the following rules:
- Sealing work should only be carried out on dry fittings. You can dry it with a household hair dryer if necessary.
- You should not take the mating planes with your hands, and those that you touched should be degreased by washing them with dishwashing detergent.
- Plastic fittings of standard fittings are provided with a margin, they should be cut to size.
- Paronite gaskets are located in the middle of plastic parts and a supply metal pipe.
- Rubber gaskets should be lubricated with a sealant before installation.
Tips for cutting sinks into countertops:
Before drawing a template cut out of the package, you should carefully examine and measure the countertop from the inside. It is undesirable to cut the transverse support bars and the frame.
Before cutting (using a jigsaw), it is worth pasting over the outlined opening along the edges from the outside with masking tape
The shoe of the jigsaw can scratch or stain the decorative coating, so excessive caution does not hurt.
Perform a cut, not very leaning on a construction tool. Strong pressure may cause deformation of the surface structure.
Use silicone to seal
At the same time, sealing is performed not only on the cut, but also on the countertops by 3-5 mm along the edges, so that dirt does not form there from flowing under the rim of the sink.
Silicone streaks that have come out during the process should be immediately removed with a cloth dipped in table vinegar.
Connecting a mortise-type sink can also be made under the countertop. This sink is held on special overhead brackets and silicone. The basis of the countertop is natural stone or a modified type of durable and valuable wood: ebony, teak, red querbajo.
https://youtube.com/watch?v=r-k7MDckjU0
It should be understood that the sink under the countertop is a device that is typical for an elite kitchen. Such designs are made in two- or three-cup type.To connect them, a high level of skill is required and they do not have any significant advantages over other types of washbasins.
Training
First you need to install the sink in its place and connect it to the water supply. The sink is connected to the sewer only after that.
You should start with measurements and calculations. It is necessary to measure the distance from the sink drain to the sewer riser (vertically and horizontally). Then you need to decide on the type and material of the siphon and pipes.
The choice of siphon is important for one reason: it determines the further ease or complexity of operation and cleaning. Pipe siphons are made in the shape of the letters U or S and serve as excellent water seals. Bottle siphons accumulate a lot of viscous effluent and solid particles. This is especially true for kitchen systems. But cleaning out such a siphon is quite easy.
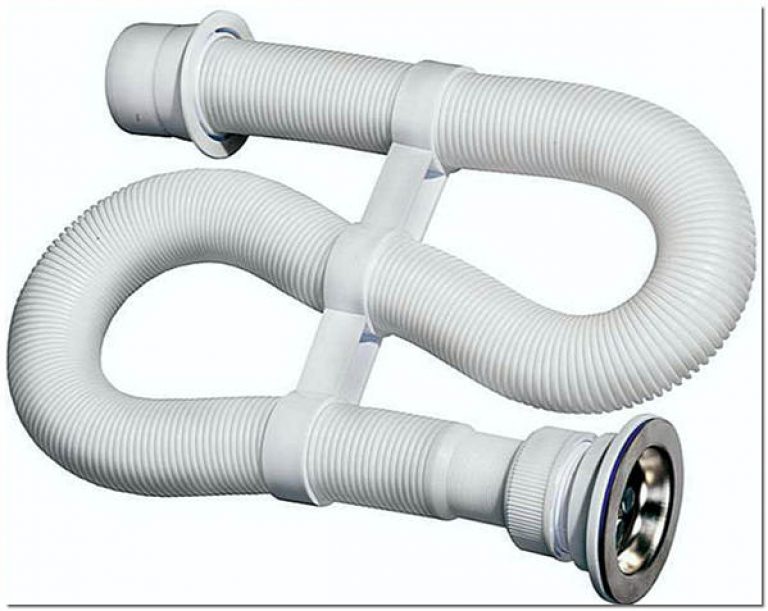
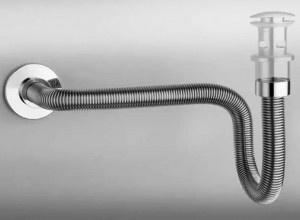
From the siphon to the sewer, sewage flows through pipes. There are two options to choose from here. Plastic corrugated sewer pipe is more versatile, it can be stretched to the desired size and bent in different ways. Such a pipe is ideal if you have to connect the sink to the sewer according to some complex or non-standard scheme.
Smooth PVC sewer pipes for outdoor sewage will have to be carefully and accurately measured, they will require various fittings (connectors and adapters). You will have to think carefully about the route from the drain hole of the sink to the outlet of the sewer. But there will be much less problems with waste masses.
Important! The "accordion" of a corrugated pipe clogs much faster than it happens with smooth pipes. If the drain elements are hidden, then special beauty is not required.
In this case, they usually stop at plastic structures. With open systems, owners often want more aesthetics. For such cases, metal pipes with various coatings are produced. And even here there are design solutions, sometimes very expensive.
If the drain elements are hidden, then special beauty is not required. In this case, they usually stop at plastic structures. With open systems, owners often want more aesthetics. For such cases, metal pipes with various coatings are produced. And even here there are design solutions, sometimes very expensive.
How to connect a bath to a sewer
After the bathtub is purchased and delivered to the bathroom room intended for it, it must be properly installed, taking into account the configuration of the room, the existing pipes, utilities and the design decisions of the owners.
Scheme of connecting the toilet to the sewer.
Having decided on its general location, which will subsequently determine the connection of water and sewer pipes, it is necessary to adjust its stability, height and slope.
Bathtubs can be installed on legs, stands or other supports. At the same time, they must withstand a mechanical load of at least 100 kg applied to the long side of the bath in any place vertically downwards, and be stable.
In addition, the height of the tub must be at least 145 mm from the floor to the outlet of the bowl. This is done in order to be able to create the necessary height difference in the area between the drain hole and the connection point to the sewer. If there is no elevation difference or it is insufficient, the water from the bowl will come out badly and possibly stagnate. In addition, the resulting space between the floor and the bottom of the bowl will allow you to organize relatively free access to the drain for a possible revision or replacement of the siphon.
After installing the bathtub on the above supports or stands, check measurements of the heights obtained are made: a) from the clean floor to the outlet, b) from the clean floor to the top of the side of the bowl at four points at its corners.The latest data should not differ from each other by more than 4 mm.
Next, the slope of the bottom of the bath is set towards the outlet, through which the bath is connected to the sewer. This slope is set at the rate of 2 cm per 1 m of bath length.
After the work on its installation and adjustment is completed and the bowl is finally fixed vertically and horizontally, you can begin connecting its drain to the sewer.
Mounting location setting
After determining the location of the sink, it is necessary to determine the height of its installation. It depends on its type.
The sink located in the bathroom can be installed on a pedestal or without additional details. If no additional parts are attached to the sink, the average height of its location should be 85–90 cm; if the sink to be installed has a supporting horn or other parts for support, its installation height must correspond to the height of the supporting parts.
The installation height of the sink, mounted in the kitchen, must be the same as the height of the kitchen cabinet in which the installation will be made. To fix the selected height level on the wall surface, it is necessary to draw a horizontal line.
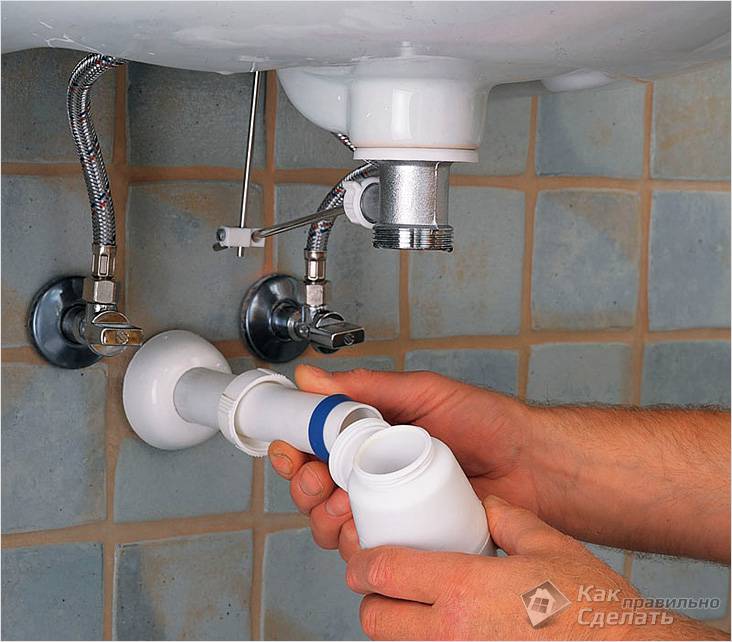
Stage 4 connection of the sink to the sewer
How to connect the washbasin to the sewer? This stage is final. A siphon is connected to the plumbing fixture, to which a pipe is attached - corrugated or rigid with a bend. Then the pipe is connected to the sewer. If its diameter does not match the sewer outlet, use a special rubber adapter.
When the work is over, it remains only to check the tightness of the connections. To do this, open the taps and run through the pipes with a dry hand or a white napkin. If everything is normal and there are no leaks, the plumbing is ready for operation.

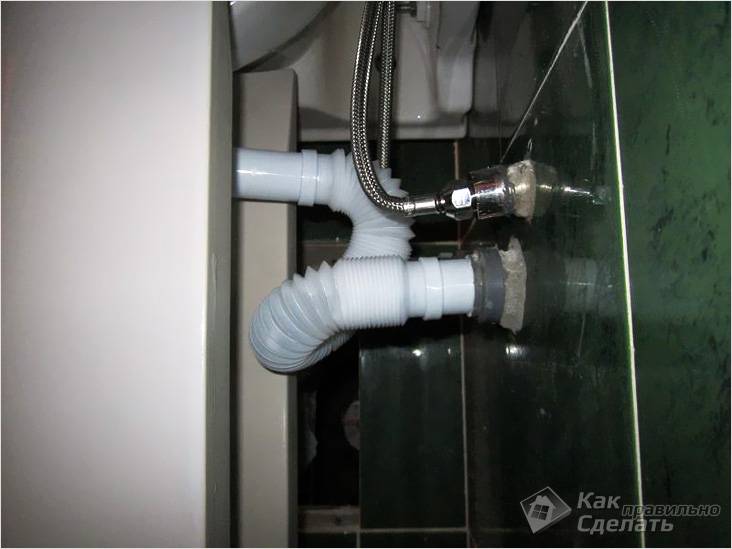
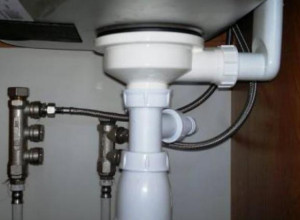
Connecting the sink siphon to the sewer
How to connect a sink to the sewer system
After finishing work on bringing the sink to the water supply, you can connect the washbasin to the sewer, and other plumbing fixtures will be connected in the same way.
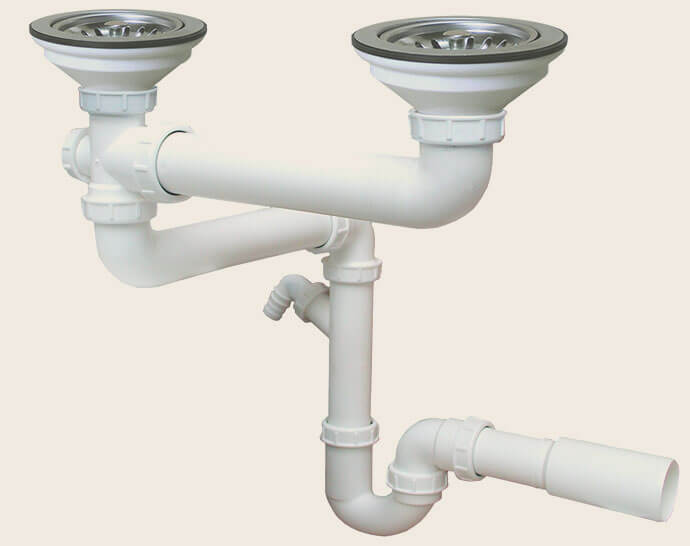
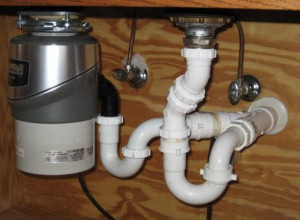
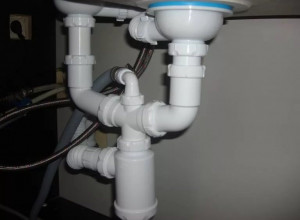
connecting a double sink to one drain
First you need to install a siphon
It is important to pay attention to the presence of a special hole in the plumbing device, which is used to protect against water overflow. If there is this hole, you need to choose the siphon that is equipped with an additional drainage
Most often on sale you can find a bottle-shaped siphon or in the form of the English letter S. If you want to install a sink in the kitchen, then it is more expedient to use the second version of the product, since in the first case the likelihood of clogging the siphon increases.
To make the correct connection of the sink to the sewer system, you need to perform a certain sequence of actions:
- first, the outlet of the siphon must be brought into the sink, which is subsequently securely fixed;
- then you need to screw the pipe to the siphon, it is better to choose a rigid product with an angle or a corrugated pipe;
- the screwed pipe should be inserted to the sewer outlet. If the diameter of this outlet is larger than that of the pipe coming from the siphon, then it is more advisable to use an adapter called a sealing collar. Only after these actions can the pipes be fastened;
- at the end of the work, the connections must be checked for leakage.
How to determine a poor-quality siphon connection?
If the siphon is connected poorly, an unpleasant odor from the sink may be felt. There may also be increased humidity of the pipe leading to the siphon, and the appearance of puddles under the sink.
When connecting the sink to the sewer system, experts do not recommend over-tightening the connections with a wrench, as this may damage the rubber seal.
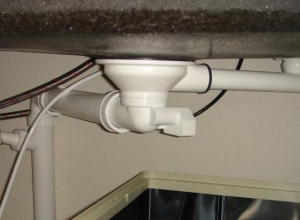
connection of overflow and drain from the sink
If during the process of checking the density between the pipe and the rubber cuff a stream of water flows, then the second element must be removed and the connection area dried. Next, the dried cuff must be treated with a sealant and put in place.
Special remarks
Before connecting the sink to the sewer, you need to take into account some notes, namely:
- when connecting the sink in the kitchen to the sewer, you do not need to tighten the connecting elements too much with a key. If this feature is not taken into account, the sealing rubber gasket may be damaged, then it will need to be changed and tightened again;
- when checking the tightness of the connection of the area between the pipe and the cuff, a trickle of water may leak. If this happens, then you need to remove the cuff and dry the surface of the connection area. Next, the dry cuff is lubricated with a sealant and the elements are reconnected;
- if you plan to connect two sinks to the sewer at once, it is recommended to buy a special siphon equipped with two outlets for sewer pipes.
By following simple rules during the installation process, you can quickly and easily connect the sink to the sewer with your own hands without the help of a plumber. It is also easy to connect the water supply to the plumbing fixture.
Assembly and connection of the bath drain to the sewer
Assembly and installation of the siphon.
Siphon installation diagram.
When the drain device, in accordance with the recommendations for selection, is purchased, you can proceed with its installation. When assembling and mounting the device according to the instructions attached to it, a certain order should be observed. First, the water seal system is assembled into one whole, consisting of parts of a drain and an overflow, since it comes in the installation kit in the form of separate fragments
At the same time, it is necessary to pay attention to the presence, quality and condition of the gaskets, as well as the fixing nuts of the system.
During installation, the nuts should be baited carefully and without distortion and tightened by hand without the use of instrumental force so as not to damage the material of construction and not to strip the thread when tightening. An overflow is mounted on the bathtub, fixing it in the hole of the bowl with a decorative trim and a screw. After that, a plastic tube is fixed to the overflow, the free end of which will be attached to the corresponding drain outlet.
Next, in the body of the bowl, a sealing ring is placed on the drain hole, a metal drain neck is installed on top of it. From below, the assembled drain is brought to the neck and connected with a fixing screw. The next step is to dock the overflow and drain using a plastic tube from the overflow, which is attached and attached to the drain
When carrying out these works, you should pay attention to how each seal is located on the drain and overflow holes of the bowl. In addition, it is necessary to carefully check the correctness of all connections made in order to avoid possible leaks.
Connecting the drain to the sewer
Scheme of connecting the drain to the sewer.
After the plumbing drain is installed and checked, it can be connected to the sewer network by means of a piece of rigid or flexible smooth plastic tube (if such a connection is not possible, then a corrugation is used). If the sewer system is constructed using cast iron pipes, then a 73/40 transitional rubber coupling should be used to dock with it and seal the drain inlet.
If the sewerage in the building is made with plastic pipes with a diameter of 50 mm, then it is recommended to introduce the drain through a 50/40 transitional rubber sleeve or using an appropriate adapter from 40 to 50 mm. In the latter case, to seal the joint on the drain pipe introduced into the sewer, it is recommended to put on a 1.5 mm thick gasket so that the upper part of the input is additionally sealed with a waterproof sealant. Similarly, it is recommended to insert a drain if the diameter of the sewer pipe is 40 mm.
In order to verify the normal operation of the mounted drain and overflow of the bowl, you need to fill it with water to the overflow level and, while draining the water, check all loaded connections for leaks. If the siphon connections remain dry, then it can be concluded that the work is done well.
Installing and connecting a sink in the kitchen - it seems that there is nothing easier. However, this impression is deceptive. You can feel it as soon as you start connecting the sink in the kitchen yourself. It is then that a lot of questions appear and various nuances come up.
Today, there are several types of kitchen sinks used, which differ in the installation method and have different operation. Connecting the sink is also individual, but there are still general rules.
Preparatory stage of work
How to determine the height of the sink attachment?
In order to properly connect a sink that is not equipped with additional accessories to the sewerage system, it must be fixed at a height of 85 centimeters. To do this, the level is marked with a horizontal line corresponding to the upper limit of the sink. If there is a support leg, called a pedestal, or if the plumbing element is mounted in a nightstand, determining the sink fixing height is not necessary, since this parameter will directly depend on the height of the leg or bedside table.
Marking for fastening
Connecting the sink provides for marking for the subsequent installation of the fastener system. In the attachment area, the sink bowl has mounting holes. Thus, by applying the back panel of the sink to the wall, while aligning the top edge with the mark on the wall, the position of the places for making mounting holes is marked.
It is advisable to involve an assistant in this work so that he can hold the sink at the level line, while another person from below marks the places for the subsequent fixing of the sink. However, the layout for the sink becomes simplified if there is a nightstand or leg.
Installation of fasteners
Mounting is done as follows:
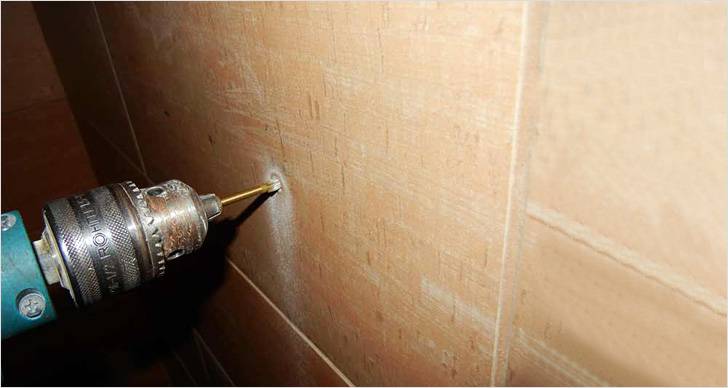
- According to pre-made markings, holes are drilled in the wall;
- Dowels are driven into the holes;
- Mounting pins are screwed in.
Thus, connecting a sink or sink in the kitchen or bathroom will require the use of construction dowels, mounting studs, as well as plastic inserts and nuts supplied in the kit.
When screwing in the studs, it is necessary to pay attention to the depth of their screwing, which should allow you to hang the sink, then tighten the fixing nut (the part of the stud protruding from the wall has a length exceeding the thickness of the sink by 1.5 centimeters to tighten the nut)
Mistakes made during the installation process that can cause clogged pipes
Pipes from sinks, sinks and other plumbing fixtures must be mounted on the connection at a right angle of 90 degrees. If two devices are mounted and drains are provided towards each other, a blockage may occur in the tee of the pipe that goes directly to the fan pipe. In this case, it is pointless to clean the pipes from the side of the sink or washbasin with a spiral or in a hydrodynamic way using a hose. When it comes to two sinks connected side by side, it is clear that the hose will pass from one sink to the second sink, while it will not be able to turn in the direction of the main drain pipe
One way or another, it will be quite difficult to clean the sewers.
Another important mistake is to lead the drain pipe from the washbasin or sink too high in the bathroom. As a result, the process of draining wastewater into the sewer pipe becomes more difficult.
Many decide to move pipes and plumbing fixtures, which include bathtubs, sinks and sinks, to another place, which is not provided for by the project. If pipes are changed, the main problem may be that the outlet to the device will be rigidly tied to the outlet of the pipe to the riser, while the situation is very difficult to change.When connecting sinks and sinks, everything should be fine, since there is a certain margin in height, taking into account the fact that plumbing fixtures are hung to a height of about 90 cm. But, despite this, many inexperienced installers may not take into account and think over such a detail. It is easier to make a mistake with the height in case of connecting a bathtub and a shower cabin. Often the drain is above the floor surface. It is difficult enough to lift a heavy bathtub yourself, so a simple solution is to run the drain pipe above the siphon outlet. Thus, the pipe is often laid without the necessary slope, which can also cause clogging of the sewer.
It is often possible to encounter a problem in which pipes that are supposed to be attached to the wall from the outside do not fix correctly. Products can sag, counter slopes and other practically irreparable cases are also often formed. Of course, this does not affect the proper functioning of the sewer system in any way, but such a feature can cause blockages, due to which you will often have to clean the pipes.
Installation of a sink in the kitchen and a washbasin in the bathroom is carried out in approximately the same way, because. the purpose of the devices is similar. Most often, the owner of the house can do all the work himself. There are general rules that must be followed when installing plumbing, you should definitely know them. However, if there are no skills in handling tools or a complex installation of plumbing is planned, it is still better to call the master.
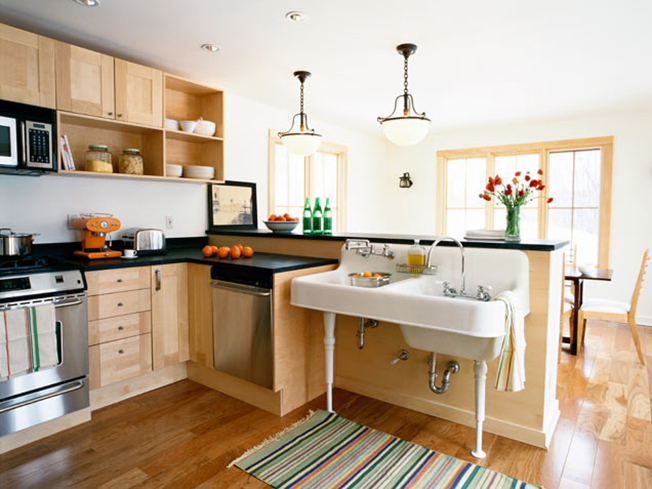
Bathroom sink installation
How to install a sink in the kitchen with your own hands - a step by step diagram
Step 1:
markup
Most mortise sinks are sold with a ready-made template, it plays the role of a packaging container. It is enough to cut out such a template from cardboard and attach it to the countertop at the location of the sink - and the outline of the seat is ready.
If there is no template, you will have to make it yourself. To do this, it is better to use thick cardboard (for example, from a TV or monitor). After measuring the inside of the sink, transfer this measurement to the cardboard surface and cut off a few centimeters more. It is better to cut a piece of cardboard several times than to look for a new piece.
Step 2:
Location
The proverb about the need to measure seven times before the first cut is very relevant for our work. You can move the finished template on the countertop easily and freely - until you start to cut it through. So consider how the faucet will open, where the filter will be, how the kitchen utensils will be located, etc.
Outline the cardboard template should be as even and accurate as possible. To do this, it is attached to the countertop with ordinary tape and draw one thin line with a pencil. After that, the "cardboard assistant" peels off and goes to the waste paper, it will no longer be useful to us. We glue the perimeter of the future hole on the outside with 8-12 cm masking tape in order to prevent damage from mechanical tools.
Step 3:
Drilling and sawing
Yes, yes, the first mechanical tool will be a drill, not a saw. A drill with a diameter of 2 mm is selected and several closely spaced holes are drilled in the place where it is convenient to start cutting out the contour. The holes are connected into a single groove with a chisel.
It is convenient to saw the countertop with a jigsaw on wood
. Just do not forget to stock up on extra canvases - thick tabletops are difficult to saw, the canvas is likely to break with a slight deviation from the vertical. Take your time and drive the jigsaw confidently - it is more difficult to correct a curved cutout than immediately cut a hole along a plumb line, with a strictly perpendicular cut.
Step 4:
We complete the installation
Apply sealant to the end of the fresh mounting hole and firmly insert the sink. We hold the sink under load from 10 to 60 seconds (depending on the type of sealant)
Carefully remove excess glue from the outer and inner sides of the sink and wait several hours until the sealant is completely cured. We connect hoses, pipes, sewers, install a faucet and use the new sink for our pleasure
How to connect a sink in the kitchen sink
-
First, a mixer is installed on the sink.
It is better to install it first because there is room for free hand movement before connecting to the sewer, which is much more convenient for tightening the connections. Additional FUM tapes and tow are not required: all connections are sealed with rubber gaskets that come with the mixer. When attaching the mixer, there must be rubber gaskets on the outside and inside. But first, reinforced flexible hoses must be screwed to the mixer, and then pushed through the sink. From below, a faucet mount is put on through the hoses. All connections are twisted by hand and slightly tightened with a key for reliability; -
Next, the hoses are connected to the water supply.
If there are no gaskets at the end of the hoses, FUM tape or tow is wound onto the pipes, after which the hose is wound onto it; -
Connecting the kitchen sink (sink) begins with connecting the siphon.
If the sink has a hole to protect the overflow, then the siphon must be with an additional overflow pipe. The siphon can be in the form of an S-shaped pipe or bottle-shaped. Personally, for kitchen sinks, it is recommended to use an S-shaped siphon, since the bottle clogs faster. First, the outlet of the siphon is inserted into the sink, then the siphon itself is screwed to it. A pipe (corrugated or rigid at an angle) is screwed to the siphon and inserted into the sewer outlet. If the outlet has a larger diameter, then an adapter (rubber sealing cuff) is installed in it.
The washbasin is connected to the sewerage and water supply in the same way as the kitchen sink.
Upon completion of all work, smoothly open the shut-off valves and check all connections for leaks. If there is a leak between the cuff and the sewer outlet, you need to remove the cuff, lubricate with sealant and insert it back.
If you connect a double sink
, then a special siphon is purchased for it with an additional pipe for the second sink.
To carry out the simplest plumbing measures, it is not necessary to call a specialist, take time off from work and spend money on paying for services. For example, installing a siphon in the kitchen is a simple procedure that even a woman can handle.
If you correctly select the device, study the instructions for it and remember a few generally accepted rules, the process of cleaning, replacing or installing the siphon will pass quickly and without unpleasant surprises.
The question of buying or replacing a siphon arises when the old model fails, as well as for reasons not related to the device itself.
Suppose, along with the purchase of a new kitchen set, it is necessary, and the design of the new sink requires a different configuration of the appliance. Consider what types of siphons offer modern manufacturers.
We remind you that a kitchen siphon is a device that connects the sink to the sewer pipe, preventing the penetration of an unpleasant odor into the room and facilitating the process of removing blockages.
There are many options for classifying devices to create, but all types can be grouped into two broad categories:
- bottled;
- knee.
Knee, in turn, are divided into rigid or elastic (corrugated), and absolutely any type can have a more complex design if connected to a sink with overflow. It is also worth mentioning pro (relevant for installation under the shower) and double - for installation under double sinks.
Along with economical plastic models, metal siphons are also used - brass, copper, steel or bronze.Their installation is relevant for styling the room when the area under the sink is completely open.
The bottle model is ideal for the kitchen, however, with a lack of free space or for other reasons, knee models (U-shaped and S-shaped) are also used. The latter types are more rational to install for plumbing fixtures with a minimum of free space - for example, under bathtubs.
Before you install a sink siphon in the kitchen, you need to decide on the model. We present several options, one of which may be useful to you.
Image Gallery

Thus, when choosing a new device, it is necessary to focus on the amount of free space under the sink, technical characteristics (reliability of the material and gaskets, patency), the possibility of disassembly for maintenance, and if the siphon is not disguised in the cabinet, then the appearance.
Sink installation
To carry out all the necessary work in the kitchen, you will need the following:
- dowels;
- winding;
- screwdriver;
- new sink;
- silicone sealant;
- adjustable or wrench;
- screwdriver or drill.
The washbasin is connected in the kitchen using a special suspension to the wall on self-tapping screws in dowels and standard brackets. Do not forget that even a complete pedestal from the bottom of the washbasin to the floor plane is not a load-bearing part.
The diameter of the self-tapping screws should be the maximum possible and allowable by the brackets. Do not forget that the sink in any washbasin is suspended. If the diameter of the special holes for self-tapping screws is less than 6 mm, then they should be drilled out or this type of sink should not be taken at all. Moreover, these "alternative" types of products are silumin (rather fragile) or plastic (fragile).
Connecting the plumbing in the bathroom (washbasin and tub) to the sewer is not a difficult job. But for these devices to work properly, there are a few common important points to keep in mind.
Scheme of connecting plumbing in the bathroom.
That is, for both the sink and the bath, devices should be connected for this purpose, which, by creating a water plug inside themselves, will prevent the appearance of an unpleasant smell from the sewer in the room. Such devices are called siphons. Currently, the existing market offers a great variety of siphons for plumbing. But, as a rule, siphons made of plastic are most in demand. They are inexpensive and durable. Also, when arranging the connection of water drain pipes to the sewer for the sink and bathroom, many are faced with the specific features of these connections, the specifics of which are that the main thing for the sink is to choose the right siphon, given its configuration and dimensions, as well as the possible need to connect through it siphon draining water from the washing machine. The connection of the bath to the sewer is carried out using appropriate devices, taking into account its location and existing sewer pipes.
Scheme of connecting the sink siphon to the sewer.
The very connection of the sink siphon to the sewer is simple: through a 50/40 rubber coupling, in the case of 50 mm plastic sewer pipes, or through a 73/40 adapter, in the case of cast iron sewer pipes. The size of 40 mm is indicated because it is this diameter that, as a rule, the drain pipe has in siphons. To connect the drain fittings to the sewer, when the diameter of the pipe of the latter is 40 mm, a sealing gasket is used, which is put on the insertion tube. The same gasket can be used if the inlet pipe is 50 mm in diameter and a 40/50 adapter pipe is used in the drain. To facilitate the organization of the joint of these pipes, it is recommended to coat the used sealing gasket with soap or dishwashing gel on top.
The situation is somewhat different when connecting a bathtub.