Ideas and colors
In order for the painted wallpaper to harmoniously fit into the interior, you need to think in advance about the options for the color, pattern and texture of the finishing material. Wallpaper manufacturers today offer a wide selection of a wide variety of wallpaper for painting - embossed, smooth, textured like wood, brick, masonry and others.
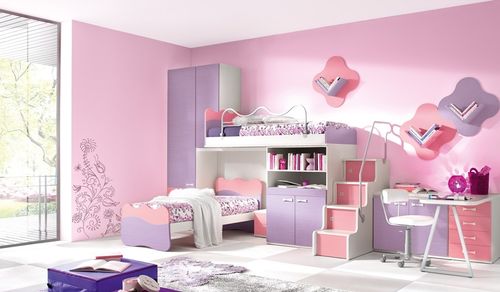
For a children's room, textured non-woven wallpaper in pastel shades is perfect - peach, beige, cream, pink, blue. Moreover, there are special children's embossed coloring wallpapers that allow the child to feel like an artist or an interior designer.
Relief wallpapers with natural textures look harmonious in the office - stone, brick or leather. When choosing a paint color, try to avoid bright, neon and dark shades. Remember that the environment greatly affects the working office atmosphere.
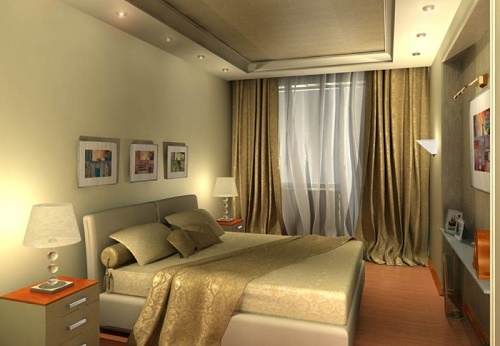
Ideal for the bedroom - wallpaper with a fine texture or smooth surfaces. You should not glue wallpaper with volumetric relief in this room, as it gives a feeling of rigor and officialdom. As for the shade of paint, the pastel calm colors of the palette will fit in well here.
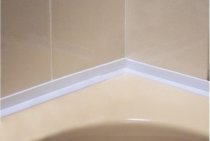
Volumetric textures look beautiful in the bathroom - in the form of tiles, bricks or other geometric elements. The optimal shades are blue, green, purple, black, golden, gray, red. If the bathroom is small, then you can visually expand the space with the help of white wallpaper with a fine texture.

In the living room, you can use any textures and shades that you like. Just remember that voluminous relief surfaces visually “eat up” the space area. Therefore, in small rooms it is recommended to glue fine-textured wallpaper.
If you want to diversify the interior of a room in an interesting way, giving it a twist, one wall can be painted in one color, and the opposite or adjacent wall in another. This will increase the space and visually divide it into zones. The only thing to consider is the combination of shades.
Painted wallpaper is not only a modern solution, but also practical. Tired of color? It can be easily repainted into another. Wallpaper ruined? It is not necessary to peel them off to stick new ones - you can lay them on an existing layer.
Ease of use and a wide variety of wallpapers and colors make this type of finish popular with most people.
Learn how to paint the wallpaper with your own hands from the video:
Which is better to choose
The best option is non-woven and vinyl wallpaper. This type of finish is designed specifically for painting. Consider their differences, advantages and disadvantages.
Vinyl
This type of wallpaper consists of two layers. The first is paper, the second is PVC. Due to this, they have high strength and elasticity. Their main advantage is fire resistance and water resistance.
They can be washed with water and detergents.
After cleaning, the top layer will remain in its original form. Such wallpapers are not afraid of direct sunlight, which means that their color will not fade and retain its original brightness for a long time. Vinyl wallpaper is not afraid of mechanical damage.
The layers of wallpaper are impregnated with a special antifungal composition, which does not allow mold to form at high humidity. Therefore, they are often glued in the kitchen and in the bathroom.
They come in a wide variety of colors and textures. Manufacturers produce coatings with imitation tiles, wood, fabric and even leather.
Vinyl wallpapers come in three types:
- Foamed.
They have a relief surface, therefore they are ideal for finishing uneven walls. The only negative is less moisture resistant.
Silkscreen.
They differ in the content of silk threads in the layer.They retain their color and structure for a long time, but are more expensive than their counterparts.
Washable.
Washable vinyl wallpaper is most commonly used for bathrooms and kitchens. Their waterproof surface protects the walls from moisture and fungus. Easy to clean, withstand constant humidity, do not fade.
Among the shortcomings, one can distinguish the presence of a synthetic layer that does not allow air to pass through and releases formaldehydes.
non-woven
 Interlining is made of cellulose bonded with polymer fibers. In its composition, it is close to ordinary paper wallpaper, but unlike them, it has increased strength and fire resistance. This type of finish allows air to pass through well, allowing the walls to "breathe". Another advantage is that dust does not settle on the surface.
Non-woven wallpaper does not require special care. Use a damp cloth or sponge to remove dirt. They are not afraid of water, are not subject to fire and fading.
Their undoubted advantage is that when they are re-repaired, they do not need to be torn off the walls - new wallpapers can be glued directly onto their surface.
Of the minuses, only susceptibility to mechanical stress can be distinguished. Scratches and cracks can easily form on the top layer if the walls are protected from the influence of external factors.
Unlike vinyl wallpaper, non-woven wallpaper is much more expensive, and design solutions are not very diverse.
Wallpaper painting is a very responsible process. After all, in order to get the desired shade, you will need to master the tinting - mixing several colors. For painting, as a rule, white wallpaper is chosen.
If the shade is not particularly important to you, and you do not want to spend more money and time on repairs, then you can opt for colored wallpapers.
Applying paint to wallpaper
All the work can be completely done by hand, then its price will not be significant. Below is an instruction on the rules of work.
Before you start painting the wallpaper, you must first check how the wallpaper adheres to the ceiling.
Attention: You will have to make sure that there are no blisters. If defects are found, they must be eliminated
Otherwise, at the end of the work, the painted areas will swell even more. This will cause the wallpaper to peel off in the future. You can’t make mistakes, because even one little thing will spoil the whole appearance of the ceiling.
- Before painting, you need to think about how to protect the floor, walls from paint. To avoid such problems, polyethylene coatings or plain paper can be used. Magnetized special masking tape is ideal for attaching them. All this will save you from the additional hassle associated with the elimination of traces of paint.
- If you have to paint polyurethane foam, gypsum moldings that are adjacent to the ceiling, then it is better to glue the adhesive tape along the edge of the baguettes. Upon completion of work, it can be easily removed.
Instrument preparation
Before you start painting the ceiling, you need to prepare working equipment.
You will have to use:
- The material that will protect the surface, i.e. paper or polyethylene;
- Rollers (see Rollers for painting: we will consider in detail), in which the fur coat is 10 or 12 mm;
- Brushes up to 8 cm wide and 1.5 cm thick;
- Dye;
- The container in which the paint will be rolled;
- Headwear, goggles, gloves.
All this must be prepared before painting the ceiling. During the work process, you will not have to be distracted.
- It is better to choose a roller depending on the type of wallpaper used. Models with a long pile will do. It must be remembered that the smoother the surface of the canvas, the less pile is used. This factor affects the quality of painting.
- When buying paint, be sure to read the instructions. Everything that the manufacturer recommends must be taken into account. For example, humidity and room temperature are of great importance.They must be as specified by the manufacturer. After painting, there should be no drafts in the room.
Attention! Buy only the paint that suits specific types of wallpaper. Alkyd or water-based paints are suitable for glass wallpapers
Non-woven wallpaper is painted with water-lispersion enamels.
These types of paints have both advantages and disadvantages:
- It will be durable and at the same time smoothes the structure of the wallpaper.
- But it must be borne in mind that alkyd enamels are toxic during the application process. Therefore, it is recommended to use personal protective equipment during work. These include glasses, gloves and other products that will protect work.
- If the ceilings are not planned to be washed frequently, then this type of enamel will last a long time.
- Latex water-dispersion paints are suitable for painting wallpapers.
Attention: The instruction from the manufacturer says that you need to dilute the paint with water. Enamel is filtered through cheesecloth
Then water is added and everything is mixed with a mixer.
Video tips on how to paint the wallpaper
To give texture to the wallpaper, the masters use the following technique: the canvases are painted with paint highly diluted with water, and then they are quickly wiped with a clean cloth.
It is also possible to paint the canvases before sticking to the ceiling. In this case, latex paint is applied to the back layer. The result is an original effect, in which the non-woven base acquires the desired shade, and the patterns remain white.
If desired, the relief pattern can later be tinted with a contrasting color, and then the correctly selected texture and surface shade will literally transform the interior.
Add your comment
The process of wallpapering the ceiling
Surface preparation
- Start gluing is to prepare the surface. If the plaster staggers or falls off in places, it must be removed.
- Putty all cracks, seams between panels, and surface irregularities with putty - then sand (see Grinding the ceiling: features of the work) Wallpaper for painting, especially with a strong texture, can hide only small cracks on the ceiling (see How to prime the ceiling - general rules and nuances of skill)
The next step is to mark the ceiling under the first strip of wallpaper:
- Step back from the wall at a distance less than the width of the wallpaper by 5-6 centimeters (if the wallpaper is 53 centimeters wide, then it is worth retreating 46-48 centimeters), and make marks at both ends of the room.
- Between the marks, pull the chopping cord, and slightly pulling it down, release it. This line will be the guide for gluing the first strip.
- If your choice fell on non-woven wallpaper for painting, then it is much easier here. We begin to glue, evenly smearing the ceiling and glue the strip to it.
- When pasting with paper wallpaper, it is necessary to apply glue not only to the wall, but also directly to the wallpaper itself. To do this, a strip cut to size is smeared with glue, and left to lie down for a few minutes.
- Further, we dilute the wallpaper glue strictly according to the instructions indicated on the package. Do not engage in amateur activities, as other proportions can spoil the quality of gluing, and complicate the work process itself.
Wallpapering
Having measured the required length of the strip - cut it off. For convenience, you can cut the strip a few centimeters longer and cut off the excess after gluing.
Further, it all depends on the choice of wallpaper:
- Next - apply glue to the ceiling in the place where the strip should be glued, it is better to spread it a little wider for the size of the canvas, so that the glue protrudes 5-10 centimeters.
- It is better to glue wallpaper on the ceiling together. One person holds the strip, and the second, meanwhile, aligns them along the drawn line and gradually glues them.
If there is no one to help, or you like to do everything yourself, this is also quite possible.We will show you how to do this, for example, paintable paper wallpapers are glued in this way:
First, the glue is applied to the middle of the strip with a thick cheek.
Beginning the application of glue
Then the glue is evenly distributed on the sides to completely cover the entire surface.
Spread glue to one of the edges
Distribution to the other edge of the web
The entire canvas must be folded with an “accordion”, so that the sides smeared with glue are in contact with each other. The step of the "accordion" should be done approximately 30 centimeters.
Fold "accordion"
With wallpaper laid in this way, it is quite easy to work with and hold in your hands. The long end of the wallpaper will not interfere with wallpapering.
Convenient folding method
"Accordion" after impregnation with glue becomes quite soft and delicate, so it will be quite difficult to hold it in your hands. For convenience of work and preservation of the integrity of the wallpaper, use an additional support. You can take a cardboard roller from a roll of foil, or a polished round stick and place it under the wallpaper to stiffen it.
Support for "harmonica"
Start gluing wallpaper for the ceiling for painting, it is necessary from the edge of the wall. With one hand we hold the “accordion”, and with the other we glue and level along the line drawn earlier.
The beginning of pasting the ceiling
It is necessary to straighten the wallpaper on the ceiling from the middle of the canvas, to its edges, using a wallpaper brush or a special roller.
Straightening the canvas on the ceiling
The next canvas is glued in the same way, the only difference is that you need to make sure that the joint of the wallpaper is clean and well fitted to each other.
Attaching the second sheet
That's all, a fairly simple process, gluing wallpaper for painting on the ceiling. Walls can be trimmed in two ways:
With scissors:
To do this, having reached the wall, press the wallpaper against the wall and run the blunt end of the scissors along the corner, then, having slightly peeled off the strip, cut off the excess part along the break line.
Near the wall
If there is a ledge on the wall, carefully cut the fabric to the corner with scissors. ledge on the wall
ledge on the wall
Under the wire, at the place where the chandelier is attached, make a cross-shaped incision. Subsequently, he will hide behind the bowl of the lamp itself.
With a construction knife and spatula.
Press the end of the strip with a spatula in the corner and cut off with a knife.

Cutting off excess wallpaper with a knife
Ceiling wallpaper for painting can be repainted several times, which will allow you to refresh the room at any time without affecting the wallpaper itself (see Wallpapering the ceiling: surface preparation and pasting process).
Which roller and paint to choose
When choosing a paint, be guided by its characteristics and purpose. Under this or that type of wallpaper, different types of paints are selected.
Water-based paint has a number of advantages - environmental friendliness, durability, lack of a specific smell, ease of application, affordable cost. In addition, it dries quickly.
Acrylic paint is used to work with most types of wallpaper. It has no unpleasant odor, contains antifungal additives.
Any water-based paint is suitable for non-woven and paper wallpapers. When working with vinyl wallpaper, it is recommended to take latex-based acrylic paint. If the vinyl wallpaper is non-woven, then a water-based one is also suitable. Both water-based and acrylic paints are used for painting paper wallpapers.
To obtain the desired shade, white water-based or acrylic paint is mixed with colors. This is a rich pigment used to give the required color for liquid, non-woven and vinyl wallpapers.
Tinting is a rather complicated process for beginners. It can take a long time to get the right shade of paint. The most important thing is to mix paint and color in the right proportions.
From the first time, the result may not meet expectations, so designers recommend experimenting first with a small amount of paint. As soon as you manage to get the desired color, you need to mix the color with paint in a larger volume in compliance with the original proportions.
While tinting, don't forget to test the shade on a scrap piece of wallpaper to see how it will look on your walls.
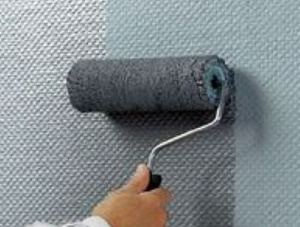
 The choice of painting tool sometimes affects the quality of the finish more than the paint itself. In work it is recommended to use a fur roller with a long pile. If this was not at hand, you can tightly wrap a piece of an old artificial fur coat on a regular roller.
What is the advantage of such a tool? Due to the long pile, it carefully paints over the surface relief over its entire depth. Foam rollers are not suitable for these purposes, since they work only on the surface layer of the pattern, which means they can leave bald spots behind them.
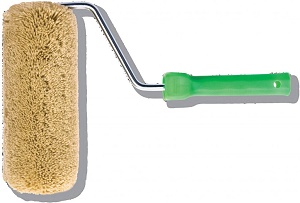
For processing corners and hard-to-reach places, use a narrow paint brush and short (up to 50 mm) rollers.
How to paint without streaks
To avoid stains and smudges, you should follow a few rules:
- Exposed areas of the walls should be painted with a roller, not with a brush.
- Coloring should be in two opposite directions, and the final movement must be done from top to bottom. This will help avoid streaks and give the right visual effect.
- Apply paint in a thin layer. You should not collect too much paint on the roller, as during operation it may drip down, forming smudges. Before bringing the roller to the wall, carefully shake off the excess composition into the drip tray.
- Try to drive the roller with smooth movements with the same pressure, evenly distributing the pigment over the surface.
- The first thing that needs to be painted over is the areas under the ceiling and near the baseboard.
- You can start painting from a window or corner. Do not approach this process randomly. Visually divide the wall into sectors and carefully paint over each of them.
- To prevent smudges and stains, blend the paint with a dry roller, gently walking it over the surface. It is not necessary to do this if the first time you get an even layer.
- After the paint has completely dried, a second layer is applied in the same way as for the first time.
The drying time of painted wallpaper depends not only on the choice of paint, but also on the temperature and humidity of the air in the space. At room temperature with normal humidity, acrylic paint dries after 1-1.5 hours, and water-based paint within 30-60 minutes.
Paints for coloring wallpaper features of choice
The choice of paint is a crucial moment in the repair of the ceiling, on which the result of the efforts will mainly depend. For high-quality painting of wallpaper, experienced craftsmen recommend using water-based dyes - environmentally friendly, light-resistant paints and varnishes that will allow the structure to "breathe" and do not prevent air from penetrating. These include acrylic, latex and dispersion paints.
At the stage of choosing a paint, it is necessary to determine what effect is planned to be created on the surface above the head and select the appropriate type of dye:
- glossy create a durable and reliable coating and give expressiveness to the surface of the ceiling;
- matte recommended in cases where it was not possible to achieve a perfectly smooth and even surface - dyes will decorate minor defects and improve the appearance of the ceiling.
The choice of paint depends on the type of finishing material. For painting vinyl wallpaper, it is better to prefer acrylic paints. Glass fiber can be painted with both acrylic and alkyd paints, which create a hard film with a long service life.