Preparation for repair
Preparation is a very important step that should not be missed. The quality of the repair and its service life will depend on its implementation. As mentioned earlier, the chip must be repaired immediately. If this is not done, rust may form and must be removed. If the chip is fresh, then this stage of preparation can be missed.
- Rust removal. To do this, you will need such improvised tools as a knife, needles, a screwdriver. They can be used to remove rust. You can also use a special tool to remove it, which is sold in household chemical stores. If it is not available, then a regular cleaning agent will do. After all the manipulations, the chip cleaned of rust must be rinsed well with water.
- Pollution can also be removed with the help of household chemicals. It must be remembered that such products should not contain abrasives.
- After complete cleaning, the repair site is well washed and thoroughly dried with a hair dryer. The surface must be perfectly clean and dry.
- Degreasing is a necessary procedure, without which the durability of the seal will significantly decrease. Degreasing is carried out with acetone, then dried again with a hairdryer.
On this preparation can be considered completed. All photos and the preparation process can be seen in this article or in the gallery of our website. After that, you can start repairing the chipped bath enamel. This can be done in several ways and using various materials, which will be described below.
Bathtub restoration - step-by-step work on removing chips from a bathtub
Necessary materials
- The main and most necessary material is auto-putty. It takes a little, and its color should be as light as possible. There is a special putty for fiberglass that will work just as well. Its advantage is heat resistance, but its price is higher.
- Sandpaper. It also needs a little, a maximum of 1-2 sheets. It should be small, you can take the cheapest one.
- Special aerosol designed for the direct repair of chips. Its color should match the color of the bath itself. The price category does not matter, but if it is possible to choose a better model, then it is better to choose an aerosol with heat and water resistance.
- Instead of an aerosol, you can use bath enamel. It will already have all the necessary characteristics.
- Abrasive polishing paste. Necessary for the final stage to mask the traces of repair.
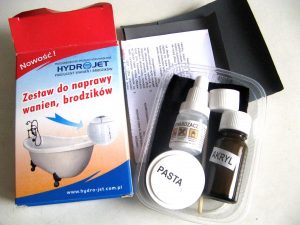
In order not to buy all the components for repair separately, you can immediately purchase a ready-made kit for repairing chips. Such kits usually include the following components: putty, spatula, sandpaper, aerosol and / or enamel.
How to repair a chipped enamel in the bathroom - using a ready-made kit or individual materials - does not matter.
Chip removal
Putty preparation. To do this, you need to mix the resin and hardener, while the resin should be thirty times more. The mass is mixed with a spatula and immediately applied to the chip. At the same time, it must be well tamped. You can put a little more than you need: all the excess can be removed first with the same spatula, and after hardening, level with grinding. If the quantity is not enough, then, most likely, the repair will have to be carried out again.
We eliminate chips in the bath
How to remove a chip on an acrylic bath
First of all, it should be understood that a chip is not a scratch and simply polishing the damaged area will not work. In addition, deep defects often become a breeding ground for fungus, mold and bacteria, so restoration work is a must.
Surface preparation
First of all, the area where the defect is found must be prepared. Otherwise, no one can guarantee you that the chip will not appear again after a short time. Surface preparation is as follows:
- Clean the area with sandpaper, starting with a large fraction and ending with a smaller one.
- The chip must be thoroughly washed using detergents with a disinfecting effect. This is done in order to completely remove the dirt.
- Next, the area should be degreased to remove fat from the surface. If you ignore this stage of preparation, then it is likely that the putty that you will apply simply will not "adhere" to the acrylic.
- At the end of all preparatory work, the surface of the bath must be dried very well. To speed up, you can use a hair dryer or dry rags.
Once you have done all the activities, you can proceed directly to the removal of the chip on the acrylic bath.
Removing a chip on the surface of an acrylic bath
A masking pencil is not suitable for removing this type of damage, since they will not be able to repair the pothole itself. To restore the evenness of the surface, you will need special repair kits. As a rule, they all have the same equipment, and it includes:
- liquid acrylic (different shade);
- hardener - added to acrylic to increase the hardening property;
- sandpaper for grouting;
- polishing paper;
- degreaser;
- epoxy glue for repairing small scratches.
Of course, the repair kit may differ in content, but, as a rule, this is a standard kit that includes all the necessary components. Additionally, in the repair kit you can find a special rubber spatula for the convenience of applying liquid acrylic.
Further, the principle of work is as follows:
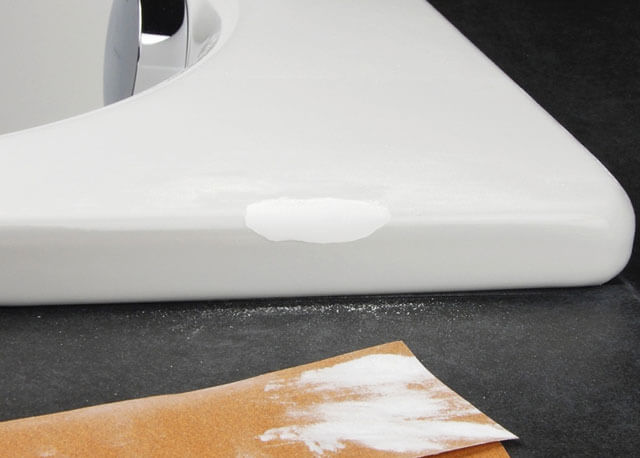
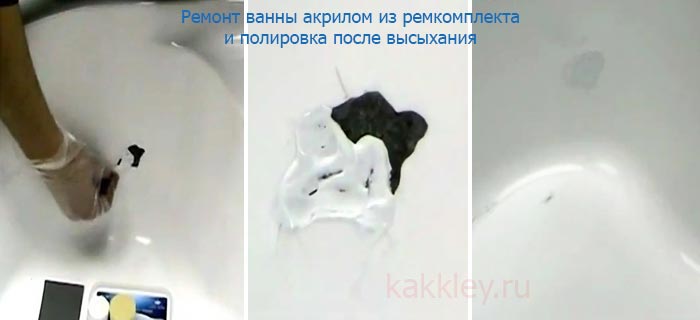
- dilute acrylic with hardener, according to the instructions;
- apply the mass to the damaged area flush with the surface of the bath, evenly distributing it with a spatula;
- equalize the mixture as much as possible;
- cover with a film (usual food, reinforced to the wall with adhesive tape is suitable);
- leave to dry completely, but not less than 24 hours;
- remove the film and degrease the surface (for example, with alcohol);
- polish the area.
In conclusion, we can say that removing a chip on an acrylic bath is certainly not an easy task. Nevertheless, if you approach this issue correctly and responsibly, then you can restore the appearance of the bath in less than three hours.
Ways to eliminate a chip in the bath
For the most high-quality solution to the issue of how to paint over a chipped bathtub, it is recommended to use the services of professional craftsmen. They do their job for a very affordable price.
If you decide to do the repair work yourself, you can use the following methods:
- Use porcelain chips.
- Cover the scratch with dry whitewash, after mixing them with glue.
- Apply spot enamel.
If the bathtub is very old and battered, then you can install an acrylic liner or use an acrylic mixture. These options allow you to quickly, efficiently and at no extra cost to repair an old bath.
When to repair damage
Before proceeding with the solution of the question of what to do if the enamel on the bath has broken off, you need to understand whether such measures are required.
There are several opinions about this:
- There is no need to close up the chip, since a high-quality result is still not achieved.
- If you repair the chip, then the bathtub will begin to rust under the patch.
- It is necessary to eliminate the damage, but this procedure is quite complicated and will take a very long time.
We can say with confidence that it is necessary to take actions to restore the enamel if a way to solve such a problem is known.Of course, an ideal restoration will not work, since such events are held at a special temperature and under certain conditions, but you can make the bath attractive with your own hands.
It is worth mentioning one mistake that some home craftsmen make when repairing a chipped bathtub. To eliminate a chip on an enameled container, they heat the problem area with a gas burner or blowtorch. According to such craftsmen, the patch will better fuse with the main coating. Professional plumbing repairmen do not recommend performing such activities, as in the future this may cause the entire enamel coating to peel off.
As for the foci of corrosion that can form in a damaged area, they can form if the issue is incorrectly resolved, how to repair a chip in the bathroom. In most cases, rust is formed by using a conventional stain sealer. This situation leads to the fact that there is a need to solve the problem of eliminating rust spots.
Using porcelain chips
To use this method of repairing a chipped bathtub enamel, you must donate a porcelain cup or saucer. In this case, you should choose dishes that match the color of the bathroom. Since most of the sanitary containers are white, the cup should also be white.
Work to eliminate a defect in the form of a crack or chipped enamel in the bathroom is carried out in the following order:
- The problem area on the enamel coating of the bath is carefully degreased. To do this, you can use kerosene, gasoline, white spirit and other similar means.
- Then the damaged area is treated with sanding paper and re-degreased to remove fine dust.
- A porcelain cup or saucer of a suitable color is broken, and the fragments are ground until fine crumbs are obtained.
- Next, take the epoxy glue and mix its components according to the instructions indicated on the package.
- The finished composition is applied to the damaged area.
- Porcelain chips are poured over the glue and the mixture is leveled with a spatula.
- The epoxy composition is left until the final hardening, which takes about 2-3 hours. After this time, the sanitary container can be operated normally.
This method is suitable not only for removing a chipped bathtub enamel, but also in the case when restoration of worn enamel is required.
Damage prevention
In order to avoid various kinds of defects, it is necessary to follow all instructions for baths. Given all the requirements of the product, you can keep its appearance perfect for many years. Basic rules for the proper operation of bathtubs from professionals:
- do not put metal and other objects that can damage the enamel in the bath and on its edges;
- the cleaning agent should be soft, it should not contain any kind of abrasives, and the use of bleaches with chlorine is also unacceptable;
- if possible, protect the bath from sharp objects;
- during repair work, the bath should be covered with a thick film;
- do not use for cleaning or pour substances containing acid on the product;
- the bathroom itself should have sufficiently thick walls;
- you can not jump in the bathroom, even a child.
Types of possible damage
Depending on the type of bathroom and its material, damage can also be different. The most common are acrylic, cast iron and steel bathtubs. All of them can have similar damage that you can fix yourself. Glass, wooden and marble bathtubs cannot be repaired: such models are considered exclusive, and without the help of a specialist, everything can only get worse.
We close the chips in the bath with our own hands
The most common possible damage:
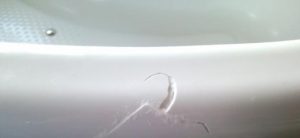
- chipping is a fairly common type of damage.It is better to close it immediately and not wait for it to increase;
- scratches - this problem is most serious for acrylic bathtubs, as deep scratches can cause the bathtub to split;
- split - applies only to acrylic baths and may be the result of a deep scratch or too thin a bath;
- rust - can be present in almost any bath;
- a hole is a defect that is the most time-consuming to repair. Only a specialist or a special insert can help here.
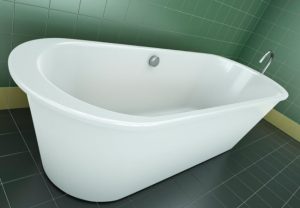
How to fix an acrylic bathtub crack
Acrylic baths are much lighter and "warmer" than traditional steel and cast iron baths. It is thanks to these advantages and reasonable price that products made of polymeric materials are increasingly being installed in apartments and houses.
However, with all their advantages, lightweight acrylic bathtubs are sensitive to external influences.
The material tends to expand at high temperatures, it is easily scratched by abrasive detergents, and when heavy objects fall in such a bath, cracks or even holes can form.
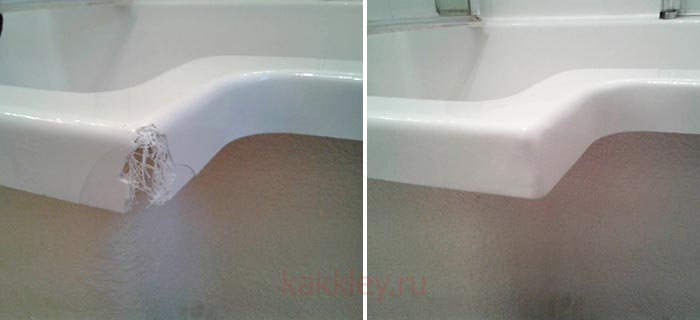
Are acrylic baths repairable? What to do if the acrylic bath burst? Can it be glued?
Yes, bathtubs made of polymeric materials are maintainable, and you can fix the crack yourself, without asking for help from specialists.
However, ordinary universal glue is not suitable for these purposes.
Since acrylic has unsatisfactory adhesive properties, you will need a special moisture and heat resistant adhesive.
Theoretically, it is possible to block a crack or a small hole in an acrylic bath using any sealant, however, it should be noted that during operation the bath bowl will continue to be subjected to constant mechanical deformations, as well as exposure to high temperatures and aggressive liquids.
In this regard, the restoration repair must be carried out in 2 stages: from the outside and from the inside.
Accordingly, to seal the bath, you will need two completely different compositions: a two-component epoxy adhesive and acrylic putty.
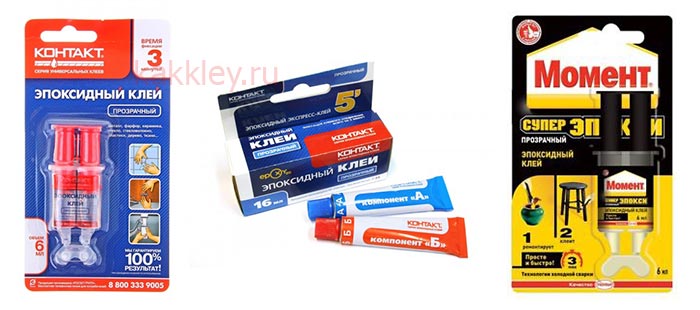
To reinforce a cracked bath from the outside, the simplest (inexpensive) brands of epoxy glue are suitable, for example:
"Contact" is a universal 2-component epoxy adhesive. The composition is colorless, not afraid of moisture, glued products can be used at high temperatures (up to 150 degrees).
The composition of the adhesive includes epoxy resin, composite hardener, modifying additives.
Glue "Contact" has increased fluidity, fills cracks and voids, restoring the shape of the product, does not shrink and does not expand during curing. It is sold in a package convenient for dosage (double syringe), it costs about 120 rubles;
Moment SUPER EPOXY is a universal two-component adhesive, supplied as a set of two combined tubes (epoxy + hardener).
The mixing ratio of the adhesive is 1:1, which simplifies the process of preparing the composition.
When curing, the epoxy adhesive from the brand "Moment" does not expand and does not shrink, it is not afraid of exposure to water and aggressive liquids. After application, the adhesive hardens after 5 minutes, and after an hour it finally sets.
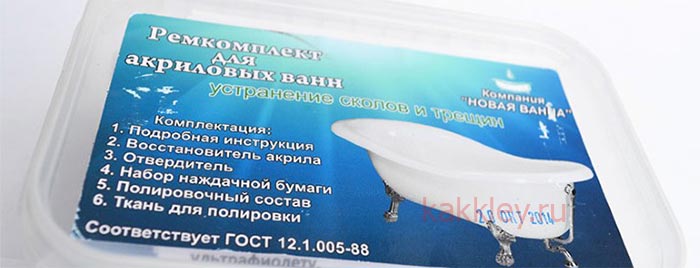
A special repair kit, which is sold in plumbing stores, will help to seal the crack on the outside of the acrylic bath. It includes everything you need:
- acrylic restorer (liquid acrylic);
- hardener;
- a set of sandpaper;
- putty knife;
- polishing compound and polishing cloth.
On sale today you can find repair kits from different manufacturers, they are sold under the trademarks "Remacril", "Samodelkin", "New Bath" and others, cost an average of about 500 rubles.
There are also more expensive imported analogues, but their composition differs little from Russian ones.

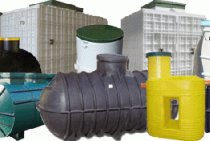
 Ready-made kits for renovation of bathtubs and shower trays made of acrylic
To seal a crack in an acrylic bath, you will need the following materials and tools:
- Epoxy adhesive;
- Reinforcing fiberglass;
- tassel;
- Acetone;
- Drill and drill with a diameter of 1-2 mm;
- Repair kit with liquid acrylic.
The crack repair process itself consists of several successive stages:
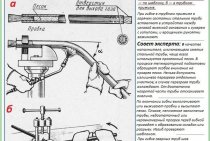
- To begin with, a further increase in the crack should be excluded. To do this, on each side, a few millimeters from the edges, drill holes with a diameter of 1-2 mm;
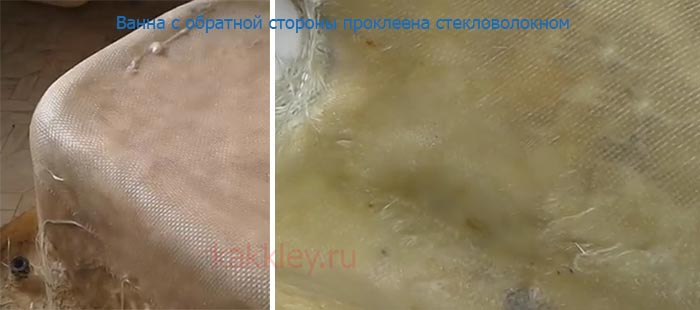
- Then it is necessary to strengthen the damaged area with a reinforcing patch on the back of the crack. Fiberglass patches should be glued in several layers on epoxy adhesive. This should be done only on a previously degreased and cleaned of dirt surface.
- The composition is applied in a uniform layer with a brush and laid with fiberglass. After the first layer has dried, glue the second layer. In most cases, 2-3 layers are enough to eliminate small cracks;
- After about an hour (see the instructions for the epoxy adhesive), you can begin to eliminate defects from the outside. To do this, the damage site is treated with fine sandpaper, degreased with acetone and covered with liquid acrylic from the repair kit. After the composition has dried, the surface is treated with a polishing paste.
VIDEO INSTRUCTION
Damage restoration methods
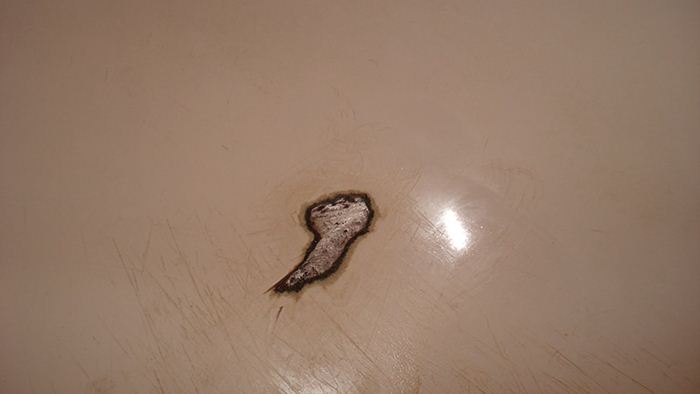
Chips on the bowl appear quite easily. A small physical impact is enough and a piece of the coating bounces off. Steel products are especially often affected. If the chip is not repaired in time, it is fraught with corrosion of the entire bowl and then the replacement of the bath cannot be avoided. Special materials for reliable surface restoration have appeared in the public domain relatively recently.

A mixture of BF-2 glue and any filler (tooth powder, chalk). The glue reliably closes the damage, but the filler, due to its porous structure, passes moisture well. Epoxy resin and porcelain powder. Porcelain is ground into powder and sprinkled on the epoxy-lubricated damage. After drying and grinding, a patch is obtained. The method gives a controversial result, since after drying the resin can easily chip off the steel surface.

Special modern materials qualitatively restore damage and are almost invisible on the surface. The most available car enamel or putty. They easily and permanently close up chips and scratches. The main thing, when applying, is to adhere to the technological process.
Ready repair kit
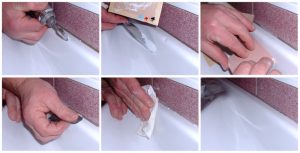
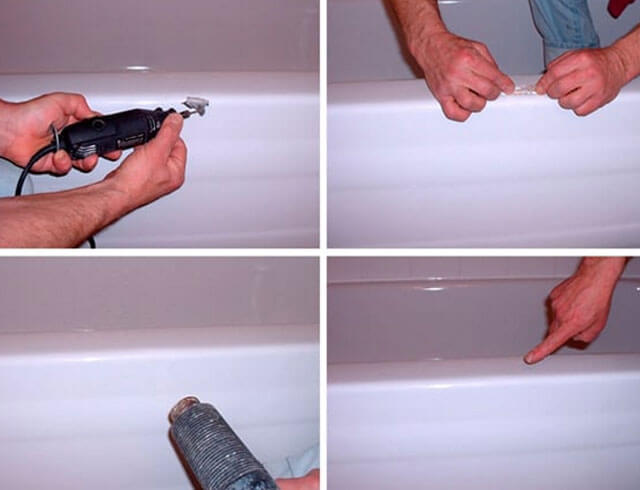
A repair kit is the simplest and most effective way to restore a bathtub. Different manufacturers have different price categories, as well as operating instructions. The kit may include a putty mixture, a spatula for mixing, sandpaper for acrylic and enamels, and a finishing spray. Typically, repairs include the following steps.
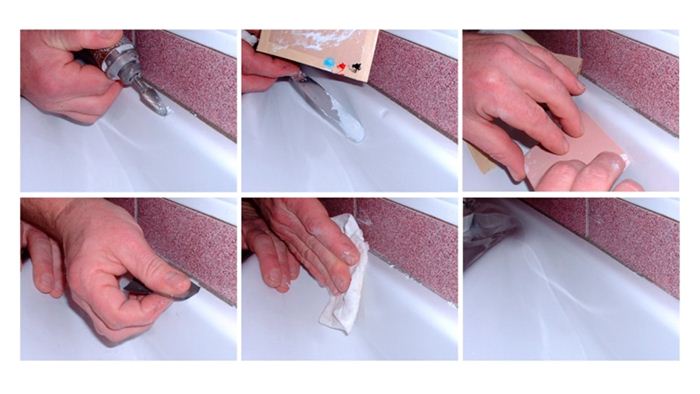
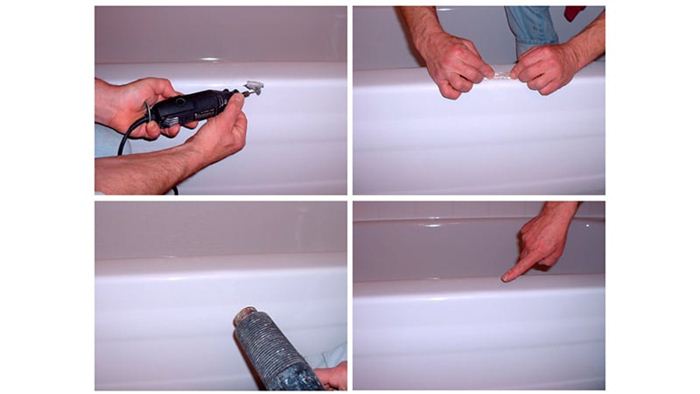
- Cleavage cleaning. It is necessary to carefully remove dirt, rust. Then degrease the surface with baking soda and dry or treat the chip with acetone.
- Putty preparation. Putty and hardener usually come in different bottles. It is necessary to combine them in proportions according to the instructions, mix thoroughly with a spatula, apply evenly on the chip and wait for the time specified by the manufacturer (usually 30 minutes).
- Surface leveling. After the putty has hardened, it will need to be cleaned with sandpaper. Ideally, you should not feel the transition between grout and enamel.
- Painting. The dye is sprayed onto the chipped area with aerosol paint from a distance of 15-20 cm. It is better to do this in several stages with an interval of 2 minutes. After applying several coats and seeing that the colors of the enamel and the patch match perfectly, let the paint dry. After two hours, the place of the chip can be touched, and after four days the bath will be ready for use.
With the help of a repair kit, you can almost completely recreate the enamel coating of a white acrylic, cast iron, ceramic bath. The disadvantage of the method is that a good set can not be purchased at every hardware store. In addition, the color of the enamel of the bath and the aerosol may not match completely, which happens in 90% of cases.
Types of baths and methods for repairing damage
- Acrylic.
- Cast iron.
- Wooden.
- Steel.
- Glass.
- From natural stone.
Wooden, glass and natural stone models are almost impossible to restore on your own. Too big a risk, permanently spoil the surface.

Another thing, bathrooms with an enamel surface. Their restoration will not require large costs and effort. The main thing is to start the recovery process immediately, without delay.
- Repair any chips on acrylic surfaces immediately. Any damage that allows moisture to get inside the material and can ruin the acrylic bowl.
- Rust. Regardless of what material the font is made of, rust on it can appear on almost any type of coating.
- Scratches. Most often, acrylic and cast iron products suffer from scratches. A scratch on an acrylic surface is much more dangerous than on a cast iron one. A deep scratch that is not repaired immediately can grow larger and lead to a split, breakage of the bottom or walls of the bowl.
- Split. The real problem with "acrylic" bathtubs is that the bottom or walls are too thin.
- Through hole. Can appear in a bowl of any material. If you can repair chips and scratches on your own, then with a through hole, you cannot do without the help of professionals in restoration. You can only try to put the insert on your own.