Connecting the boiler to radiators and hot water
This process is performed in the following sequence:
- Do-it-yourself installation of ball valves on the boiler nozzles. To ensure sealing, tow, fum-tape or thread is wound on the threads on the nozzles. It should be added that before fixing valves or filters, one of these elements must always be wound on the threads of metal pipes. If you plan to use polypropylene or metal-plastic pipes, you will have to solder and use special fittings. The features of these processes can be found in various videos.
- A pipe is connected to one tap for supplying coolant to the heating system installed in the house.
- If necessary, mount the security group.
- An expansion tank is placed on the return pipe of the heating system (of course, if it is necessary).
- Carry out the installation of a ball valve and a water purification filter. The latter must be mounted on a horizontal section of the pipeline. It is also possible on a vertical pipe, however, in this case, you will have to use a special version of the filter. It is installed in such a position that the direction of the arrow depicted on it coincides with the direction of movement of the coolant.
- After the filter, a second ball valve is placed. These taps are necessary to facilitate filter cleaning. They are covered with their own hands and the filter is cleaned.
- Connect the return pipe from the heating system to the boiler.
- Connect the "hot" DHW pipe to the tap located on the desired pipe.
- A water pipe is cut into the return line from the DHW. Of course, a ball valve is placed at the beginning of this pipe. It will stop the flow of cold water after it fills the entire heating system and hot water installed in a private house.
- A ball valve, a water purification filter, a magnetic filter and a ball valve are placed on the return pipe from the hot water supply before entering the boiler.
There was no mention of a circulation pump. Wall-mounted double-circuit boilers always have it. For floor boilers designed for natural circulation of the coolant, it is not needed. If a device for natural circulation was previously installed. and then I wanted to make the movement of the coolant forced, I would have to install two circulation pumps: one on the return line of the heating system, the other on the return line of the DHW.
Connection Features
The features listed below are not mandatory, but their implementation extends the life of the boiler and facilitates the maintenance of the entire heating system as a whole. They are:
- Do-it-yourself shut-off ball valves should be installed on all water pipes of the gas unit.
- It is worth installing a water purification filter on the pipe through which the cooled coolant returns. Thanks to this, it is possible to protect the heat exchanger from contamination by substances that return from the heating network. The same filter is in demand on the cold water supply pipe to the second circuit.
- Shut-off ball valves should be placed on both sides of the filters. This will make the filters easier to clean.
- It is desirable to include a chemical water softener in the strapping. It reduces the hardness of the coolant and prevents the formation of scale in the heat exchanger. It is placed on the return pipe.
- Connecting the boiler to the heating main should be done using detachable threaded couplings and the same pipes that make up the heating network. The first will come in handy when you need to remove the boiler. Thanks to them, it is not necessary to violate the integrity of the pipes.
- A valve for draining the coolant from the boiler should be installed on the lower circuit of the heating system. Thanks to this, it will not be necessary to drain the entire coolant from the network.
According to the requirements described in different videos, it is mandatory when connecting:
- provide a valve that drains the water. It is installed by hand on the lower circuit of the network;
- connect the make-up pipe to the coolant supply line to the system. This approach does not allow cold water to enter the red-hot heat exchanger. This rule is relevant for classic gas boilers. If condensation devices are used, then it is better to connect such a connection to the return line;
- do not install a shut-off valve between the boiler and the safety group (this requirement is appropriate for situations involving the additional installation of such a group; usually it is not needed, since it is part of the device).
What is the principle of indirect heating
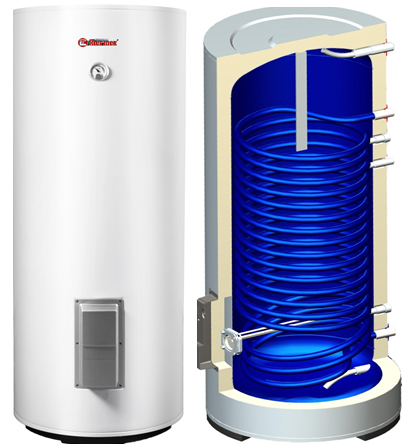
Indirect heating boiler: general view
Unlike direct heating, when water receives heat directly from a burner or electric heater, indirect heating involves heating using the working medium of the heating system. Being heated by the boiler, it is fed into the heat exchanger in the boiler, where it gives off the acquired energy. Further, everything happens in the same way as in a conventional heating circuit: the cooled coolant enters the "return" pipeline and through it - again into the boiler.
Such water heaters are often referred to as heating boilers. Here are their benefits
- The design of such a device can be considered primitive. The central element - a heat exchanger, which is a tube or container, is much simpler than a burner or an electric heater.
- Since the temperature of the coolant does not exceed 90 degrees, the risk of water boiling in the boiler with subsequent rupture of the tank is completely eliminated.
- Water is heated faster than in an electric boiler.
In domestic conditions, it is more convenient to use a boiler than an instantaneous water heater, since it:
- requires relatively little power for operation (due to the heating process stretching in time);
- can serve several points of water intake at the same time;
- capable, albeit for a limited time, to provide an arbitrarily large flow of hot water.
There are, of course, disadvantages to such a device. There are also several:
- The temperature of the water in the boiler cannot be higher than the temperature of the coolant, therefore, in the off-season, when the heating system is operated in low-temperature mode, the heated water is consumed very quickly (it has to be used without dilution with cold water).
- In summer, when the heating system is off, indirect heating does not work at all.
- Like any other boiler, this unit takes up quite a lot of space.
Storing a large supply of hot water in standby mode is accompanied by heat losses, although in the case of the incidental use of the boiler as a heating device in the boiler room, this disadvantage should not be taken into account
Installation and installation requirements
It depends on how the gas boiler is made. If it is floor-standing, then the installation consists in placing the boiler in the place where it should be. Before this, they check the strength of the base with their own hands and, if necessary, strengthen it.
If you plan to connect a wall-mounted unit. then its installation in the house involves the sequential implementation of the following steps:
- Building a chimney. It can be classic (needed for natural draft boilers) and coaxial (designed for forced draft units). The first is made of steel round pipes, which must be insulated. The second is assembled from pipes that are part of the boiler kit. The coaxial chimney must be immediately connected to the unit.
- Fixing brackets.
- Hanging the boiler.
Regardless of the installation method, all hosts should follow the requirements often mentioned in the video:
- The presence of a boiler room for a floor gas boiler.It must have a volume greater than 15 cubic meters. m, a separate entrance, a window with an area of more than 0.45 sq. m and ventilation.
- The presence of a gas contamination sensor in the room where the boiler will be located.
- There must be a layer of material between the wall/floor and the boiler. which does not burn.
- The nearest gas appliances should be placed at a distance of at least 20 cm.
- The distance between the boiler and adjacent walls should be 30-50 cm.
Connection to the gas pipeline and installation of the chimney
The first process should be done by specialists of the company that supplies gas. They must first check that the boiler is installed correctly and that all requirements are met. After they connect the device and issue a document that allows you to use the gas unit.
This need is dictated by the fact that all gas-powered devices are dangerous, and if installed incorrectly, an explosive situation may arise in the future.
To connect to the gas pipeline, you need to prepare:
- Tap.
- Mesh filter. It will carry out gas purification, so that the burner will not clog and will be able to function for a very long time.
Partially about the chimney has already been mentioned. It was about a coaxial chimney. It is typical for boilers with a closed chamber (mainly these are wall-mounted options). Also, floor units have such a camera. However, most of them are equipped with an open chamber. This means that air enters the combustion chamber from the room, and good draft is in demand for the removal of carbon monoxide. And for this you need to make a high chimney with your own hands.
The chimney is mounted like this:
- Install vertical stainless steel pipe. fixing it with a special fastener. Its height should be such that the upper end protrudes 0.5 m above the roof ridge. At the same time, they try to make as few turns and horizontal sections as possible. If the latter cannot be dispensed with, then they cannot be made longer than 1 m.
- Connect this pipe to the boiler.
- All parts of the chimney that will be in contact with cold air are thermally insulated. For this, it is better to use basalt wool.
- A special umbrella is placed at the top.
Installing a solid fuel boiler Connecting a solid fuel boiler and a gas boiler to one system Selecting and installing a gas fireplace Installing a heating boiler in a private house
Manufacturing technology step by step
We act like this:
-
If the water heater is supposed to be made rectangular, then from stainless steel sheets of the appropriate size it is necessary to weld a box without a lid and one side wall. If you are going to make a boiler tank from a round billet, then it must be cut lengthwise into two halves.
- In the side wall of a rectangular tank or in one of the halves of a round one, we drill a hole with a diameter of 38 mm, into which the coil outlet will be threaded. The same hole will need to be drilled in the second, not yet welded wall (in the case of a round tank, in the second half).
-
Now you need to make a square coil, sequentially welding pipe sections and bends to each other. The extreme sections of the pipes must be rotated so that they are parallel to the axis of the coil - these will be outlets.
- Next, we install the coil in a box or one of the semicircular halves, placing its outlet in a hole drilled in the wall. From the outside, the outlet must be welded to the tank wall with a sealed seam.
- To exclude vibration of the heat exchanger, it is desirable to fix it by welding a pipe segment between it and the bottom.
- Now we install the missing side wall or the second semicircular half in place, putting it on the second outlet of the coil, and weld it. This release is also hermetically sealed.
- If the boiler is pressurized, the cover should also be welded, non-pressure - you can simply put it on top.
Next, in the tank, you need to drill several holes to which the pipes are welded:
- for supplying cold water (for a pressure boiler - at the bottom, for a non-pressure boiler - at the top);
- for the selection of hot water (above);
- for installation of a thermal bulb (in the lower part);
- for inserting a relief valve if the boiler is pressure;
- to connect the recirculation system, if any (below);
- for heating elements (you will need a model with a flange mount).
The length of the nozzles should be selected taking into account the thickness of the thermal insulation. A flange must be welded to the pipe for installing the heating element.
Also at this stage, brackets must be welded to the tank for attaching the casing and for hanging it on the wall (if the model is floor-standing, the legs should be welded).
Further:
- We cover the tank with basalt fiber mats, fixing them with a cord.
- We fasten to the brackets a protective casing made of thin steel panels, powder-coated or zinc-coated.
Now we install the heating element, the thermal bulb and the relief valve or float valve in place.
Rules for installation on a wall or floor
The gas unit must be placed inside a separate room. which meets the following requirements:
- There is a window that can be opened at any time.
- Availability of existing ventilation.
- The presence of gas and water pipes.
- The presence of a socket to ensure the operation of the circulation pump and electronics. Of course, it should be the end of a separate branch that extends from the electrical panel. This cable must be connected to a separate circuit breaker. In addition, grounding is mandatory.
There are also requirements regarding the correct placement of the boiler in the house. They are:
- The distance between the main element of the heating system and other gas appliances must exceed 20 cm.
- There should not be a window nearby.
- The distance between the boiler and the socket must be at least 0.5 m (at least, such recommendations are given by manufacturers). In general, the farther the outlet from the boiler, the better. It is worth adding that some models have a power cable without a plug. This means that the wire must be connected with your own hands immediately to the circuit breaker located in the electrical panel.
- The space between the side walls of the boiler and adjacent walls or objects must be greater than 15 cm.
- The wall on which or near which the boiler is installed must be solid and covered with non-flammable materials. If the wall is such that it may catch fire, it should be covered with at least 3 mm non-combustible material. This is often noted in various videos.
Connecting the wall-mounted boiler to the mains
Most modern wall-mounted gas boilers are equipped with sophisticated automation. It controls many processes, turning the heating boiler into an autonomous mini-boiler room, the operation of which practically does not require the intervention of the owner. Obviously, the control unit and various sensors require an electrical connection.
Double-circuit wall-mounted boilers are available in two versions: with a familiar socket and with a cable for connecting directly to the machine. In any case, they must be powered from the mains through an individual machine. If you purchased a model with a plug, then an individual socket for a gas boiler should be located next to it, but in no case under it. This is one of the safety requirements so that in the event of a coolant leakage, a short circuit does not occur.
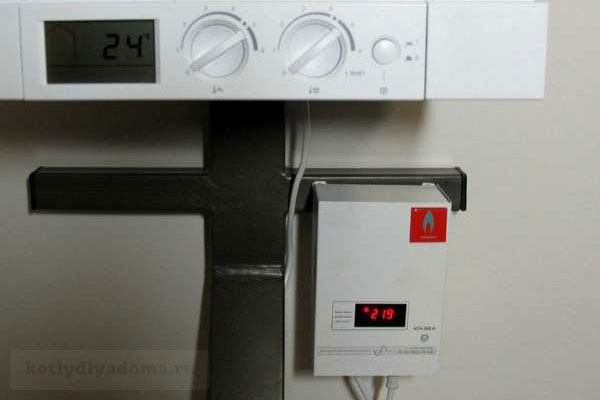 Photo 3: Installing a voltage stabilizer for a wall-mounted boiler
The gas boiler requires mandatory grounding. For these purposes, you can purchase a point grounding kit. It is installed in the basement or next to the house and occupies a small area of about 0.25 m².
Attention! It is strictly forbidden to ground a wall-mounted gas boiler to a heating radiator or a gas supply pipe. This is a gross violation of the rules for operating gas equipment and is extremely dangerous.
Boiler automation is very sensitive to the quality of the supply voltage. With an insufficient level or imperfect shape of the sinusoid at the input, the devices quickly fail. To prevent frequent breakdowns and extend the life of the unit, it is required to connect voltage stabilizers for gas boilers. To avoid stopping the heating equipment in the event of power outages, you should additionally purchase an uninterruptible power supply.
Scheme with an additional heat exchanger
Such a boiler connection scheme is in demand when there is a need to completely waterproof individual circuits of the heating system. This need arises when using various coolants in the circuits. That is, water can move in one, antifreeze in the other.
The strapping shown in different photos looks like this:
- Boiler.
- Heat exchanger.
- Various circuits of the heating network.
- Safety elements installed on each circuit, a circulation pump, a drain cock and a make-up cock.
The heat exchanger is a heat accumulator with at least three coils. Water heated in the boiler circulates one at a time, and various types of heat carriers circulate through the other two. The heat from the first coil is transferred to the others through the water in which they are located.
The benefit of an additional heat exchanger also lies in the ability to combine open and closed systems. The first is safer for the operation of the boiler, the second is more gentle for radiators.
Schemes for connecting an indirect heating boiler to the boiler
In order for the water to heat up faster, you need to slightly improve the connection diagram of the water heater. Here are some options.
Using a 3-way servo valve
The valve is installed in the place where the line for supplying the coolant to the boiler branches off from the main pipeline. The latter should be equipped with an electronic thermostat linked to a 3-way valve actuator.
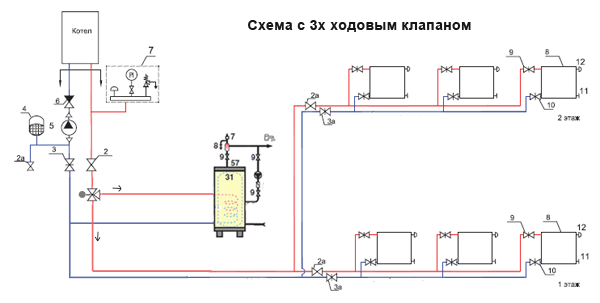
Connection diagram with three-way valve
This scheme provides the priority of the water heater: if the water in it needs to be heated, the servomotor, at the signal of the thermostat, will move the valve to such a position that the coolant circulates only through the boiler coil. Upon reaching the desired temperature, the valve will return to its previous position, redirecting the working medium to the heating circuit.
The 3-way valve arrangement is the most commonly used.
Of course, the temperature set on the thermostat scale should not exceed the temperature of the coolant (taking into account heat losses, it should be at least a few degrees lower), otherwise the valve will always be in the “on the boiler” position.
With two circulation pumps
In this version, the boiler circuit is equipped with its own circulation pump, which is also activated by a signal from the electronic thermostat.
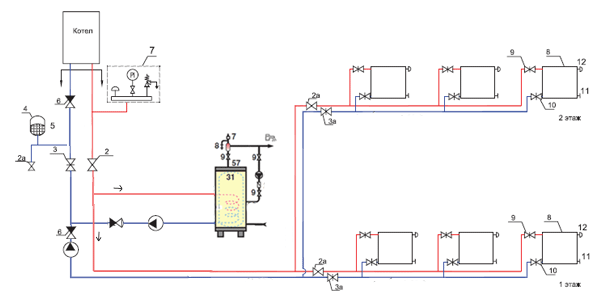
Connection diagram with two pumps
So that each of the pumps does not create counterflow in the adjacent circuit, check valves are cut into the pipelines.
With the use of a hydraulic gun
A hydraulic arrow, also called a hydraulic separator, is used in cases where the heating system consists of several circuits. Without a hydraulic arrow, a change in the coolant flow through one of the circuits or its complete shutdown always affects the operation of other circuits. If this element is set, the mutual influence is reduced to zero.

Using a hydraulic arrow in a boiler piping scheme
In private houses, radiator heating, floor heating and an indirect heating boiler are most often connected through a hydraulic arrow.
Connection with recirculation
During the period of inactivity, the water in the pipeline connecting the boiler and the draw-off point has time to cool down, so that the user has to wait for some time each time for the appearance of hot water.This, firstly, is not very convenient, and secondly, it leads to cost overruns: today you have to pay for water according to the meter.
To make the system more practical, the hot water supply line to the tap is looped, laying along it, one might say, a “return” to the boiler. Now it is enough to install a circulation pump in this ring - and the stagnation of water, and hence its cooling, will be finished.
If the pipe leaving the boiler starts in a vertical section and only then goes down to the taps, and the return pipe is laid below it, then the recirculation system will be able to function without a pump - due to convection, that is, in natural circulation mode (provided that the pipes have fairly large diameter).
Features of installation and operation in accordance with the characteristics
If the boiler is wall-mounted, then you need to choose a sufficiently strong main wall for it. The parameters of fasteners depend on the volume of the water heater and the wall material:
- with a volume of 30-50 l (pull-out force - 15-25 kg): for concrete - diameter 6-8 mm, length 60-80 mm; for brick or cinder block - diameter 8–10 mm, length 80–100 mm;
- 80-100 l (pull-out force - 25-35 kg): concrete - (8-10 mm) / (80-100 mm); brick / cinder block - (10–12 mm) / (100–120 mm);
- 150-200 l (pull-out force - 45-60 kg): concrete - (10-12 mm) / (80-120 mm); brick / cinder block - (12–14 mm) / (120–150 mm).
A non-return valve must be installed at the cold water inlet in front of the boiler, which will prevent hot water from leaking into the cold water supply. It is forbidden to install shut-off valves between the check valve and the boiler. But you need to embed a tee with a tap in this area - through this tap the tank can be emptied for maintenance (it will not work to drain the water from the boiler through the draw-off point, since hot water is taken from above).
The main damaging factor for a water heater of any type is scale - a loose “fur coat” formed as a result of the crystallization of magnesium and calcium salts. The process of scale deposition begins at a temperature of about + 80 ° C and it occurs the more intensely, the more the water heats up. Therefore, with moderate consumption of hot water, for example, for washing a couple of dishes or washing, it is advisable to set the minimum possible temperature on the boiler thermostat, that is, such that hot water does not have to be diluted with cold water.
And only if a lot of water is required, for example, the user is going to take a shower, it is necessary to set the regulator to maximum heat.
To remove scale, a solution of acetic or citric acid must be pumped into the tank, which is then heated to the highest possible temperature.
When using ordinary water as a heat carrier, which has not been prepared in the form of a desalination procedure, scale can also form inside the coil. This can be easily guessed from the noticeably reduced heating power. It is “treated” in the same way: with the help of a pump, a solution of citric or acetic acid is pumped through the heat exchanger. In this case, it must be fed at a speed of 1 m / s.
During operation, a leak may appear at the points where the boiler is connected to communications. In this case, the threaded connections must be repacked by adding a little more sealant. If, due to lack of experience, you are having difficulty organizing tight threaded connections on pipelines, try using Tanget Unilock linen thread as a sealant.
It costs a little more than ordinary sanitary flax, but it is more convenient to use and, if laid in excess, does not cause destruction of the screwed-on part.
If a leak is found in the tank, it is necessary to weld the seam more carefully in the place where it appeared.As a temporary measure, the leak can be sealed with cold welding glue.
Video: homemade indirect heating boiler
The ability to get hot water by simply opening a tap is an invaluable convenience, without which modern life cannot be considered comfortable. In winter, we somehow have to heat the coolant of the heating circuit. And, as they say, it’s a sin not to take advantage of this - the use of the resources of this system allows you to quickly and easily prepare hot water for household needs. To do this, you need the simplest device - an indirect heating boiler, which, following our advice, can be made very easily on your own.
Options for homemade water heaters for solid fuel heat generators
In the case of wood or coal stoves/boilers, flue gases can be used as a heat source for indirect heating. To do this, instead of a coil, a pipe is installed in the boiler, which is connected on one side to the flue pipe of the heat generating installation, and on the other to the chimney. It is desirable that this pipe (it is called a fire-tube heat exchanger) is located vertically.
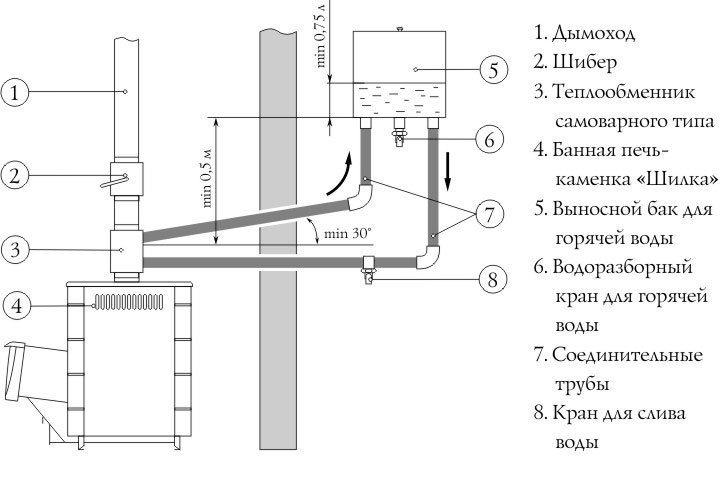
Use of flue gas heat: boiler drawing
It is even better to purchase a convector oven, the firebox of which is surrounded by vertical pipes. Hot air is constantly blown out of them during the operation of the heater. The fire tube heat exchanger of the boiler can be connected to one of these pipes using a metal corrugation. This method of connection, unlike the version with a chimney, does not cause the flue gases to cool down, which is accompanied by a deterioration in draft and the formation of a large amount of condensate.
Schematic diagram of titanium (wood boiler)
Connection to the gas line
The process of connecting a gas boiler to a gas pipeline must be carried out exclusively by qualified specialists from the gas service or another organization licensed to carry out this type of work. Independent connection to the gas main is illegal and, at best, threatens the owner of the premises with a considerable fine, and at worst, it can lead to tragedy.
The first stage in the process of gasification of an object is contacting the gas service. After submitting all the necessary documents, individual technical conditions (TS) will be developed for you, the fulfillment of which is necessary to connect to the gas main.
After you have the specifications in your hands, you can safely start looking for a certified specialist who, in accordance with the requirements of the regulatory authorities, will design the gas pipeline and connect your heating boiler to it.
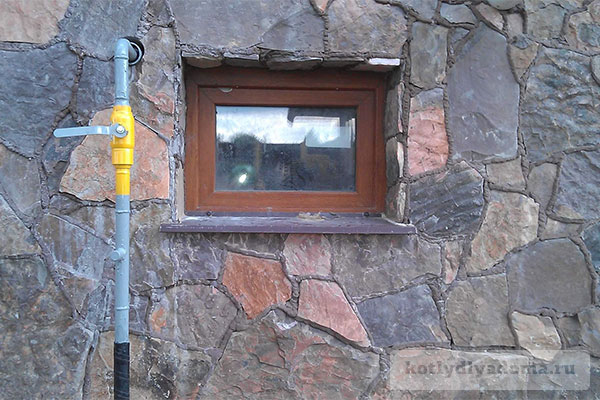 Photo 5: Connecting the wall-mounted boiler to the gas main
Gasification of the premises can be carried out by underground and aboveground methods. Corrosion-resistant polyethylene pipes are used for the underground section, and the above-ground part is made of steel pipes that enter the room right at the location of the gas heating boiler, at a distance of 1.2-1.5 m from the floor.
Attention! When using several heaters, the gas supply to each of them is carried out separately. Laying gas pipelines indoors is strictly prohibited.
When accepting installation work, special attention should be paid to the fact that all joints must be sealed with tow or paint. The use of sealing tape or FUM is not allowed due to the low degree of tightness of the connection
A gas filter must be installed on the shut-off valve to protect the boiler from small debris and condensate. It is recommended to connect the gas boiler directly to the shut-off valves using steel pipes.It is allowed to use a special corrugated stainless steel hose, but pipes are still preferable, since their use does not reduce the cross section of the gas channel.
For more information on connecting and piping wall-mounted gas boilers, see the following video:
The service life, efficiency of work, as well as the safety of its owner depend on how correctly the wall-mounted gas boiler is connected. We hope that our short overview of the main stages of connecting and tying was useful to you.
Fixing the boiler
The installation of a wall-mounted boiler in the house is carried out in this way:
- They study the manufacturer's recommendations and select the best place in terms of safety and convenience.
- Fix on the wall mount. supplied with the boiler. To carry out its installation in the house correctly, you should use the level and slope. Very often, the fasteners are long dowels and hooks with threads on the longer end.
- Where the chimney should cross the wall. make a hole for it.
- Fix the chimney in the boiler. This process is carried out very carefully, since the chimney is coaxial (not only carbon monoxide exits through it, but fresh air is also supplied). And this means that if a mistake is made, air and carbon monoxide will not be able to circulate correctly, which will necessarily lead to bad consequences.
- The boiler is hung on fixings fixed in the wall.
In the case of a floor-standing boiler, installation is simpler, because you just need to make a solid base on the floor with your own hands and place the device against the wall.
The main nuances of connecting double-circuit gas boilers
Before connecting the equipment, it is imperative to install a filter for coarse water purification on the pipeline branch pipe itself. It prevents debris from clogging the boiler, which is formed in the battery as a result of the reaction of water with metal.
connection diagram for gas double-circuit boilers
If you do not put a filter for coarse cleaning, then the equipment will very soon cease to function. To properly install the filter, you need to screw it onto the return pipe itself so that the arrow points to the boiler.
If you install a shut-off valve on the return of the boiler, then in the event of an unexpected failure of the equipment, it will not be necessary to air all the liquid in the heating system.
Before you start connecting double-circuit gas boilers, be sure to install a shut-off valve with a detachable connection so that, if necessary, it is convenient for you to disconnect it from the heating circuit. without resorting to cutting pipes.
A bad connection between the boiler and the gas pipeline can lead to an explosion.
The connection scheme for gas double-circuit boilers provides not only for their correct installation, but also for their piping.
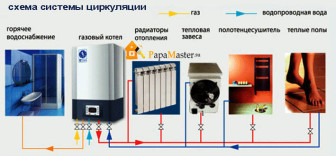 circulation system diagram
The piping scheme depends directly on the model of the boiler, on the type of device and on the heating system. They come with natural circulation and automatic.
A system with natural circulation is considered easier to maintain and more reliable. Such a system can only be controlled manually, it is just perfect for private homes, where an unexpected power outage is possible.
The automatic circulation scheme is more convenient because it does not require human intervention. With such a scheme, it is enough to set the desired temperature level once and this level will be constantly maintained automatically. However, in the event of an unexpected power outage, the pumps will stop working, and accordingly, the heated coolant will not circulate.
When choosing a boiler, pay attention to its power, but it is worth noting that with a high boiler power, gas consumption will be greater. With proper connection, the boiler will serve you for a very long time and will help create coziness and comfort in the house.
Recently, they have become massively popular among buyers, since they occupy a minimum of space and at the same time are highly efficient.
Interesting on the site
Drilling is one of the indispensable technological operations in the production and construction sector, in the restoration of equipment and the repair of premises. Modern drills are installed in machine tools, portable electric or ... more. »
When compared with other roofing materials, metal roofing can be called a clear favorite. It is durable, quick and easy to lay, and the color palette of different manufacturers ... more. »
Heating of private houses through two different systems has become normal. Most often, on the ground floor, the installation of a warm system that has gained great popularity over the past decade ... more. »
Competently approaching the choice of this floor covering for a simple layman is an order of magnitude more difficult than it might seem. To take into account the many existing nuances, the buyer must be aware of ... more. »