How to assemble the simplest furniture from plasterboard
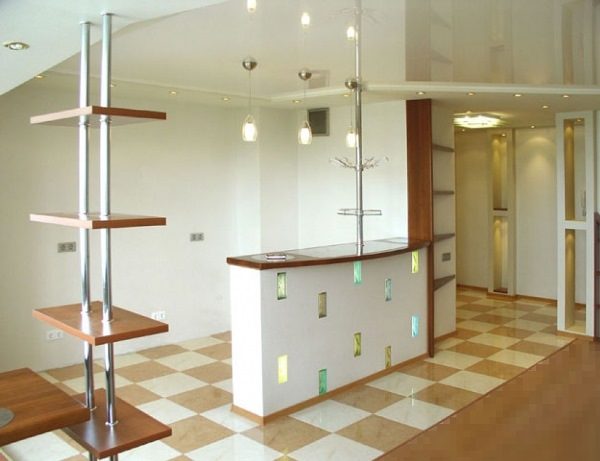
To begin with, we will tell you how to make drywall shelves. To do this, you will need wall sheets with a thickness of at least 12 mm.
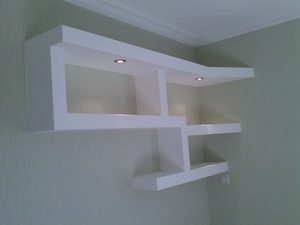
Drywall shelves
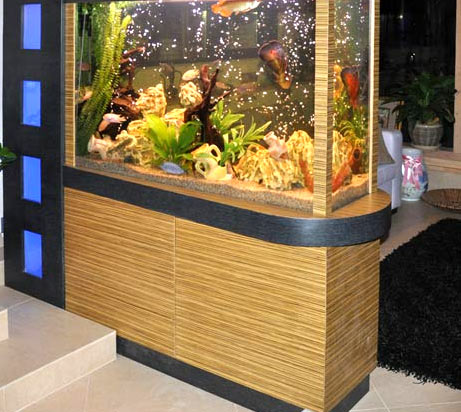
If you need a decorative stand, for example, for a photo or dried flowers, you can mount a lightweight frame and sew it with GKL in one layer. For bookshelves, an aquarium, house plants, plasma panels, a structure with increased strength will be required.
In this case, reinforce the frame with additional profiles, and sheathe it with drywall in 2 layers.
- First, calculate the supporting profiles, depending on the future loads on the shelf.
- Draw an exact drawing of the structure with what will be located on it.
- Then transfer the diagram to the wall.
- Now you can start assembling the frame with your own hands. Mount the supporting profiles on the wall where the shelf will be located, as well as on the ceiling - at the locations of the vertical walls. Do not make the design too deep. This will complicate its finishing and give the product a heavy look.
- For the remaining batten, use the CD-60 profile. During installation, strictly observe the horizontal and vertical fastening of the strips.
- After that, sheathe the frame with drywall.
- To strengthen the outer and inner corners of the shelf and give them evenness, reinforce them with a perforated corner profile.
- Next, apply a thin layer of putty to the shelf. Before doing this, stick a plastic plaster mesh on the product.
- As a finish, you can use paint, wallpaper, decorative plaster.
Plasterboard shelving
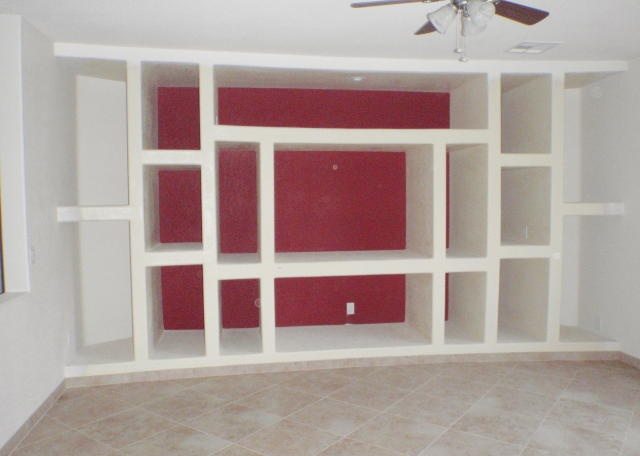
From GKL you can make racks that have any configuration. At the same time, the price and labor intensity of such an interior element will be small.
As in the previous case, the main part of the work is the creation of a sketch, the marking of surfaces for shelves and walls, then the installation of the frame. It consists of UD and CD profiles that are attached to the floor, ceiling and walls. GKL sheets are mounted on it.
Below is a small guide.
- Choose the thickness of the sheets depending on their purpose, but not less than 1.2 cm.
- If the weight of the items placed on the racks is large, the step of the frame profiles should be minimal, and the sheets should be fastened in two layers.
- If the furniture will be located in the toilet, bathroom, or kitchen, use moisture-resistant sheets (they are green).
- When communications are sewn into the rack, it is better to replace the profile in the frame with welding corners or channels, as well as strong fittings.
- If a chimney will pass through the structure, heat-resistant drywall (it has a red color) must be used.
- For mounting complex shapes and making corners even, use a thin steel profile.
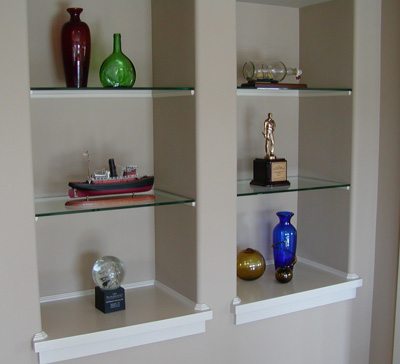
- Horizontal elements, that is, shelves, can be made not only from plasterboard sheets. As the photo shows, for this you can use thick moisture-resistant plywood, impact-resistant glass, OSB, chipboard, etc.
- To improve the design of furniture, highlight it with light bulbs.
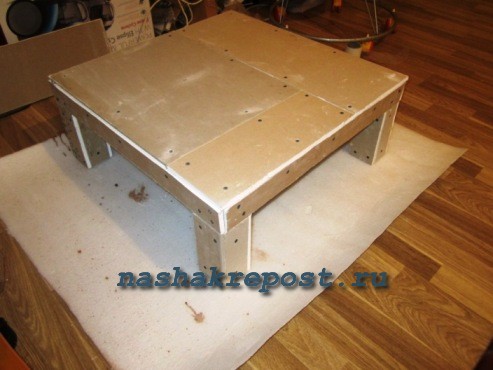
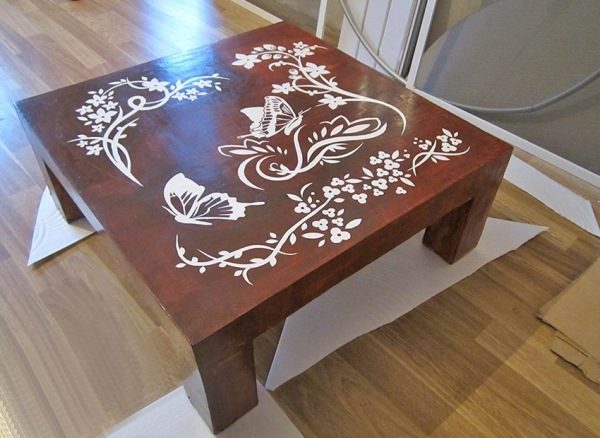
DIY drywall table
As with other types of work with gypsum sheet material, for its fastening it is necessary to make a solid base structure. The material for this can serve as wooden bars of one or another section or a steel profile. From individual parts cut to length, assemble the frame of the table according to the dimensions that are most convenient for you.

To connect the steel profile, use small metal screws with a cap of sufficient diameter. Remember that the strength of drywall sheets is relatively low, so the distance between the individual support parts should not exceed 30-40 centimeters.
The next stage in the assembly of this piece of plasterboard furniture is the finishing of the frame with flat parts. In order to obtain rectangles of the desired size from a large sheet, it is necessary to cut individual strips of equal width along or across. There are two separate ways to do this. At the first sawing, sawing is carried out using a carpentry fine-toothed hacksaw or an electric jigsaw. Its disadvantage is the release of a large amount of gypsum dust into the surrounding space, which, to put it mildly, is not useful for the human body. Respiratory protection must be used to prevent gypsum particles from entering the lungs during hand or power sawing. This option is good in cases where curved parts are needed.
For direct cutting of drywall sheets, it is better to use the second method. You will need to have a construction knife, such as those used to cut linoleum, and a fairly long rule (a steel or aluminum corner or a perfectly evenly planed wooden lath). After preliminary marking on one side of the sheet, attach the rule and cut the top cardboard layer along it. After that, break the gypsum core by placing the rule under the sheet at the place of the cut. After that, it remains only to cut through the back layer of cardboard with a knife. To obtain even cuts, the edges of the obtained parts must be cleaned with sandpaper, fixing it on a special block or a small wooden block.
Fix the resulting rectangles to the steel base with self-tapping screws.
Drive the screw heads flush into the drywall. After finishing the entire table, it is necessary to putty not only the seams between the parts, but also the places where the screws are installed. Places of puttying are also leveled with sandpaper on a block. After preparing the entire surface of the product, proceed to surface finishing. For these purposes, any dye of your preferred color can be used. It can be applied by brush, roller or spray.

After the first coat is dry, sand it down and apply another coat. Applying an original pattern with a thin brush and dye in a contrasting color will help to get the maximum expressiveness of the furniture finish.
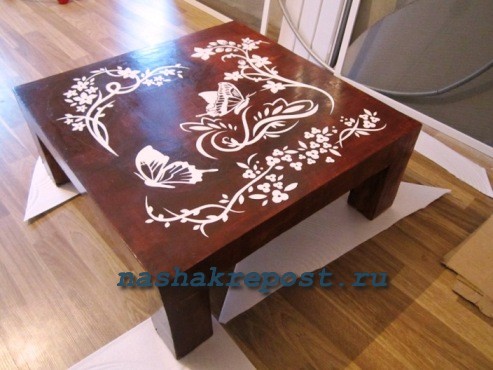
The finished look and shine of your product will give the application of several layers of varnish with drying of each layer.
concrete surface
You can combine impressive appearance and strength in a concrete countertop. There are several options for its manufacture. One is to make a formwork and a frame so that later a hob and a sink can be mounted in the table top. To do this, with the help of tin strips, an isolated contour is created into which concrete will not fall. Then the self-made base of the product is reinforced and the solution is poured.
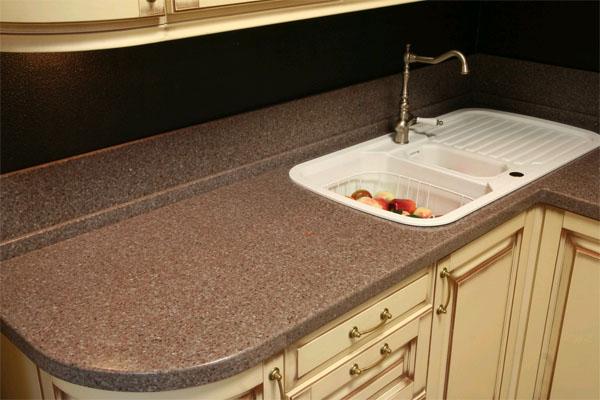
Another option is to make a new product based on the old one: it is washed, dried and polished well. Then, an aluminum border and corners are attached to the liquid nails to the ends. A day after the assembly of the prepared base, you can pour the concrete mixture.
To assemble concrete countertops, it is better to take a polymer cement mixture for self-leveling self-leveling floors. It will create a smooth surface with small pores.
If a decorative layer is planned from above, the concrete mixture is not poured to the top: it should not reach the top edge of the planks by about 10 mm. When the solution is completely dry (after about two days), you can start decorating - tiles, marble chips, etc.
Facing
Regardless of whether we are talking about a TV cabinet or an aquarium, in any construction made, the final stage, such as cladding, is necessary. Drywall is a fairly malleable material. Therefore, it can be dressed brightly and unexpectedly. For drywall cabinets most often used:
Some owners of houses or apartments create real masterpieces by outlining the cabinets with various patterns, stickers and other decorative elements.
It is important to put your soul into the space of your own nest. Creating interior items with your own hands is a great opportunity to fulfill such a mission.
Drywall was originally created for leveling surfaces, but the craftsmen gave it a new life in the manufacture of cabinets, kitchen countertops and other structures.
Plasterboard furniture can harmoniously fill the space of any of the rooms, because the correct use of installation technologies allows you to give it different shapes and dimensions. The material can be easily adjusted to any size and mounted manually.
What does a room decorated with plasterboard sheets look like?
Drywall is a find of every designer. With its help, any fantasies are realized, and thanks to dyes with a rich palette of colors and modern decorative elements, they give the idea a uniqueness. Attractive price, quick and easy installation without unnecessary pollution, low weight and the possibility of reconstructing damaged elements.
The kitchen is the main room in every home. Here they prepare various delicacies, receive guests, spend a significant time of their lives, and therefore every owner wants to equip it as comfortably as possible.
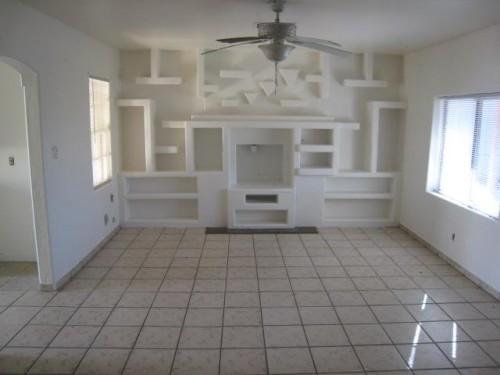
Drywall furniture is practical, durable and hardy. Tables, pencil cases, various niches and shelves, bar counters, cabinets, a kitchen set or even beautiful arched structures can be built with your own hands.
Assembly does not require special skills, the main thing is to adhere to the dimensions on the drawing, be able to work with a puncher, screwdriver and metal shears, initially take measurements correctly with a tape measure and ruler. Shelves (open or closed) - a simple and practical option. The basis is a metal frame on which the plasterboard is attached.
It is not difficult to make a table for tea drinking with your own hands. The sequence of steps in the manufacture of the table:
- select material for a stable frame - wood, steel;
- self-tapping screws connect steel guides;
- finish the frame with plasterboard sheets, measured in advance in size and carefully cut;
- cover the seams and screws with putty, and then grind with sandpaper;
- the last stage is decorative finishing - painting and drawing a picture of your choice.
Making a bar counter with your own hands will not take much time:
- The size of the finished structure must correspond to the dimensions of the kitchen. Having made calculations and measurements, a frame of metal strips is mounted. To make it stronger, fix a solid bar in the corners.
- Having made the perimeter of the rack, transverse profiles are placed in it. After fixing to the surface of the walls and floor, using the level.
- If the frame has successfully passed the strength test, GKL is attached to it. Self-tapping screws with appropriate caps are screwed in with a screwdriver (the distance between them is maintained at 15-20 cm) so that the sheets hold tightly.
- Then the seams are puttied and sanded. When the design is ready, proceed to the decorative surface treatment.
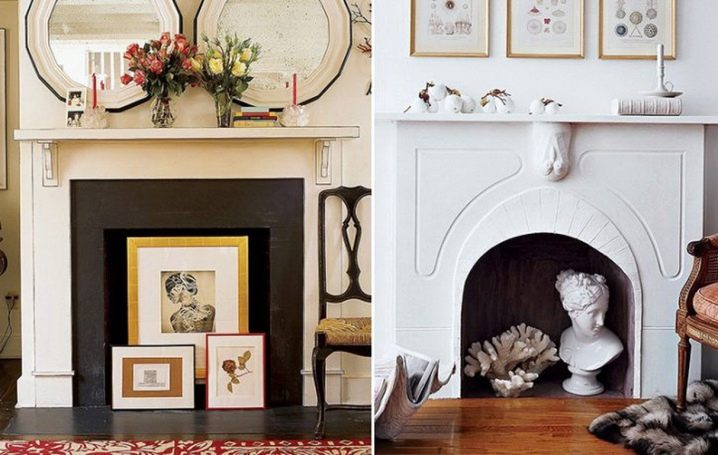
Purpose of simulation
A homemade plasterboard fireplace performs not only a decorative function, but also has a lot of advantages. With it, you can close the batteries, give the room atmosphere, comfort, intimacy. The peculiarity is that you can build a fireplace with your own hands in the apartment, and at the same time do not collect permits for its construction. A false fireplace can be of any shape, size, configuration, and this allows it to fit into any interior.
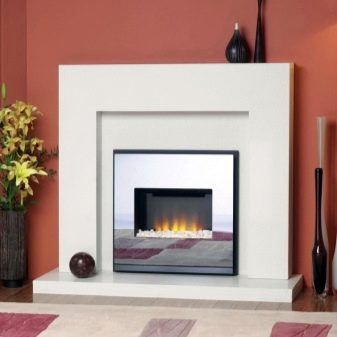
To build a fireplace, you will need simple materials that are sold in hardware stores. Experts can show how to build a fireplace correctly, as well as decide on the choice of the right tools. Plasterboard fireplaces are safe, as the design does not allow the use of open flames.The cost of artificial fireplaces is low, and you can install them yourself without outside help.
Features, pros and cons
So, in the kitchen it is possible to construct standard furniture from gypsum plasterboards: pencil cases, cabinets, a table, a niche for a TV, arches with shelves, racks and a lot of other elements. The advantage of any drywall product is the availability and low price of the material. Also they are different.
-
Ease of installation.
Plates can be fixed in a variety of ways, including glue. The main thing is to take into account the load. The products themselves are light, which removes the weight from the floors. -
Ease of finishing.
By themselves, the panels do not create an impressive look, but they are easily painted, wallpapered, tiled, in other words, lend themselves to any finish. If damaged or dismantled, the plasterboard fragment can be replaced without much effort. -
Furniture made from such raw materials is completely safe.
It does not emit harmful substances, is resistant to high temperatures (does not burn or melt), which allows you to run electric cables under or on it.
At any time, the plasterboard furniture structure can be disassembled and a new model constructed.
- Brittleness of the material. Naturally, such interior items are designed for a certain weight, which is not recommended to be exceeded.
- The suitability of raw materials is limited in rooms with high humidity. Even when using moisture-resistant species, they must be additionally protected. Otherwise, soaking with regular condensate cannot be avoided.


It turns out that drywall has almost no minuses.
It is important to choose the right material for a particular design, and then accurately make an independent installation. Then there will be no problems, and the result of the work will please
Drywall and humidity
There is always high humidity in the kitchen. However, for such an interior it is not necessary to choose raw materials with a moisture-proof coating. As a rule, kitchen sets are equipped with a hood, from which moisture does not have time to penetrate the material.
Drywall is always finished with a finish (paint, tile, oilcloth, washable wallpaper).
Through it, moisture will not reach the base. The thickness of the panels is selected based on the functions of the product, as well as taking into account the size of the working area and the strength of the frame. Interior items made of cardboard should be as functional as possible (shelves, pencil cases). As the basis of such structures, you can use load-bearing walls (arches with shelves, shelving, bar counters).


Where to start making a kitchen from GKL
It is worth noting that in order to make such a kitchen without a project it is difficult. That is why you need to start with it. They plan the space on a scale, draw furniture designs with dimensions in the drawing. How to make a project:
First, they measure the kitchen with a tape measure, taking into account the height of the room, the dimensions of the window, the height to the windowsill, the doorway.
Transfer the dimensions to the drawing to scale. It is difficult to make a project in volume with detailing on your own, so draw the layout of each wall separately.
Draw household appliances on the kitchen plan, keeping the dimensions (refrigerator, stove, dishwasher, oven). For it, you need to make separate niches from GKL
When drawing shelves, it is important to take into account the dimensions of profiles and sheets of GKL (normal and moisture resistant 12.5 mm thick).
When the layout is ready, they think over what material the gypsum will be finished with, decors, what to make the countertop from. If possible, you can use the services of a designer. He will not only offer a stylistic solution, but also provide detailed drawings.
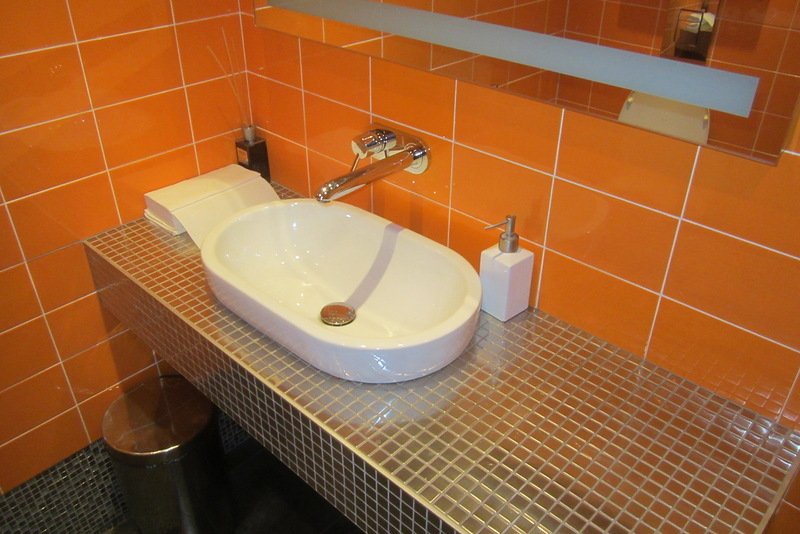
Countertop options
The work surface is a significant functional element of the kitchen set, it must be practical.
We do not consider the countertop of their natural stone, because at a cost it can be more expensive than a kitchen set.See in the video the manufacture of drywall countertops.
Countertop materials
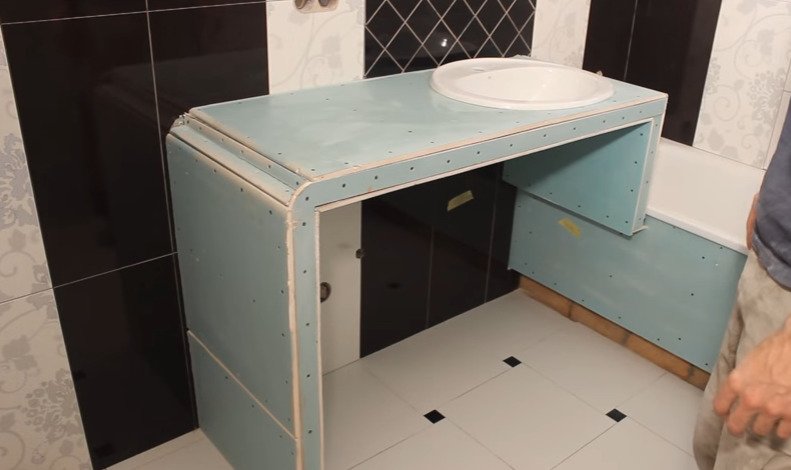
The main elements of such a countertop are the frame and trim. By itself, drywall will not be able to hold a sink, and even without a load, it will begin to sag over time, which means that you can’t do without a frame. The first step is to choose the right materials, because the durability of the countertop depends on this.
The choice of drywall
Manufacturers produce several types of drywall, differing in characteristics:
- GKL - the simplest and most inexpensive option, designed for use in dry rooms. It is lightweight, easy to process, used for the manufacture of various partitions, shelves, ceiling and wall cladding. As a rule, the GKL surface is gray and marked with blue ink;
GKL
- GKLV - the material contains hydrophobic additives, due to which it absorbs less moisture, and when moistened, it keeps its shape and does not delaminate. In addition, it is resistant to fungus. The surface of the GKLV is green and marked with blue ink;
GKLV
- GKLO is a material with a heat-resistant core that can withstand exposure to open fire for about half an hour. It is used for finishing dry rooms with a high risk of fire, for example, near stoves and fireplaces. Has a gray or pink surface with red markings;
GKLO
- GKLVO - a material that combines all the best properties of other types of drywall, that is, lightweight, easy to handle, resistant to moisture and high temperatures. The surface of the sheets is green, the marking is red.
GKLVO - material. combining moisture resistance and resistance to high temperatures
For a countertop in the bathroom, the GKLV is the most optimal type, since ordinary drywall will quickly lose its shape, and it makes no sense to use fire-resistant sheets where the risk of fire is unlikely. In addition, fire-resistant drywall will cost more.
The standard thickness of moisture resistant sheets is 9.5 and 12.5 mm. If the expected loads are low, you can take a thinner material, but if the sink is heavy and the countertop area is large, then the savings are inappropriate.
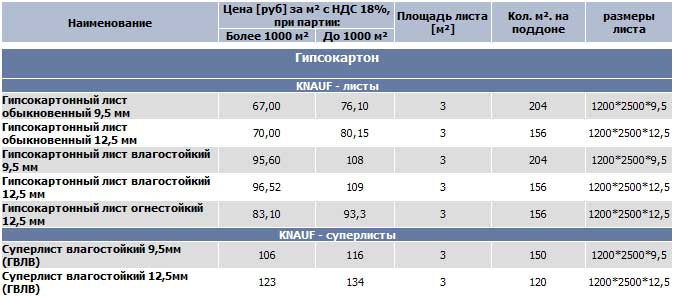
Dimensions of drywall sheets
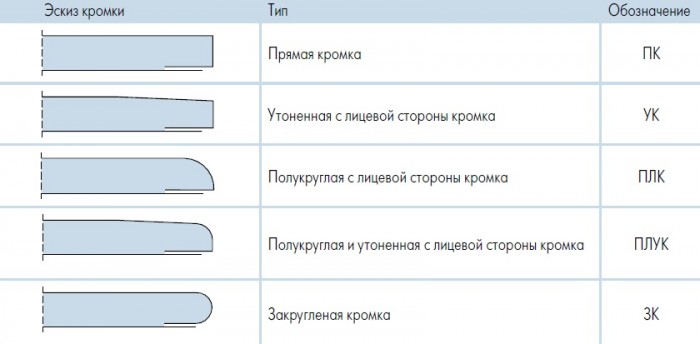
Sheet edges
Sheet dimensions are 2500x1200 mm, which is quite enough for the manufacture of a compact design, subject to competent cutting. But for an overall countertop with pedestal supports, one sheet is not enough, so before buying drywall, you must definitely draw up a drawing and calculate the approximate area of \u200b\u200bsheathing, adding 5-7% in reserve.
What to make a frame
There are two options for the frame device - a wooden beam and a metal profile. The beam is cheaper, and the frame from it is strong, but its moisture resistance is low. Before installation, wooden elements must be treated with a protective compound, and periodically such treatment will have to be repeated. And yet, this option is very common, and many home craftsmen prefer to work with wood.
Bar with a section of 50 × 50 mm
A metal profile costs more than timber, but due to durability, such costs are fully paid off. The profile for drywall is not subject to corrosion, has a small weight, and is easy to install. To make a frame for a countertop, you will need to purchase two types of profiles - a guide (28x27 mm) and a carrier (60x27 mm).
Profile, guides, hangers
Work algorithm
The first step in creating drywall structures is preparation for work. It includes:
Preparation for work
- clearing the workspace;
- priming the surface with special means that prevent the development of fungi and mold;
- marking application.
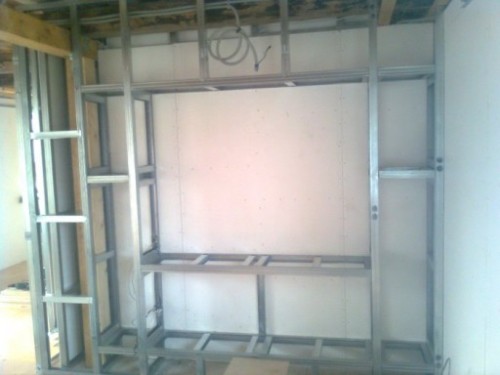
The second stage is the construction of a metal frame. It is better to calculate everything in advance and immediately make a frame for the entire room. Especially if you have thought of creating shelves and niches.The laying of the frame for them should always be done at this stage.
If in the future it is planned to hang wall cabinets, then when forming the frame, it is necessary to insert a wooden beam in a pre-designated place. It is he who in the future will take on the entire weight of the cabinets and will avoid the deformation of drywall sheets. This method is also suitable for hanging heavy shelves. In the same way, you can hang a chandelier on the ceiling.
We mount the frame with our own hands like this:
Niche frame
- apply the profile along the marked lines. To create a frame around the perimeter, we use profile guides. Mounting step - 60 cm;
- fasten profiles with dowels;
- for jumpers we use rack profiles. Mount them every 50 cm.
Note! Any structure must be rigid and durable, especially if it will withstand a certain weight.
If the niche will have doors, in the frame, respectively, you need to provide a place for this.
The third stage is the sheathing of the metal structure with plasterboard sheets. It is worth noting here that you need to use only moisture resistant sheets.
Sheathe the frame with sheets as follows:
- cut the leaves into desired pieces. Finishing shelves and niches should be done with the help of pieces. The tabletop can also be sheathed with solid sheets;
- we fasten sheets / pieces in the right places of the frame on self-tapping screws.
At the fourth stage, we putty the entire structure.
Provided that all the steps are completed correctly, a do-it-yourself plasterboard kitchen will last you a very long time.
DIY kitchen set
Such a set will definitely fit into the design of the kitchen. For a small area, this is a great option, as the owner, taking into account the needs of the family, is able to make it as practical as possible.
For assembly, you will need standard building materials: a screwdriver, a clerical knife, metal scissors, glue, tape measure, and more.
Before starting work, they draw up a project, where they indicate the correct dimensions of each element. From drywall, you can make all the components of the kitchen set: countertops, shelves, cabinets, bar counter.
Ready-made furniture is easy to fit into the interior, you just need to make decorative processing:
- paint in your favorite colors and varnish;
- stick washable wallpaper;
- decorate with decoupage;
- draw exquisite patterns with a brush or print using a stencil.
Installed cabinets and shelves (open or closed) are filled with kitchen utensils.
Making kitchen shelving
In order to make a drywall rack on your own, it is worth preparing the same list of tools that was indicated above. The only thing that will have to be supplemented with scissors designed to work with metal.
Below, an example of a rack will be considered in detail, which consists of shelves located on two racks along the entire height of the room, while their depth is 50 cm. A similar design can be equipped with doors, but this will be a more complex option.
First of all, the markings for the racks are applied:
- in the corner between the floor and the wall, a mark is placed where the first rack will be located;
- about 50 cm recede from this mark, that is, its outer edge;
- from the first marked point, a line is drawn vertically from the ceiling to the floor;
- from the line thus obtained, one should retreat half a meter deep. This is the horizontal part of the future rack;
- 1.5 meters retreat from the contour of the rack located on the right and all previous manipulations are repeated. As a result of these works, it is possible to obtain the contour of the second rack.
After that, according to the established marks, the profile is mounted and, using a drill, is attached to the wall surface. Then the total height of future racks is measured and an element is cut off, depending on this value - two elements of the supporting structural profile.Thus, external racks will be obtained. They are inserted parallel to the wall surface into special grooves and connected. As a result, two rectangular frames will be obtained, which are then sheathed with drywall.
In conclusion, it remains just to sheathe the frame with drywall and you can do the final finishing. If you want to equip this design with doors, you will need to install wooden blocks in certain places and mount hinges on them.
As can be seen from the foregoing, such a process and the solution of the question of how to make a kitchen out of drywall does not belong to the category of complex ones. If you have simple tools at your disposal and possess elementary skills, as well as follow the above schemes, you can quickly create high-quality plasterboard furniture and equip the kitchen with it.
Necessary tools and material
It is not difficult to make a drywall rack with your own hands, and this is within the power of any landlord who is used to equipping his house on his own. This will require the following materials and tools for drywall:
- Drywall. Depending on the location and the planned load, the following types of gypsum boards are used, differing in their thickness and quality:
- Wall 12.5 mm, used for standard structures in a residential area;
- Moisture-resistant 12.5 mm, recommended for shelves in rooms with high humidity, such as kitchens and bathrooms;
- Thickened 18 mm, installed on a shelf surface with planned heavy loads;
- Thin drywall 6.5-9.5 mm, used for curved structures.
- Metallic profile. A combination of various types is also used, including:
- Guide PN 50/40 and rack PS 50/50 are used for wall structures that do not provide for the location of heavy objects;
- Guide PN 75/40 and rack PS 75/50 is the best option if a partition is mounted;
- Corner PU 31/31 is required to protect the corners of the structure.
- Fasteners. For assembly you will need:
- Dowels 6x40 mm for attaching the frame to the base;
- Self-tapping screws for metal 6x35 mm for screwing the plasterboard to the profile;
- Self-tapping screws for metal for connecting rails and racks to each other.
- Power tool. His set is small and more than standard. Required:
- Cordless or electric screwdriver for fixing drywall and assembling a metal frame;
- Impact drill or puncher for drilling holes for dowels;
- A jigsaw for cutting drywall, however, if the rack does not involve complex details, then its presence is optional.
- Finishing materials. Depending on the type, this set may vary, but basic materials are needed. Including:
- Putty for finishing joints and surfaces;
- Fine-grained sandpaper for finishing grinding;
- Serpyanka tape for reinforcing seams;
- Acrylic or latex-based paint if you plan to paint the drywall surface.
- Auxiliary materials and tools. For quality construction work, you need:
- Vertical, more than 80 cm long and horizontal building level, for convenient work, its length should be less than the width of the shelves;
- Spatula for applying putty on drywall;
- Nozzle on an electric drill for the preparation of a leveling compound;
- Scissors for metal cutting profile;
- Drywall knife with a retractable blade for cutting and cutting plasterboard sheets;
- Pencil, square, tape measure for cutting material, as well as applying.
Materials and tools
Plasterboard constructions are the most popular today. This material is most often used for sheathing the frame. It goes well with any finish and is easy to assemble. It is easy to arrange a spatial form of any complexity from drywall.The price of the material is low.
To build an artificial fireplace, you will need tools. It is necessary to purchase: U-shaped metal profile, drywall sheets, slats, self-tapping screws (14-15 mm), special self-tapping screws with a countersunk head, tape measure, dowels, screwdriver, grinder, perforator, plumb line, building level, silicone, putty, water-based paint, elements for decoration. The amount of materials depends on the calculations made and the dimensions of the structure.
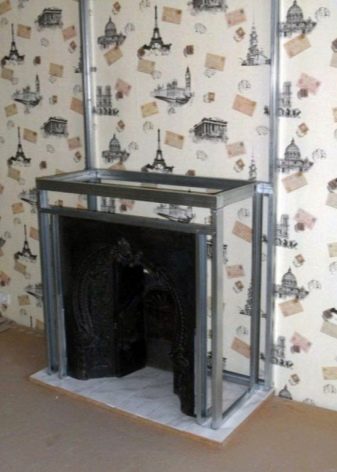
The frame of the drywall fireplace is built from a standard profile. Usually, a metal rack or guide profile is used for these purposes. A frame box is created according to a drawing or layout. It should be fixed to the wall and floor with special glue, if the fireplace is small - with self-tapping screws. From above, the box should have a solid base for further finishing (if you are going to make a shelf).
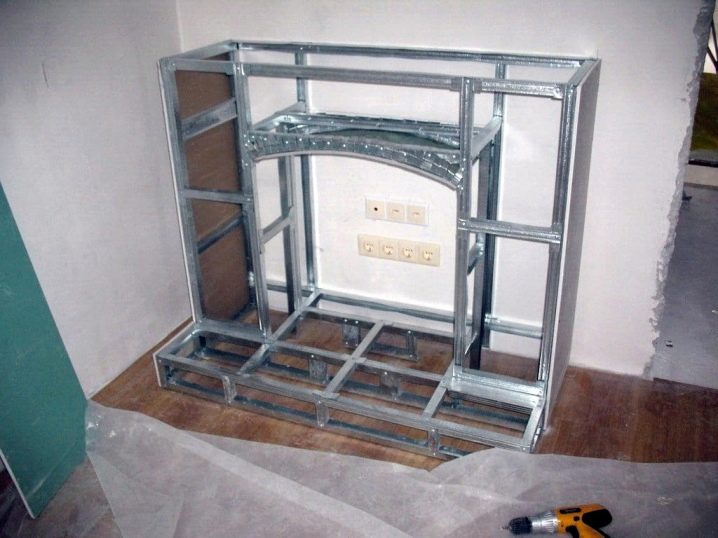
The frame should be sheathed with drywall. It is a lightweight material that lends itself well to cutting. It's easy to work with him. The technical characteristics of the material are such that it is used not only for decorative purposes, but also for the construction of non-load-bearing partitions, suspended ceilings, wall cladding, when creating columns, arches and other structures. High-quality drywall sheets, made in accordance with GOST, are durable and can withstand additional weight.
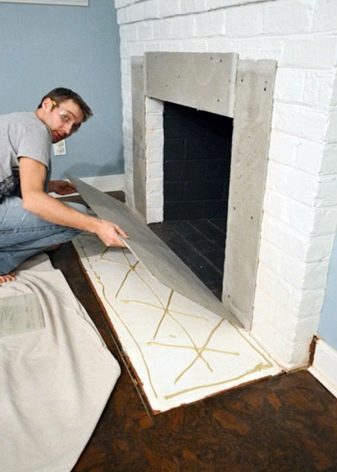
After the frame is made, it should be sheathed with plasterboard. For these purposes, you will need to cut sheets with a manual grinder. The joints must be additionally fixed with a profile (keep this in mind when purchasing materials). Sheathing seams are fixed with self-tapping screws and puttied. Often, drywall material does not require finishing, so after some time the portal lining can be changed without disassembling the device.
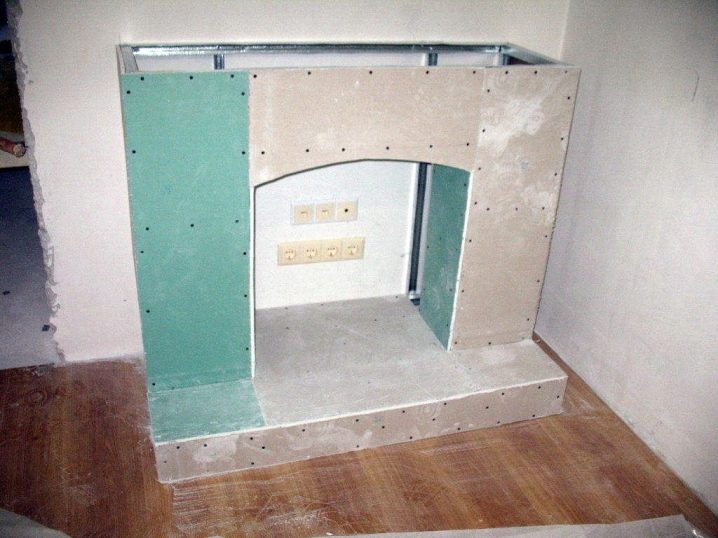
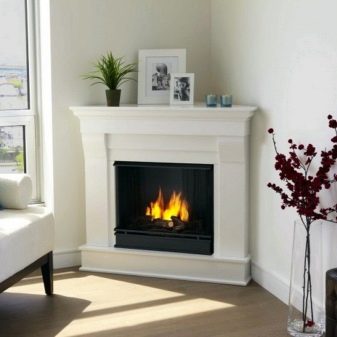
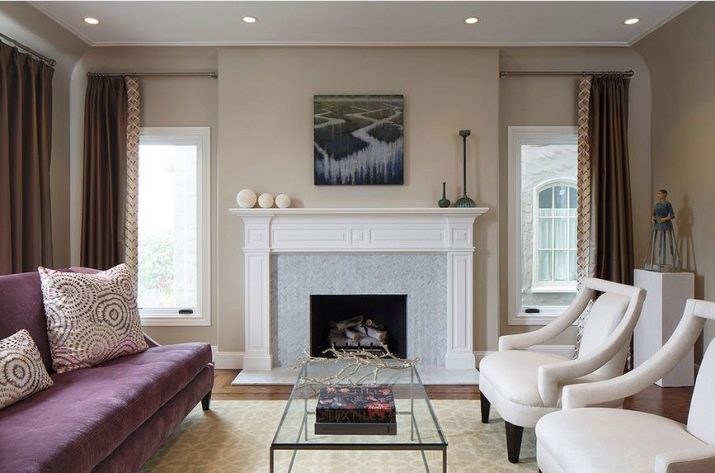
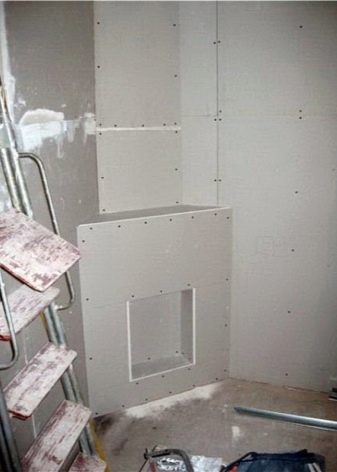
Decorative plasterboard fireplace
The next piece of furniture that will be discussed is a plasterboard fireplace portal or a false fireplace. It is a decorated niche of a certain shape, imitating the presence of a fireplace in a city apartment or a country house. The manufacture of this product, like the previous one, begins with the installation of the frame. To do this, on the wall to which the structure is attached, it is necessary to pre-mark the contour. Then, focusing on these lines, attach to the wall parts from the profile used for the manufacture of drywall structures. In parallel, at some distance, follow the same contour and connect both parts with transverse parts of equal length. If necessary, before simulating a heater, make a small podium using the technology described above.

The next stage in the assembly of this piece of furniture is the installation of drywall parts cut in advance on the assembled frame. The technology for cutting material and attaching to the base is described in the first part of our article.
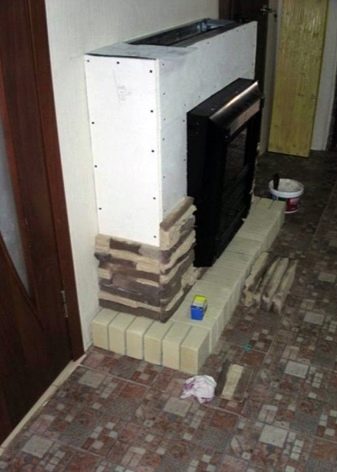
An obligatory element of work with drywall is the application of construction putty to the seams between the parts and the holes from the heads of the screws to level the surface of the products. In the case of using other finishing methods instead of painting, puttying can be neglected. Try to cover the surface of the fireplace with plates of artificial or natural stone. To fix it, mix a sufficient amount of tile adhesive and apply the mixture to the surface of the structure using a notched trowel. Then, pressing the tiles, glue them evenly filling the entire surface of the fireplace. To cut parts into pieces, use a grinder with a stone disc mounted on it. In addition, you can use a tile cutter.
Between the individual plates, install special crosses for tile work, and after the adhesive has hardened, fill the resulting gaps with a special tile grout. As a result, the decoration of your room will be the original product.
Inside the fireplace, you can glue a mirror or purchase a special artificial fireplace that imitates the burning of fire.
Dear readers, comment on the article, ask questions, subscribe to new publications - we are interested in your opinion 🙂
Articles that will be of interest to you: