Stretch ceiling with lighting
Illuminated stretch ceilings can be safely considered leaders among all luminous ceilings - a beautiful view at any time of the day, various glow modes and a wide color palette make them so popular. We add here the ability to adjust the glow, which is also an additional advantage. It is not difficult to make such a ceiling with your own hands. You only need to have:
- stretch ceiling film (matte, with a transparency of about 50%);
- fittings for stretch ceiling;
- transformer (220/12 V);
- electrical wiring;
- screwdriver;
- aluminum tape;
- lighting elements;
- ladder;
- electrical tape;
- indicator;
- building hair dryer;
- building level.
Production begins with markup. First you need to mark a horizontal line around the entire perimeter of the room. All ceiling panels will be fixed along this line. But this is all much later, since now it is necessary to mount the backlight with high quality. For this purpose, we cut the aluminum tape into strips, the length of which will be equal to the width of your room. These strips will become a kind of reflector for the light, which will allow the backlight to be uniform. For the same purpose, all strips must be attached to the ceiling at a distance of about 30 cm. If you do this at a greater distance, then you risk getting the effect of a mattress, and the light strips on the ceiling will become annoying after a while. Already attaching the tapes to the ceiling is also not always good, as you will get a ceiling that is too bright.
Light source for such a ceiling
So, let's look at what kind of light source can be used to create a luminous top of the room. The most ideal option for such a source are LED strips.
It is thanks to them that you can make sure that the light is created in many places and as a result we get uniform illumination. If you use several powerful lamps, then in some places the luminous top of the room will be brightened to a greater extent, and in others - to a lesser extent. That is, its glow will be uneven.
Useful advice: light bulbs can be used when a certain image will be on plastic, canvas or glass. As you know, the image has light and dark areas. In other words, one object is well lit, and the other is in the shade. Above the first object and there may be one or more light bulbs. In the end, everything should turn out so that the dark part of the image, which can have a luminous ceiling, should be perceived as a design idea.
How to make a luminous ceiling suspended structures
One of the best options for making a luminous ceiling can be considered a suspended structure, behind which light sources are placed. Moreover, it should not be one light bulb that can illuminate a small space within a radius of 15-30 cm around itself. We'll have to think of one that can emit light even in the farthest corners of the room. It is best to cope with this task, which is located in stripes over the entire area of \u200b\u200bthe ceiling, and not just in the center or on the sides.
We have decided on the light source. Now you need to think about what material is capable of transmitting light rays and at the same time not deforming from the heat emitted by the lamps. This function can be assigned to PVC film, in other words, done. Here it should be noted that the fabric is not suitable for these purposes, you need to choose the film.
-
A stretch ceiling is an ideal option for creating a beautiful coating, perhaps even with a pattern depicted on it, which will be illuminated from the inside. This lighting option can even be used as the main lighting.
Luminous stretch ceiling photo
- - this option is associated with large financial costs, because it will not be cheap to make blocks of tempered glass, bring them to the site and install them. Although the external effect of the glass luminous ceiling is impressive. Using this method, as well as using the previous one, you can create the effect of daylight pouring from the ceiling.
-
Stained glass ceiling - a kind of glass. Only in contrast to it, some actions are not played out, drawings are depicted that carry a certain subtext. Currently, matte light ceilings with a transparent pattern, which are made by sandblasting mirrors, are relevant. Also popular are classic stained glass windows illuminated from the inside.
Stained glass ceiling with lighting photo
-
backlit - this method will not allow you to highlight the entire surface of the ceiling, because the drywall does not transmit light. For the device of such a ceiling, niches or shelves are made, on which the LED strip is fixed. But in this case, it is not necessary to rely on bright (main) lighting, because the light ceiling will be diffused, directed to the sides, and not down. This is just a decorative technique that can diversify the interior.
Glowing ceiling photo
- Light panels, they are also used in outdoor advertising. These are separate square or rectangular segments made of high-transmission acrylic glass, on the back of which LED bulbs are fixed (they are located close to each other). Thanks to this arrangement of the lamps, the panels emit a uniform light and can be used as the main lighting. From the point of view of decor, the advantage of this method is also that it is possible to assemble the ceiling from panels of different colors.
Light panels create a uniform light space, unlike stretch ceilings with a built-in light strip. Why? In the panels, the bulbs are located close to each other, so they emit a uniform glow. And the LED strips behind the stretch fabric are arranged in stripes, and these stripes shine through the PVC film.
Stretch star ceiling
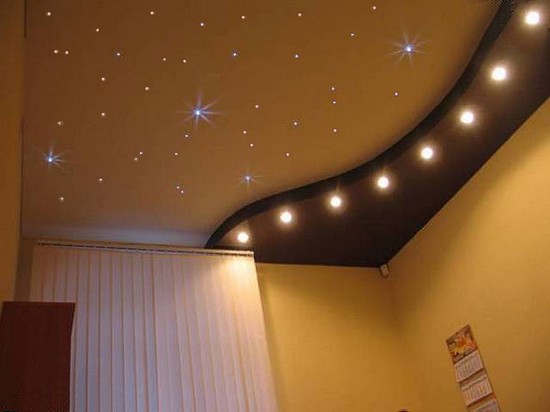
Stretch star ceiling
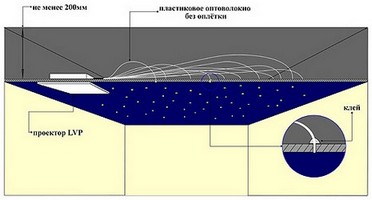
The process of arranging such lighting is in many ways similar to the installation of the starry sky in combination with the suspended ceiling considered earlier, however, it has a number of important features and differences. Perform the following steps in sequence.
Stretch star ceiling
First stage. Attach a light projector to the draft base.
Second step. Install profiles for mounting a stretch ceiling around the perimeter of the room. Mount profiles with a 50-70 mm clearance from the base.
Third step. Prepare a projection of the luminous composition on the base on sheet plastic or plywood. For more convenience, you can use fishing line nets.
Fourth step. Make holes in the blanks and insert several threads into each finished hole.
Fifth step. Attach the finished false ceiling (sheet material and threads) to the draft ceiling. Connect the filaments to the projector.
Sixth step. Install the stretch ceiling.
Seventh step. Turn on the light generator, find the ends of the stretched threads and make holes in the ceiling canvas in the established places. Use a small soldering iron with thin wire at the end to create the holes.
Ceiling starry sky
Eighth step. Pull out the threads and cut off the excess length.
You may not create holes in the stretch fabric, but in this case, the backlight effect will be less bright.
Additionally, you can build reflectors and LEDs into the design to simulate large stars.
During the installation process, provide a hole in the ceiling sheet through which you can later service the light generator. To do this, you can equip a plasterboard structure around the perimeter of the room.
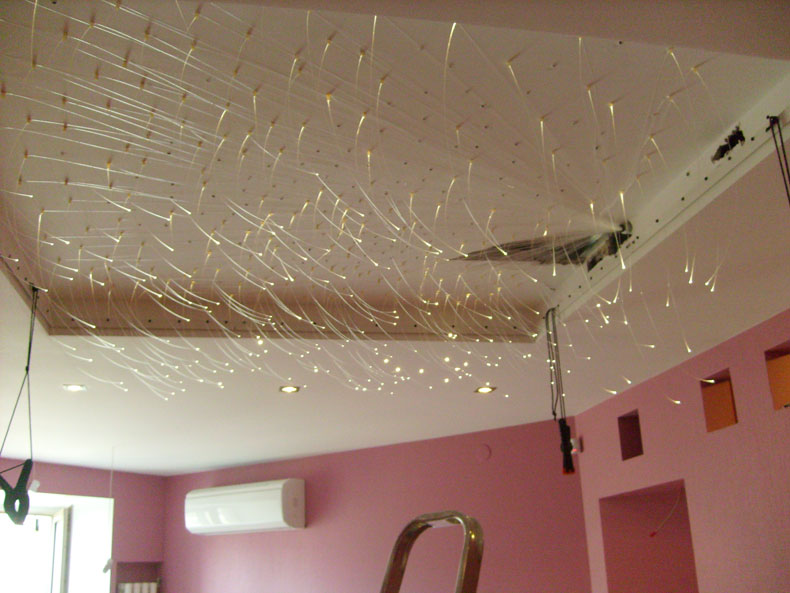
Stretch ceiling starry sky
Advantages and disadvantages of ceilings without lighting elements
Skeptics grin when they read these lines. But you know that absolute darkness does not exist, so a slight glow of the ceiling will be constant. But the constantly changing light outside the windows will allow the colors to shine at full strength. We also take into account the fact that when the angle of incidence of the light beam on the paint changes, the degree of luminescence will change. And this is a very significant plus of the ceiling, since it will not bother you with its monotony.
There is only one drawback: the colors are not always bright (the quality of the paints is not always high), and such paint does not last long. The main advantage lies in the exclusivity of such a ceiling, since you can paint it at your discretion. And you don't have to be artistic to do it. It is enough just to have the mentioned paints, brushes of different sizes and a primer for the ceiling.
Luminous ceiling with stickers
The modern market is very saturated with luminous stickers that can be successfully used if you want to create a do-it-yourself ceiling in a child's room. Such elements are glued simply, they are quite inexpensive, changing their position is also very simple. And they are “charged” from any light source, even from an ordinary light bulb. One hour of light consumption is equal to two or three hours of constant soft glow for the mentioned elements.
They most often emit rays of a light green color, but if desired, you can significantly expand the spectrum, as other colors are increasingly appearing. There is still one drawback - a loose fit to the ceiling surface. Either something is wrong with the adhesive base, or the ceiling requires pre-treatment. The way out of this situation is simple - use double-sided tape. First, a piece of adhesive tape is glued to the sticker, and only then the element is pressed tightly against the clean surface of the ceiling. We remind you that when gluing all the elements in the room, there must be normal humidity, otherwise the adhesive tape will not firmly hold the luminous figures. At first glance, there is nothing to worry about if one (or several) elements fall off. But if this happens at night and the fall falls on the person's face, then instead of the calming effect of the ceiling, you will get additional sleepless nights. Otherwise, there are no problems. Unless in the daytime such a ceiling looks rustic.
Installation of the lighting system
Now you need to mount the main element of the ceiling - the lighting system. You can use both neon bulbs and LED strip for this. There are a large number of them for sale, so the choice will not be difficult. The features of all these lighting elements are that they consume very little electrical energy, have a long service life and do not heat up (practically) during operation. The last point is one of the most important, since you absolutely do not need a fire situation in the apartment.
Fixing the lighting strip to the LEDs is simple. The main thing is that the contact wires from it are near the power source. It is often advised to mount the transformer directly on the ceiling as well. This makes sense only when you do not want the supply wires to be hidden from prying eyes. There is nothing more to add to this, since for other reasons this arrangement of the transformer loses. Firstly, in the event of a necessary repair, you will have to work very hard to get to it. And secondly, the transformer releases a large amount of thermal energy, and with prolonged use of the backlight, you risk that the temperature above the false ceiling will rise and the ceiling membrane will deform.
It makes sense to place the transformer somewhere nearby so that it can be easily reached. In this case, the supply electrical cable must be laid in a special box or the wall must be pierced and the cable laid in the resulting inner box, and only then this cavity must be plastered.
An interesting way to design a living space is a luminous ceiling. Due to its decorative qualities and originality, it is now at the peak of popularity.
You can diversify the interior in many ways, but one of the most spectacular can be considered a continuous light stream pouring from above the room. To realize such an idea, you will have to make a false ceiling and hide the light source behind it. What types of such structures exist and what materials to make a luminous ceiling? Let's talk about this together with the House of Dreams.
Luminous ceiling as the main photo lighting
Luminous ceiling description, features, installation technology. Luminous stretch ceiling
The stretch ceiling device provides almost limitless possibilities for decorative design. The technology of organizing luminous coatings is considered the most spectacular.
It is important to take into account the difference between this approach and the implementation of classical lighting, which includes incandescent lamps. A well-made luminous stretch ceiling makes the room more expressive and attractive in terms of design
If earlier the ceiling surface remained on the outskirts of the interior, then thanks to the stretch fabrics and the inclusion of decorative elements, the situation has changed radically.
The procedure for applying luminous paints
First, we clean the surface of dust and apply a small layer of primer on it. The dried primer allows you to apply the pattern. A star can be drawn simply: dip the brush into the paint, remove excess paint from the edges of the container and direct the brush perpendicularly to the ceiling. The bristles should spread apart and form small rays on the surface. We make stars with brushes of different sizes (then the stars will be different) and use paints of different colors for this. Well, we draw comets in the same way, but at the final stage we move the brush along the arc. To create such a ceiling with your own hands, you only need the ability to draw the moon. But even a person who has never held brushes in his hands will cope with this work.
Stretch ceilings and their installation
-
First way
- it's always fascinating. They are made of PVC optical film with 50% transparency. The installation technology coincides with the technology of a standard stretch ceiling. An LED strip is used as a light source. It can be monochrome or have RGB colors. Positive points:- Low power consumption; - Long service life; — Low heating temperature; - The predominance of yellow to white flowers; — Luminous stretch ceilings can be powered by auxiliary equipment, and this is an additional color scheme. Negative points:
— Financial component.
Material and its components:- Wire 2x0.75 (two-core cable, for example, ShVVP). The amount of wire is affected by the type of LED strip and the installation process; - LED strip: can have one or more shades of RGB, light flux - 4000 lm; - Transformer for 220v or 12v; - Controller - required when using a multi-color RGB tape; — Plank, usually aluminum. Preparatory work:
- Make markings on the ceiling - to fix the aluminum bar; - Cut the aluminum strip into pieces. They must be equal to the transverse length of the base ceiling; - Carry out the laying of wires to the place of installation of the transformer; - Cut (connect) the LED strip; - Disconnect the entire room from the mains - usually carried out in the main panel. Installation work:
- Fasten the aluminum strip to the ceiling, following the markings.Step - 300 mm; - Fix on the bar, having previously selected its desired length; - Connect the wiring to the transformer. Use a dedicated controller or switch; - Turn on the circuit breaker and start the structure (using a switch or controller). Advice
: To achieve the best effect, fasten the strips in 300mm increments. This is necessary so that the line of LEDs is not visible from the side of the room. -
Second way
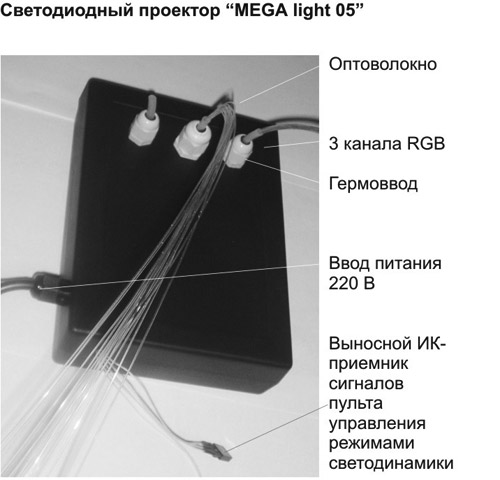
Suspended luminous ceilings are also made from aluminum panels. Then photo printing is applied to order. In this case, the main light source is an LED or fiber optic. Standard panels are a disk, 5 mm thick and 1.2–1.5 m in diameter. Lighting effects are controlled using a control panel.
Material and its components:- Disc "Starry sky" with built-in LEDs; - Remote control with a controller that allows you to change the brightness of the LED elements; - Controller and control panel - responsible for the twinkling of stars and the movement of meteors.
Installation work:
The installation process usually does not take much time. In terms of complexity, the installation of LEDs coincides with the installation of a conventional chandelier. All fasteners are included in the lighting package. You will have to bring the cable to the central part of the panel.
Selection of LED strips
It is worth noting that LED strips are characterized by different levels of brightness. So, SMD 3528 is less bright than SMD 5050. The actual choice of brightness depends on your preferences.
Useful advice: if a stretch ceiling is installed using plasterboard blocks (they usually go along the perimeter), then high quality tapes must be chosen to create lighting. They must work for a long time.
This is necessary from the point of view that in the event of a breakdown, it is necessary to dismantle and re-install drywall and PVC film. And it's a complicated procedure.
This nuance is also important: PVC film transmits light by 50 percent. It also changes the color of the light. It becomes softer by 500-1000 Kelvin. To create a daylight white shade, the LED strip must create light with a temperature of 5-6 thousand Kelvin. A warm-white device involves the use of an LED strip with a temperature of 3.5-4.5 thousand Kelvin.
Installation of LED strips
And so, the first stage, during which a luminous ceiling is created, is the installation of LED strips on the surface of the uppermost plane of the room. They are placed next to each other.
In the event that PVC was made in Germany, then the distance between the tapes should be 15-17 centimeters. The distance from them to the PVC sheet should be 14 centimeters. If the space between the LED strips and PVC is smaller, then the effect of "zebra" will be obtained.
When luminous parts of the ceiling canvas are organized to illuminate a room that has a low ceiling, this distance can be reduced. But in this case, LED strips should have less power and should be placed more densely.
Useful advice: when using PVC manufactured in other countries, it is recommended to make preliminary calculations of the pitch of the tapes and the distance between them and the PVC. To do this, you need to take two LED strips and a canvas (preferably with dimensions of 20x20 centimeters or more) and experimentally determine the desired values.
When creating our indoor false ceiling lighting, it is better to install the LED strip on a special lattice platform. First, strips of PVC plastic are installed along the ceiling surface (its width should be from 5 to 10 cm).
Further, until now, aluminum plates are attached across this surface. The LED strip is attached to the latter. After that, power supplies, a controller, RGB amplifiers are connected and drywall and PVC film are mounted.
It is desirable that, in addition to the PVC film, there are drywall boxes. They can contain the following elements:
- wiring;
- Power supplies;
- controller;
- RGB amplifiers.
In the case of installing an Armstrong-type ceiling, the luminous part is made in the same way. The only difference is that the squares of glass or plastic will glow. These squares are very easy to shoot.
Luminous ceiling wallpaper
We must not forget about the special ceiling wallpaper. They are also available in different types and may contain retroreflective elements, fluorescent paints. Such wallpapers “work” in the same way as described earlier. Gluing them to the ceiling is not difficult, you can not be afraid of falling off elements. More elegant look on the ceiling wallpaper, which appeared on the market of finishing materials recently.
The process of their manufacture is kept secret by the manufacturers, but it is easy to describe them: the finest silver threads, formed in the form of certain patterns, are included in the composition of the wallpaper. These threads in the dark begin to emit a slight glow. This glow can be adjusted remotely.
Making a ceiling with your own hands using such wallpaper is very simple, you just need to glue them according to the instructions on a smooth and primed ceiling surface. Oddly enough, the disadvantages of such a ceiling are the most: wallpapers are expensive, the pattern can get bored very quickly, since it is not able to change from certain conditions. But the most frightening thing is that the wallpaper production technology is not disclosed - you never know what may be in their composition. And if excess humidity appears in your apartment (and this cannot be ruled out)? What will happen to the expensive wallpaper on the ceiling then?
These lines cannot be considered as anti-advertising of the goods; rather, they are expressed by the unknown principle of work. But if you want to decorate the ceiling with your own hands using wallpaper with silver threads, then you need to take a closer look at their composition and principle of operation from distributors (trading companies). They are required to provide information about the product and have an appropriate quality certificate for these products.
Multi-level plasterboard ceiling with spotlight
Ceilings that have their own light sources are considered to be more reliable and beautiful.
The simplest of them can be considered multi-level plasterboard ceilings, in which spotlights are mounted with a horizontal arrangement at the depth of a certain level (or several levels). They will not create the illusion of a starry sky, but even in the daytime they will look like a real work of art.
This trend in home interior design has existed for several decades and remains relevant to this day. The disadvantages of such ceilings can be safely attributed only to the need to often wipe the installation sites of lighting elements (dust always accumulates next to them).