Making a greenhouse from polypropylene pipes
When choosing a material for a future greenhouse, it is best to stop at a ready-made set of blanks - pipes are sold cut strictly to size and complete with fasteners and connecting parts. The pipe diameter must be at least 20 mm.
When making a structure with your own hands, you can choose the desired size and assemble the frame, based on the characteristics of your site.
Location selection
When choosing a place for a greenhouse made of polyethylene pipes, consider the following points:
- lack of shade from buildings or tall trees;
- convenient access to the greenhouse doors;
- the most frequent wind direction in your area. Proper placement will help reduce heat loss.
Before erecting a greenhouse from polypropylene pipes, the ground in the allotted area must be leveled. It is not necessary to dig or, conversely, compact the soil, it is enough to achieve a relatively flat surface.
Frame assembly

First, prepare and check all the materials and tools that you may need to make a greenhouse:
- polypropylene pipes and elements of their fasteners;
- adapters for corners, tees and self-tapping screws;
- metal fittings about 80 centimeters long.
Then mark the area, indicating the dimensions and position of the future frame. Drive the reinforcement into the ground approximately to the middle of the rod along the long sides of the marked rectangle. The more often the pins are located, the more stable your greenhouse will be.
Push the polypropylene pipes onto the reinforcement on both sides of the frame - you should get even arcs. After installing all the pipes, carefully lay a horizontal pipe at the highest point of the arch and secure it. If you want to achieve maximum strength of the greenhouse, then lay several horizontal supports.
Covering the greenhouse with polyethylene
Stretch the plastic film over the prepared frame. This work is best done at a temperature not lower than 15 and not higher than 18 degrees in order to avoid sagging of the film.
The PET web is stretched with clamps, this allows you to gently pull up the sagging film at any time of operation.
In the lower parts of the structure, the film can be pressed down with something heavy (brick, board) or simply sprinkled with earth.
A greenhouse made of polypropylene pipes is built quite easily, but at the same time it is short-lived. After one or at best two seasons, the PET coating will have to be replaced. You can also note not the best thermal insulation of this design.
We make a greenhouse from HDPE pipes
Since HDPE and PVC pipes are similar in properties and have the same shape, the creation of greenhouses is carried out according to an identical scheme. Except for one thing: beautiful and inexpensive non-threaded fittings are used for PVC pipes in the construction of engineering structures.
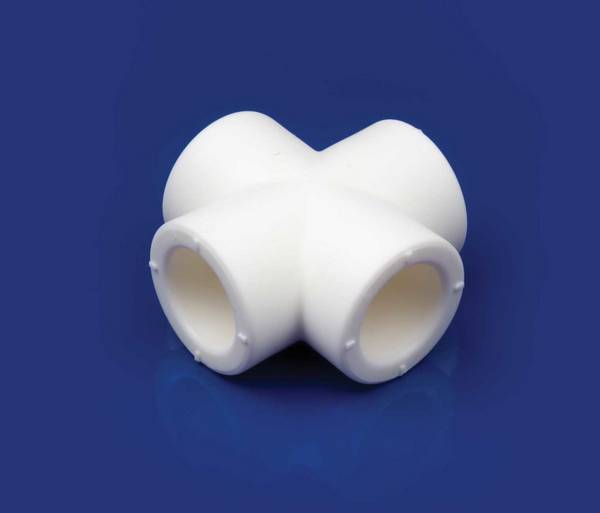
The fitting-cross is designed to connect PVC pipes
And for HDPE pipes, expensive threaded fittings for a compression connection are more common or with an embedded wire heater, which, after being connected using electro-fusion welding, heats up and fuses the pipes.
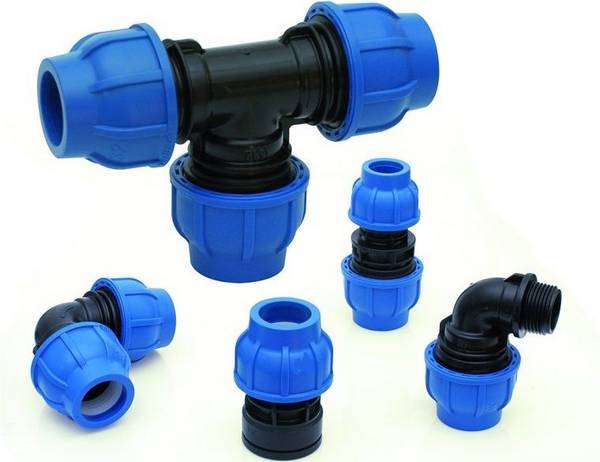
Threaded fittings for HDPE pipes are expensive
Therefore, to facilitate the task, we will select such a design in order to do without fittings at all.
Choose a model
We choose the most convenient for our material and average in complexity design model. The most convenient - arched; it does not require a large number of connections, complex cutting of covering material, rain or sudden snow will not accumulate on top.
Before construction begins, it is necessary to determine the size of the greenhouse
Sometimes metal pipes are concreted into the ground
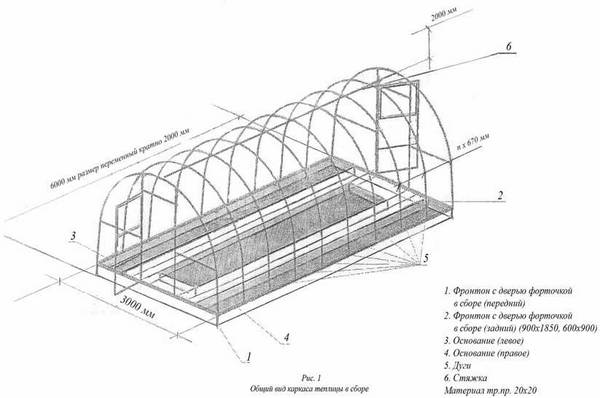
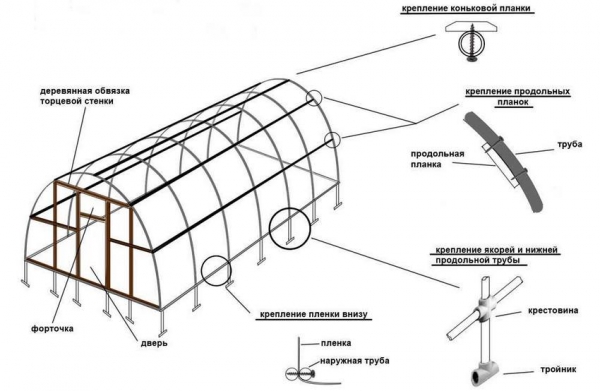
We are looking for a suitable drawing on the Internet.Then we will adjust it to the required dimensions and adjust the details according to our capabilities.

A drawing of a greenhouse made of HDPE pipes with wooden parts includes all fasteners
We will not use fittings and will add a wooden base to the structure. All nodes are clearly visible. The greenhouse will be assembled as a model from a children's constructor.
We take the dimensions of the base 5x2.9 meters, the height of the greenhouse - 1.8 meters, the number of arcs from pipes - 6.
Material selection
We select a HDPE pipe of the desired diameter and wall thickness. Given the flexibility of these pipes, we will need a larger diameter with a higher wall thickness than for other plastic pipes. Let us dwell on a pipe made from recycled materials (it is much cheaper) for technical needs with a diameter of 50 millimeters, with a wall diameter of 4.6 millimeters, a weight of one linear meter of 0.6 kg and an average price of 60 rubles per linear meter.
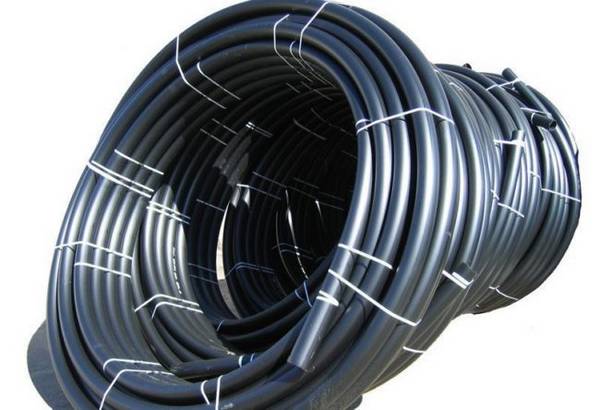
HDPE technical pipe with a diameter of 50 millimeters is suitable for a greenhouse frame
We choose an edged board for the frame: the optimal thickness for us is 25 millimeters.
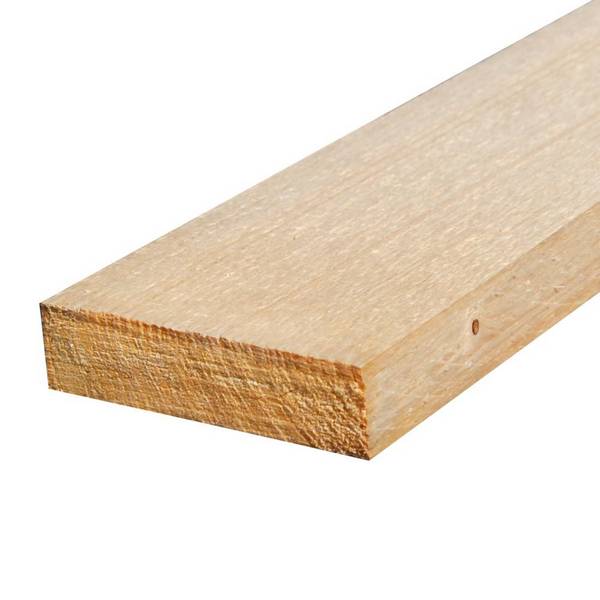
The edged board will serve as the base of the greenhouse from HDPE pipes
The rigidity of the structure will add pieces of timber.
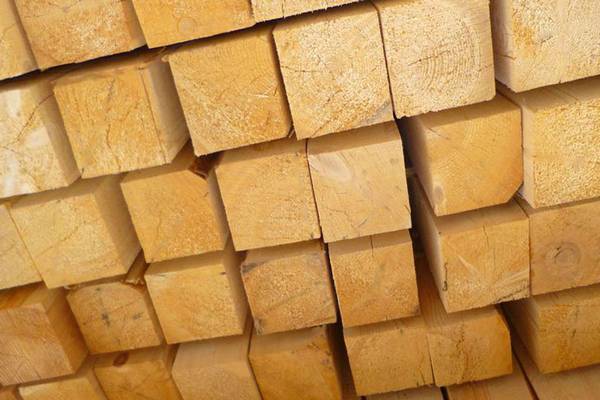
Edged timber from pine 40x40x6000 mm will give rigidity to the structure
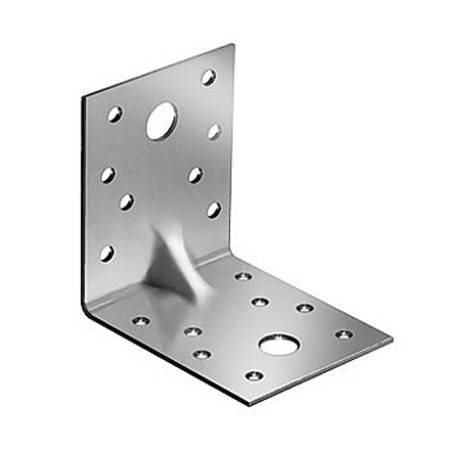
The fixing corner will help to thoroughly fasten the base boards
For additional fastening of pipes to the base and the ground, we need rebar rods about 80 centimeters long.
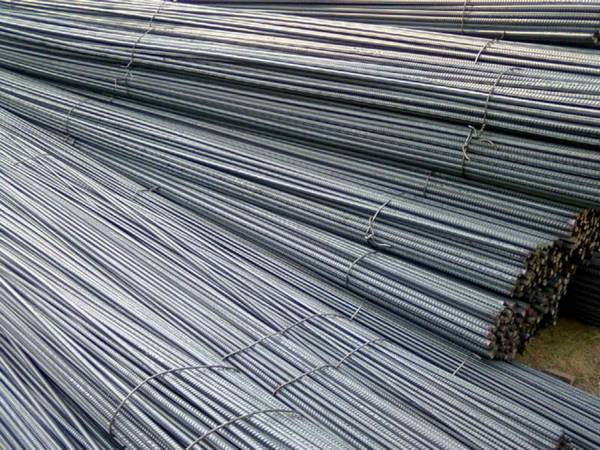
Reinforcement bars will ensure the strength of the frame pipes
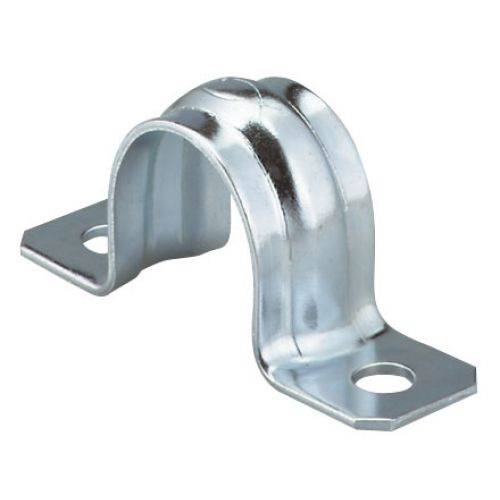
The galvanized double-sided holder will help to fix the pipes on the base completely
If we cover our pipe structure with a conventional film, then this will be the most economical option.
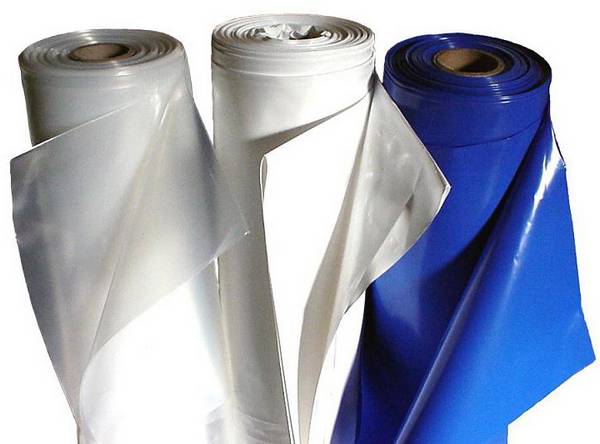
Film-sleeve for covering greenhouse structures is sold in rolls of 10 meters
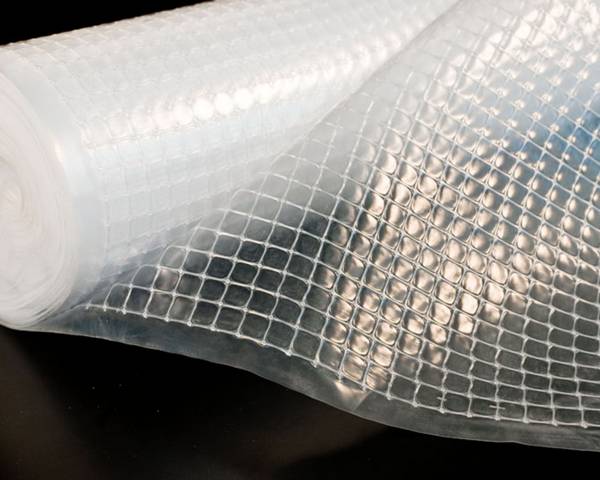
Reinforced heat-resistant film will last much longer than conventional polyethylene
Spade bayonet.
Owl shovel.
Electric saw (hacksaw).
Bulgarian (with disks for metal).
Hydraulic level.
Carpentry corner.
Drill (with a set of drills).
Hammer.
Roulette.
Screwdriver.
Mounting stapler.
Table: calculation of the necessary materials
| Position | Name | Specification | Quantity | Approximate unit price | Price (average) | Notes |
| 1 | HDPE pipe from recycled materials 50t | Ø 50x4.6 mm | 70 meters | 60 rub./m | 4200 rubles | The pipe is sold in coils of 6 meters. |
| 5 | Double-sided galvanized holder | Ø 50 mm | 12 pieces | 20 rubles / piece | 240 rubles | |
| 6 | Edged board | 25x200x6000 mm | 3 pieces | 370 rub/piece | 1110 rubles | |
| 7 | Edged pine bar | 40x40x6000 mm | 20 pieces | 100 rubles / piece | 2000 rubles | |
| 8 | Reinforced polyethylene film PET | 200 microns (120 g/m2), 2x25 m per roll | 1 roll | 1 200 rubles | 1 200 rubles | |
| 9 | Metal fittings 35GS | 10 mm | 10 meters | 20 rub./m | 200 rubles | |
| Reinforced fixing angle | 90x90x65x2.0 | 4 pieces | 20 rubles / piece | 80 rubles | ||
| 10 | self-tapping screws | About 2 kg | On demand | |||
| Total | 9020 rubles (excluding the cost of self-tapping screws) |
In addition, you will need a certain amount of wooden lumber, possibly substandard, which can usually be found in any area.
What are the advantages of a frame made of PVC and HDPE
The main positive point of using plastic pipes or polycarbonate products is the low monetary value. Any gardener is able to make a design on their own. Another advantage is the mobility of the greenhouse. It can be moved to any place, depending on the needs of the owner.
Greenhouses made of plastic pipes do not have a negative impact on the grown plants and soil. If the rules of assembly are observed, a long service life is guaranteed. Polycarbonate is a material that protects plants from ultraviolet radiation. At the same time, sheets made of this material are characterized by an increased transmission of light rays, which does not decrease with prolonged use of the frame.
Despite the fact that polycarbonate is lighter than any glass, it is stronger than this material. You can not be afraid for the state of the greenhouse during hail. The positive point is that there is no need to prepare the foundation and use specialized equipment. Polycarbonate is not exposed to the negative effects that occur during sudden changes in ambient temperature. The flexibility of the material allows you to easily make any kind of greenhouses.
Plastic pipes do not need specialized treatment with antiseptic agents.
Greenhouse made of HDPE pipes: advantages and disadvantages of the material
First of all, you should determine what kind of material it is. The abbreviation HDPE means low-pressure polyethylene, which indicates the method of its manufacture. This material is produced in diameters from 20 to 1200 mm. It is sold rolled up. For the convenience of visual differences in characteristics, these pipes are made in different colors.
It can be sold in this form
The use of this material in the construction of greenhouses and greenhouses has gained wide popularity among gardeners and owners of private houses. This was facilitated by the numerous positive qualities of HDPE pipes, which include:
Long service life. Depending on the thickness, color and reinforcement, the construction of this material will last from 10 to 40 years.
Moisture resistance. Perhaps this quality can be attributed to one of the main ones, since wood or metal cannot be compared with HDPE pipes. In this regard, they are widely used for the construction of greenhouses and greenhouse structures. It should be noted that this material is not subject to corrosion.
Environmental friendliness. The material does not emit substances harmful to humans and plants. Due to this quality, HDPE pipes are used in residential buildings for supplying drinking water.
Ease of installation and replacement of structural fragments. When exposed to external weather conditions, mechanical damage or significant temperature changes, the polyethylene material may be deformed. Thanks to fittings, tees, crosses and other connecting elements, parts of the structure are easy to disassemble, replacing damaged areas. The process of assembling a greenhouse itself is not difficult, as it is more like connecting parts of a Lego constructor.
Open flame resistant.
Material weight. The finished structure is easy to move even for one person. This quality of HDPE does not affect its strength in any way. Depending on the thickness of the pipe and the method of its reinforcement, its weight varies.
Reliability and strength. HDPE wide temperature range, which allows you to not change the structure of the material. The quality of such pipes will not change at temperatures ranging from -10 to +95 ° C. It should also be noted that this material is resistant to chemical and biochemical factors.
Flexibility. LDPE pipe is easy to bend. This makes it possible to produce greenhouses of various shapes. This quality is widely used in the manufacture of arched structures.
Wear resistance. HDPE pipes of a quality manufacturer are able to withstand significant loads. The finished structure does not require additional maintenance.
Low material cost. Compared to metal structures or structures made of wood, the material is much cheaper. This is especially noticeable when you consider that metal and wood additionally require special processing and painting, and these are extra costs.
With so many positive properties, the construction of a greenhouse made of polyethylene pipes still has negative properties:
The lightness of the material is both a positive quality and a negative one. The HDPE pipe construction is lightweight, so it is not resistant to strong winds or tipping over.In this regard, such a structure needs to be strengthened at the base or lay a shallow foundation.
Low-density polyethylene, without proper coating, is exposed to ultraviolet rays, which is why its service life is almost halved.
Greenhouse design and types of materials
The frame of greenhouses is made of wood, metal pipes and corners, plastic pipes of various composition and quality, and, finally, the entire greenhouse can be made of finished aluminum or wooden double-glazed windows.
To protect against rain and snow, cold and wind, the frame is covered or completed with a polyethylene film - sleeve, reinforced or bubble (which better protects against cold, but transmits light worse); non-woven materials (spunbond, agroscan); plastic sheets (cellular polycarbonate) and even glass. The last two positions, as well as aluminum double-glazed windows, are used for heavy capital greenhouses of the "greenhouse" type, which operate all year round.
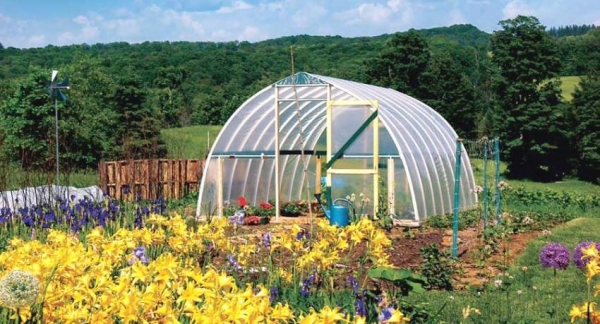
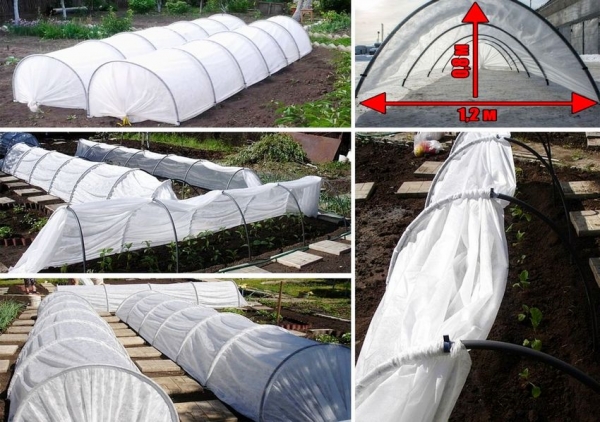
Do-it-yourself model of a greenhouse made of polypropylene pipes. Photo of greenhouses covered with foil
Arched frames for greenhouses and greenhouses can be purchased at specialized stores or ordered on the relevant websites. The kit includes ready-made marked elements of the frame from pipes and fasteners. Such structures are assembled quickly and easily: a foundation is not built under them, but only a place on the site is leveled.
Arched frames for greenhouses and greenhouses can be purchased at specialized stores or made independently
Do-it-yourself installation of a greenhouse made of polypropylene pipes allows you to get a design made according to individual sizes and drawings. The arched greenhouse is equipped with windows and doors at the ends of the structure. For budgetary coverage, polyethylene film is used.
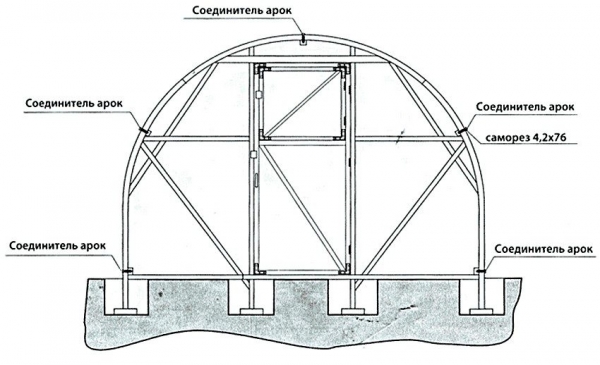
Scheme of a greenhouse made of polypropylene pipes covered with a film
Choosing a place for a greenhouse
When choosing a place to install a greenhouse made of polypropylene pipes with your own hands, you need to consider the following points:
- the greenhouse should not be under the shade of garden trees or other buildings on the site;
- a convenient approach to the structure for caring for plants should be provided;
- the prevailing wind direction in your area must be taken into account. The location of the greenhouse, taking into account this factor, will reduce heat loss.
Greenhouses made of plastic pipes are becoming more and more popular among gardeners.
Before starting construction, the site for the greenhouse is leveled. If the ground surface is not smooth enough, leveling is done without excessive compaction so as not to disturb the soil structure. Then, precise markings are made, observing the correct angles, which will ensure the stability of the frame.
It is recommended to cover the frame of the greenhouse with a film at a temperature of 16-18 ° C, which will help eliminate sagging of the material
Frame assembly
To assemble the greenhouse frame, prepare all the necessary materials:
- polypropylene pipe, fastening elements;
- clamps for fixing the polyethylene coating;
- tees, corner adapters, a set of self-tapping screws;
- metal reinforcement bars 0.8 m long.
On the long sides of the marked rectangle, metal rods are driven in. The distance between the reinforcement bars should be from 0.5 to 0.9 m. The closer the bars are, the more stable the structure will be. Reinforcement should enter the ground by 0.4 m
At this stage, it is important that the rods on one side are clearly opposite the rods on the other side. In this case, the greenhouse will turn out without distortions.
Installation of a greenhouse, in the design of which plastic arcs are used
Further, pipes of the required length are put on opposite reinforcement bars - this way smooth arcs are obtained. When all the arcs are installed, a pipe is laid horizontally along the upper points of the arches and fastened to the arches with anchors.To obtain a more rigid structure, horizontal supports can be fixed in several places.
Covering the greenhouse with polyethylene
When the frame is ready, proceed to cover the structure with a film. It is recommended that this work be carried out at a temperature of 16-18°C to avoid sagging of the material. Polyethylene is fastened with clamps. This fastening allows, if necessary, to pull the film and remove sagging. At the point of contact of the film with the ground, it can be dug in with earth or weighting agents (board, brick) can be laid on it.
Folding plastic greenhouse
It should be noted that greenhouses created using polyethylene film are not durable enough. They are designed to operate for one or two seasons, after which the film will need to be changed. In addition, the film coating does not provide adequate thermal insulation.
The device of the greenhouse from plastic pipes
Advantages of greenhouses from HDPE pipes
The production of a greenhouse frame is possible from a wide variety of materials - wood, profile, metal pipes. But many farmers prefer low-pressure polyethylene (HDPE) pipes, as it has many undeniable advantages:
- this material does not corrode, does not rot and does not suffer from the effects of various microorganisms;
- it does not require paint or any protective coatings;
- has a presentable appearance;
- HDPE pipes are reliable and durable - the approximate life of these products is up to 50 years;
- the frame made of HDPE is easy to mount and dismantle, and the pipes themselves can be easily sawn or bent, creating structures of any configuration and size.
As a cover for a greenhouse made of HDPE pipes, you can use plastic wrap or polycarbonate. The first option will make the structure lighter and suitable for preparing seedlings in the spring. The second option will be a good solution for year-round use, as it is a more reliable and durable structure that will withstand frost and wind well. To make your greenhouse more durable and reliable, you should also prepare a foundation for it.
Carrying out preparatory work
Before you make and install a greenhouse structure on the site, you will have to carry out some preparatory work.
First, you need to choose the right place for the greenhouse. Choose an open and unshaded area for this. If you want to make it in the form of an extension to the building, then it is better to choose the south wall as the location, since it is the sunniest.
Secondly, you will need to mark out the site for the future greenhouse and clear it of all kinds of debris, grass and weeds. After that, you can already proceed to the direct construction of the structure.
Foundation preparation
For the construction of a greenhouse structure, the best option is a shallow strip foundation, which can be poured independently and without the involvement of special equipment or trained workers.
The process itself consists of the following steps:
- Along the perimeter of the future greenhouse, you need to dig a trench, the width of which should be 25 cm and the depth - 0.5 m.
- A mixture of crushed stone and sand is poured into the trench in equal proportions. Its layer should be approximately 10 cm.
- Wooden formwork is installed.
- The foundation frame is prepared from the reinforcement. The main criterion is strength, as it will serve as the basis of the entire structure.
- Then a concrete solution is prepared, which is poured into the formwork.
- The poured foundation settles for about a month, after this period, you can begin to build a greenhouse on it.
Greenhouse assembly
In order to save time, you can start assembling the greenhouse in parallel with settling the concrete foundation
The most important thing is not to install it until the concrete has completely hardened.
So, how does the process of assembling the greenhouse structure itself take place? Consider a simple example:
- Prepare 4 pipes of various sizes: two of them should correspond to the length of the structure, and two to the width. Then fasten them into a frame with self-tapping screws.
- Install several cross bars on two parallel tubes of the frame. Their number should depend on the size of your structure. The approximate distance between the arcs is about 1 m.
- To ensure that the arcs are securely fixed on the frame and do not squint, fasten them together with stiffeners - these are longitudinal pipes that are mounted on the sides and top.
- For the doorway, the door frame and the door itself are assembled - 3 pipes for each element. The frame is attached to the base and to the outer arc of the greenhouse, the door is attached to it with hinges.
- Then the material used as a cover for the greenhouse is prepared - polycarbonate or polyethylene. It is attached to the frame with self-tapping screws.
- The finished structure is fixed on a concrete foundation with dowels. Everything, your greenhouse is ready!
As you can see, the construction of a greenhouse is not such a difficult task as it might seem at first glance, and with a certain amount of effort, it is quite possible to do it yourself. As a result, you will not only save your money, but also become the owner of a magnificent greenhouse created by yourself. And the harvest grown in it will doubly delight you for many years in a row!
Information provided by Silkalin LLC, a manufacturer of HDPE pipes in Moscow.
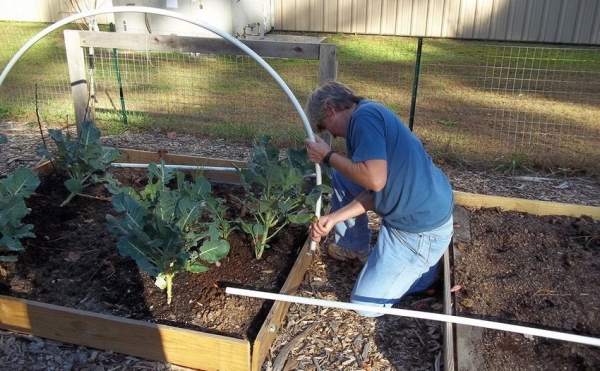
II. The easiest option is wood, PVC and film
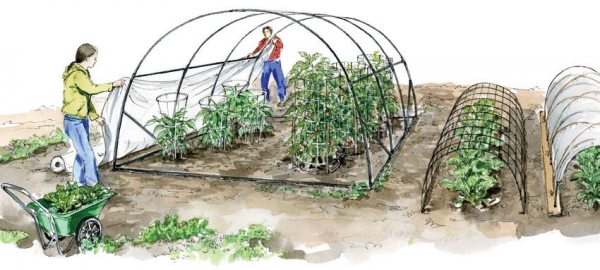
A simple and inexpensive option is a small greenhouse for summer cottages made of PVC arcs, reinforced with wooden planks and ends. As a covering material, you can take a regular film. The frame will last for many years, it can be disassembled for the winter and reinstalled on the site in early spring. With this use, the earth receives all the necessary elements, moisture and does not need additional processing.
Such a greenhouse consists of two end walls, PVC pipe arches and longitudinal wooden planks to reinforce the frame. The base of the greenhouse can be made of a wooden beam or a brick foundation can be made.
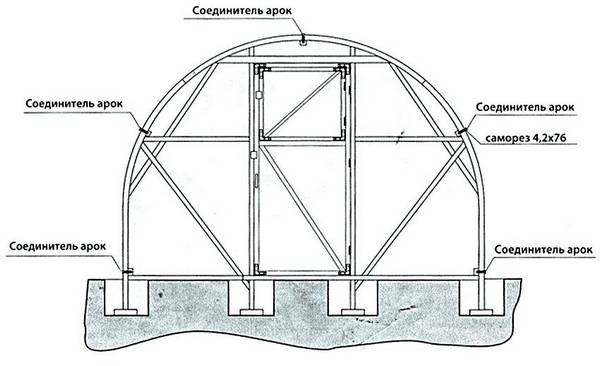
On the foundation, you must first install the end walls. They are made according to the finished curved arc. Inside the arc (it must be laid on a flat surface and bolted to a wooden block of the base), side posts and the upper beam of the doorway are formed. The optimal opening height is 190 cm. To strengthen the end, you need to fill one more plank, connecting the edges of the arc and the edges of the top board of the doorway. The angle between the sloped bar and the base board should be 60-65 degrees. The upper nodes of the end part must be reinforced with additional planks and wooden overlays, since it is here that the longitudinal wooden planks of the greenhouse frame will be fixed:
On the sides of the base, metal rods must be placed vertically. Their diameter must correspond to the inner diameter of the PVC pipes so that the arcs are put on the rods. We install the end walls on the base and connect them together with two upper beams and two middle planks. We strengthen the attachment points with metal corners.
We put the arcs on reinforced rods and hook them to wooden planks using construction clamps. Do not forget to check the top of the arches and ends for level. We cover the finished frame with a film:
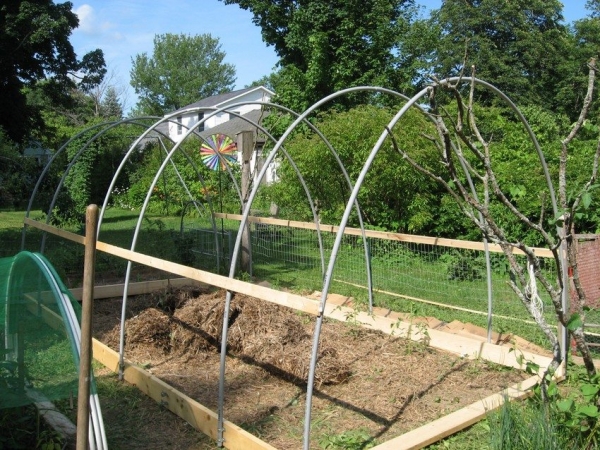
Greenhouse made of metal pipes
The photo above shows a greenhouse 6 meters wide and 20 meters long with most of the structural elements for the "wedding" part. The top rail steel tubes are bent into hoops to make ribs for the greenhouse. This approach simplifies the design - the rib replaces two walls and two rafters. The structure uses the natural strength of the semi-circle, which is easy to prepare.Due to the curvature, it “throws off” the snow quite well and provides a lot of usable space under the galvanized arches. If you make it small, you won't have any vertical supports to get in the way.
The photo above shows fasteners for checking and tightening, as well as using self-locking nuts.
This photo shows the joists joining the top purlins together, and a diagonal brace extends from the ridge of the piece down to the bottom joists (not shown). The beams and diagonal braces are tied together to create 5 triangles that create a strong shell across the top of the ribs.
Power tools are not needed, but they make the job much easier. Your most important tool is a friend to help hold parts in place and provide tools and fasteners. This is a job for two. You can build a greenhouse like this on your own, but it's much more difficult. Cut down on time, effort, and frustration, and get a helper. Say thank you to him now, and then thank him with fruits and vegetables.
View the embedded image gallery online at:
Photo source: www.frugal-living-freedom.com/build-a-greenhouse.html