How to arrange a shower in a small corner
The layout of the bathroom must be approached wisely, because after the repair there will be no possibility to change or redo something. Thus, it is necessary not only to think about where the sink and toilet will be located and how the wiring of communications can interfere with your plans, but also how many people will live in the apartment in the future
It is especially important in small rooms that no one feels discomfort when they are in the bathroom or want to get there. The bathroom should be comfortable, modern and functional! The small size of the room implies the compactness of any equipment located in it
The ideal option for this type of room would be one in which the toilet bowl is hidden in the wall.
An ordinary shower cabin may not always fit into the style and general atmosphere .. Photo No. 5 A brick partition separates the shower cabin from the kitchen and. The idea of \u200b\u200bthis design is very simple - fencing off with formwork or.
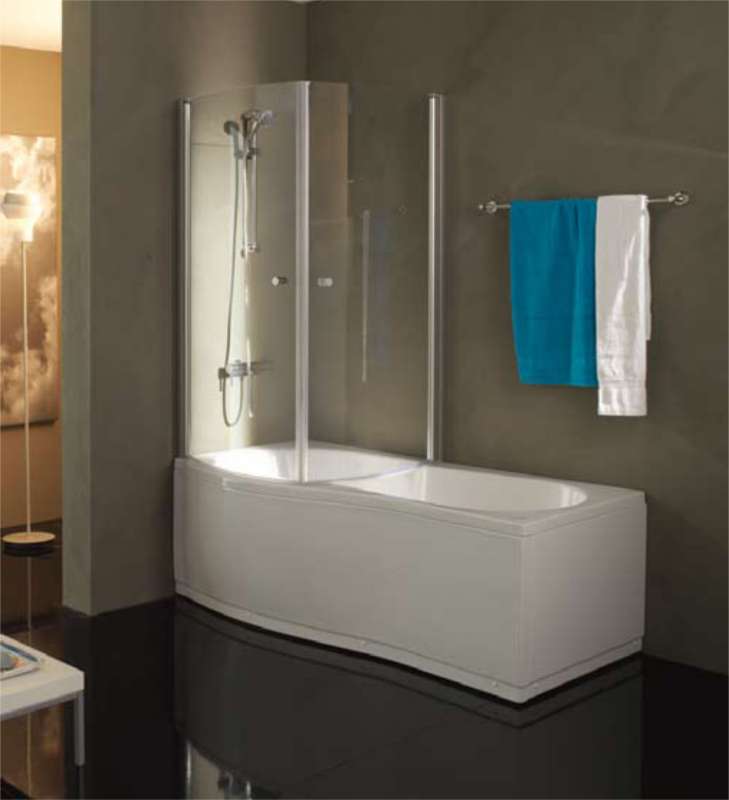
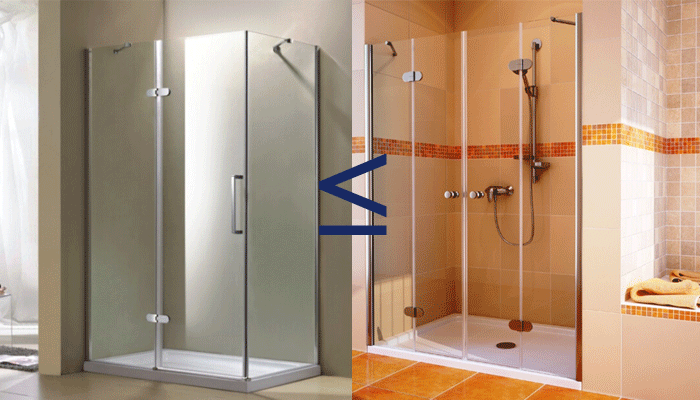
The modern rhythm of life dictates its own conditions of life, because sometimes after a hard day's work there is absolutely no time to take a bath. A shower cabin comes to the rescue - comfortable, stylish plumbing, contributing to an increase in the level of comfort. To better navigate how to choose a practical and high-quality cabin model, as well as how to equip it in the bathroom at the proper level, we recommend that you read the information in this article. A traditional bath is indispensable for lovers of soaking in foam and hot water. However, shower enclosures are gaining popularity as they save space in the bathroom, which can be used to install a countertop or a washing machine.
Achieving a cozy atmosphere in small spaces is oh so difficult! A separate bathroom is two rooms in which the lack of space is a big problem. In order to somehow improve the situation, they are often combined.
Topic in the section "Baths and showers", created by the user Vadim , Login or register. Construction forum VashDom.
I live in a private house, on the first floor in the bathroom there is a toilet bowl and a sink. On the second - a toilet bowl, a sink and a small bathtub, in which we bathe children. We are not going to remove. Now I wanted to have a shower, but there is no place in the bathrooms.
I managed to implement several of the ideas mentioned in the article in my small combined bathroom. Plus a sliding door, not a hinged one. It's been ten years now, and I'm not overjoyed at what I've done. And guests perceive the room as very large! True, I think to replace the Jacuzzi with an ordinary bath of the same shape, it was too much trouble with it. I have never seen toilet bowls designed for less than a kg of load.
Puzzle of modernity or combined kitchens and bathrooms
A do-it-yourself shower cabin in a private house, arranged in accordance with all the rules and with diligence, will not only make living more comfortable, but also save you from the cost of attracting third-party and not always conscientious workers
Equally important is the moral satisfaction received from the results of their work. Just as the construction of any capital structure begins with the development of a project, so before starting work on equipping a shower in a private house with your own hands, it is necessary to think over, and it is advisable to indicate on paper the main plans and diagrams, for example:
The preparation of the room for the shower and the direct arrangement of the cabin in it are carried out in several stages. It is necessary to calculate and put on the plan not only the dimensions of the cabin itself, but also all the distances to the points of connection to engineering networks, which will avoid miscalculations and save materials.
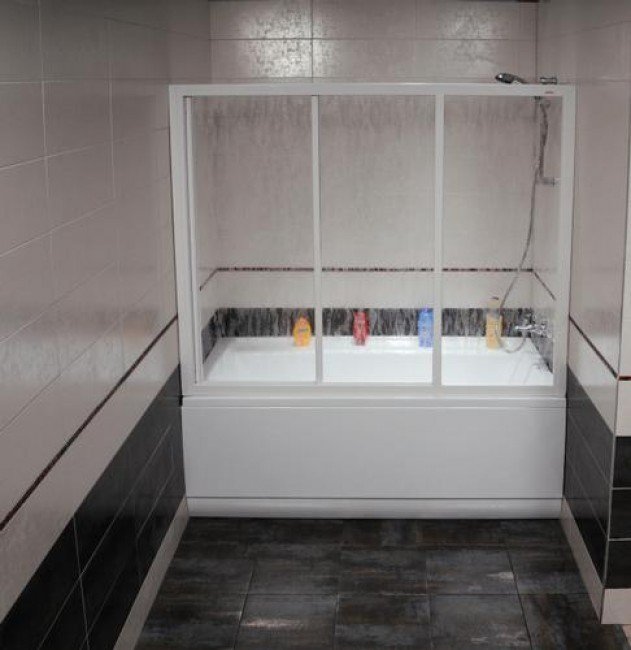
The abundance of showers and hydromassage boxes does not satisfy home craftsmen seeking to realize their creative potential. The field for independent search here is very large. Looking at the range of sanitary ware offered, you notice that only brands and designs change, and the dimensions of most shower cabins remain quite modest.
Today, the massive and voluminous bathtubs that were installed in every apartment during the construction of the old housing stock are being replaced by practical and comfortable shower enclosures that not only save our space, but also look very aesthetically pleasing and modern. Everyone who lived or lives in an old apartment knows perfectly well how valuable each meter of living space is, especially in the bathroom. That is why recently showers have become very popular, which allow much more rational use of space in the bathroom and conveniently take a shower. However, today the cost of such corners for bathrooms is quite high, and not every person can afford to buy it.
Choosing a shower
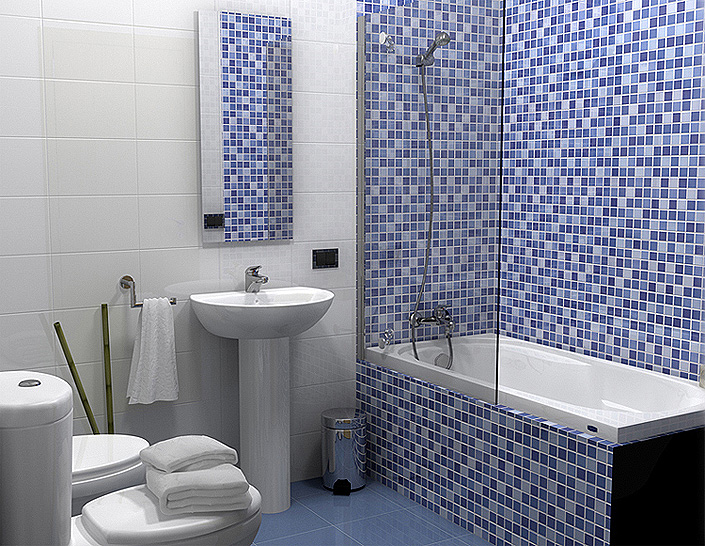
Beautifully equipping a small area is not so easy, especially when it comes to the bathroom, the convenience of which, as a rule, is not combined with style. And what kind of interior design can we talk about if a significant part of an already tiny room is cluttered up by the bath itself? Crampedness, however, does not mean that you need to limit yourself in comfort as well - designers offer many options for stylish and modern bathroom arrangement so that you can comfortably take water procedures. And it is advised to start with a rather progressive step: to replace bathtubs with shower cabins, which more and more people began to give preference to. It is understandable - cabins are not only much more convenient and practical than baths, but they also take up much less space.
This article will consider an example of planning, its main principles and nuances, as well as the stages of planning. Bathroom projects are carried out in such a way as to achieve maximum comfort with maximum functionality, because in the morning a person gains vigor here, and before going to bed he relaxes and enjoys it.
For several years in a row, the bathroom interior has been dominated by a shower cabin with extended functionality, but now most designers recommend installing just a shower without a shower cabin. This is a lightweight design that can be attributed to the style of minimalism. The absence of a pallet, the installation of partitions directly on the floor is a feature of this configuration.
Choosing a project for the redevelopment of a bathroom and a bathroom
Today, the modern market offers a lot of sanitary ware, ranging from acrylic and steel bathtubs to entire home complexes equipped with the most modern equipment for spa treatments. The assortment of this popular device offered in stores is able to satisfy the most demanding consumer, but there is a large group of people who are not satisfied with industrial designs. One does not like the price, the second does not like the appearance. After all, in a country house, and even in an apartment, you want something special - not like everyone else.
WATCH A VIDEO RELATED TO: Repair for Granny! Bathroom renovation with a shower cabin! Uralkeramika tiles! Cutting without a tile cutter
In the 1950s, many residential buildings had a layout that seemed strange to us - kitchens and bathrooms were combined in one room. It is difficult to say what the architects were guided by, and even those who signed such projects, nevertheless, they take place. Although I believe that it was more convenient and cost-effective to combine plumbing. I want to offer you different options for solving the issue, as well as show an interesting video in this article. Interesting to know!
Related video
There are different designs of shower drains: ordinary, which look like a round or square mesh in the floor, like a tray. There are more modern models - wall-mounted. A shower tray and a wall drain are necessary if you make a cabin with a large flow of water. In this case, the conventional design may not be able to cope with the retraction and more efficient models are required. And in the tray there can be two drain devices. Features of their editing in a video from one of the manufacturers.
One of the ways to waterproof the shower cabin
And another type of waterproofing
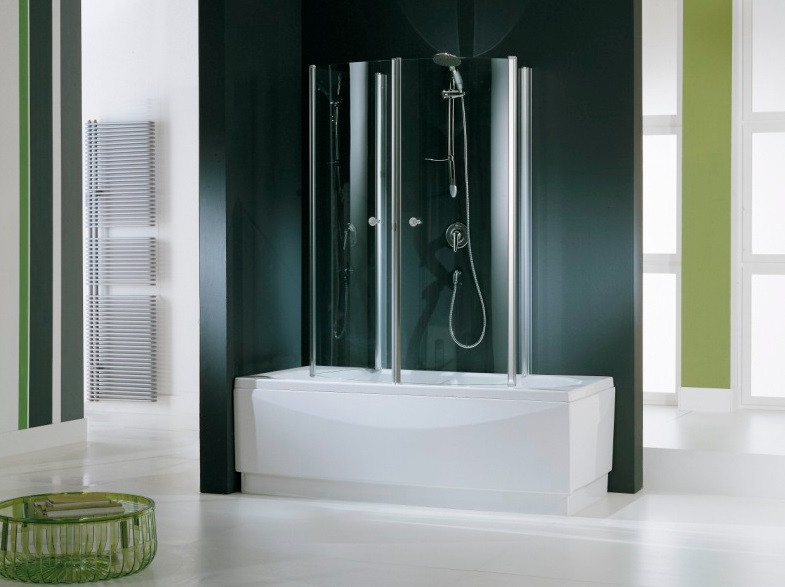
The procedure for taking a bath is quite lengthy. The shower allows you to quickly refresh and rejuvenate. In addition, a shower stall takes up less space than a bathtub. Therefore, a shower is arranged in almost every home.
If the house has two bathrooms, then one of them, as a rule, is equipped only with a shower. In another, you can install both a bath and a shower.
In the only small bathroom in the house, you have to arrange only one shower.
How to make a bathroom screen with your own hands
If you could not find a screen in the desired size, color or design in the store, you can make it yourself. In addition, a homemade screen will cost you an order of magnitude cheaper than a purchased one. When making a homemade screen, it is better, after all, to give preference to plastic, since this material is much easier to work with.

We need the following materials for work:
- Polycarbonate sheet of the required height and width;
- Profile for making a frame (we will make a frame screen);
- Self-tapping screws and a screwdriver;
- Construction roulette;
- Bulgarian / stationery knife / hacksaw;
- The handle for which the screen will open.
Work order:
- Using a tape measure, measure the exact dimensions of the future screen. You should take into account that there should be free space between the top edge of the screen and the ceiling for light and fresh air to enter. Otherwise, too much humid air will accumulate behind the screen and you will simply have nothing to breathe.
- Mark the resulting dimensions on the polycarbonate sheet and carefully trim the excess with any suitable tool you have available.
- If you plan to make a fixed screen, we attach the bottom profile to the bathroom side with a sealant. Allow the sealant to dry completely before proceeding with the next steps.
- The side profile will be attached to the wall. First you need to make a markup in the places where you plan to place the mounts. Then make holes in the appropriate places and attach the profile to the wall with self-tapping screws.
- Insert the polycarbonate into the grooves of the profile and make sure that it is firmly seated and does not wobble in it.
- Attach the remaining profile along the top edge of the sash and from the second side.
- Attach the handle at a comfortable height for you.
- Check the operation of the screen.
With a strong desire, you can make a screen, starting not from the side of the bathroom, but from the floor. However, in this case, it makes sense to think about purchasing a shower cabin. As you can see, the process of making a bathroom screen with your own hands is not at all complicated. If you purchase special rollers and appropriate fasteners, you can even make a sliding or folding screen yourself.
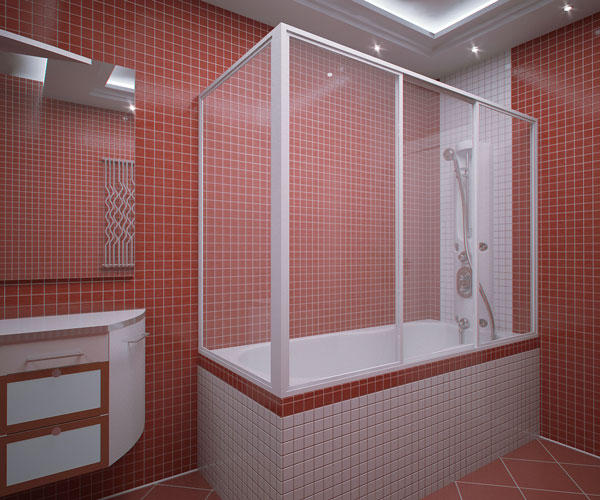
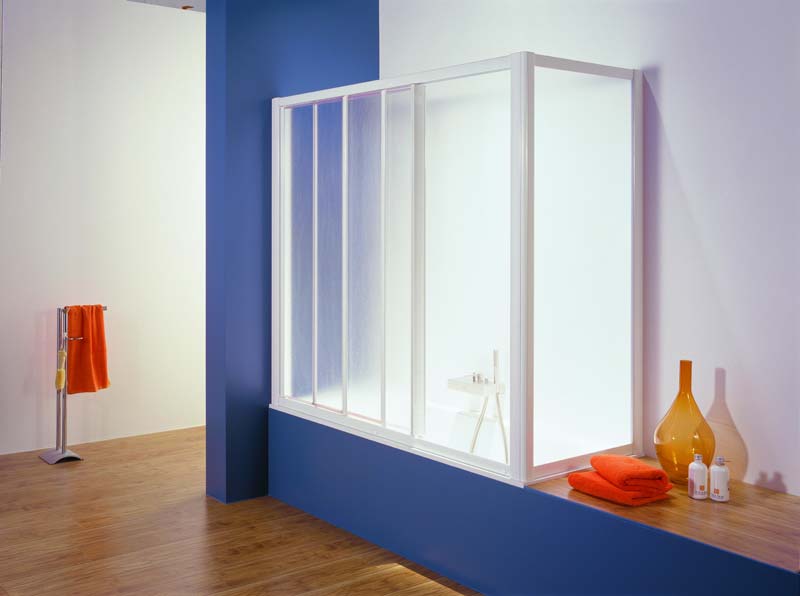
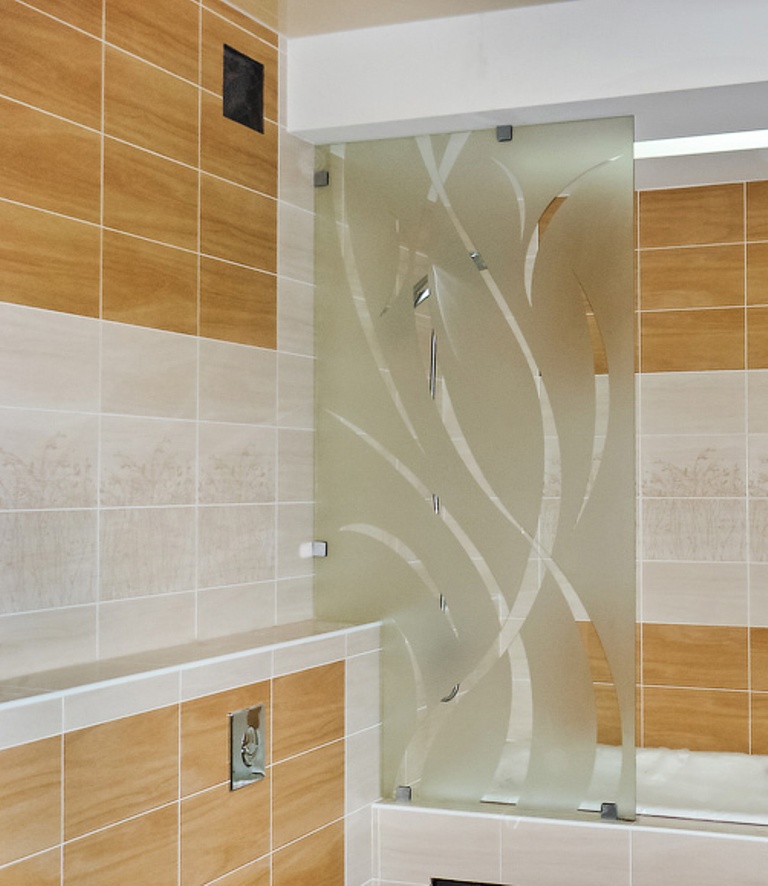
Shower doors
If the cabin is rectangular, everything is solved more or less simply: a rectangle can also be cut out of glass in the workshop. There are many canopies for glass doors, you can choose the most convenient for your case. Just order doors with awnings: you will have to drill holes under them, and it is best to try them on.
It is desirable to take tempered glass. If it breaks, then into small fragments with blunt edges, which are difficult to injure. But, most likely, the fragments will remain hanging on the film. The disadvantage of this glass is that it is expensive.To save money, you can order the usual thick one - 5-6 mm, and at home paste it on both sides with a translucent polymer film. You will have to tinker, but the effect will be almost the same as with tempered glass: the fragments will be on the film.
One point: the glass is washed before applying the film, then degreased. The film is glued to wet glass. This makes it easier to expel air bubbles, and you can also move the film for a while.
If you don’t want glass doors, but you need translucent ones, you can make them from polycarbonate, but not cellular, but sheet. You will have to find a suitable furniture profile, make a frame out of it and put polycarbonate into the frame on the sealant. For reliability, you can also attach through screws with washers.
Another option is to buy ready-made doors. There are also glass ones specially for cabins, or you can adapt them, as in the video.
Role in design
The screen is no less significant element of the decor of the room than tiles or plumbing, because due to its impressive dimensions it is simply impossible not to notice it in the room. What should be considered when choosing a screen design for your bathroom?
- For those who do not want the screen in their bathroom to be too noticeable, a screen made of transparent glass or polycarbonate is ideal.
- If several people live in your apartment, and your bathroom is combined, it is better to use a matte screen or a screen with a dense pattern.
- In addition, both glass and plastic screens can be made in a specific color scheme. It must be selected in accordance with the color scheme of your bathroom.
- A bathroom screen can be supplemented with an original design touch, if you place some beautiful drawing on it or create an interesting texture on it.
- We advise you to give preference to translucent screens of light shades. Otherwise, you will have to think more carefully about lighting directly above the bathroom itself.
Design classification
All screens can be divided into two large groups: movable and fixed.
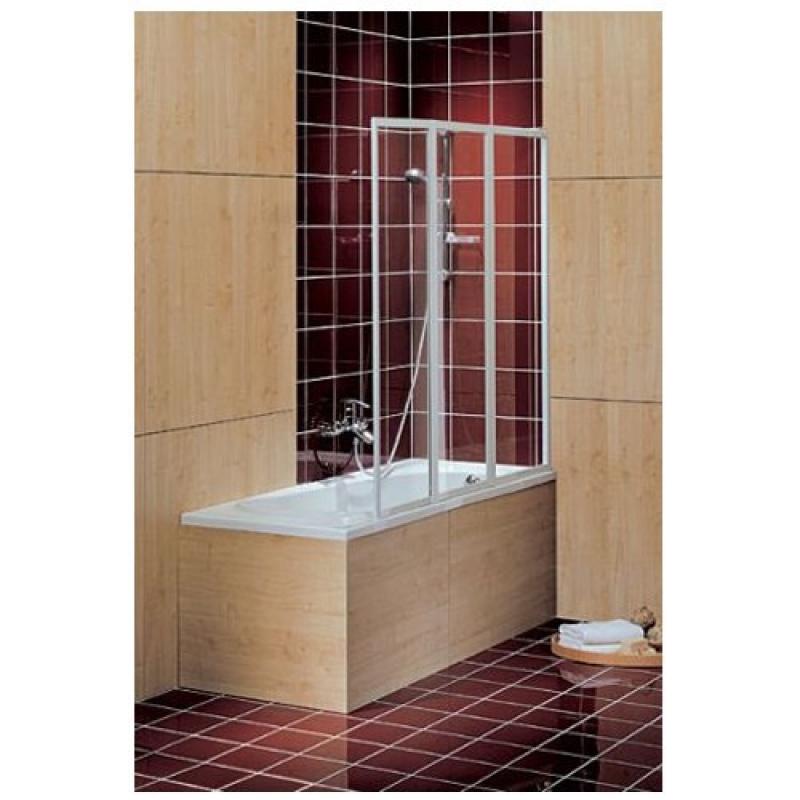
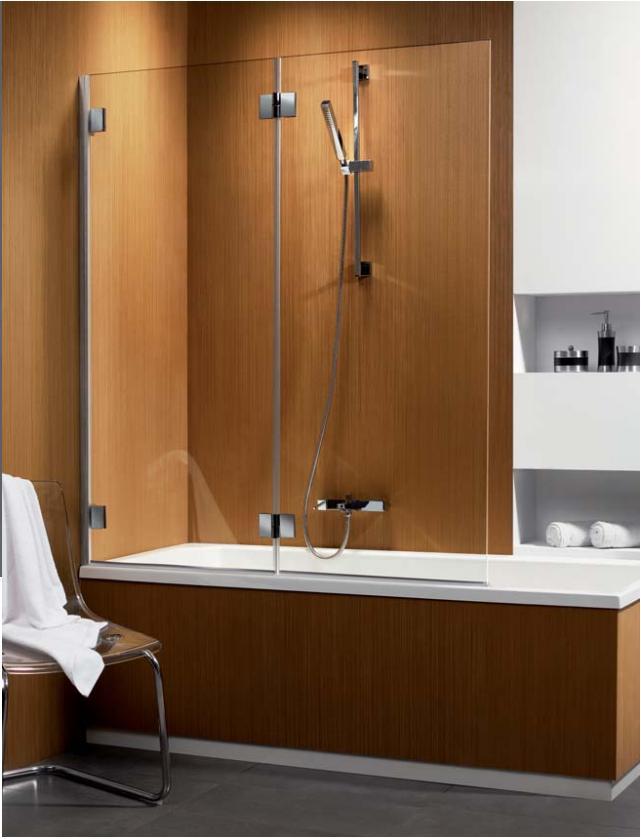
Movable screens are installed on the side of the bathroom and attached to the walls near it.
By type of construction, such screens are divided into:
- Frame - have a special plastic or metal frame that allows you to use thinner glass or plastic. Such designs are considered more durable and reliable and will not allow a drop of moisture to fall on your floor.
- Frameless screens. As a rule, thick tempered glass is used for their manufacture. The most common is the model of a screen that covers half of the bath, with smooth rounded corners. They are also called corners.
- Combined or multi-section screens, as the name implies, combine both of the above types of structures.
- Also, screens can be solid and composite.
Depending on the type of sashes used, the screens are:
- Opening - in which one or more wings open with a push outward.
- Sliding - in which either one door on the roller drives off to the side, or two doors move apart in different directions.
- Folding - doors that fold on hinges.
The first option with opening doors is not the most convenient and is only suitable for baths with a large area.

Small bathroom 10 layout options
A bathroom should be ... above all practical, comfortable, safe and functional. Therefore, the design of bathrooms should be carried out taking into account ergonomics and all SNiP standards in conjunction with the needs of the apartment owners. The layout of bathrooms and bathrooms includes the arrangement of plumbing and furniture: a bathtub, a sink, a toilet bowl, a mirror, a cabinet, a heated towel rail, possibly a bidet, a washing machine, a shower cabin, as well as a wiring diagram for engineering communications: water supply, sewerage, meters, ventilation, electricity .In the article we will talk about different types of bathroom layouts, and separately touch on the design features of small and combined rooms. To maximize the use of space, you should draw a bathroom plan with dimensions, and carefully consider how plumbing and furniture will be placed. Design projects of combined bathrooms in a linear arrangement of plumbing. If the room is rectangular, elongated and narrow, then a linear layout of plumbing is recommended, and if it is almost square, then the bathtub, toilet bowl and sink can be placed according to the radial principle, as shown in the diagram below. Ways to place plumbing in a combined bathroom.
Ways to organize a drain in a shower stall
Despite outwardly almost the same appearance - the walls and floor are tiled, some doors, home-made showers have many options for internal arrangement. There really is plenty to choose from.
Types of pallets
The easiest and most reliable option to make a waterproof floor in the shower cabin is to put a ready-made pallet. It can be installed on bricks or made of foam blocks. Under the "ready pallet" refers to two types: acrylic and enamel. Acrylic is light and non-slip, but yellows over time. Enameled - not bad in operation, but slippery when wet: you have to put a rubber mat. The advantage of acrylic is that it is not so cold - it feels like it.
If both options are not suitable, a pallet is made of brick or cast-in-place concrete, which is then tiled - ordinary, for the floor, or mosaic. This is a capital solution, but difficult to implement. If you decide to make a shower tray from tiles, and you live in an apartment building, you will need a very good multi-layer waterproofing: so that there are no problems with neighbors from below and from the side. This does not mean that in a private house a do-it-yourself shower cabin is made without waterproofing. It's just that if you "screw up" you will suffer yourself.
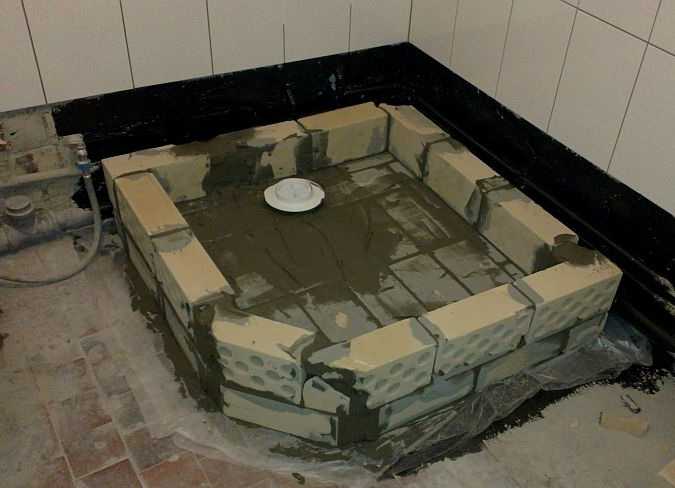
There is another option - an intermediate one. A “trough” of suitable sizes is brewed from metal, it is well treated with anti-corrosion materials. They are installed on a podium made of bricks or foam blocks (a drain is also needed), if necessary, they are covered with bricks from the outside, forming a side or a step. A mosaic is glued on the inside.
These options are usually chosen. There is also a device without a visible pallet at all, and the drain can be made into the wall, but then in the entire bathroom it is necessary to raise the floor level and form a slope towards the drain.
Now about the dimensions of showers and trays in particular:
- 80 * 80 cm - this is very small, it is difficult to bend down even for a slender person, you constantly touch the walls;
- 90 * 90 cm - somewhat better, but still cramped;
- 100 cm and more - you already feel normal, you can sit down without any problems.
If you want comfort, make at least a meter gap from wall to wall, but if the dimensions are very limited, try to leave at least 90 cm.
Organization of the drain
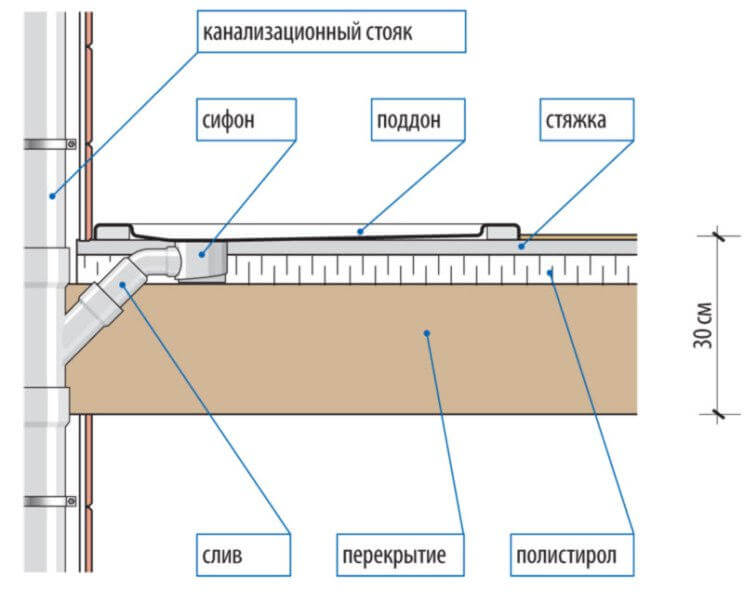
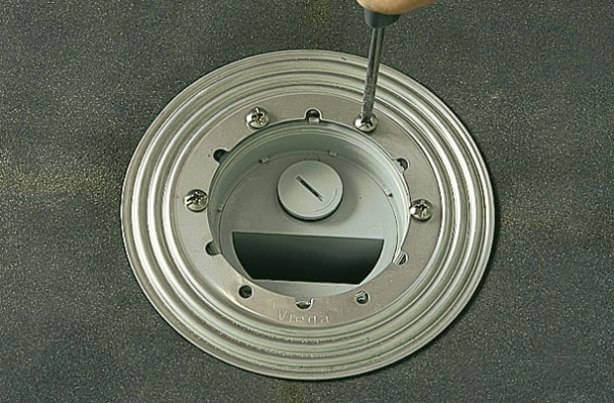
Next, you need to choose how the drain will be arranged. There are two devices: a siphon and a ladder. The ladder is more expensive, but it is usually smaller in height and more reliable. Its margin of safety is enough for a decent period and it can be poured into concrete, which is usually done.
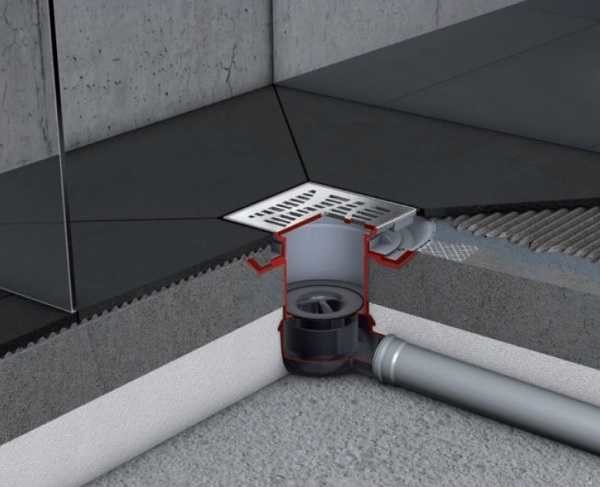
The siphon is cheaper, but when installing a pallet, you will have to provide for the possibility of replacing it. Just monolithing it is not a good idea, because if there is a repair issue, you will have to work with a hammer drill to get to it. You present the results. Therefore, when using a siphon, leave an inspection passage that is closed by a hatch or a small door.

Do-it-yourself shower cabin: how to make an inspection hatch
In any case, the drain must be serviceable. This means that the upper part - the mesh can be removed and the pipe cleaned with a cable.And to make this possible, lay the drain pipe so that the maximum angle of rotation to the sewer is 45 °, but it is better not to do more than 30 °.
Now for the slopes. So that the water in the pipes does not stagnate, the pipe from the ladder to the sewer outlet is laid with a slope of at least 4-5%. This means that for one meter of length, the height difference is 4-5 cm. The floor should have approximately the same bevel: water should drain to the drain point.
Benefits of shower niches
Shower niches with a door, by and large, are analogues of shower enclosures (see examples in the same store).
The only difference is that the fence does not require the construction of a partition in the bathroom (a glass panel is used instead).
This difference can be attributed to the disadvantages of niches, but this is not entirely correct.
The presence of three walls, on the contrary, makes niches more practical, comfortable and cozy than shower enclosures.
In addition, the functional area of the shower room is effectively highlighted.
Another advantage over a shower enclosure is that a solid partition can be used as a full-fledged wall, but not a glass panel.
Shelves are often installed on the partition, cabinets and canisters are attached, heated towel rails are mounted, etc.
Well, the most important thing is maximum reliability and easy cleaning.
The glass shower door in the niche and the tiled walls are very easy to clean and do not lose their original appearance over time.
And with careful use, they can serve up to 20, without even requiring cosmetic repairs.
Are there any disadvantages?
The only negative is the need for additional construction work.
Well, not every room fits a niche.
Otherwise, this method of implementing a shower is ideal.
Shower niches are made for decades, so you should not save on them, as the savings will definitely come out sideways.
- Make a partition of brick, it does not absorb moisture and is great for the bathroom. Plus, it has high strength, which allows the partition to be used for mounting hanging furniture or for other purposes.
- Install only glass doors in the shower niche, as they let in maximum light and are easy to clean. With plastic, things will not be so optimistic.
- Use warm pallets made of acrylic or tile, but heated. Cold tiles in the shower are a nightmare, and using a rubber mat is inconvenient.
Well, the last and most obvious recommendation - before building a partition, find out the possible sizes of pallets and doors.
Otherwise, it may turn out that you will not be able to pick up either a pallet or a shower door to fit the size of the niche and you will have to make them to order, and this is expensive.
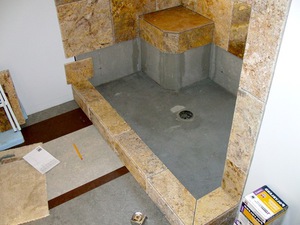
The dream of many owners of apartments and comfortable houses is a beautiful and comfortable shower cabin. But it is not always possible to find a bathroom product in plumbing stores that would fit in size, would be convenient to use and interesting in appearance. And if there is such a model, then it can be quite expensive.
If there is time and desire, it is quite possible to build a shower cabin with your own hands. To understand how this is done, you will need to carefully study the instructions and see photo examples of ready-made plumbing structures.
Do you need a shower tray?
Modern designers often refuse to install a standard shower tray, using their own floor finishes. Yes, and it is not always possible to choose a pallet according to the size of a niche.
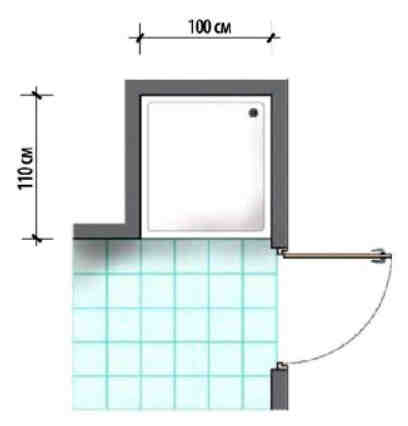
The minimum dimensions of the shower room in terms of 70 x 70 cm
. But a shower of this size will not be comfortable, especially for overweight and tall people. Try to increase the size of at least one side of the shower. In the house, it is recommended to make a shower room with a size of at least 100 x 100 cm
. In such a shower you can stand in the shower, relax even together.
The most popular pallets are enameled steel or acrylic.Steel pallets are cheaper, resistant to scratches and cleaning products, but uncomfortably cold to the touch.
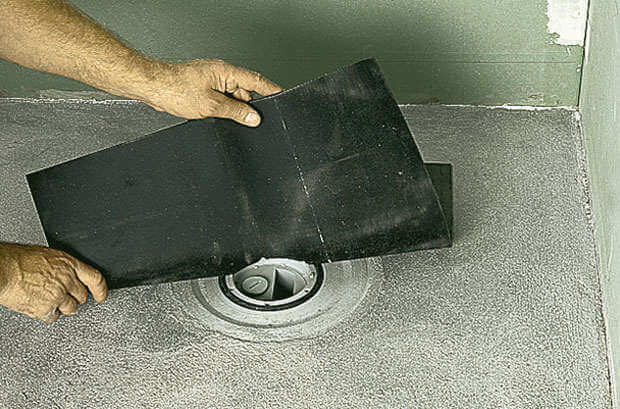 A sheet of built-up roofing material with a size of approximately 0.5 x 0.5 is applied to the flange of the siphon of the ladder and the screed m.
 The roofing material is pressed from above to the flange of the drain siphon with the outer ring
  Over the entire surface of the floor in the shower, the built-up roofing material is laid, bending it onto the walls, to a height of 5-8 cm.
The roofing material is heated with a burner and fused with the base, as well as individual sheets with each other.
A receiving grate is inserted into the siphon of the ladder. A concrete screed is laid on the waterproofing layer. Form a screed slope from the walls towards the receiving grid, approximately 1% (level difference 1 cm.
for 1 m.
length)
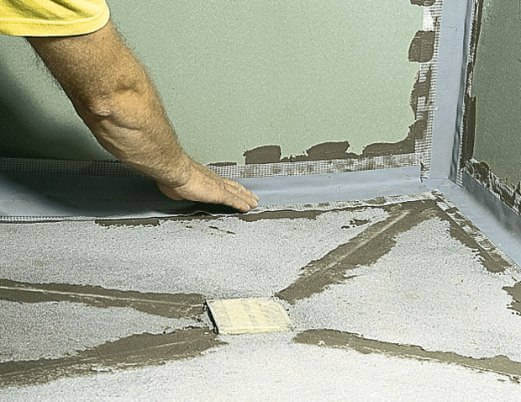
A waterproofing tape with cut out holes is also glued to the exit points of the pipes for connecting the mixer.
It is recommended to apply a layer of additional waterproofing on the walls and floor of the built-in shower cabin. Good results are obtained by brushing, on tileable surfaces, waterproof tile adhesive, in a layer about 1.5 mm
. Coating surfaces with a waterproofing primer for 2 times is less effective.
After the layer of additional waterproofing has dried, the walls and floor of the shower stall are tiled with ceramic tiles. For gluing tiles, it is recommended to use a two-component waterproof tile adhesive.
In a floor without a drip tray, it is fashionable to use linear, elongated elegant metal drains. The floor in the shower room must be lined with anti-slip ceramic tiles.
An efficient bathroom in general, and shower niches in particular, is a necessary condition for comfortable use of the bathroom, for the absence of fungus and mold on the walls.
Articles on this topic:
Do-it-yourself shower cabin without a pallet
 In some cases, it is not practical to use shower trays, but it is better to perform for them sloping floor
.
First of all, for this it will be necessary to waterproof the base in the bathroom where the cabin is supposed to be installed.
The floor is completely cleaned of the old screed and from scratch in three layers waterproofing is laid
.
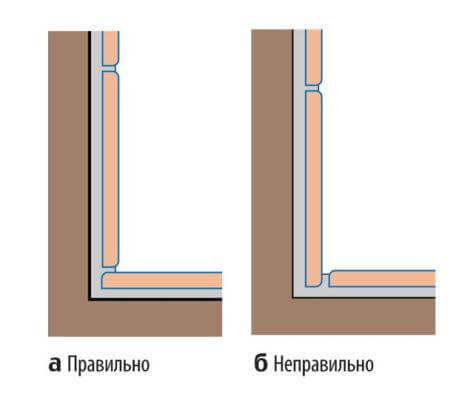
- Walls to a height of at least two meters are covered with bituminous mastic.
- The drain of the shower structure is mounted and a screed is poured over the entire area of \u200b\u200bthe room.
- Directly at the installation site of the cabin, the floor should be slightly sloped so that the water flows straight into the drain. This will prevent puddles from forming in the shower area.
- A recess is made in the floor and a drain is installed.
- The tile is laid. In this case, it is recommended to use a special tile that will avoid slipping.
- The tile joints on the floor and walls are rubbed with a silicone-based sealant.
- You can equip the structure with any equipment, including hydromassage. For him, it will be necessary to break through the walls in order to install additional pipes. In the right places, it is necessary to make outlets for connecting equipment.
- When installing a shower cabin, one should not forget about the electrical communications that will be needed for lighting and forced ventilation.
- The electrical wiring is laid outside the hydrobox and protected by a differential relay.
- The best option for a partition for a cabin without a pallet is glass doors. The glass must be finished and not less than six millimeters thick.
- A glass workshop will help you cut out a partition of the right size, and you can buy accessories for attaching it to the floor and ceiling in the store.
- To install such canopies in the glass, you do not need to make any holes. It is only necessary not to forget about the installation of the handle.
- To reduce transparency, the glass is decorated with a film.
- Hinges are attached to the ceiling and floor according to the level, their mating parts are pressed onto the glass.
- With the help of hinges, everything is connected into a single whole and the doors are installed in place.To prevent the doors from opening in both directions, it is necessary to put a limiter.
Doors can also be made from plastic or fiberglass
. It all depends on the desired degree of transparency and the size of the bathroom. The easiest option is to use inexpensive curtains. For them, in the form of an oval or a circle, a high-quality pipe is installed, on which curtains are hung.
It is the most inexpensive and sufficient creative option
shower enclosures. Now you can install a shower head, coasters, soap dishes, various hooks and other accessories.
To make a high-quality and beautiful shower cabin with your own hands, you will have to spend a lot of time and effort
. But the result is worth it. Moreover, after looking at the photo examples of designs, you can choose and mount a shower cabin for the interior of the bathroom.
Shower cabins are often made in small bathrooms. It is popular in baths and cottages, they put them instead of a bathroom in apartments and houses, they do it in addition - who knows how. But not everyone likes plastic cabins: they are too flimsy. A do-it-yourself shower cabin, although it takes more time, is more reliable.
If you want to make your own shower stall in order to save money, do the math first. You will need good waterproofing, and most likely for pools. You just need a good drain, for which you will need to raise the floor, and this is a decent amount of a solution with plasticizers that increase water repellency. For finishing, you will need a good floor tile with a non-slip surface or mosaic, and glue (water-repellent). It would also be nice to have floor heating - it is very unpleasant to stand on a concrete floor in winter. You will also need doors, although you can get by with a curtain. It's already a big amount. There are cheaper options - simple shower enclosures.
If you also need to build walls, even from drywall, then there will be no savings for sure. Many note that a do-it-yourself shower cabin is not cheaper, and this is at least. But what's good is that you can make it exactly the way you like it, in the size you want (or how it turns out). An independent shower cabin is inexpensive only if there is a ready-made nook that is simply fenced off with a door or curtain, but the cost of installing a drain and a floor does not disappear.