shower compartment
Another interesting layout option for the bathroom is the separation of the shower area by erecting a blank partition. “The options here are very different. For example, a combined bathroom can be divided by two partitions into 3 parts: in the middle there is a shower, and on the sides of it there is a toilet bowl and a washing machine. A corner sink at the opposite wall will successfully fit into such a layout, and a corner cabinet with a mirrored door can be placed symmetrically to it. You can divide the bathroom into 2 parts - a shower and a washbasin, the rest is similar. Such a layout also makes it possible to use the available space as efficiently as possible,” says interior designer Tatyana Levko (Krasnodar).
By the way, the concept with a blind partition can be quite implemented in the very first option we considered “bath + shower”.
In any case, for such a layout, not a shower enclosure is used, but the so-called niche door, which is also made of tempered glass. “Initially, this solution was created specifically for a niche. The door has a reliable waterproofing and allows you to turn any existing niche into a full-fledged shower cabin. However, the space between the partitions is the same niche, so the door will organically fit here as well. Like a shower enclosure or a bath screen, it can be transparent, tinted in mass or matte, and also decorated with any image at the request of the customer, up to a photo panel. With a shortage of free space, the door can have a double-leaf, folding or sliding design, ”says Lyudmila Adestova.
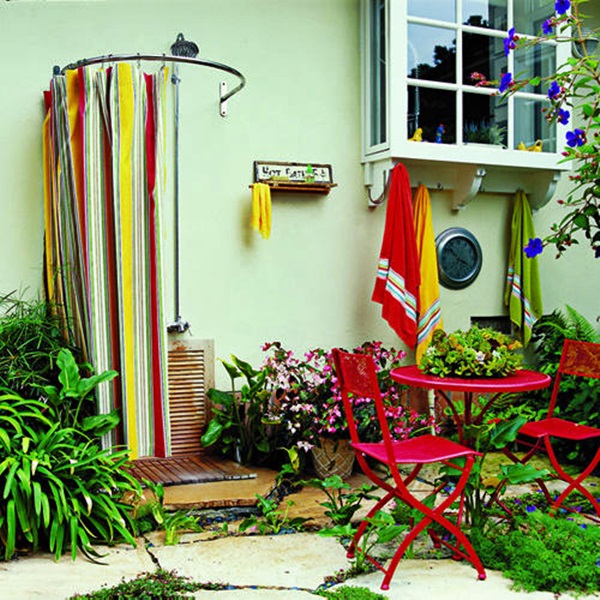
Placement of a summer shower choosing the right place
 It is advisable to install a shower away from home, but in a sunny place. Moreover, it is necessary to take into account the preferences of the owners of the site regarding the time of day for taking water procedures - if you like to freshen up at lunchtime, then install the shower in a place that the sun illuminates in the morning, and if water procedures are carried out in the evenings, let the sun shine on the chosen place after lunch.
The second important point is the presence / absence of drafts: it is undesirable to place a shower "on seven winds", the comfort of water procedures should be ensured as much as possible.
Be sure to take care of the organization of the drain - stagnant water on the floor of the summer shower, unpleasant odors and insect invasion are unlikely to please anyone. If possible, then install the shower on a hill, a mound - the water will be drained naturally. If this is not possible, then you will have to make a septic tank. Some site owners believe that water will safely soak into the ground under the shower floor - this is a mistake. Yes, for one person such a septic tank will be enough, for two it is already not enough, and for three or more it is catastrophically insufficient.
Please note: it is advisable to equip a drain and a septic tank with drainage near the shower building. Directly the water drain must be equipped with a waterproof layer - for this, PVC film, roofing material or hydrostekloizol are used
We recommend reading:
Do-it-yourself cesspool: an overview of popular arrangement methods
Selection rules

When choosing shower holders, you should pay attention to the price. Low cost often indicates the same quality
It is better to give preference to more expensive plumbing. There are a few more criteria to consider before making a purchase:
- How is the shower mounted on the wall, ceiling or in the shower cabin. The easiest way is to use products on suction cups. The reliability of fastening with the help of hardware has been tested for years, therefore it is considered the highest quality.
- Is it possible to rotate the holder, thereby changing the slope of the watering can. This model is more convenient and expensive compared to the usual one.
- Is the shower height adjustable?
Installation of the simplest country shower on the site
 Installing a summer shower of the simplest design is literally a matter of a couple of hours. The main thing is to know the main components of this structure:
- closed cabin;
- flooring or a full floor under your feet;
- water container.
In principle, the installation of such a simple design is not difficult - put a booth, put the prepared flooring on the floor and put a water tank on top. But there are some features of the work that must be taken into account:
a tank designed for water always has a lot of weight - the booth racks must be strong;
it is advisable to dig the racks of the building into the ground (you will first need to treat them with special protective equipment), ideally, pour the same racks into the ground with cement mortar, which will ensure the reliability and stability of the entire structure;
on top of the shower stall, you need to install a small platform / pedestal - it is on it that the water container will be placed;
the floor can be made from an ordinary wooden ladder - the water will leave almost instantly;
the walls of the booth can be made of any opaque material (wooden shields, dark film) - it is important to complete the task of completely hiding the swimmer from prying eyes;
if you plan to use the shower too often, it is advisable to equip a forced flow of water - a pipe is dug under the floor of the shower stall with an output at a certain distance from the building at an angle.

As for the water tank, it can be plastic or metal, and the second option is preferable in terms of the speed of heating water under the sun. But it should be borne in mind that the metal under the constant influence of water quickly undergoes a corrosive effect. If you want to speed up the process of heating water, then paint the container black or “wrap” it in foil and black film - this will ensure not only quick heating of water, but also the effect of a thermos.
 You can pour water into the tank manually - for this, the back / side wall of the shower cubicle must be equipped with a ladder. And you can make this process easier - just run a hose from the water supply point to the shower cabin, but in this case, carefully calculate the location of this building so as not to pull kilometers of the hose through the entire area.
Please note: if a decision has already been made to equip a temporary place for water procedures, then you can limit yourself to fixing a metal arc into a concrete wall or a wooden shield, or in general into any vertically located plane. A small flooring (light) and a water tank are installed on top of it
True, you need to understand - the water tank should be with a minimum volume, because the usual frame will not withstand a large mass. Well, you can close yourself from others with an ordinary oilcloth-curtain.
Shower cabin without tray in the bathroom, in the apartment
A stationary shower without a pallet can be equipped in any room that has waterproof walls, ceiling and floor. In addition, the absence of a pallet implies the presence of a drain embedded in the floor and sewer pipes passing under it. To ensure the water resistance of the ceiling and panels, various waterproofing materials are used: roofing material, polyurethane foam, dense polyethylene.
Walls can be pasted over with oilcloth. As for the ceiling, the best solution would be to install a stretch fabric. PVC film does not let steam and water through, it has high performance and aesthetic characteristics.
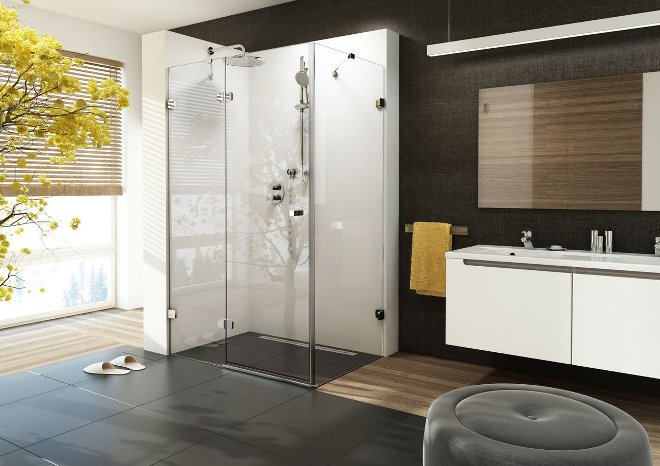
Benefits of a shower without a tray
A shower room without a pallet has the following advantages:
- Flat floor.The risk of falling by slipping or tripping on the bowl is minimized.
- Space. The absence of partitions and walls makes water procedures comfortable. There is no need to restrict movement.
- Presentable appearance. A room where there are no unnecessary items looks prettier and cleaner.
- Wide range of floor and wall finishes. The design of a bathroom with a shower can be done in one style or another. Tiles with patterns and paintings are laid out, organic artistic compositions are created.
- Convenience. A person does not need to adapt to a tight cup. He can move freely, taking any position convenient for him.
The main types of hidden structures
First of all, you need to decide what you need the device for and how you plan to use it. After that, you can start choosing the type of concealed mixer that suits you. The modern market offers several varieties of such equipment:
- built-in mixer for an acrylic bath - the utilitarian mechanism of such a system is hidden in the wall, and the shower hose is hidden in the side of the bath;
- systems with a thermostat - this mechanism allows you to set the required pressure and temperature of the liquid, which is very important for pressure drops in the water supply;
- hidden designs for a sink with one lever - simple and affordable appliances;
- multifunctional bidet devices - a hidden system that allows you to carry out hygiene procedures after using the toilet;
- a typical built-in faucet for a hygienic shower - allows you to hide all unsightly communications and installation elements.
Regardless of the chosen sample, all these designs will provide comfort and convenience in the operation of a bath or shower and will significantly improve the interior of the room.
It is also worth noting the need for the right choice of material for hidden systems. A wall-mounted shower faucet should not be attached to a pipeline made of metal-plastic pipes, as in this case it is necessary to use threaded objects or press fittings.
It is better to opt for copper or polypropylene pipes, since the method of their joining fully advises the installation features of hidden structures, minimizing the number of threaded connections. Of course, in this case, the installation process will become a little more complicated, but the reliability of the system will noticeably increase.
What is a concealed faucet
Traditional appliances involve the placement of the adjustment device and the water supply in the housing. A concealed faucet is a fixture that exists separately from the spout. It is necessary to install such a device at the moment when the water pipes are being diluted, since installation into the wall takes place. From the outside, only a metal nozzle and a control lever are visible.
Each manufacturer strives to release their own flush-mounted faucets, but in general there are 2 main types: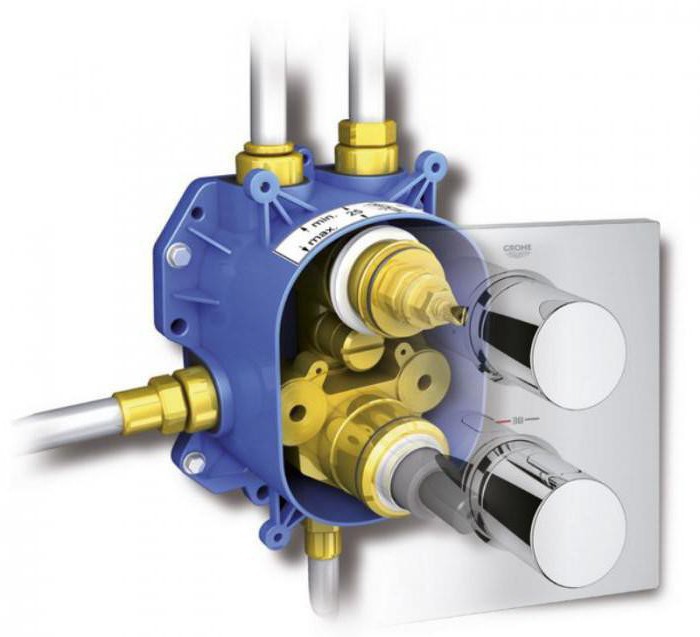
- The built-in mechanism is a monolithic metal cast frame with holes for supplying hot and cold water, equipped with fasteners. The only collapsible part of such a mixer is the cartridge.
- Embedded box. These universal concealed faucets come in two types: a shower device (ceiling hand shower or a hand shower equipped with a flexible hose) and a bath and shower device (two water outlets: shower head and spout).
How to make a shower without a pallet
Even though ceramic tiles and grout are impervious to water, there is always a chance of leaks. In addition, it should be borne in mind that such a surface is cold and needs to be insulated.
A shower for a bathtub without a tray must have a base consisting of the following layers:
- Waterproofing. It is laid directly on the floor slab.
- Thermal insulation. The best option is foam 5 cm thick.This material is dense, resistant to moisture, has low thermal conductivity.
- Screed. If construction is being carried out in a multi-storey building or a shower room is being equipped in a private house with a wooden floor, you should use a light gypsum-based mixture.
- Finishing. To minimize the risk of slipping, it is advisable to use tiles with a corrugated or rough surface.
Design of places for installation of shower cabins. Design. Design
The project of a bathroom with a shower is drawn up taking into account the bearing capacity of the floor slab, the material of the walls and ceiling, the area and layout of the room.
The diagrams indicate the following information:
- Water supply system. The place of attachment of the watering can, the method of transporting the liquid (through a flexible hose, external pipes or pipes hidden in the walls).
- Type of space zoning. The design of partitions, hinged or sliding doors is revealed. If a screen will be used, a cornice is designed.
- Pallet (if planned). In the case of self-production, the ordering and its finishing are drawn.
- Drainage and sewerage. The best possible option is selected (hidden, surface or under the box).
Stock
A bathtub with an open-type shower must be equipped with a reliable and efficient waste disposal system.
There are such installation options for the drain block:
- Linear. The hole is located in the far corner of the room or against the wall. This design is suitable for small spaces.
- Spot. The drain is located in the center of the room. Properly selected grille contributes to the style of the interior.
The pipe outlet is carried out at a slope of 2%. In a private house, the drain is combined with a siphon, to which a vertical riser is attached, which drains water into the central collector.
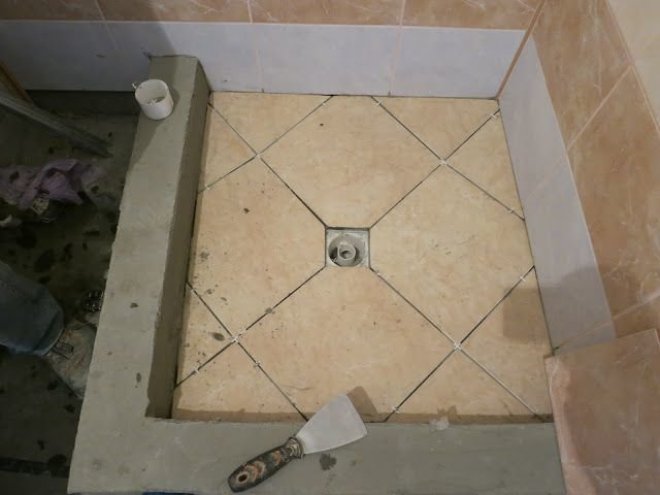
Installation of a floor for a cabin without a pallet. Floor covering requirements
For finishing the floor, a large square tile is selected. If there are no notched models in the assortment, you need to take care of purchasing special rugs, since the floor should not be slippery.
Installation of the floor without a pallet is carried out in the following sequence:
- Concrete base primer.
- Laying a waterproofing sheet with the output of its edges on the walls. Sealing joints.
- Laying foam boards. Making a groove for a sewer pipe.
- Installing a drain system.
- Screed filling.
- Treating the screed with a primer.
- Laying ceramic or glass tiles.
- Seam grouting.
https://youtube.com/watch?v=F0H52y4KKJs
Choosing walls for booths without a pallet
There are the following options for choosing materials for the manufacture of booth walls.
- Tempered or glued glass. Beautiful, practical, but expensive.
- PVC panels. Reiki are low cost, light and easy to handle.
- Cellular polycarbonate. Plates are light, strong and beautiful. You can choose products of different colors and degrees of transparency.
- Monolithic polycarbonate. A substance whose strength is 20 times greater than that of glass, with a specific gravity 2 times less. Can be processed with home tools.
Tiles on the floor and walls as an option
From the correct finish of the shower room depends on its presentability and functionality. The best option for decorating a room with high humidity is a tiled floor. Porcelain stoneware is considered the most reliable and durable material. The polymer is strong, waterproof and has a uniform structure throughout.
Suspended rain shower installation
Decorative bracket
The easiest way to install a rain shower is to screw it onto a mixed water pipe coming down from the ceiling or onto a wall bracket. In the first case, the pipe can be aesthetically removed through any type of decorative ceiling using a special decorative bracket.
It is worth starting work on installing a rain shower with meal planning (if you have a backlit model).Power supplies are one of the most frequently failing electronics elements, as they take on the load from power surges. In this regard, we advise planning the location of the shower power supply in such a way that, in the event of a breakdown, it can be easily accessed. Our rain showers have a standard cable length of 3m, but can be extended upon request. Therefore, you can, without any restrictions, choose a convenient place for the location of the outlet from which the shower will be powered.
Also, if the model you have chosen does not have the included backlight control panel, then the socket into which the shower will be turned on should be controlled using a switch - otherwise the rain shower will glow around the clock.
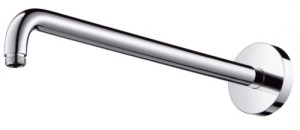
Bracket for fixing the shower on the wall
It should be noted separately that for your safety, when placing a socket under the ceiling in the bathroom itself, it is better to choose a special version for rooms with high humidity.
If you have a decorative ceiling in your bathroom, then you should provide two holes in it - one with a diameter of at least 25mm for the outlet of a pipe with water and another 15mm for the outlet of the power wire. After the electrical and plumbing wiring is done, you can plug the power supply into the outlet and hang the shower. In this case, you should start by winding the shower onto the pipe and only after that connect the backlight wires.
So, to install a rain shower in a suspended version, you must:
- Bring up the 1/2 ″ pipe with mixed water;
- Make a socket for powering the shower - so that it and the power supply can be accessed after the repair is completed;
- If you have a decorative ceiling, then make a hole in it for the wire that feeds the backlight;
- Connect the power supply to the socket, bring the end of the backlight wire through the hole in the ceiling;
- Screw the shower onto the pipe;
- Connect the lighting wires.
Diagonal bathroom design
An interesting option for bathroom design is the symmetrical arrangement of its zones or sanitary equipment relative to the diagonals drawn from corner to corner of the room. For example, in a combined bathroom, if space permits, a bath, shower, washbasin and toilet can be placed in the corners, leaving the central part of the bathroom free. Another option is to place everything on two adjacent walls. For example, it can be a corner bath or shower, and on either side of it, respectively, a sink and a toilet with a bidet. Then the room is divided diagonally into 2 zones - functional and free.
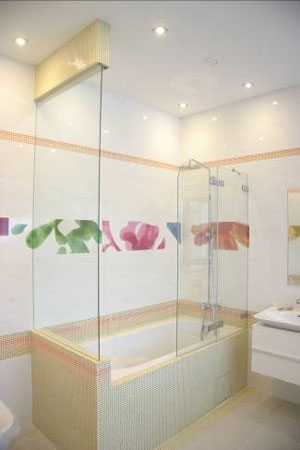
“A good addition to a bathtub, including a corner one, would be a glass curtain. This is a type of shower enclosure that is mounted on the side of the bath. In the general case, it provides protection for the room from splashes and water, and when organizing a separate shower area is not possible, it turns the bathtub into a kind of shower cabin. For installation on a curvilinear side, the tempered glass of the curtain can be bent with the desired radius. So that the design does not take up extra space, there is a special roller system for sliding curtains. In addition, curtains can also be made from patterned sanitary polystyrene,” explains Lyudmila Adestova.
“An interesting option for a diagonal layout, especially for small spaces, is dividing the bathroom with a shower enclosure from corner to corner. It turns out a spacious triangular shower area, inside which you can mount two hydromassage panels on perpendicular walls. There is also a lot of space outside the shower room, so you can use a large washbasin with a cabinet, which, with a linear layout, will not fit in every bathroom. In this case, you can also choose a corner sink, ”Tatyana Levko shares her experience.
Let's move on to installation
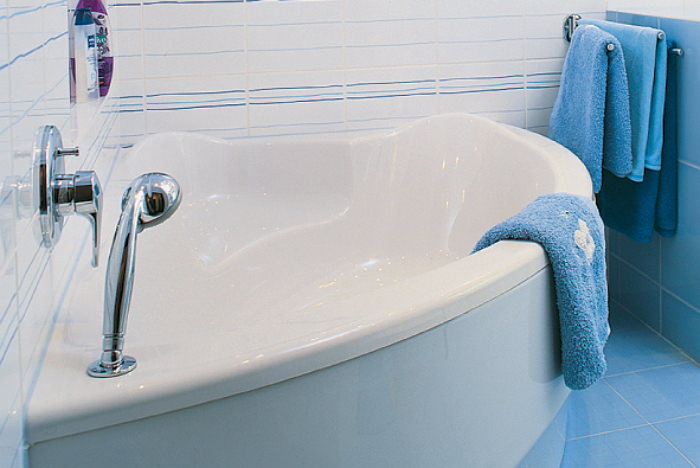
One of the most beloved options by many consumers is the combination shower with a bathtub.However, it is only suitable if the bathroom is medium and large in size. Agree, because not everyone can place both a shower and a bath in a tiny room at once.
 Shower box and bath
Most often, if this option is used, a jacuzzi or hot tub acts as a bath. And the shower modestly stands on the sidelines or in the corner. The benefits of this type of setup are many. After all, at the same time, two people, if necessary, can take hygiene procedures. It is enough to separate the space with curtains or an elegant elegant mobile screen. Thanks to the modern design of such sanitary ware, you can give your bathroom a very harmonious and modern style.
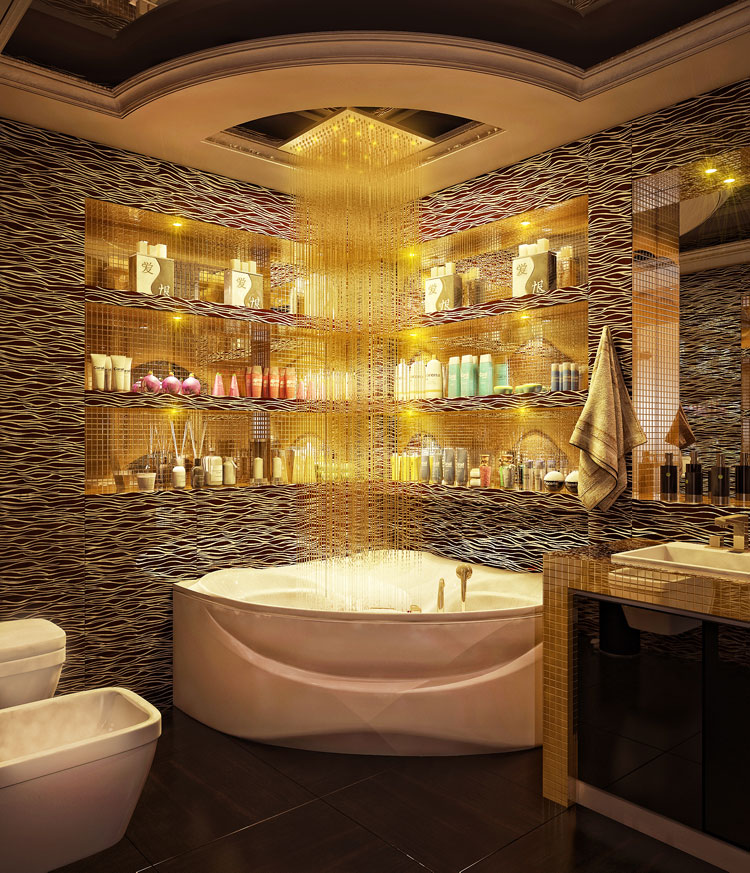
Another hit that has just begun to gain momentum is the so-called rain shower. And despite its relative novelty, many people want to install it for themselves. And this is not surprising, because once you look at this design, it will sink into your heart for a long time! Installation of this type of shower is made directly into the ceiling. The hose is represented by a rather short metal tube (there may be several of them), and the watering can looks like a flat wide canvas of various shapes. The most common are square, rectangular and round. Throughout the plane there are a huge number of holes through which water flows. It creates the effect of the most real tropical downpour, which can only be. Since this development is new, then, accordingly, it cannot be a simple ordinary shower. There are so many different lotions in it that by right such an element can be considered part of a “smart home”. You can adjust different modes of water supply. More expensive models also have beautiful backlighting. Most models come with a pre-installed thermostat so you never feel the water temperature fluctuate if another member of your family drains or turns on a kitchen faucet. Of course, all this pleasure will cost a pretty penny. But take another look at this shower and you will realize that it is worth it!
 New plumbing fixtures - rain shower
If it comes to savings, one cannot fail to mention the most standard and familiar option for each of us - an ordinary shower in the bath. Its installation is reduced to the installation of special fasteners that will hold the watering can. All you need is a shower faucet. This option is convenient in small bathrooms, as well as when it is necessary to reasonably save on repairs. This is an ideal ratio of quality and cost, however, in this case, the design loses significantly. Be sure to also install a curtain that will protect the floor from splashing water. Everyone can independently install a shower of a similar design.
If you are interested in more exotic options, we suggest stopping your look at the rotational model. Its secret lies in the constant rotation of the small blades on the watering can. The watering can is mounted on a short metal rod under the ceiling. The blades have very small holes for water to escape. One can only imagine what beautiful spirals this shower “draws” with water. However, it is not suitable for daily hygiene procedures, as it provides a fairly powerful massage effect.
Tell us about your preferences between bath and shower? What mixer model did you buy? Were there any difficulties with installation?
Shower panel installation options
Their installation may differ depending on where it is planned to install the structure and what materials it is made of.
Possible options are:
Scheme of wiring and sewerage in the bathroom.
- Installing a shower panel over a bathtub.
- Installation in a shower cabin with a tray and an ordinary drain.
- Multifunctional box with steam generator.
- In simple booths with sloping floors (in most cases they are installed in gyms).
Today it is possible to get both separately shower panels, and complete with shower cabins. In the second case, it is better to choose a cabin that is at least 80x80 cm in size. This is necessary because in it, in the process of taking a shower, you will need to bend over, raise your hands, and move.
In a free cabin, the user will not experience discomfort.
Regarding the shape of the pallet, you should know that it can have standard rectangular, round, square and semicircular shapes.
It is quite important when choosing shower panels to pay attention to the quality of the elements. If you plan to purchase a shower panel along with a cabin, you should know that the cabin must be made of glass at least 6 mm thick. This type of glass is more durable and impact resistant.
Such glass is more durable and impact resistant.
As for the decorative side of the panel, in this case it makes sense to give preference to personal tastes. Panel models are available with different colors, patterns and so on.
If you plan to install it not above the bathroom, the process will include the installation of equipment, which includes a panel with a mixer and a shower head, a tray and a fence.
To date, there are cabins that have thermostatic mixers. It is able to maintain the optimum temperature in the event of a change in the water in the system.
There is some advice on this. When choosing a panel, it is best to give preference to a design that has 2 shower heads - cascading and manual.
Installing the panel in a cab with a sloping floor
Self-installation of the shower structure in the cabin can be done with an inclined floor.
To equip the drain (ladder), you will need to make a recess in the floor.
In such cases, tiles are laid on the floor with a slight slope towards the drain holes. This arrangement of the floor will be able to help prevent stagnant wastewater. Next, a fence is mounted on the racks, water is supplied to the mixer.
Before laying the facing tiles, it is necessary to insulate the floors in order to exclude the possibility of moisture ingress.
Variety of shower heads
The range of modern watering cans is huge. They differ in design, materials of manufacture, functionality, size and price.
Basic water supply modes ↑
The variety of options for pouring water is based on the process of aeration - mixing water with air in one or another proportion. The number of operating modes available depends on the specific shower model.
Jets are changed by switching a special lever located on the nozzle disk, or using a small button on the watering can. So that when choosing this item of plumbing, the list of available operating modes is not a “Chinese letter” for you, familiarize yourself with the features of each of them:
- "Rain". Standard mode - water under medium pressure is dispersed through the holes in the watering can. Their number can vary widely - from 40 to 100 pieces.
- "Monojet". From the largest hole, located in the central part of the disk of the watering can, one jet is supplied. However, the pressure is not strong, so the mode is more suitable for pouring.
- "Massage". Assumes the operation of several nozzles located around the opening for the monojet. Water is supplied under high pressure.
- "Soft Dispersion". Water is mixed with a large amount of air, as a result of which you feel not jets, but many small drops. A great option for relaxation.
- "Fog". Reminiscent of soft dispersion, but the effect is even more enhanced. During the procedure, it seems that you are in a cloud of steam.
- "Waterfall".In this mode, the flow of water falls on you with force, imitating the phenomenon of the same name in nature. Actual for stationary models with large watering cans.
Manufacturing materials - advantages and disadvantages of the main solutions
The most popular for the manufacture of shower heads acquired two materials - metal and plastic.
Metal products look noble and aesthetically pleasing. Their service life can exceed 10 years, and with regular care, the chrome surface will not lose its original appearance. But a lot of weight creates inconvenience if you need to hold such a shower in your hands for a long time. And the risk of damage to the bathroom enamel when it falls is high.
Plastic products are almost always disguised as metal due to the same chrome coating. However, it is much less durable and tends to wear off, peel off. Inferior to plastic watering cans compared to metal counterparts in terms of body strength. Their advantages include light weight and affordable price.
Additional features for convenience ↑
A modern shower is not only dispersing water in one mode or another, but also additional features that make hygiene procedures even more enjoyable. These include: illumination of the jets, the presence of a thermostat and a pressure reducing valve, a system for cleaning from lime deposits.
The illumination of the jets is a set of small LEDs that work autonomously and do not require an electrical connection. The flow of water passing through the watering can rotates the mini-rotor located inside it. Then the mechanical energy is converted into electrical energy, from which the light sources work.
Your shower can be illuminated in one color, two or more, changing each other at a given speed and in a certain sequence. In the presence of a special sensor, they will correspond to the temperature of the pouring water. Blue is for cold, red is for hot, respectively.
Another practical and extremely convenient addition is the thermostat. Its presence will protect you from unpleasant surprises in the form of boiling water or ice water. Before taking a shower, it is enough to set the desired temperature (in some models this can be done up to one degree), which will ensure smooth mixing of water.
The thermostat also gives you the opportunity to reduce utility bills, because you do not have to spend time and expensive cubic meters of water to “tune” it to the desired temperature.
An important role is played by the pressure reducing valve, often called the pressure regulator.
It allows you to set the desired pressure, which is important when the pressure in the plumbing system is unstable
The watering can can also be equipped with protection against lime deposits in the form of special silicone inserts in the holes that prevent clogging.
A modern shower in the bathroom is not just a sanitary ware, but a reflection of your tastes and passions. Properly approaching its purchase, you can daily set your mood, relax and even heal the body.
We plan the stages of work
Of course, it is best to install a shower even in the process of repair. Firstly, you can provide for its installation not where tiles, washbasins and other factors allow it, but where you want it. Secondly, with repairs already made, it will be quite problematic to do all the work efficiently without affecting the tiles or breaking expensive plumbing. Even if you are not going to get by with one shower yet, but prefer a bathroom, be sure to leave an opportunity for its installation in the future.
As a rule, pipes should be located in a strobe or behind a tile. And the mixer must be mounted so that at any time it is possible to replace it with a suitable model. The secret is to bring out pipes or some elements of the faucet that have a connector for a shower hose.It is this connector that will become the starting point that will allow you to install the shower hose and watering can.
How not to miscalculate with a mixer?
Models of mixers can now be found, any! And among such a multitude, each consumer will be able to find exactly the one that is necessary for taking a bath and shower. Such faucets differ from ordinary ones in just one small detail - the outlet to the shower hose. This way you can enjoy both a relaxing bath in the evenings and an invigorating “rainy” shower every morning.
 Stylish bath and shower faucet
Basic installation steps
You should be aware that the self-installation of hydromassage shower panels in cabins in most cases occurs with changes in the plumbing system.
The location of the shower structure in the cabin can be as follows:
- In the corner of the room.
- Attached to the wall.
So that such a design does not quickly fail or grooves do not appear, self-installation of the shower cabin should be carried out taking into account the following points:
The sewer outlet must be no higher than 70 mm to the sewer pipe from the floor. Otherwise, the installation of the pallet should be made on the podium.
Installation must be carried out according to the instructions provided by the manufacturer.
Sealant must be applied to the joints of the parts. Its drying time, depending on the brand, can be up to 24 hours.
It is worth paying attention to the fact that a reliable panel in the shower cabin, which will be installed using acrylic or silicone sealant, must be made with acrylic on the outside of the cabin, and silicone on the inside.
Installation of sewerage and pallet construction
The information described above may not be enough to understand how to install a shower rack with your own hands. In this regard, it makes sense to consider a more detailed description.
Installation must begin with a drain connection:
- The drain hose must be connected to the sewer.
- The joints must be treated with a sealant.
- A sealing gasket must be installed in the drain hole of the pallet.
- The surface of the gasket must be treated with silicone sealant. The gasket is installed under the pallet, and the drain unit is fixed with screws.
The next step in the installation of the shower panel in the cabin will be the installation of the shower tray and other elements of the cabin.
- Staples are fixed to the wall to the height of the decorative panel of the pallet, which are included in the kit. If the panel is missing, the height is determined by the possibility of connecting the sewer.
- Before you install the cabin for the shower panel yourself, the junction of the pallet with the sewer pipe must be treated with a sealant. Next, the tightness must be checked by pouring water into the pan.
- If no leak is found in this place, you can start leveling the pallet (horizontally) and fix it using the leg settings.
It should be noted that the installation of the pallet is a fairly easy process. In addition, designs with a pallet have a fairly large number of advantages compared to shower cabins with a sloping floor.
During assembly, there will be no need for sanitary and hygienic measures.
Installation of enclosing elements
When mounting the side panels on the pallet, it is necessary to install the guides that are intended for the cab doors.
The elements are connected to each other using standard fasteners using sealant.
It is worth paying attention to the fact that the sealant should not fill the grooves in the pan, which are intended for better water flow. To fix the side walls, use sealant and regular hardware
Elements must be assembled relative to each other
To fix the side walls, use sealant and regular hardware. The elements must be assembled relative to each other.
https://youtube.com/watch?v=B6rCIot-UwU
After the installation of the top panel is completed, the operation of the electrical equipment (light, ventilation, radio receiver) should be checked.