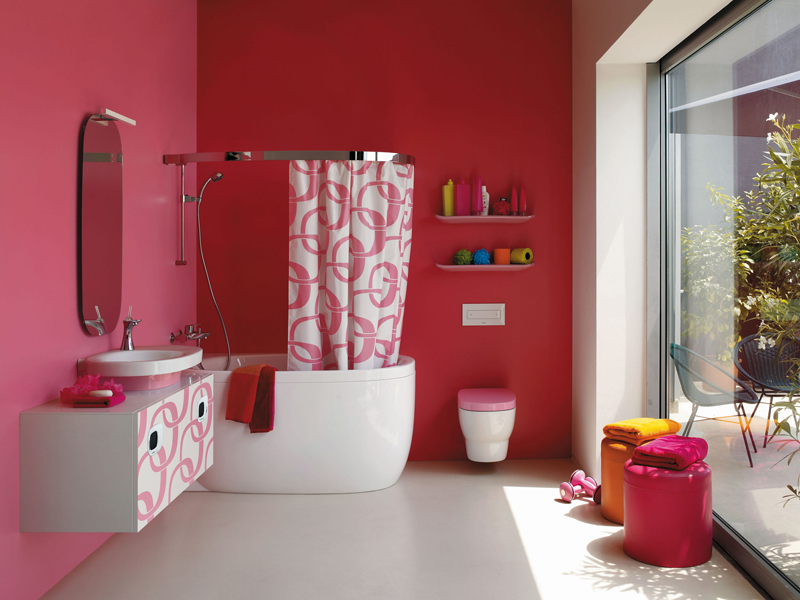
What problems can you face
There are several shortcomings of old baths, which are eliminated by suitable methods. This includes:
- the enamel has become rough, the problem is eliminated by restoration;
- rust appears on the coating, and the removal of dirt has become difficult - the problem is solved by updating the coating;
- water does not drain well from the product, which is due to serious errors during the installation of the structure, therefore, it is dismantled and re-installed correctly, but a stain may appear from the water, which can be eliminated by using an acrylic liner;
- peeling paint is removed by creating a new enamel or using an insert;
- during the use of a steel bath, there is a lot of noise, rapid cooling of the water is ensured and rust is constantly formed - this problem applies to all steel products, and it is solved by installing a special acrylic liner that increases the thermal insulation parameters of the bath, making it quiet and resistant to rust.
Method 2 bathtub restoration with liquid acrylic
This method of bath restoration appeared relatively recently, thanks to the emergence of a special material - glass.
What do we restore?
Glass acrylic is a two-component acrylic material designed specifically for bathroom renovations. It consists of acrylic itself and a separately supplied hardener. When acrylic and hardener are combined, the polymerization process begins, and when applied to the surface, the composition turns into a high-quality acrylic film with a thickness of 4 to 6 mm.
Advantages of glass
Stakryl has three remarkable properties that help it quickly and effectively restore the bath:
1. Viscosity
Optimally matched coefficient of viscosity of glass helps to make an acrylic coating with a thickness of 4 mm on the walls of the bath and 6 mm on its bottom without much effort.
2. Fluidity
The fluidity effect allows glass to independently envelop the surface of the bath and lay down in an even layer.
3. Delayed polymerization
Thanks to this quality, you can calmly and relatively comfortably carry out work on the restoration of the bath, without fear that the acrylic will harden too quickly.
After curing, the acrylic surface has mechanical and impact strength far superior to the acrylic inlay or enamel layer.
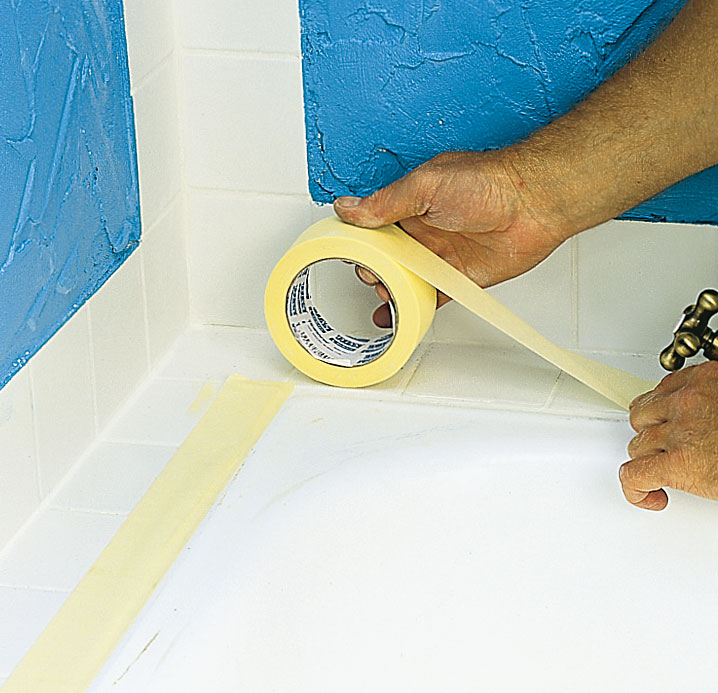
1: Surface preparation
This stage does not differ from the restoration of the enameled surface. Repeat the same steps. Then disconnect the siphon and place a container under the bathtub drain, where excess acrylic will drain.
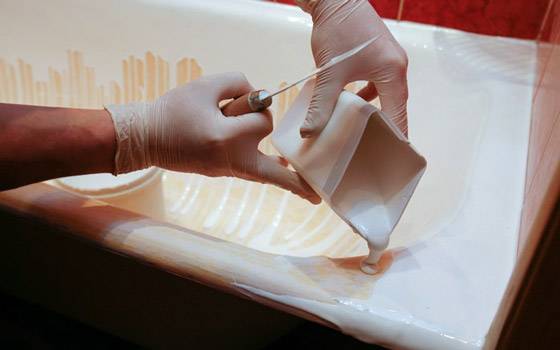
2: Apply liquid acrylic
- prepare the acrylic mixture according to the manufacturer's instructions;
- slowly pour the finished mixture onto the upper edge of the bath, as soon as the jet reaches the middle, we begin to smoothly move the jet of glass along the perimeter of the bath;
- when the circle closes, repeat the procedure, starting from the middle.
The process of poured restoration must be continuous, for this you need to take a glass container of a suitable size. It’s not worth saving - it’s better to pour out a little more acrylic than it will be lacking, the excess will go into the container under the drain hole.
Acrylic is polymerized, depending on the type, from one to four days. Choose a glass with a long drying time, in which case the acrylic surface will be of better quality.
The service life of the restored bath will be about 20 years.
Method 3 bath restoration with an insert
The simplest, but also the most expensive way of restoration is the installation of an insert. In addition, it is impossible to completely restore the bathtub with your own hands using this method, since the liner is made in the factory.
There is an option to order the manufacture of an insert for a specific bath at the enterprise, and install it yourself.
Insert installation technology is as follows:
- thoroughly clean and degrease the surface of the bath;
- insert the manufactured liner into the bath;
- check the correctness of the docking of the drain holes;
- cut the liner along the wall tile line;
- apply special glue to the inner surface of the bath and the outer side of the liner and dock them;
- joints are additionally sealed with silicone.
After installing the liner, cold water is poured into the bath and kept for a day. After that, the restored bath is ready for use.
The insert will serve you up to 10 years.
Method 1 ordinary enameling
Cast iron and steel enameled bathtubs are the most common types of bathtubs in our apartments. They are produced in accordance with GOST 18297-96, which has been in force since 1997. According to this GOST, the guarantee for bathtubs is 2 years. But as practice shows, the enamel on them lasts no more than 10 years of use.
Enamel on baths in the factory is applied quite simply. First, the outer surface is red-hot, then the enamel powder is sifted onto the inner surface and held for some time to sinter the powder with the metal. Heat the outer surface again until the powder is melted. The result is a smooth, glossy enamel finish. It is clear that at home this method of restoring a cast-iron bath, as well as a steel one, is not suitable.
Why does enamel usually wear out?
The wear of the enameled surface occurs as a result of two factors:
- The use of cleaning products containing abrasive powders or substances with chlorine inclusions.
- The use of chemical reagents in the cleaning of water supply networks.
As a result of many years of exposure to these factors, the enameled surface of the bath becomes thinner, rougher and begins to rust.
Restoration of the enameled surface
Do-it-yourself enamel restoration is a fairly simple process. It consists of two stages: surface preparation and application of a new layer of enamel.
What will be needed for work?
You will need the following tools and materials:
- electric drill with a nozzle in the form of a grinding wheel;
- abrasive powder;
- sandpaper;
- rust converter (for example, "Tsinkar");
- degreaser (for example, "Nefras");
- lint-free napkin;
- natural bristle brushes or spray;
- respirator and gloves;
- enamel, preferably two-component (enamel plus hardener).
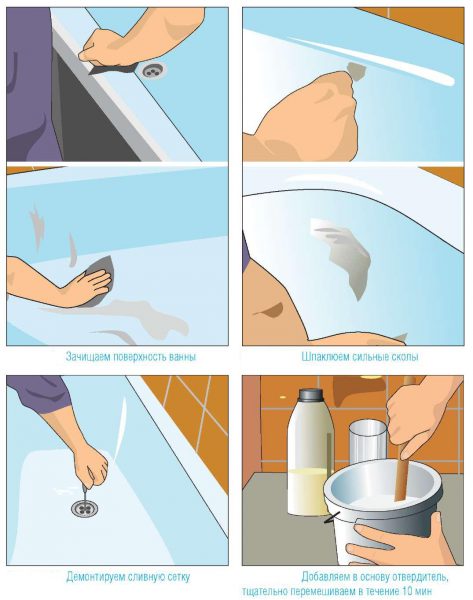
Preliminary step: surface preparation
A very important step. The more thoroughly the surface of the bathtub is cleaned, the better the new enamel layer will be.
- sprinkle the old enamel with abrasive powder and clean it off with sandpaper or a grinding wheel mounted on an electric drill;
- treat areas affected by corrosion with a rust converter, hold for half an hour, then clean with sandpaper;
- wash off the enamel and crumbs with water;
- thoroughly treat the bath with a degreaser using a lint-free cloth;
- fill the bath with hot water and let it warm up for 10 minutes;
- drain the water and wipe dry with a lint-free cloth; make sure that there are no lint or other foreign elements on the surface.
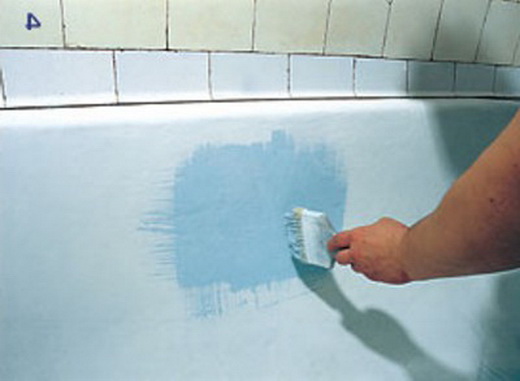
The main stage: applying enamel
- according to the manufacturer's instructions, enamel and hardener are mixed in a certain proportion and mixed thoroughly;
- apply the first layer of enamel with a brush or spray;
- withstand a certain period of time according to the instructions;
- apply a second layer of enamel.
This completes the process of restoring an enameled bath with your own hands. It is advisable to withstand at least a week before the start of the operation of the bath. This is how long it takes for the enamel to fully polymerize.
The service life of the new enamel will be about 6-8 years.
Possible methods of restoration
There are several ways to update your bathtub.
Enamel option
The market is able to offer the consumer two-component enamel in cans or as part of aerosol cans. But if you use enamel in the second option, then the enamel on the surface will last no more than a year. If someone decides to restore the bath according to this option, then it is more expedient for him to immediately purchase a complete repair kit. In addition to enamel, it also includes all the accessories necessary for the work, including even napkins. But sometimes the enamel itself may not be included in the kit. In this case, it is purchased separately.
The algorithm of actions includes the following works:
- First you need to apply the soil. After it dries, it should be treated with a lint-free cloth. Then the first layer of enamel is applied. It is better to do this with a spray gun. Those who do not have it use a regular brush.
- Minimum 2 coats are required. A maximum of 4 layers are applied. The exposure time between coats is 1 hour. As a rule, along with the preparation for such work, the whole daylight hours are spent.
- After the last layer of enamel is completed, a gloss is applied to the surface. To do this, after an hour, the surface should be wiped with a napkin with a solvent. Although the paint will dry in an hour, you will not be able to use the bathroom until after a week.
The paint consists of two components that must be mixed. In this state, it will harden in an hour. Therefore, do not immediately mix a large amount of paint. This must be done in such an amount that it is enough for one coating. You should not unconditionally trust the manufacturer, who claims that such paint will last more than 5 years. It will last no more than 3-4 years. Painting work is accompanied by the presence of a pungent odor. It is necessary to work with such paints only in a respirator.
Using Liquid Acrylic
According to consumer reviews, the use of acrylic coating is the best option. All work is carried out in several stages:
- First, they also prepare. The bath must be cleaned, rinsed, dried and degreased. Then acrylic is carefully poured onto a dry bath. You need to start with the sides. In this case, rollers and brushes should not be used. Acrylic itself is distributed over the entire surface of the bath.
- Do not forget to substitute a container under the drain into which excess composition will drain. After the board is filled, go to the middle. Filling is continued until the surface of the bath is completely covered with acrylic. As a result, a layer 5-7 mm thick is formed.
- After pouring, the bath must dry thoroughly. The average drying time is 3-4 days. These indicators may vary in one direction or another, which depends on the quality of the composition and the manufacturer.
All work, including preparation, will take 2-3 hours. In addition, acrylic does not have a suffocating smell. This is an undeniable advantage. The only downside is that acrylic is more expensive than enamel. Within 10 years, acrylic will have to be replaced at least 3 times.
bathtub in bathtub
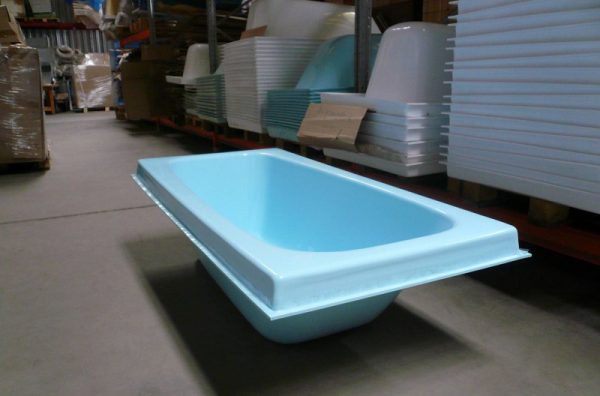
This method involves inserting a plastic liner into the bath. It has a fairly small thickness, and in size corresponds to the inside of the bath.
First you need to purchase the insert itself. Externally, all bathtubs look the same, but in practice, the parameters may differ. Before buying, you must take the exact dimensions of the bath and provide them to the seller so that he can choose the right option. You can take a picture of the bath before going to the store or shoot it on video. Such a function is available in almost every phone today. The plastic trough should enter the bath tightly, but without effort. If additional force is applied to the liner, it may simply burst. We must not forget that this is just a thin plastic. The liner may not reach the end due to overlap on the edge. In this case, it must be carefully cut with a grinder.After the insert is inserted, it is necessary to make holes for draining and overflowing. To do this, you need to use a drill with a core drill. After that, the edges are processed with a round file.
But just inserting an insert is not enough. It needs to be glued on. All existing problem areas are treated with a sealant. Otherwise, mold will grow in these places. Gluing is carried out with a special foam, which looks like ordinary mounting foam. After processing with a sealant, its excess is removed. On this, the restoration of the bath can be considered complete.
Features of the use of acrylic insert
It has the following advantages:
- can be used to update different types of bathtubs with different shapes, sizes and materials;
- the resulting coating does not turn yellow during operation and is resistant to rust and dirt settling;
- the cost of this product is at a low level;
- after the work done, you can use the bathroom literally the next day;
- the liner has excellent thermal and sound insulation parameters;
- the new coating is easy to clean and with the help of different detergents;
- there is no need to dismantle the old product or subject it to a complex and expensive overhaul;
- High-quality acrylic inlay will last more than 20 years.
The negative parameters of this method include the fact that for baths of non-standard sizes, you will have to order an insert, so it will have a higher cost.
Some Tips
In order to clean the bathroom effectively, you can use the following recommendations:
- But do not try to clean the bath with the help of the skin manually. The enamel on the surface lies quite firmly and it will take a lot of time and effort to clean up. For this purpose, it is necessary to use a special nozzle on the drill. Bulgarian is not recommended. Due to the high speed, you can peel off the enamel to the ground.
- After cleaning, everything must be washed off. The surface of the bath is completely treated with a jet of water under pressure.
- In the presence of chips, shells with traces of rust, the flaws are puttyed. In this case, special modifiers can be used. Before using them, it is recommended to read the instructions in detail.
After removing the rust, the remnants of the modifier must also be washed off. To repair flaws, you can use body putty, which is easy to purchase on the automotive market. To apply the composition, use a soft rubber spatula. After the putty dries thoroughly, its surface is subjected to grinding. The final chord of the preparatory work is the degreasing of the surface using alcohol-containing compounds.
Primer.
The bath primer in this case is nothing more than applying a preliminary layer of paint (enamel). We decide in what containers we will buy this enamel - in cans or in the form of an aerosol. Before you update an old bath, remember that spray enamel is applied faster, however, when spraying with a can, it will be more difficult to achieve uniform staining of the surface than using a brush. It is in connection with this circumstance that when renovating a bathtub, master restorers prefer to use two-component epoxy enamels in jars in their work.
Having acquired the required amount of paint (consumption parameters can be found on the bank), you need to remember to stock up on a pair of flat brushes based on natural bristles. Enamel preparation for application occurs exactly in accordance with the instructions. The work with a brush is made from the edges of the bath to its middle.
It is important to prevent the formation of bubbles and smudges. After completing the application of the first layer of paint, you need to give it about 30 minutes to dry, unless other numbers are indicated in the instructions for using the enamel.
Now this article on how to update a cast-iron bath is moving to the final stage.
We put fillings enamel restoration with liquid acrylic

Renovating a bathtub with acrylic is a little more expensive and takes longer. It is necessary to peel off the old enamel from the bath and apply a new coating based on acrylic resin. To seal, if we speak in a stomatological way.
- Arm yourself with a grinder with a coarse abrasive, a drill with a metal brush or ordinary coarse sandpaper and carefully remove all old enamel. It will be noisy and long.
- After removing all the old enamel, rinse the bath with a degreaser and dry thoroughly.
- Large irregularities and roughness (and they will certainly be) close up with putty for metal. Where to buy - in any hardware store.
- In the same hardware store, buy a special bulk composition for bathtubs based on acrylic resin. For example, "Stakryl" or "Liquid acrylic".
- Disconnect the bathtub from all plumbing: remove the faucet if it interferes with the process, and be sure to disconnect the drain. Place a container under the drain hole - excess of the finished mixture will drain there.
- Prepare composition. Mix liquid acrylic with a hardener in the proportion indicated in the instructions and mix well. The mixture should be viscous and fluid.
- Gently and evenly pour the composition onto the edges of the tub so that it flows down to the bottom of the tub. No need to correct or “help” the composition - it will drain to the bottom and leave a coating of the desired thickness.
Acrylic coating is applied in one or more layers. Before applying the next layer, let the previous one dry properly - at least a day.

Leave the updated bath for a few days alone - the acrylic composition needs 3 to 5 days to completely dry. If you covered the bath in several layers, wait at least a week. The service life of such a new bulk enamel, subject to careful care, is up to 5 years. Then the procedure will need to be repeated.
How much does such a procedure cost?
Grinding machine - from 500 to 1200 rubles. Liquid acrylic for a bath 1.7 m - about 2000 rubles (for one layer of coating), detergent - about 200 rubles, putty for metal - 700 rubles.
Total: 3400 rubles (with the most inexpensive grinder).
You will have to spend two or three days on the whole process: a day for cleaning the old enamel, washing and puttying, and a day or two for pouring and drying the mixture. You can use the bathroom after 5 days.
How much does a bathroom renovation cost?
In conclusion, we will conduct a comparative analysis of the cost of bath restoration, based on the methods discussed above.
Bathtub enameling
The cost of high-quality enamel "Reaflex 50" produced by the Finnish company "Tikkurila" is 550 rubles per 1 kg. The Russian set for restoration "Svetlana" costs 750 rubles. As a result, you will have to pay 1300 rubles.
Cast restoration
If you buy a set for restoring a bathtub with liquid acrylic, for example Plastall, it will cost about 2000 rubles. By the way, it has everything you need for independent work, even a CD with a video lesson.
Acrylic liner
The cost of the insert itself and polymer glue ranges from 2800 to 3000 rubles.
The best option is the method of bulk restoration, in which you will get a beautiful and durable coating for little money. Moreover, any of these methods is several times cheaper than buying and installing a new bathtub.
Restoration with liquid acrylic
You can quickly and effectively repair a cast-iron bath at home using liquid acrylic. Thanks to the unique texture and consistency of this advanced polymer, the restoration of the enamel layer is faster and easier than with epoxy enamel. Acrylic compounds consist of 2 components - directly acrylic and hardener. The ingredients of the mixture are combined, and then thoroughly mixed until a fluid, plastic mass is obtained.Restoration of cast iron products occurs as follows:
- First, the damaged font is prepared for work, thoroughly cleaned of dirt, chips and cracks are sanded with “zero” sandpaper. Then the surface is degreased, heated and dried.
We do prevention whitening and polishing of enamel

If the enamel of a cast-iron or steel bath does not have large visible cracks, chips, and just darkened or turned yellow, we restore whiteness and smoothness by polishing and bleaching. The procedure is not very complicated and is safe for the enamel: the enamel of a good bath can be polished several times.
Bath enamel (by the way, just like tooth enamel) changes its color because microcracks appear on its surface - dirt and other deposits accumulate in them. With them, we will fight.
In the hardware store we buy a cleaning bleach for the bath - in any market you will find a dozen items. You can also use folk remedies: vinegar, chlorine bleach, car cleaner.
You will also need a rotary or vibration type grinder - it doesn't matter. Rent it from friends or buy it - a useful thing, it will come in handy on the farm.
- Wash the bath thoroughly with detergent and scouring powder, remove all dirt with a sponge or stiff brush
- Apply bleach to a clean bath surface. Do exactly as instructed
- After the time specified in the instructions, rinse off the bleach with plenty of water. If acid is used as a bleach, add soda to water: alkali neutralizes acid (chemistry, grade 7)
- If darkening or yellowness remains somewhere, repeat the treatment in these places.
- After the bath is dry, start polishing with a sander. Start polishing with coarse emery, then medium, and finish with polishing paste. Ideal for car polishing products.

Before polishing, try bleaching and polishing some of the most heavily soiled areas. If everything went well, great. If there are visible cracks, it means that the enamel coating has worn out, restoration of the bathtub enamel or even its replacement is needed.
Polishing will last for a year or two, no more: the enamel layer becomes thinner, but the temperature and mechanical effects on it remain the same. Then - only treatment.
How much does such a procedure cost?
A grinder - from 500 to 2500 rubles, a bleaching agent - about 500 rubles, sandpaper - about 200 rubles per pack.
Total: 1200 - 1500 rubles (if you buy the cheapest grinder).
In terms of time, you can meet in one day. The bathroom can be used that evening.
We insert the jaw acrylic liner into the bath

And finally, the most expensive and most effective way to update the bath is an acrylic liner. The principle is clear already from the name: an acrylic liner is installed in the old bathtub in size. Compare this, for example, with false teeth.
It is not necessary to remove the old enamel. But something will still have to be removed and removed. But in order:
- Rinse and degrease the inside of the tub thoroughly and allow it to dry thoroughly.
- Remove the decorative screen or false panels, carefully remove the row of tiles that come into contact with the bathroom.
- Apply a two-component mounting foam to the inner surfaces of the old bathtub.
- Insert the finished liner into the tub
- Treat the joints with mounting foam or waterproofing sealant.
- Replace the tiles and false panels.
In principle, you can immediately use the bath, but it is better to pour water into it and leave it for a day. Under the weight of water, the liner will “sit down” and take the form of an old bathtub.

This method has one drawback: ready-made liners are sold only for standard size bathtubs. For a non-standard bath, you will have to make an insert to order, and this is more expensive, you know. The advantage of this method is that a bathtub with an acrylic liner will last at least 15 years.
How much does such a procedure cost?
A standard acrylic liner measuring 1.5 m is about 4,000 rubles, a 1.7-meter one is from 4,800 and more. Mounting foam for fixing - about 300 rubles. Silicone sealant for joints - about 200 rubles. Bath detergent - 200 rubles.
Total: according to the most conservative estimates, about 5,000 rubles.
Repair with acrylic liner
If the surface of the cast iron washing container is in a state of neglect, if most of the enamel surface is damaged, it is problematic to repair it with epoxy enamel or liquid acrylic. To restore the appearance of heavily damaged products, a more radical method is used - the installation of an acrylic liner. In this case, the restoration proceeds as follows:
according to shape and size cast iron bathtubs choose an acrylic liner.
An acrylic insert with a hacksaw or sandpaper is adjusted to a repaired washing container.
The inner surface of the bowl is cleaned and degreased, and then a special adhesive for acrylic is applied to it.
Preparatory work
Whatever method the owner chooses, the bath must be prepared for restoration. Some sources say that not in all cases, when carrying out restoration work, it is necessary to replace the drain and overflow. However, practice suggests that when performing such work, the siphon must be removed and replaced with a new device. Moreover, the price of such elements is quite acceptable for any consumer. Despite the loss of attractiveness, the old enamel continues to cling to the surface. Since it has a smooth surface, the new material will not adhere well to it due to insufficient adhesion. It is possible to increase the adhesion of the material to the surface of the bath by cleaning it.
How to restore a bathtub with enamel
This method is chosen most often. To achieve the ideal result of the work, the following sequential actions are implemented:
the enamel itself is selected, and high-quality material should be purchased, so you should not save on this element, and the most optimal are Finnish enamels, which are distinguished by excellent parameters;
two sets of enamel are purchased at once, since one will not be enough to completely cover the product;
if, simultaneously with the restoration, the appearance of the bath and the entire room is changed, then a color scheme is purchased that provides the enamel with a certain unique shade;
before applying the material, all surfaces of the bath are degreased, for which suitable means are used;
the walls are processed with a grinder, abrasive or sandpaper, which ensures the formation of a rough surface that provides excellent adhesion of the new coating to the base;
if there are cracks or crevices, they expand slightly with the same tools, after which a cord brush is passed over all surfaces;
another degreasing process is performed;
the bath is completely and thoroughly washed;
work continues only after the structure has completely dried, and this process can occur naturally or be accelerated by a building hair dryer;
various additional fasteners and elements, such as drains or gaskets, are dismantled from the bath;
dust generated during operation is removed with a vacuum cleaner;
rags or sheets of paper are placed under the bath so that excess enamel does not drip onto the floor;
enamel is diluted in a prepared container;
the solution is applied in a thin layer with a brush on the product from its edges to the bottom, and it is constantly leveled by alternating movements horizontally and vertically;
subsequent layers are applied before the previous ones dry;
it is important to achieve uniform coverage, so the same amount of attention is paid to all elements and details of the structure;
at the end of the work, streaks are removed.
You will be able to use the renovated bathroom after 4 days. Thus, updating the coating of a sanitary ware using enamel is a fairly simple and quick process that can be easily implemented by anyone. It does not require significant expenses and excessive physical effort, therefore it is considered an economical and convenient way to upgrade.