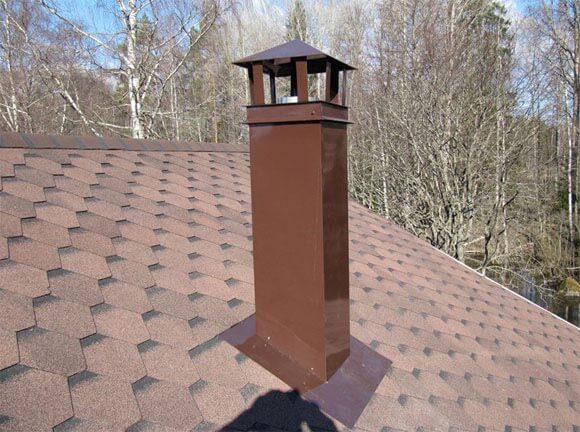
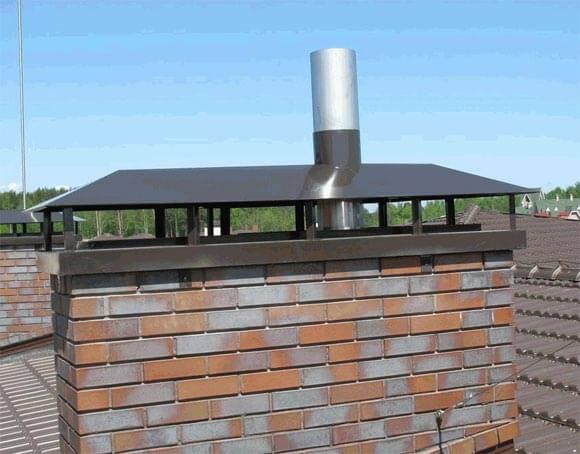
Passage through the roof of a brick chimney
The passage of the chimney through the roof must simultaneously solve two difficult tasks: to ensure fire safety and tightness. According to fire safety rules, in places where the chimney comes into contact with combustible materials, the temperature of the chimney walls should not exceed 50 ° C. For brick chimneys, this is solved by increasing the wall thickness. For this, the stove-makers lay out a special penetration. There is no single solution here, since a lot depends on the angle of the roof. Therefore, this option is not very popular today - it is difficult to find a person who can competently and safely make such penetration through the roof.
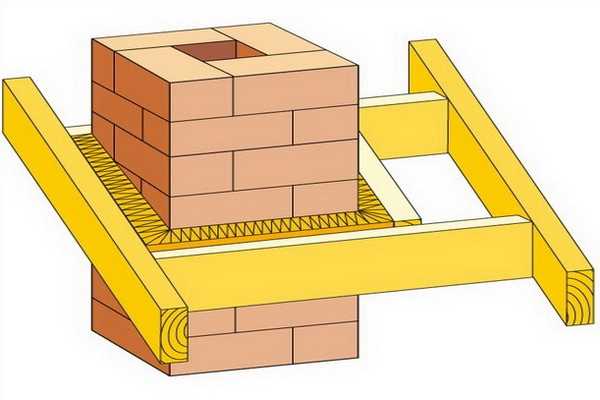
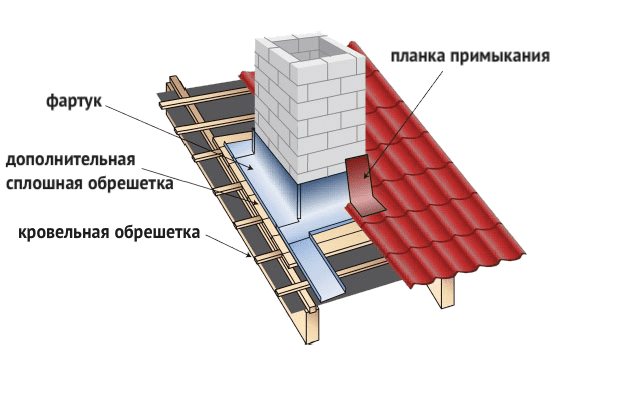
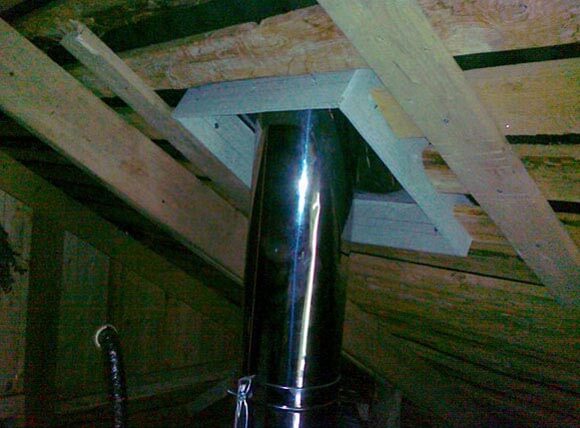
When a brick pipe passes through the roof, it is surrounded on all sides by a box of additional rafters and transverse beams
How is the issue then resolved? They simply make a square or rectangular pipe, which is brought out between the rafter legs, transverse beams are installed above and below the pipe. The distance between the pipe and wooden structural elements is 13-25 cm. If the distance between the rafters is greater, additional ones are installed. Thus, the damage that we will definitely cause to the hydro- and vapor barrier of the roof is minimized: in order to remove the pipe, it will be necessary to violate the integrity of the films and membranes. When installing the chimney, it turns out to be in a separate box. Films and membranes inside this box are carefully cut. The geometry of the cut is similar to the geometry of the pipe or box, but smaller than the dimensions of the box of rafters. In the corners, the films are cut at an angle (envelope), the edges of the films are folded and fixed with staples or clamping strips to the elements of the truss system. The edges and entry points of fasteners are sealed with adhesive tapes or sealants. This operation should be carried out carefully - the durability and reliability of the roof depends on it.
There is one more option. It is possible if the temperature of the pipe in the roof area is not higher than 50 ° C. In this case, the edges of the films can be glued to the pipe with sealants or the same adhesive tapes (trying to seal everything as best as possible). Now there is free space between the rafters and the brick pipe. It is laid with a heat-resistant heat insulator.
Drainage of water from joints
The most difficult thing is to seal the junction of a brick pipe and a roof if a hard roofing material is used.
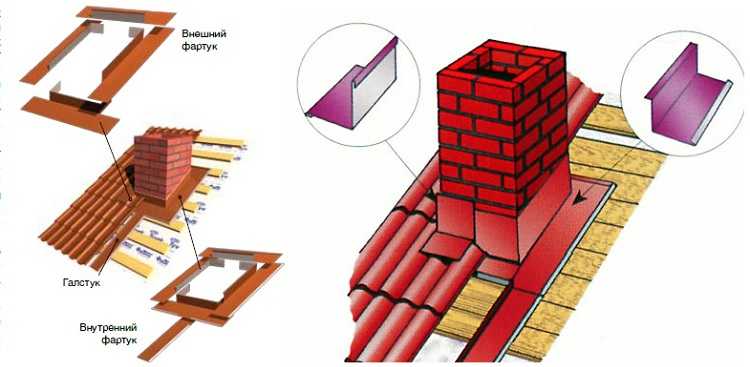
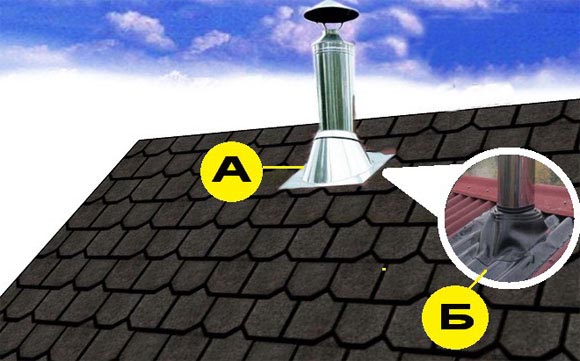
When removing the chimney through the roof, you need to solve the problem of waterproofing. To do this, use a system of two aprons: lower and decorative
First, a lower apron is installed around the pipe. It is usually made of tin and consists of four elements: two side, upper and lower parts. How to do it, see the next video. Everything is told in detail.
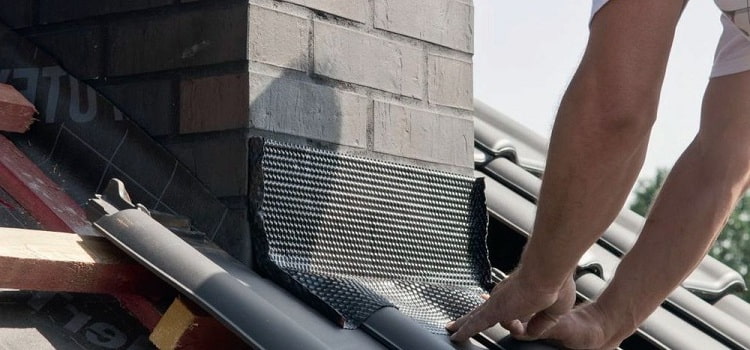
Under the lower apron, the so-called “tie” must be laid. This is a section of roofing material, a sheet of tin or galvanized metal that will drain water to the drain (the tie should be that long - go into the drain a little) if the chimney is low or into the valley if it is closer. The following video demonstrates once again the technique of installing the inner apron for a brick pipe, and also shows how the tie and outer decorative apron are installed.
In general, how many materials, so many ways to mount the pass-through node. Another video demonstrating another brick pipe waterproofing technique. Here they use modern materials that are produced by the manufacturers of Ondulin.
It is much easier to waterproof the joint between the chimney pipe and the roof if soft tiles or other soft flexible roofing material is used.On a plastered pipe, coated with impregnation for better adhesion, this material is simply bent and trimmed. It is possible to apply a layer of sealant along the curved roofing material and fix everything with a clamping bar. The place where the roofing material is connected, the pipe and the plank are also treated with a sealant. This video demonstrates the technique for sealing a chimney using soft tiles.
Chimney fire protection
Today, ready-made "sandwich" panels made of steel or ceramics are on sale. Their installation is as follows:
- To install a modular system, an asbestos gasket is carried out between the furnace and the chimney.
- Then a layer of solution is applied on which the module is placed. Align the level, fix the subsequent blocks with a layer of mortar.
- The places where the smoke device passes through the roof are well insulated. Fire-resistant insulation of the roof will be provided by a galvanized steel box, stapled to the rafters and cross beams at the point where the pipe passes.
Pipe waterproofing
Quick and reliable protection of the chimney from leakage is carried out by applying roll materials.
The main stages of installation work:
- The pipe is coated with a primer, pasted over with a superdiffusion membrane. Instead of a primer, it is possible to use polymer-bitumen mastic. The membrane is glued to the roof, the edges lead to the pipe.
- The upper and lower ties are made of metal. Bars are stuffed onto the crate and the corners are fixed.
- The rolled material is overlapped, allowing you to achieve the correct flow of water on a soft or metal roof. The length of the bottom sheet reaches the overhang of the roof.
- The joints are isolated with bituminous mastic. The corners are attached to the crate with dowels. Slots are treated with a heat-resistant sealant.
- The roofing is laid, a PVC apron is placed on top, using Onduflash tape, sealing is completed.
Roof-to-pipe junction device
Repairing a leak on a roof near a pipe
A pipe is flowing on the roof of the house - bitumen tape, a polymer cap or a tin apron will fix the problem.
Bitumen tape insulation takes place in 5 steps:
- With a metal brush, clean the roof around the chimney along the outer lower part.
- A damp cloth removes dust and dirt.
- At the junction of the pipe and the roofing cake, pieces of bitumen tape are glued.
- The segments are heated with a gas burner, pressed as tightly as possible to the roof and chimney.
- Wooden bars or boards are fixed from above. The service life of the tape is 2-3 years.
Do-it-yourself chimney sealing with bitumen tape
Polymer cuffs reliably protect the junction of the roof with an oval pipe and do not cause any particular difficulties during installation:
- In the upper section of the cuff, a cutout is made with a diameter less than the thickness of the chimney.
- Put on the outer part of the riser, lowered to the level of the roof.
- In places where the roof comes into contact with the menzhet, a protective layer of sealant is used.
Polymer pipe collars are a great and inexpensive way to protect your roof from leaks.
Creating metal bends
To protect against water, a tin apron with parameters similar to the dimensions of the pipe is put on the chimney pipe. The upper part of the coating is fixed to the vertical structure, crimped with clamps and sealed. The lower part of the apron is installed on the roof over the roof sheathing and fixed with self-tapping screws.
Special “layouts” will also help prevent the penetration of water into the ceiling - wide metal strips with a side edge that seals the gap between the top layer of the roofing cake and the pipe. Layouts are placed between the ridge and the passage of the pipe, covered from all sides.

Sealing the pipe with metal "layouts"
The cost of material and work
The cost of services for the installation and repair of roof penetrations, depending on the volume or complexity of the work, is 450-850 rubles / m2.
| Material name | Price |
| Self-adhesive strip with aluminum foil 12.5 m long, 8 cm wide | 2500-3000 rub. |
| Bituminous mastic | 50 rubles/kg |
| cement mastic | 40 rubles/kg |
| Apron | 100 rub./m linear |
| Elastic penetration Master Flush for pipe termination | 1500 rub. |
| Flange | 500-800 rub. |
When creating a waterproofing of the junction of the roof to the chimney system, it is necessary to ensure maximum safety and comfort, without fires and leakage.
How to bring a pipe through the roof
To organize a hermetic junction of the roof to the chimney, an internal apron is created at this point. To create it, use the lower junction bars. The strips are applied to the walls of the chimney, where its upper part is marked. On this line, a grinder makes a strobe. Then dust is carefully removed from the formed border. This is done so that small particles of sand and cement do not get on the surface of the waterproofing or roofing. In some cases, fine grains of sand will turn into an abrasive over time, which can seriously damage the roofing material.
The lower apron begins to be installed from the bottom wall, while only one part of the apron is inserted into the strobe. Similarly, this element is attached around the entire perimeter of the chimney. Separate elements must be overlapped with an overlap of 15 cm. The joints are sealed.
For chimneys with a circular cross section, you can purchase special passage elements in hardware stores, consisting of a steel sheet and an apron cap. Their use allows you to significantly speed up the work on the equipment for the passage of the chimney pipe through the roof. A purchased or manufactured apron should be securely fixed to the roof. At the same time, it is not rigidly fixed with the chimney, since the expansion of the material or the shrinkage of the truss system can cause damage to the chimney with an apron (be sure to read: “ Roof penetration - device“).
The passage of the chimney pipe through the roof, detailed video instruction:
At the junction of the pipe and the apron, a skirt is installed - a steel clamp, which is fixed using a heat-resistant gasket. This approach allows you to significantly improve the waterproofing of the roof in this place. Upon completion of the installation of the apron, it is necessary to apply sealant to all junctions of the element and the chimney. This contributes to obtaining a reliable connection that does not leak.
How to equip roof passages
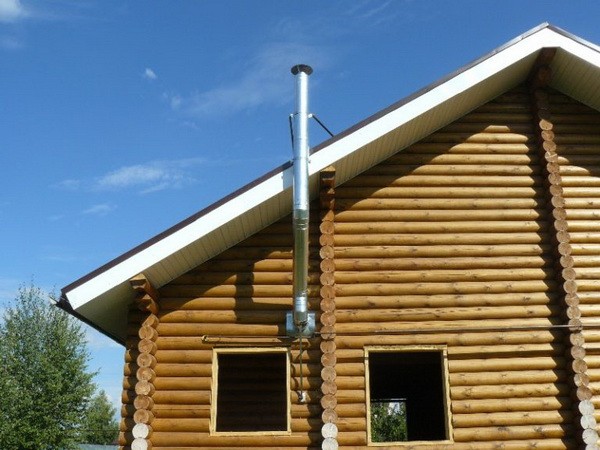
The installation of a chimney is necessary so that draft is formed in the furnace, and combustion products come out of it. When it comes to arranging a bath, metal or brick pipes are most often used.
Even during the design period of the building, it is necessary to decide how the chimney pipe will be removed from the roof. Otherwise, difficulties may arise already during the period of direct construction. The passage unit between the roof and the chimney must be fire resistant, and also provide reliable protection for the room from external environmental conditions.
That is, it is worth paying special attention to high-quality waterproofing
There are several ways to install a chimney:
- Pipe exit through a load-bearing wall at an angle,
- Through a load-bearing interior partition.
The best option would be when the pipe passage is located closest to the highest point of the roof. This arrangement to the maximum will be able to protect the structure from leaks. In any case, the pipe head must be raised above the coating by at least 50 cm.
The passage node will be equipped for each individual type of pipe in an individual way. In addition, the material from which the roof is made also matters. Modern construction markets present a large number of materials that are suitable for waterproofing a chimney under a particular type of roof.
The most important point in arranging the passage of the pipe through the roof will be the choice of the correct slope.The pipe should be positioned so that there is a distance of about 7 cm between it, the roof and the rafters. Subsequently, these holes must be filled with non-combustible insulation.
The passage of the chimney through the roof of the metal tile
Waterproofing a chimney on a metal roof requires the preparation of the following tools and materials:
- construction pencil or marker;
- drill and a set of drills;
- grinder with a 2 mm disc;
- silicone sealant;
- riveter;
- aluminum tapes and collars;
- metal corners;
- roofing screws;
- long ruler or tape measure;
- pliers and hammer.

Tools and materials needed for work
Bypassing the chimney on a metal roof provides for the creation of two protective layers, which are done as follows:
- An inner apron is assembled on the crate, covering the roof and chimney.
- Prepare the outer decorative strips covering the roofing material and the bottom apron.
If the smoke system is located near the ridge, then the edge of the upper bar is inserted under the ridge element.
The arrangement of the internal apron begins with the bottom wall of the riser.
- Each element covers the slope by 200 mm and rises along the vertical of the ventilation structure to a height of 150 mm.
- The side strips go under the crest of the metal tile, cover the lower element of the apron along the entire length, go beyond the pipe by 20 cm.
- All parts are firmly connected with self-tapping screws.
- 15 cm are measured on the pipe, a grinder is made with a strobe 15 mm deep.
- Next, the ditch is filled with silicone sealant, after which the lower abutment bar is fixed.

When pouring silicone, it does not need to be spared, it must fill all the voids between the pipe and the apron
Important! The top part of the apron should fit snugly into the groove filled with sealant.
It remains to lay the roofing material and attach the upper strips to the chimney with self-tapping screws, fill the sealing line with waterproofing mastic.

So that the screws do not stand out against the background of the roof, the color of their hats should be matched to the tone of the roofing
Cutting for round pipes: metal penetration
The sealing of a round chimney will help to carry out a ready-made apron-cap, represented by a metal sheet with a hole, closed by an inclined truncated cone.
- The sheet is attached to the crate, the pipe is passed through the cap, the upper part of which is pressed against the chimney with a steel clamp with a heat-resistant gasket.
- Wanting to direct the flow of water down, a side is made along the edge of the sheet with pliers and a hammer.
Interesting to know! An apron for a round chimney is made of black steel 1-3 mm thick. They cover the metal with heat-resistant enamel that can withstand heat up to 600 degrees. It is also possible to manufacture stainless steel parts with a maximum thickness of 2 mm.

Sealing the joint with a ready-made apron-cap made of stainless metal
Sealing the junction of the roof and pipes with the Master Flash system
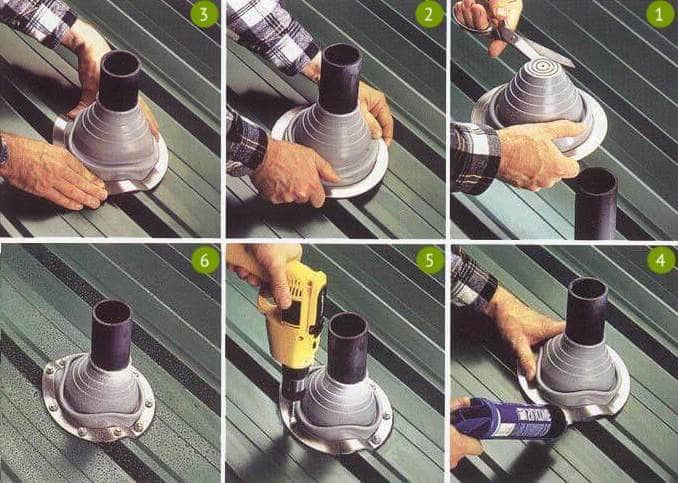
Installation of the elastic node of the passage through the roof is carried out in the following order:
- Choose a seal ring with a gap of 20% less than the diameter of the ventilation system.
- The seal is pulled along the pipe, pre-moistened with soapy water.
- The hood is fixed with sealant and screws equipped with neoprene or rubber gaskets. Pitch - 35 mm.
Important point! Elastic penetrations with a flexible lead or aluminum ring are equipped with an adhesive layer under a protective film. To enhance fixation, use an additional adhesive composition.
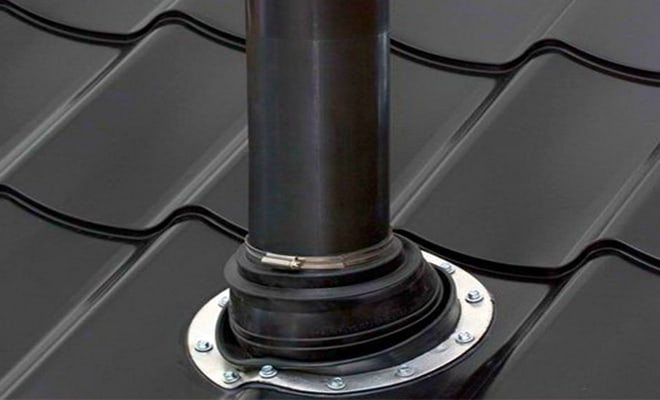
Chimney seal Master Flash is convenient and easy to install
Aluminum and lead tapes
An alternative to ready-made penetrations is the waterproofing of the chimney with self-adhesive aluminum / lead tape based on bitumen or modified polymers. It allows you to seal the joints of the pipe and the roof.
Pipe waterproofing with self-adhesive tape is done in several stages:
- Clean the tape application area, then press the film firmly.
- Paste the vertical part of the chimney with segments, covering the horizontal roofing at the same time.
- Clamp the tape with a metal bar and fix with heat-resistant dowels.

Pipe sealing tape is a great way to save time and money
Passage through the roof of a round pipe
The node of the passage through the roof of round pipes can be either metal or soft - made of rubber or silicone. Metal penetrations of the roof are made of galvanized iron, sometimes a protective coating is applied to them, similar in color and composition to the metal tile coating.
Often, metal tile manufacturers offer special penetrations: this is the same sheet of roofing material to which an elastic rubber cap is attached, which serves as an excellent insulator.
For other roofing materials, flexible penetrations can be used as a roof penetration. There are many of them on the market today. Different colors, compositions, at different angles of the roof, straight penetrations, with different types of fastening (for self-tapping screws, with adhesive, etc.).
Of all flexible penetrations Master Flash (Master Flash) has the best recommendations. It is quite easy to distinguish it: in addition to the applied company name, there are additional corrugated grooves on the back of the roof penetration, which increase the degree of adhesion to any roofing material. From the outside, the base along the edge has a metallized coating, with which it is easy to achieve any desired relief.
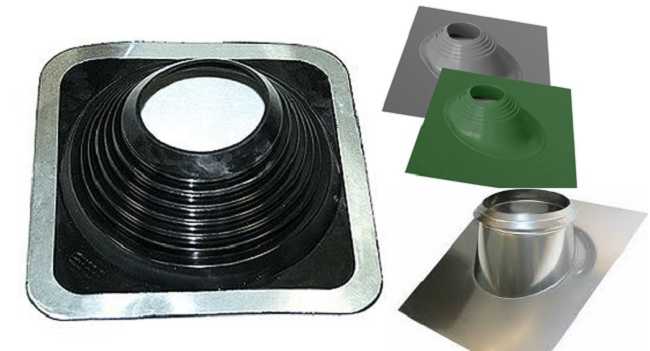
Roof penetrations for round pipes
To install a flexible penetration, cut off part of the outer cap - the diameter of the resulting hole must be less than the diameter of the pipe. The penetration is pulled onto the pipe with force. To reduce the resistance, you can smear the surface of the pipe with soapy water. After the penetration is tensioned, the lower flange is given the desired configuration. On the back side, it is smeared with sealant, then pressed against the roof and fixed with self-tapping screws. This method of sealing a round pipe is not very laborious, but reliable enough.
Silicone and rubber penetrations are used at pipe temperatures up to 100 ° C. If the temperature of the chimney is higher, you will either have to make an additional layer of insulation between the penetration and the pipe, or, more likely, use a metal skirt and a glass. How they look and how to fix them is shown in the following video. Everything is done there not quite correctly, then the principle of installation is clear.
How to equip the passage of the pipe through the roof
The passage of the pipe through the roof is the most complex structural element with several problems associated with its construction. In this article, we will talk about performing work on the correct installation of the passage, as well as how to pass the pipe through the roof while maintaining all the protective properties of the roof pie.
The node of the passage of the pipe through the roof is the object of controversy of various specialists. Thus, professionals in the field of work on the equipment of fireplaces and boiler rooms believe that the passage of the pipe through the roof should be located at the ridge. This allows you to protect the main part of the pipe from the effects of cold, which reduces the likelihood of condensation inside the pipe. Roofers, in turn, say that the passage assembly must be equipped directly through the ridge, as this makes it possible to simplify the work associated with the installation of the passage element. This method, among other things, eliminates the formation of snow deposits above the chimney. But everything is further complicated by the fact that the outlet of the pipe through the roof can also be arranged on slopes at a certain distance from the ridge.
In order to protect the internal surfaces of the chimney from moisture getting there, its outlet is covered with a special umbrella.But if the chimney is connected to boiler equipment, then it is better not to install such a protective element, since due to the low temperature of the combustion products, they can accumulate under the umbrella on the chimney pipe. which will create additional pressure in the pipe itself and ultimately reduce traction.
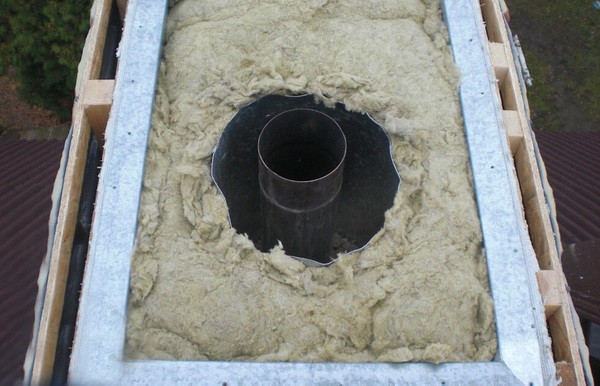
The most problematic place of this node is the passage of the pipe through the roof, since in this place it is necessary to take special measures to protect the roof and isolate it from high temperatures. In order to protect the "pie" of the roof from the chimney, use a separate box
At the same time, it is very important to adhere to the requirements of SNiP regarding the location of beams and rafters, and the interior of the box must be filled with non-combustible material. Well proven for these purposes, such material as stone wool
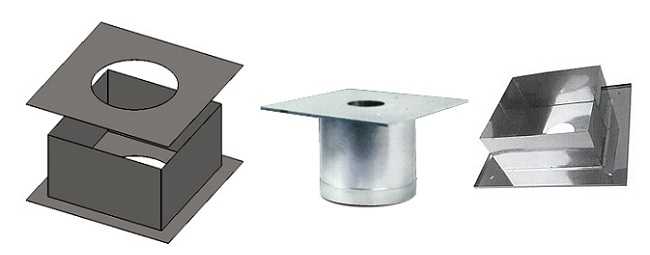
The passage element can have a different shape depending on the section of the chimney itself and the roofing material used:
Types of passage arrangement
In order for the tightness of the passage assembly to be the best, it is necessary to make high-quality roof connections. When arranging the passage, materials subject to ignition should not be used.
How to organize a passage
The vapor barrier layer must be cut with an envelope and laid over the penetration. Its edges are fixed with a construction stapler to the truss structure. Near the passage, it is necessary to create a crate and fill it with waterproofing material. Further, by analogy, a water-repellent carpet is made by cutting it with an envelope. Leaving about 10 cm on it, to place the material on the pipe wall.
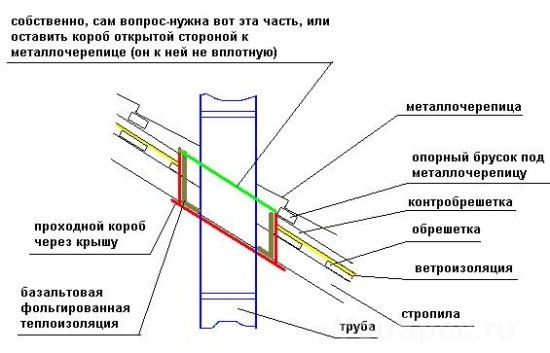
It is imperative to leave a small gap around the perimeter of the chimney. This is done for proper shrinkage of the structure. In addition to the above method, the following can also be used:
- self-adhesive tapes with strips,
- special self-adhesive strips,
- special parts that are produced for a specific type of roof.
In the case when we are talking about a non-newly built building, and the arrangement of the chimney is not taken into account in the original design, then when the pipe is removed through the roofing, its integrity is always violated. In this case, it will be necessary to determine the area where the chimney will pass through the roof.
A so-called separate box is created in which the passage node will be located, separating it with transverse beams. This is necessary so as not to violate the integral layer of insulation of the entire floor. Thus, the thermal protection of the entire room will be reduced.
The distance that is formed between the pipe and the rafter structure is filled with basalt wool, which tolerates high temperatures well and does not triple its properties under the influence of humidity.
Installation and repair of fan pipes
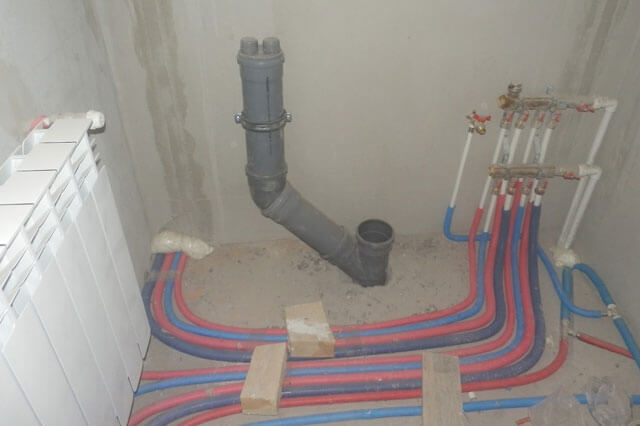
The material for the manufacture of fan pipes are ordinary sewer pipes of the required diameter. They are connected to the top of the riser and become its continuation, which exits into the atmosphere through a special ventilation duct. In some cases (for example, if there are too few ventilation ducts), the outlet pipe is carried out not through the roof, but through the wall.
The installed fan pipe completely eliminates the possibility of sewer “aromas” penetrating into the living space, but this rule only works if the sewer system is supplemented with high-quality ventilation. Most modern plumbing is equipped with a small siphon, so the amount of water in the water seal is small. If such a device is not used constantly, then the water seal will simply dry out and cease to perform its functions.
In addition to sucking air from the atmosphere, the fan pipe provides proper ventilation of the sewer riser.Warm air escaping into the atmosphere creates a vacuum that does not allow odors to remain in the room, and with a dried siphon, the volume of air entering the room will be much less.
The fan pipe should be installed in a heated room - freezing significantly reduces the efficiency of the ventilation system. If it is not possible to mount the pipe in a warm place, then it must be insulated, which will not only ensure the functioning of the system, but also extend its service life.
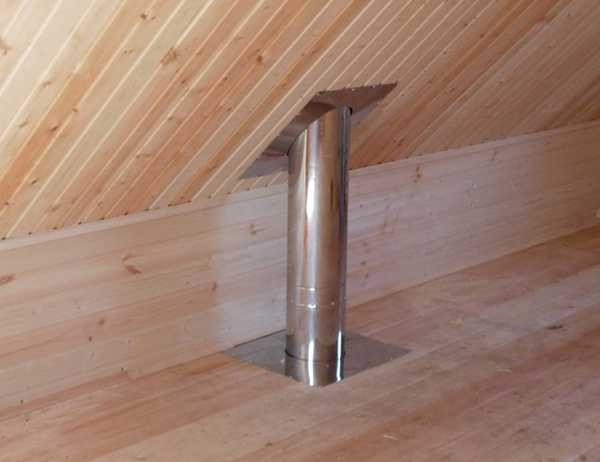
The passage of a round chimney pipe through a wooden ceiling using polyurethane foam of various designs
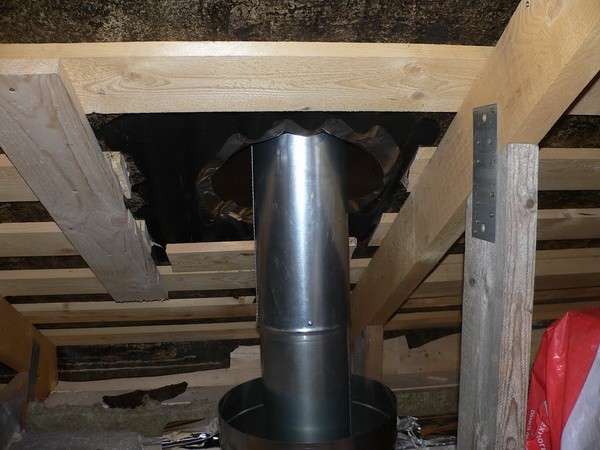
To pass the chimney through wooden structures, you can use a ready-made ceiling-through assembly (see photo). It is selected based on the outer diameter of the pipe. Before installation, this node of the passage through the ceiling must be prepared: all surfaces that will be in contact with the wood of the ceiling sheathing, and all internal surfaces of the passage box are laid out with thermal insulation.
Ceiling pass-through assembly of factory production. Before use, it must be overlaid with heat-insulating material on all sides, except for the front.
Usually, basalt wool serves as thermal insulation, but it must be special: to withstand high temperatures. When buying a material, make sure that it is designed for use at temperatures of 800-1000 ° C. These materials have a higher cost, but it is unreasonable to save on safety. Cheaper options include binders that sinter at high temperatures, due to which the thermal insulation loses all its properties, and this can lead to a fire. In addition, it is advisable to use a foil heat insulator - this will make the design even safer.
Having insulated the passage node, prepare a place for its installation. On the ceiling, mark where the chimney will be located. Outline a hole of a suitable size: slightly smaller than the size of the front panel of the pass-through node in such a way that it is convenient to attach it to the ceiling sheathing with self-tapping screws. Having cut a hole, cover its edges with the same heat insulator as the passage unit, or any other with similar properties. To increase the level of fire safety, metal strips can be strengthened over the heat insulator. Insert the prepared passage assembly into the finished hole. It can be put on the pipe and installed with it. Having installed this structure in place, fix the panel of the passage unit with self-tapping screws (holes can be pre-drilled).
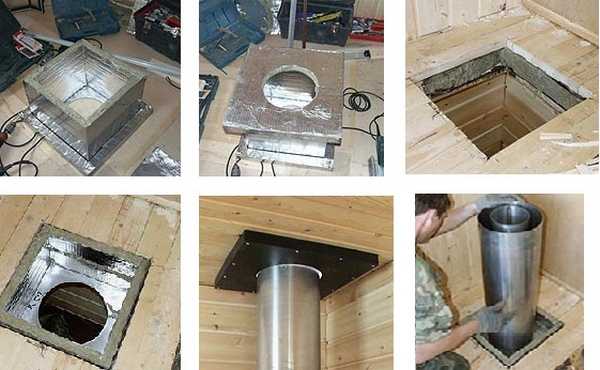
Preparation and installation of the ceiling penetration
After checking the verticality of the installation of the chimney pipe, proceed to complete this stage. The voids remaining in the passage node are filled with thermal insulation. You can use pieces of the same basalt wool or fill the voids with expanded clay. Sand can be used, in theory, but not worth it. It loses in terms of heat-insulating properties and expanded clay and basalt wool, in addition, sooner or later it will be at the bottom, since there are cracks, and through them grains of sand will fall onto the stove.
Further actions depend on where you led the chimney: to the second floor or to the attic. But the main difference is in the aesthetics and the availability of finishes. If you brought the chimney pipe to the attic, then the passage through the ceiling can be considered complete. If you brought the chimney to the second floor or to the attic, you put on a protective metal screen on the pipe, which is now attached to the floor with the same self-tapping screws. After that, you proceed to the next stage - the output through the next ceiling (this is if you are on the second floor) or through the roof, if in the attic or in the attic.
It looks like the penetration of the ceiling in finished form
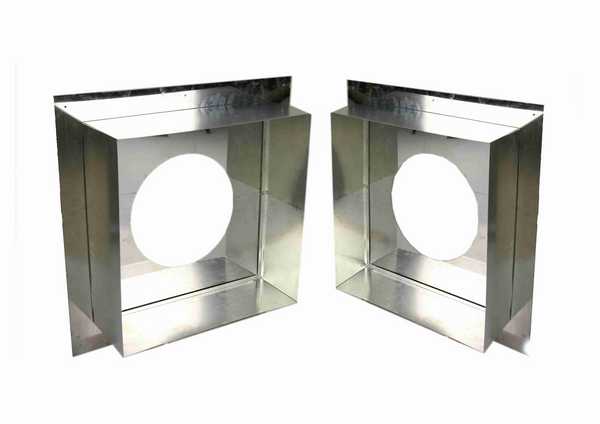
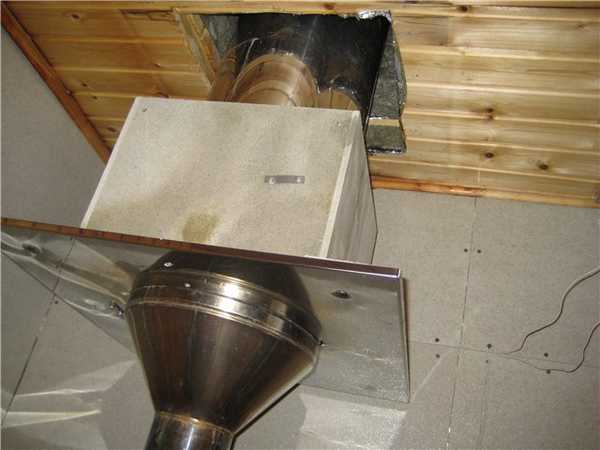
The passage unit of the chimney through the ceiling may also look like this. This is a ready-to-use version, which consists of two boxes.The inner box is made of metal, the outer box is made of heat-resistant material (in this case, mineralite).

Minerite roof passage node. It is completely ready to use
Between them there is an air gap that provides fire safety. According to the manufacturers, the remaining free space between the sandwich pipe and the cutting box does not require filling with a heat insulator. You can leave everything as it is, or you can, for greater reliability, still add heat-resistant thermal insulation. In such a case, as the passage of a chimney through a wooden floor, it is better to play it safe than to put out the fire later.
This is how the minerite node of the passage through the roof is installed. Just put it on the pipe and put it on the prepared method
The passage node through the ceiling can be like this (see photo). In this case, sealing the edges of the hole in the ceiling is mandatory (recall, first, thermal insulation along the edge, metal on top).
The factory aisle assembly may look different. Depending on the form, the installation method varies slightly.
How to calculate the height of the chimney above the roof
The height of the chimney determines the safety for you and your loved ones. If during the operation of gas boiler equipment the chimney plays the role of a flue channel, with low-temperature combustion products, then no compromises are allowed for solid fuel boilers, stoves and fireplaces.
Calculation of the chimney pipe from its location
The fact is that if the parameters of the chimney or channel are incorrectly calculated, there is a risk of serious poisoning by combustion products, or even a fire can be provoked by unburned fractions or fragments of ignited soot.
Technological requirements for the height of the pipe relative to the ridge
All norms for the optimal determination of the height of the chimney relative to the ridge are prescribed in the collection SNiP 2.04.05-91 in the subsection regarding stove heating.
In accordance with technical standards:
- The total length of the chimney duct should be more than 5 m. In houses that do not have an attic, the height of the chimney pipe may be less than 5 m, but this is subject to stable draft.
- The height of the section of the flue duct extending beyond the roof structure must exceed 50 cm.
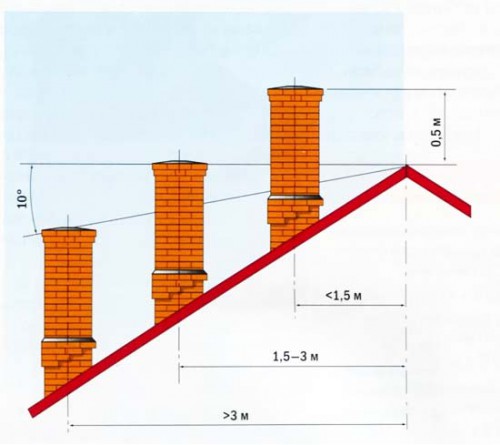
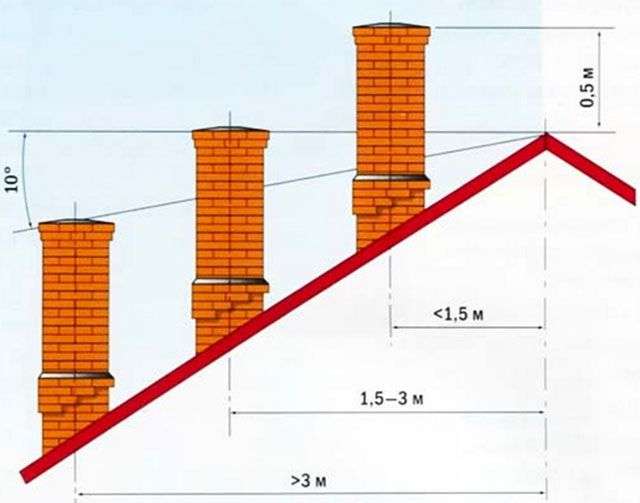
- Above the ridge, the chimney should rise by 50 cm or more, if the gap between it and the ridge rib in the horizontal plane does not exceed 150 cm.
- The mouth of the chimney should be equal to the height of the ridge rib or slightly exceed it if the horizontal plane segment from the chimney to the ridge line is in the range from 150 to 300 cm.
- The top edge of the chimney should be above the line from the ridge to the eaves at an angle of 10 degrees to the horizontal.
If the segment from the ridge rib to the pipe is less than 150 cm, then you can find out the height by creating a model of the house.
This will require:
- On the diagram, draw a straight line parallel to the ground plane.
- From this line, where the roof intersects with the chimney, the top is measured on the same scale of 50 cm.
- At the formed point, draw a new horizontal plane. It will correspond to the minimum height at which the mouth of the chimney can be located.
By the same principle, we determine the height limit of the chimney, if the horizontal space between the ridge rib and the pipe exceeds 150 cm, but does not reach 300 cm. From the top of the roof, we set aside a horizontal plane, which will indicate the smallest height of the outer section of the chimney.
It should be noted that it is strictly forbidden to overestimate the height of the pipe above the roof, which goes beyond the limits of the standards. Excessive wind flow can simply overturn such a chimney.
How to correctly calculate the parameters of the chimney
The following rules should be followed:
- The height of the chimney is not the only parameter that affects the performance and safety of the heating system, with a gas or solid fuel boiler as a heating device. Designing a chimney begins with determining the operating parameters of the heating system. This means that the complex for calculating the boiler house should take into account these factors as well. By this time, the owner of the premises must decide on the type of fuel used (gas, pellets, firewood or peat), and with the help of a specialist, determine the heat output of the boiler. decide on the types of radiators or convectors. There are a lot of questions, however, the omission of some moment can adversely affect the performance of the entire heating system. For example, many novice builders of their own homes are mistaken that all chimneys are the same. This is not true. A brick chimney is well suited for heating with solid fuels, such as wood, but it is not intended for space heating with a gas boiler.
- With regard to the operating parameters of the boilers, the height of the chimney can also affect the final heating efficiency. Do not forget about the cross section of the pipe - the diameter affects the minimum and maximum volume of passing combustion products, provided with natural draft.
- The process of calculating the chimney of a fireplace or solid fuel boiler may require additional calculations and measurements. This is due to the use of one smoke channel by several devices in the boiler room at the same time. Self-activity can lead either to unforeseen parameters of heating operation or even to sad consequences.
- There is no chimney system that could be universal for any type of fuel, boiler equipment and used as a standard solution. In this regard, the most difficulties arise for developers and owners of private houses and cottages.