Collector connection and adjustment
After the collector is installed, it must be properly connected. If a metal-plastic pipe is used as the main heating element of the system, then special fittings must be used to connect it to the distributor.
These connecting links must be very well tightened both on the pipe itself and on the manifold. To seal such connections, rubber rings are used, which can be damaged during installation work, which will cause depressurization of the circuit, so the connection of the metal-plastic pipe with the fitting must be done very carefully, slightly swinging the pipe when installing the fitting.
To properly adjust the distributor, do the following:
- The protective cap is removed from the valve.
- With a special hex wrench, the valve is completely closed to failure.
- Set the minimum number of revolutions for this heating circuit.
- Open the valve by the given number of turns.
- The protective cap is put in place.
This operation must be done for each circuit of the heating system.
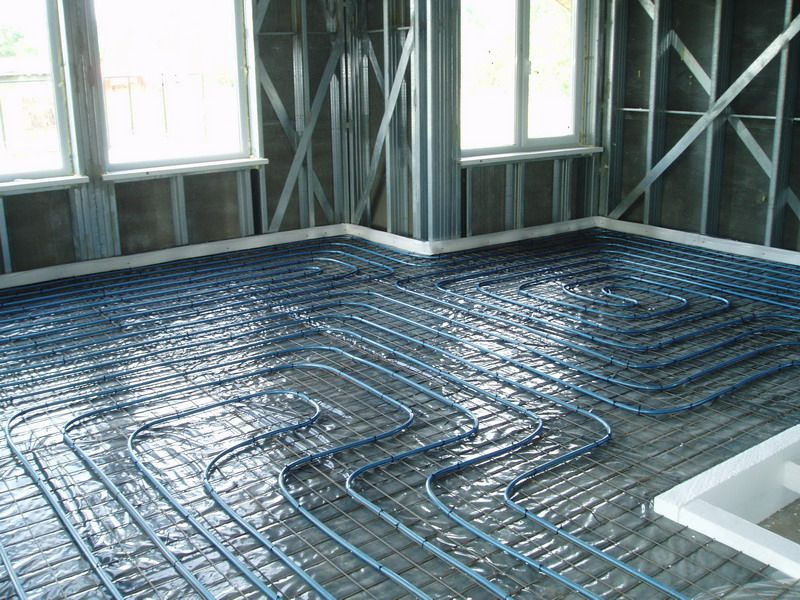
When creating a warm floor, each room has its own separate heating branch.
This is due to the fact that there are restrictions on the length of one branch, as well as ease of installation.
The distribution of the coolant from a single boiler flow to each branch occurs in a special unit called a collector, or a comb for a warm floor.
With your own hands, you can make an analogue to the factory collector, which will perform its functions no worse, but for less money. What you need to buy, how to properly assemble and mount in practice.
Selection Tips
If you decide to buy a collector for underfloor heating, you need to choose it according to the following criteria:
- For how many circuits is it intended. That is, how many separate branches of the warm floor are planned (the radiator branch is not considered).
- Equipment. Even just buying all the parts separately and assembling it yourself will cost less. But with a ready-assembled comb - a minimum of hassle.
- Material. Collectors are metal (steel, copper, brass) and plastic. Plastic can be used on simple systems with a short circuit (for example, for a toilet or kitchen).
- Adjustment. Even on factory models, manual control valves (not servos) are found.
Conclusion
A simple comb without servos is not very expensive.
By purchasing all the elements, valves and regulators separately, you can really save money, but the risk of errors and leaks increases if the connections are of poor quality. So, when deciding whether to make a comb with your own hands, weigh everything well.
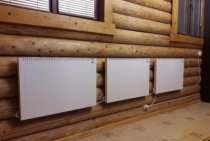
Everyone knows that a large part of the heat in a wooden house goes through the floors. A warm floor in a wooden house will fix this problem.
What underfloor heating to lay under the laminate? Read the tips of the masters in this thread.
Installing a comb for underfloor heating
The installation of the collector must be carried out in such a way that all circuits are, if possible, of the same length. You can install the distributor in the utility room or in a special cabinet that is mounted in the boiler room. If 2 or more floors are heated, then the collector can be placed on the ground floor, but in this case there is no need to install an air vent with a comb.
Air from the system will not be purged automatically. When placing the collector below the level of the warm floor, it is necessary to install a separate air valve for each circuit at the highest point on the return flow of liquid to the boiler.
In the event that the collector is installed on the same floor as the underfloor heating, the distributor must be installed at a height of at least 1 meter from the level of the pipes of the underfloor heating system.
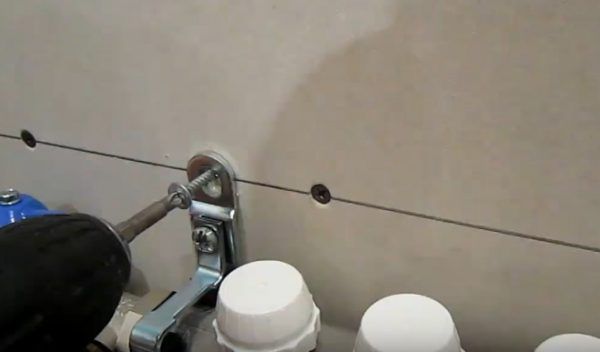
Thus, it is possible to establish the ideal process of circulation of the coolant in the pipes. To obtain an ideal distribution of heat from the collector, it should be installed in the room where the heating system is installed. In order for the installation of this device to take up as little space as possible, a niche is made in the wall into which the comb will be installed and pipes will be connected.
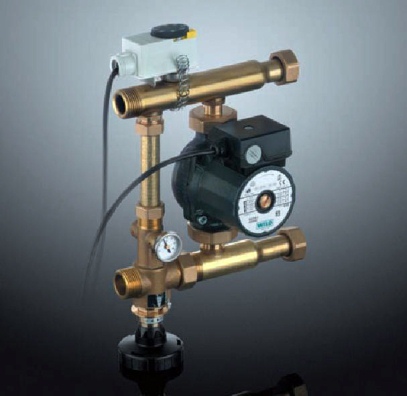
 Collector with contact temperature sensor
What is a comb for a warm floor, the role of the node and the principle of operation
As a rule, the modern scheme of "warm floors" is quite complex, represented by several circuits with different lengths of pipes and the amount of heat carrier, so the role of such a node as a comb should not be underestimated.
With two way valve
The main difference between the standard "comb" scheme, equipped with a two-way valve, is represented by a continuous supply of water from the "return" without the use of special cut-off type fittings. In this case, the mixing unit for the "warm floors" system periodically mixes boiling water under conditions of cooling of the heat carrier below the specified parameters. This type of circuit has proven itself in practice, but only in the absence of excessive contours.
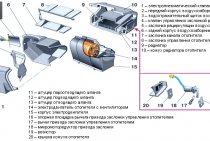
The diagram shows:
- 1 - two-way supply valve;
- 2 - circulation pumping equipment;
- 3 - temperature sensor;
- 4 - balancing type valve device;
- 5 - check valve.
The supply-type valve device is distinguished by the presence of a liquid thermostat sensor built into it, which cuts off or adds a certain amount of hot heat carrier if necessary. Stable temperature indicators along the perimeter make the operational life of the structure as high as possible. The advantages of this option are represented by the smoothing of sharp jumps in conditions of low throughput of the valve device.
With three way valve
The category of universal equipment includes modern and highly efficient mixing units mounted in the "warm floor" system with a three-way valve device. This design assumes the mixing of boiling water with the "return" directly inside the body, as well as the presence of a combined function of the supply valve device with bypass-type balancing. The damper, which has an adjustable position, is built into the faucet.
This type of control valves is equipped with special weather-dependent controllers, thermostats and servo drives, therefore it is the best option for installation in multiple circuits for heating very large areas.
The main disadvantage of the design with a three-way valve is the possibility of inlet of a hot heat carrier and the risk of excessive pressure inside the system, which adversely affects the pipes and significantly reduces their operating period. At the same time, the complexity of the most accurate regulation of temperature indicators is due to the presence of increased throughput, therefore, even a slight turn of the damper can cause a noticeable change in temperature inside the “warm floor” system by 3–5 ° C.
Assembly and installation instructions
Self-assembly of the distribution manifold is quite possible, since all factory-made products are always completely complete and are accompanied by intuitive instructions.
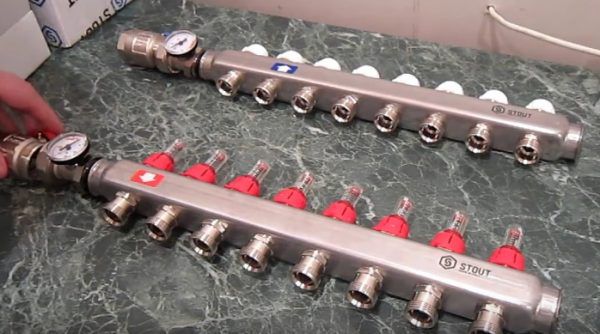
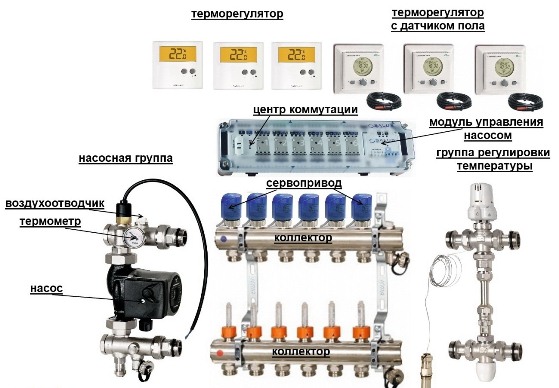
The standard configuration of the collector for arranging the "warm floor" system is presented:
- metal cabinet;
- thermometer;
- drain cock with stopper;
- automatic air vent for each branch;
- fittings;
- thermostatic valves;
- flow meters.
Temperature control is performed by thermostatic fans, the setting of which can be manual or fully automatic. The second option is more convenient and practical, which affects the total cost of equipment.
Required Tools
For self-assembly of a factory product, it is necessary to prepare a standard set of tools, as well as a traditional tow or FUM tape to obtain the most reliable connection of all elements. Additionally, a special lubricant can be used to increase the quality of the twist on threaded connections.
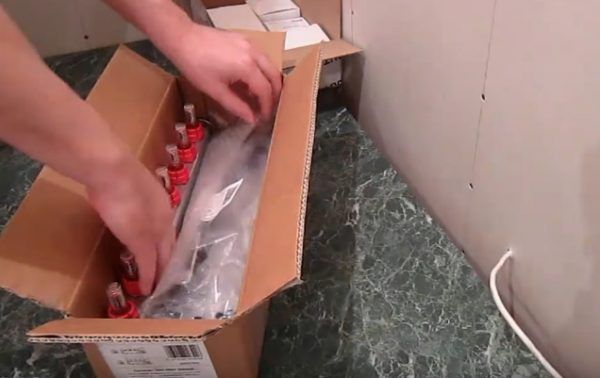
Assembling the factory comb
To assemble a factory-made manifold, follow these steps:
- After the box is unpacked, it is necessary to check the complete set and make sure that all the elements are intact.
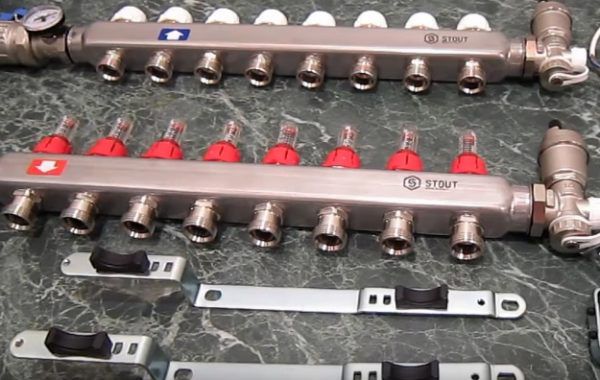
Fixture mounting
Installation of the unit includes the following steps:
- For independent installation of the comb into the "warm floor" system, it is necessary to unpack the mounting brackets and make sure that they are complete.

How to assemble an underfloor heating comb
I must say that assembling a comb with your own hands is a very real task. If you installed the heating system in your house yourself, then you have enough skills to assemble this unit. Moreover, prefabricated combs are supplied complete and they are accompanied by installation instructions with diagrams and explanations. An example of such a scheme is shown below:
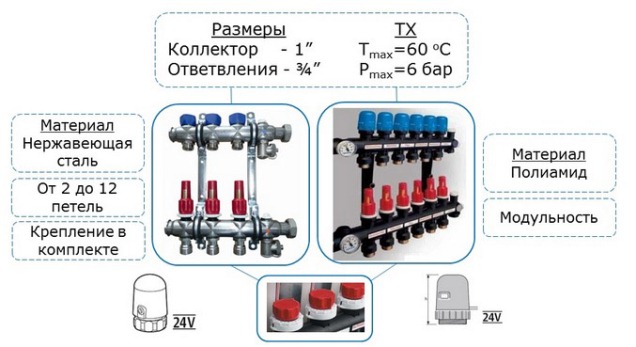
At the moment, distribution units are made of the following materials:
- brass;
- stainless steel;
- plastic (polyamide).
A factory comb made of plastic is truly a godsend, its cost is much less than that of metal "brothers". Moreover, in practice, it functions no worse, in any case, there are very few negative reviews about it. Assembling a distributor from any material consists in connecting the comb sections to each other, screwing a mixing unit from a pump with a valve to them, installing thermometers, taps and air vents. The finished collector can be installed in place and pipes connected to it.
For those who do not want or cannot purchase a plastic manifold, there is another option - to solder a comb of polypropylene pipes and fittings on their own. To do this, stock up on the required number of tees and sections of PPR pipes of the same diameter. Since the tees cannot be connected directly to each other, pipe blanks should be cut, which will serve as connecting nipples.
If you managed to solder the number of tees you need, it remains to securely attach them to the wall, and then beat the rest of the piping around them: pump, valve, taps and other details. We must try to ensure that massive parts are attached to the wall on their own, and do not load the distributor with their weight. True, a do-it-yourself comb will be devoid of flow meters and control valves, but if necessary, they can be purchased and installed additionally.
Automatic temperature control TP
Automatic adjustment of the underfloor heating can be carried out thermomechanically or electronically using electromechanical actuators that control the operation of shutoff valves.
Thermomechanical control system
It is based on the operation of thermostatic valves or taps with thermal heads that react to changes in the temperature of the coolant. Today, many manufacturers offer various models of such shut-off and control valves, for example, Oventrop. However, regardless of the name and type of thermosetting substance used in them (liquid or gas), these are thermomechanical self-regulating mechanisms that are most appropriate to install to control the temperature of one, separately taken circuit.
The principle of operation of thermal valves is simple, which makes them very reliable and fail-safe. A copper, brass or bronze core installed in the body of the device, being heated by the passing flow of coolant, transfers the temperature to the thermosetting filler. In turn, the thermosetting element, which increases in volume, pushes the core, which, by moving the valve, gradually blocks the circulation of the heated liquid.
The thermostatic valve for underfloor heating, in addition to being installed on a distribution manifold, can be mounted in a separate unibox assembly. Such assemblies also include automatic air vents, which, together with thermostats, are placed in compact boxes (boxes). The use of a "unibox" allows you to adjust the temperature in a single branch of the TP without being tied to bulky collector cabinets, which is especially convenient with a small number of circuits.
In addition, thermomechanical floor heating controllers can have remote air sensing elements. They allow you to configure them to control the flow of the coolant not by its temperature, but by the air temperature in the premises. The principle of their action is the same, only the thermosetting substance is much more sensitive. It is advisable to install an air thermal head for simultaneous control of several circuits in one room, where water floor heating is the only source of heating.
Electronic control system
It includes electronic thermometers, a controller and electric drives (actuators, servo drives). Electric drive mechanisms can be attached to the mixing heads of conventional control valves (valves) or be part of their design. The change in the intensity of the coolant supply is carried out in accordance with the specified threshold values. The measuring medium for the temperature sensors of the automatic floor temperature controller can be both a heat carrier and indoor air.
Advantages
 When using combs of a warm floor, you can get a number of advantages:
- Energy savings compared to conventional radiator use. Its value can be from thirty to fifty percent.
- High degree of safety during operation. There are no flammable open heating elements.
- Great service life. The service life can be two decades or more.
- High comfort of heating the apartment and the absence of areas with uneven heating.
- The aesthetics of the design used. The system takes up little space and is usually mounted in a special small cabinet.
- Hygiene. Keeping the floor warm facilitates wet cleaning and eliminates the damaging effects of excessive moisture. This, in turn, makes it impossible for fungus or mold to form.
- Burn safety. In the absence of such a control system for heating, hot water can be used. When touching the pipes, not only children, but also adults can get burned. The underfloor heating comb allows you to qualitatively regulate the temperature of the coolant, avoiding its excessive heating.
How to assemble a collector
Assembly of the collector begins with the acquisition of all the necessary elements. Next, you can start making the comb.
Instructions for assembling a collector of a warm floor
Comb made of polypropylene pipe
In the factory, the main collector element is made of metal. And with their own hands they make it both from iron and plastic. One of the most important steps in the process of its manufacture is the correct calculation of the diameter.

Scheme of installation of polypropylene pipes
The easiest material to work with from which a comb for underfloor heating can be made is plastic, since it does not require welding.
Tools and materials
To save time and speed up the launch of the water floor heating system, you need to prepare the following tools in advance:
- soldering iron and scissors designed for soldering and cutting polypropylene pipes;
-
wrenches.
Wiring diagram for a warm water floor
You will also need certain materials.

Equipment for the water floor heating system
- Polypropylene pipe of the desired diameter. In this case, a pipe is needed with which the radiator heating is installed.
- Tees.
- Mayevsky crane - 2 pcs. Their installation requires the use of metal adapters and corners.
- Threaded plastic couplings in an amount equal to the number of circuits in the heating system.
- Fitting.
Instead of Mayevsky taps, automatic air vents can be installed. Air vents are needed to remove air from the system. If you neglect their installation, then if air enters the pipes, the heating efficiency will decrease significantly.
Assembly process
A full-fledged comb for a warm floor is two identical parts that are connected to each other. You can make the main element of the collector with your own hands only by learning how to use a soldering iron, since individual elements will have to be soldered to these two parts. However, even an amateur is able to master working with a soldering iron, but it still doesn’t hurt to learn first.
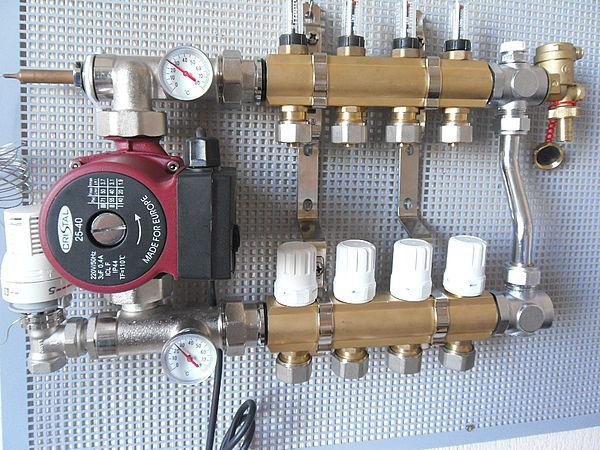
Underfloor heating collector IVAR
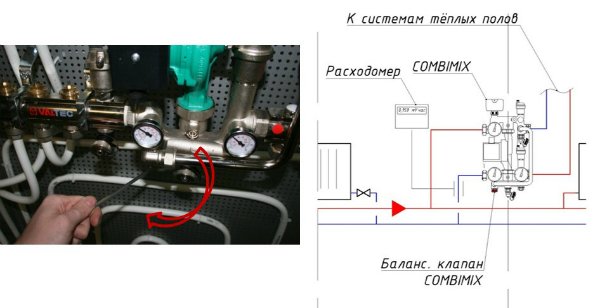
Scheme of the design of manual and automatic control of mixing units
One part of the comb consists of tees. Moreover, the tees can simply be soldered to each other, or interconnected using segments of a polypropylene pipe. If you do it according to the second option, then in the future there will be no difficulties with connecting an additional circuit.
And the first option will no longer allow this, although in this case the look of the comb will be more aesthetic. Therefore, it is still preferable to use pipe segments. It should be remembered that the number of tees must correspond to the number of circuits.
The next stage of the work will be soldering the couplings to the tees. But first they should be prepared by screwing the fittings. To exclude the possibility of leakage of the coolant, a fum-tape or tow is wound on the thread of the couplings. If there are more tees than contours, couplings with fittings are also soldered to them, but the excess ones are closed with plugs.
At the final stage, it is necessary to solder a corner from one end of the comb, turning it up. A coupling is also soldered into it, however, not a fitting is already screwed into it, but an adapter that allows the installation of a Mayevsky crane, which can be replaced by an automatic air vent. The other end of the device remains free, since the heating boiler pipe will be connected to it in the future.

Instructions for connecting the comb
In the same way, another comb is made, or rather, its second part, since a full-fledged device consists of two such elements. One of them performs the functions of supplying the coolant, and the other takes it from the pipes. In this case, the supply, as a rule, is placed on top, and the return - on the bottom. For convenience, they can be painted in red and blue colors.
Interesting: Kärcher window cleaner
How it works
In short, such a comb is a distribution device for water that enters the apartment for heating. In fact, this is a rather complicated device.
Let's list its components:
- Two manifolds made of brass equipped with adapters for incoming and outgoing pipes.
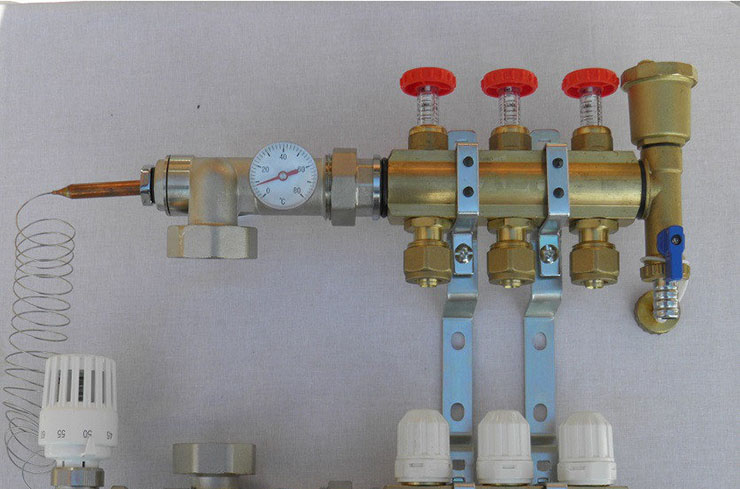
- Flowmeters are installed on the incoming pipes.
- Thermal valves are installed on the outgoing pipes (as soon as the water cools to a certain temperature, they open and the water drains).
- Faucet with remote temperature sensor.
- Air bleeder.
- A special check valve that prevents the coolant from flowing in the opposite direction.
- Drain tap.
- Crane on the return line.
- Circulation pump.
The service life of this device is more than two decades. There are various comb options for underfloor heating. You can connect a different number of thermal circuits to them. Usually, we are talking about the number of pipes from 2 to 16.
This device allows you to adjust the amount of water and the degree of heating of the coolant that enters the warm floor. Also, it is possible to adapt to different weather conditions. Indeed, in frost, a high degree of warming up is needed, and in other weather, a slight degree of it may be needed.
This system allows you to use the same coolant for both apartment heating and underfloor heating. At the same time, uneven heating of the floor of the apartment can be avoided.
What is a comb made of?
Having decided on the method of adjustment, having decided what will be used - a three-way valve or thermal heads, the remaining elements of the comb are assembled.
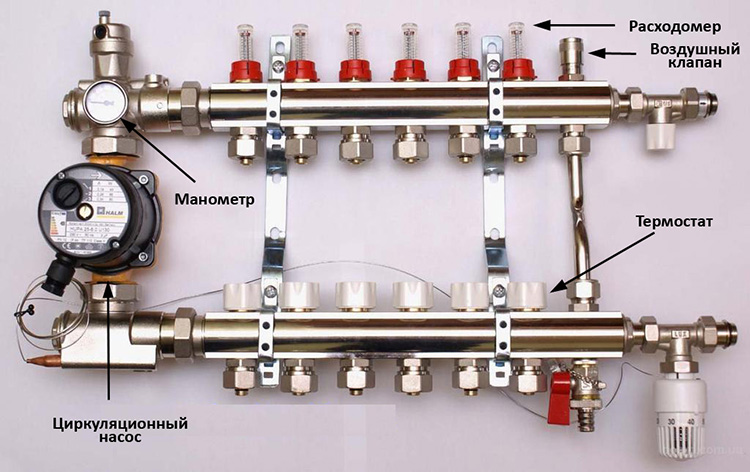
- The collector itself is two parallel tubes (supply and return) with outlets. One side of each comb is plugged. It can be purchased ready-made, but its cost is the main costly part of the mixing unit (we are talking about thousands of rubles). It is much cheaper to assemble a comb from a series of tees, which have an internal thread on one side and an external thread on the other. The tubes of the circuit are connected to the side outlets (through fittings - crimp or solder).
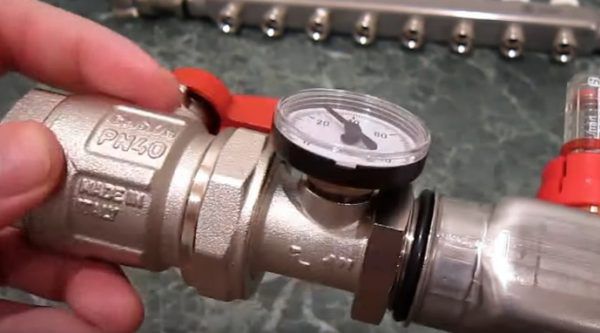
- Pressure gauge.
- A blast valve that will open if the pressure is exceeded.
- Servo drives for each circuit are especially important when the length of the circuits is different (if you give free rein to the laws of physics, the temperature in them will vary significantly). Thermostats equalize pressure and temperature.
Selection and installation
Scheme of the device of the water floor
If professionals are engaged in the installation of the floor, then the surest decision would be to entrust the installation of the distribution control unit to them.
At the same time, if you independently carry out the installation of a water heating system, then it will not be difficult to assemble a comb for a warm floor with your own hands. All components can be purchased separately at any hardware store.
When purchasing a comb from a factory manufacturer, pay attention to the nodes included in the kit. Safety elements must be built in: a safety valve and an air release valve
In the event of an unexpected change in the set parameters, these elements stabilize the system. For more information about the mixing unit, see this video:
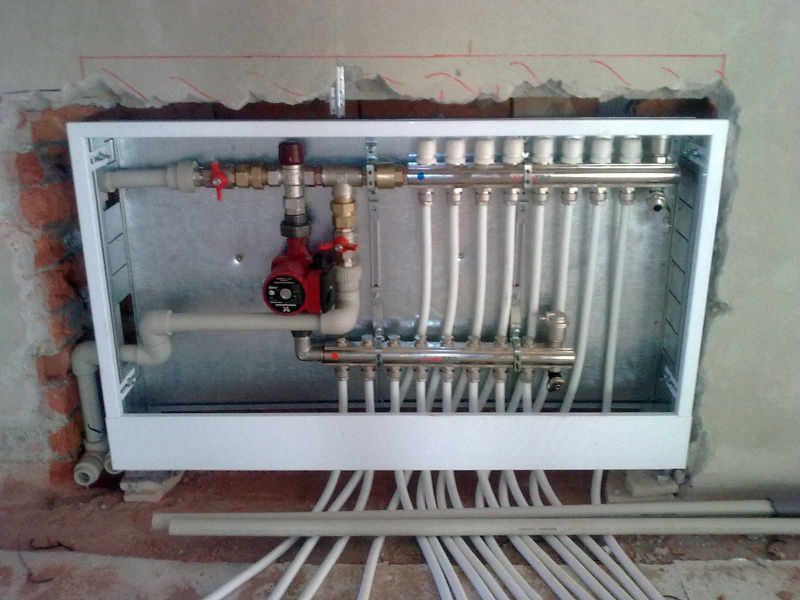
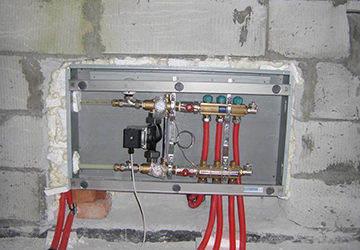
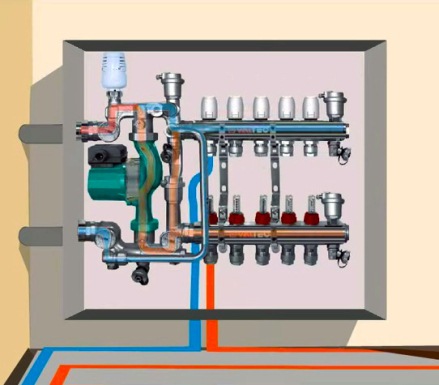
The metal box will protect the comb from accidental shifts of the regulators
It is better to give preference to a product made of stainless steel or PVC.
There are some points to consider during installation. The comb for the warm floor should be located inside the metal box. This will prevent accidental impacts and shifts in the performance of regulatory nodes.
In addition, in this way, a rather unaesthetic device can be decoratively hidden. During installation, follow these recommendations:
- It is necessary to place the comb at the highest possible point relative to the underfloor heating system. This will allow you to quickly get rid of air in the pipes in an emergency.
- When mounting the comb, it is necessary to take into account the length of the hose connecting each circuit, their value should be approximately the same.
-
The number of inputs and outputs on the comb must be equal to the number of heating circuits. How to mount a comb in a niche, see this video:
For the same reason, do not connect underfloor heating pipes directly to the central heating system.
A mounted comb for a warm floor will allow you to avoid unnecessary heating costs, guarantee a comfortable level of floor heating, and in the event of an accident, a quick solution to the issue of water outflow without any changes in the internal climate in the room.
Setting up a comb for underfloor heating
Factory products undergo bench pressure testing, as evidenced by the accompanying documents containing complete information about all hydraulic tests performed under special conditions. The use of such compact devices with a guarantee of tightness of welded and threaded joints is the best option in any in-house heating systems. Such units are characterized by an ergonomic arrangement of controls, and installation inside special mounting cabinets does not prevent access to control valves.
The heat carrier from the supply pipe and the "return" is mixed inside each outlet or directly in front of the collector, but it is advisable to entrust the calculation of the optimal scheme to specialists.
Regulation of the temperature regime of the floor surface involves the implementation of several sequential actions:
- Set the bypass valve to max, setting it to 0.6 bar. Triggering this node during configuration causes an erroneous result.
- Calculate the balancing valve, using for this purpose the temperature indicators on the return, flow line and outlet of the heating device, under the conditions of a standard coefficient of 0.9 and according to the throughput formula: K \u003d 0.9 × [(tk – to/tp – to) – 1]).
- Set up pumping equipment by calculating the flow rate of boiling water and the pressure loss indicators on the circuits. It is allowed to set the minimum feed with a gradual addition of speed.
- Balance the branches by fully opening the control nodes and smoothly closing them to the desired position.
At the final stage of setting up the comb for the "warm floor" system, the flow rate of the mixing unit is linked with other heating devices.
It should be noted that the installation of a flow meter will greatly facilitate obtaining accuracy when setting up all nodes. The processing parameters of the bypass valve device are recommended to be set approximately ten percent lower than the established maximum pressure values \u200b\u200bof the pumping equipment.
Comb Selection Criteria
The first step is to pay attention to what material this design is made of. The most popular manifolds are made of brass, which are produced by casting.
In this case, a strong and durable part is obtained, but at the same time it is very expensive.
Welded products made of stainless steel are cheaper. The comb is quite strong, but this material can be subject to electrochemical corrosion.
Products made of high-quality plastic material are considered a budget option. In terms of their qualities, they are not inferior to metal parts.
The next criterion for choosing a collector is the number of production outlets. It is best to choose a product with taps equal to the number of heated circuits so that you do not have to jam extra holes.
Further, the technical equipment of the collector for automating and controlling the temperature of the coolant is taken into account. If you need a comb that will last you a long time, then brass is your option.
 If you need a comb that will last you a long time, then brass is your option.
To date, there are combs that can be connected to thermostats and programmable controllers. With their help, it is much easier to carry out adjustments, as well as to control the quantity and quality of the coolant in the circuits.
Installation
Consider the installation of one of the heating circuit diagrams.
Starting from the heating boiler, the following is installed:
- A simple tee. One of its outlets is directed to the underfloor heating, the other to the radiator heating.
- The manifold cabinet is installed. It is advisable to choose the installation location so that the cabinet is closest to the center of the house.
- Three-way valve (the direction of flow is checked by the arrow).
- Circulation pump. It is installed at the outlet of the three-way so that the flow is sucked out of the valve.
- The supply and return manifolds (assembled from tees, or purchased) are mounted in the cabinet on mounting brackets. The combs are connected by a bypass.
- A temperature sensor from a three-way valve is fixed not far from the pump. The place where it is located can be insulated with penofol or a similar heat insulator to take more accurate readings.
- At the highest point of the comb, an air vent (Maevsky's tap) is placed.
- On the comb - the return line, thermostats are placed for each branch.
- Floor pipes are installed, wiring and laying in rooms is done. The connection is made to the fittings using union nuts. It is not necessary to cut the length of the pipe from the bay until all the turns are laid. Having brought the pipe to the manifold cabinet, it is cut to length and fixed to the return comb.
- The usual tee is to connect the floor return to the three-way valve (to its side outlet, which mixes the cold coolant), the other part of the tee is the return of the entire system, which will go to the boiler.
- Heating connection - test run and adjustment of servomotors separately for each circuit.
Comb with servo
Only after making sure that there is no leakage, you can fill the screed.
How to adjust the comb
In order for the water heated floor to provide a comfortable temperature in all rooms, the distribution unit must first be configured. The system is regulated according to 2 parameters of the coolant:
The first parameter is set on the three-way mixing valve. This can be done manually by setting the required water temperature by turning the adjusting wheel. But more often, a thermostatic head with a remote sensor and a capillary tube is involved in the circuit, so the water temperature must be set on it. The sensor is tightly attached to the manifold.
The quantitative adjustment of the comb can be carried out both manually and automatically. By rotating the cap on the valve of each circuit and looking at the readings of the flow meter, you should achieve the estimated water flow, if you know it. If not, then you will have to adjust according to your feelings within a few days.
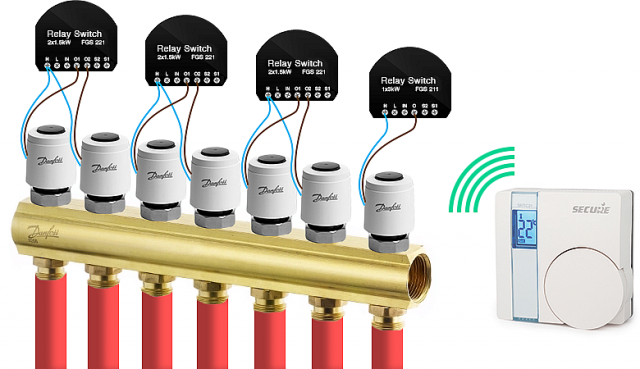
Automatic adjustment involves the installation of caps of special servo drives that remotely interact with thermostats in all rooms. Then the comb with the pump will deliver as much coolant to the heating circuits as needed at the moment. Servo drives on all outlets will control the flows at the command of the thermostats.
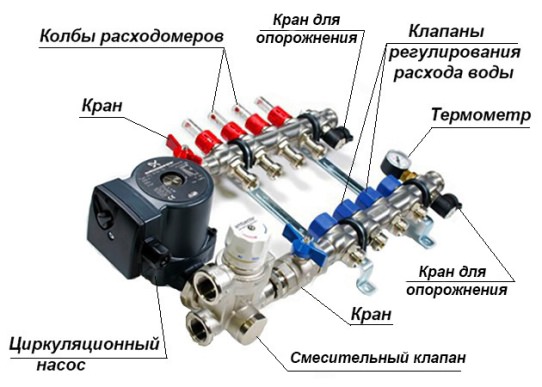
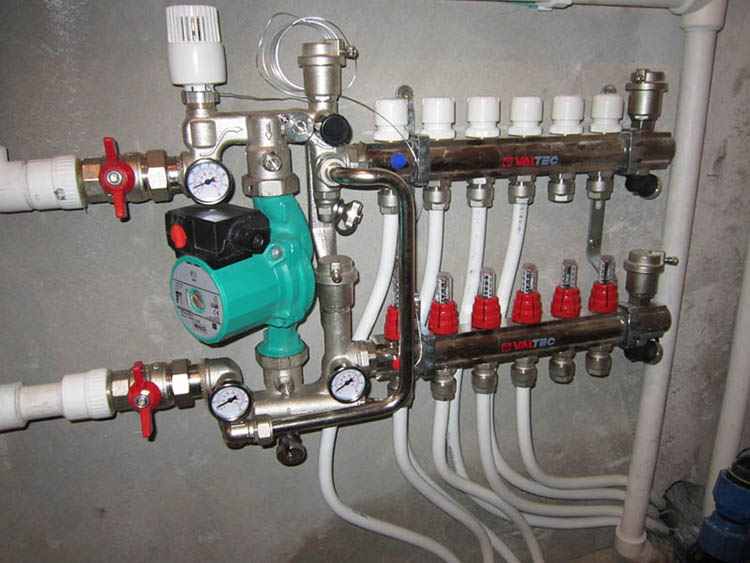
Device and principle of operation
In the process of laying out the pipes of the heating circuits, their ends from all rooms converge in one place, where they are connected to the underfloor heating comb. It is a distribution and mixing unit, whose task is:
- reduce the temperature of the heat carrier coming from the boiler. To supply the floor system, water with a temperature of no more than 45 ° C is needed, and the heat generator rarely heats the coolant to such a low threshold. Typically, a minimum of 55 ° C is kept at the entrance to the comb;
- provide the required amount of heat for each room. Here, the distribution comb works as a regulator for the release of thermal energy, controlling the flow rate of the coolant in each circuit.
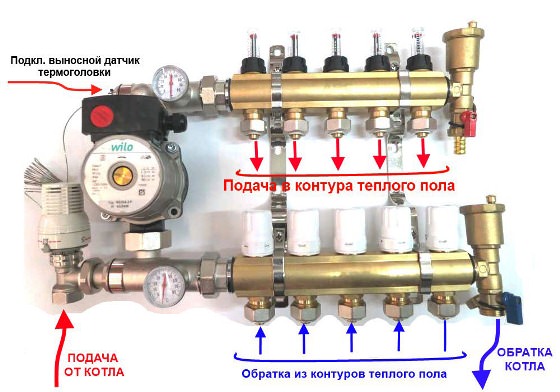
The distributor for underfloor heating visually resembles large heating combs installed in heating points. It also has 2 horizontal collectors - supply and return, to which consumers are connected, in our case - heating circuits.From the ends to the branch pipes of the collectors, the coolant is supplied from the main line - from the boiler room. A typical comb connection diagram is shown in the figure:

To regulate the amount of water leaving each of the circuits, valves with a push rod are installed on one of the collectors. Adjustment can be made both manually and using various automation tools, such as servo drives. To control the amount of coolant, the outlets from the second collector are equipped with flow meter flasks. The comb device is shown in detail in the diagram:

It can be seen here that in addition to the elements listed above, an important part of the comb is the circulation pump. Without it, not a single circuit will be able to work, since it is the pump installed between the two collectors that is responsible for the circulation of the coolant through the pipes
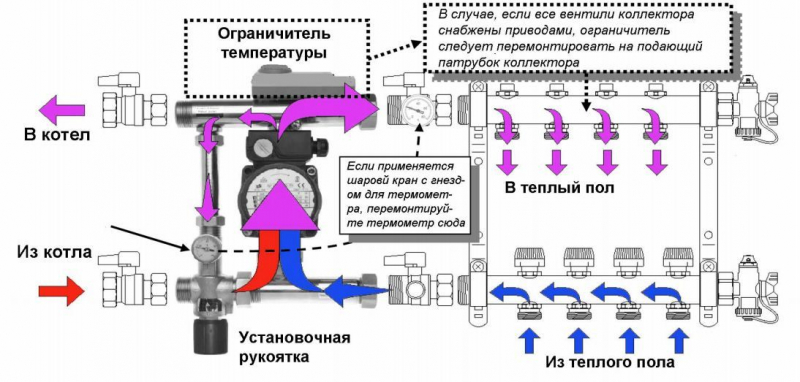
The very principle of operation of the comb is as follows. Hot water coming from the boiler enters all circuits in the required amount, prompted to move by the pump. Moreover, the coolant moves in a circle until its temperature drops below the set temperature. Since the temperature of the water is controlled by the sensor of the three-way valve, after its decrease, the valve will begin to open the way for water from the boiler line, mixing it with the cooled coolant.
When the temperature in the collector rises to a predetermined limit, the three-way valve will again close the line. The pump of the warm water floor comb works non-stop, providing circulation within the system, independent of other heating networks in the house. To empty the assembly, the design of the comb provides for the installation of drain valves. In order to release air from this separate system, the scheme can be supplemented with automatic air vents.
Comb for water floor heating principle of operation
- normalize the water temperature;
- distribute liquid along the contours.
In heating boilers, the liquid is heated to 60 - 90 ° C and hot diverges along the contour.
For obvious reasons, it is impossible to let such a hot coolant into the warm floor.
Lowering the temperature is one of the main tasks implemented in the collector unit. Temperature reduction can occur in two ways:
Mixing a cooled coolant with a hot one is the most popular method. Mixing takes place in a three-way valve. After the liquid is driven through the circuit by the circulation pump, it cools down. It is this cooled return pipe that is added to the hot coolant. The proportions of both streams are adjusted by the thermal head. Its working part is installed on the valve itself, and the sensor is installed on the supply.
Instead of a thermal head, there can be a servo drive. And for stable heating systems, when the boiler produces a relatively uniform temperature, you can set the three-way valve to one position, attach a thermometer to it and control the degrees manually.
The main elements of the collector assembly
Without a circulation pump, the water floor circuit will not work. Also, if you place the pump up to the three-way valve, the coolant will not enter the floor coil, but will go in a small circle, where the resistance is less.
Temperature limitation is implemented by installing a special thermal head in the system, which measures the temperature of the coolant. Outwardly, it is similar to a radiator thermostat, but fundamentally different from the latter, which measures the air temperature in the room.
A person sets an indicator that is comfortable for himself, and the device, fixing the excess of the threshold, limits the clearance inside the device, reducing the flow of coolant.
Russian-made warm floors are in increasing demand. Underfloor heating national comfort - reviews and cost.
What you should pay attention to when choosing a collector for underfloor heating, we will tell here