Making and installing a do-it-yourself cap
When assembling a simple cap model at home, you can do without special rolling machines, simple tools and fixtures are enough.
Necessary tools and materials
A set of necessary tools for the manufacture and installation of a wind vane should consist of:
- metal ruler;
- marker
- wedge-shaped mallet;
- scissors for metal;
- electric drill;
- special clamp;
- sheet bender;
- mandrels;
- small hammer.
From the materials you will need:
- a sheet of cardboard;
- sheet metal;
- metal plate;
- screws;
- primer for metal;
- dye.
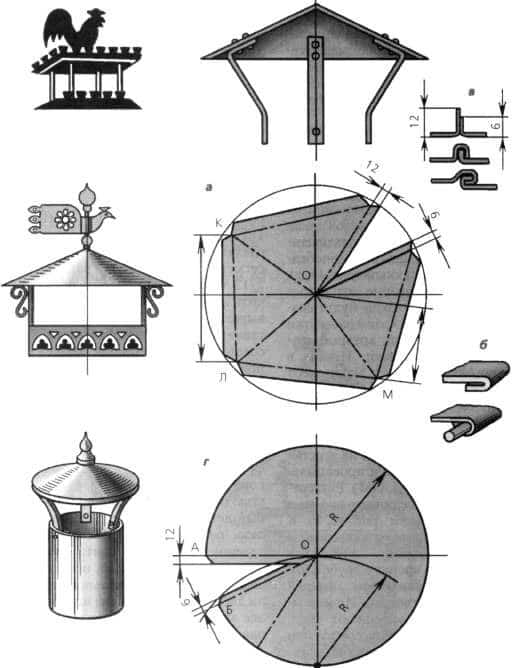
Drawings and diagrams
A simple cap made of galvanized sheet 0.6 - 0.8 mm thick for a square or rectangular brick pipe can be easily made by hand. It has a pyramid-shaped lid and is cut using a pattern from a single sheet of metal.
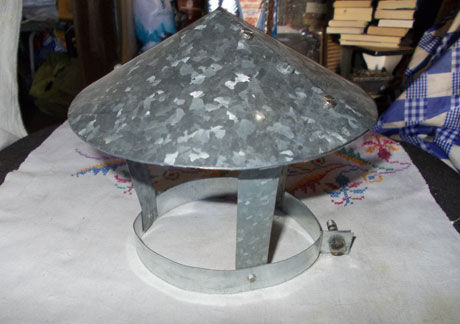
For chimneys and ventilation shafts of circular cross section, a TsAGI deflector is used. So it is called because it is an invention of the Central Aerodynamic Institute. It can be made from a sheet of thin stainless steel or galvanized.
A Grigorovich deflector can also be installed on a round chimney.
Size calculation
The chimney must cover all planes from the end of the pipe, and if the head is included in the design, then the cap must also cover its horizontal surfaces.
The future product should be quite easy to put on the pipe, so each of its length and width must be increased by 4-5 mm.
The wings must be of such a size that they cover the horizontal surfaces of the head.
Work progress
The process of assembly and installation of the cap consists of the following steps:
Making patterns from cardboard according to the calculated dimensions.
- Transferring its contours to a sheet of metal and cutting out an umbrella blank with metal scissors.
- Placing the workpiece on the desktop with the marking up, so that it is more convenient to bend first the lines marked in the drawing with a dotted line to a right angle, and then the lines marked with the letter “d”.
- Rolling a cone. The connection point must be secured with rivets.
- Making a drip. The contours of the details of the apron - drip are drawn according to the pattern on a sheet of metal and cut out. Bends along the edges of the elements are made using a sheet bender. Rivets are also used to connect parts.
- Bracket attachment. They must first be cut from metal plates, and then welded at one end to the apron and umbrella. For the treatment of welding spots, a primer for metal is used.
- Cap trim. All surfaces of the chimney are covered with 2 layers of paint, which will protect the metal from corrosion and give the product a more aesthetic appearance.
- Installation of the cap on the head of the smoke exhaust pipe. The mounting option of the product is selected depending on the type of pipe. In some cases, screws are used or a clamp is additionally placed.
>Installation video
The manufacturing technology of a round umbrella is clearly shown in the video:
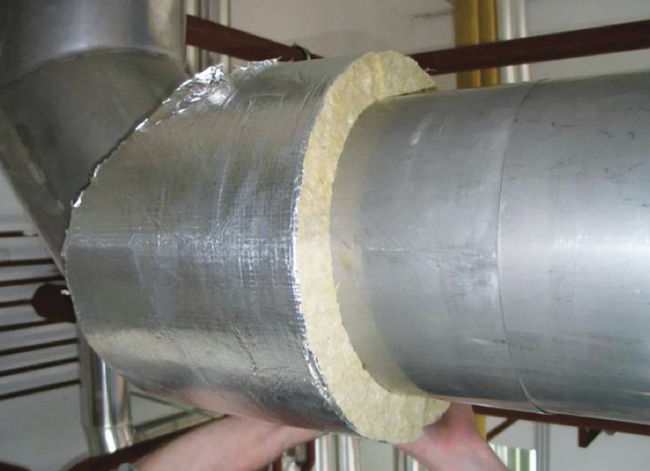
Materials used for insulation of ventilation duct systems
Currently, there are a large number of heaters in construction and specialized stores, including those for ventilation ducts. In many ways, they are universal, which means they can be used to insulate various surfaces and objects.
First of all, it should be noted that the materials must have certain properties:
- high quality material;
- fire safety. In case of fire, the pipe with insulation should not become a “path” for fire, which will be directed to the roof;
- moderate material cost.
As mentioned earlier - the best option is mineral wool. She is absolutely cheap. In addition, the material is not flammable. However, there are some disadvantages of mineral wool. First of all, it is the difficulty of installation.
Care must be taken when working with mineral wool. The material is dangerous if it comes into contact with the nose, eyes or any other exposed part of the body.
As for performance characteristics, it should be noted that over time, cotton wool becomes caked. And this means that gaps form on the pipe. This is where condensation will begin to collect.
Styrofoam is considered an alternative to mineral wool. For health, it does not pose any danger. It's pretty easy to install it yourself. On sale there is a foam insulation, which consists of two semicircular parts. He is put on a pipe. The material is fastened with spiked joints. Over time, the foam does not lose its properties, even if the temperature fluctuates significantly. The only drawback of polystyrene is flammability and the release of toxic substances when heated.
What type of insulation to work with - only the owner of the house decides
It is important that the work carried out gives a positive result. The main task during insulation is to prevent the appearance of condensate in the ventilation duct, as well as to increase the life of materials
It is best to entrust the design and insulation of ventilation ducts to a specialist. However, it is worth noting that you can make the insulation yourself. As with any job, accuracy is key here. It is unacceptable to leave gaps on the pipe. That's where the moisture starts to show up. In addition, it is necessary to take into account the features of some materials, such as mineral wool. The quality of the entire ventilation system depends on the correct performance of the work.
Tips and tricks for choosing
When choosing a hood design, one should take into account what material the chimney is made of and the type of fuel used to operate the heater.
This is due to the different temperature of the flue gases and the efficiency of the heater:
- for a brick oven with a square or rectangular chimney, also made of brick, a special cap is suitable - a deflector. A feature of chimneys of this shape is the risk of turbulence, which worsens draft. In addition, more soot, soot and dust are deposited on the rough surfaces of the brickwork, narrowing the pipe clearance, which can greatly impair traction, up to a complete stop. The deflector will protect the walls of the chimney from excessive moisture, which will reduce the sticking of combustion products and act as a draft booster. It will create a vacuum in the upper part of the channel and facilitate the outflow of air from the furnace;
- solid fuel boilers are usually equipped with ceramic pipes or chimneys from "sandwich" - pipes with a double wall. They have a smoother surface than brick structures, are equipped with a condensate collector, where condensate and precipitation drain, so they have much less soot deposits on the inner walls. The thrust stability of such boilers depends on the height of the chimney. If you do not organize forced draft, then you need to install a very high pipe (up to 8 m). When installing a deflector, the height of the chimney can be reduced by 15-25%, while the stability and traction force will remain at the same level, and the installation of a reduced pipe structure will be less difficult. In the presence of a boiler, the operation of which is based on the principle of pyrolysis, it is better to install a cap with an open nozzle on the chimney pipe. It will be able to protect the channel from debris and precipitation, but will not become an obstacle to the exit of low-temperature smoke;
- for gas and diesel boilers, it is also recommended to use a cap with an open nozzle.In them, the draft is carried out forcibly, so there is no need to strengthen the draft with the help of a chimney - a deflector.
Do I need to put a recommendation cap
Regarding the installation of umbrellas on chimneys, the regulations of different countries put forward different requirements. For example, in European countries it is allowed to mount nozzles only on ventilation ducts, and on chimneys it is strictly prohibited. In Ukraine, caps cannot be placed on pipes connected to gas boilers. There is no direct ban in the Russian Federation and Belarus, but the wording of the SNiP is very vague:
"Deflectors, umbrellas and other nozzles on chimneys should not interfere with the free exit of combustion products."
 In this chimney, emissions pass through a through pipe and do not encounter obstacles
We propose to approach the issue from the point of view of safety and practicality, and only then think about beauty. Before you make and hoist a cap on the chimney, consider the following recommendations:
- Round steel pipes that remove smoke from high-efficiency boilers with an efficiency of more than 85% cannot be covered with a traditional fungus. Use a cone nozzle in the form of an open nozzle, which will not freeze in any frost.
- A brick chimney without inserts, connected to a high-efficiency heat generator, can be protected with a cap-shaped nozzle with a pipe passing through, as shown in the photo.
- It is allowed to install umbrellas on vertical channels from furnaces and TT-boilers. In order for the iron visor to perform a protective function on the chimney for a long time, provide a stainless steel plate inside.
- It is highly desirable to mount gable or hip caps on chimney blocks made of bricks and equipped with side vents. The goal is to close the upper part of the masonry from precipitation and wind, without touching the gas outlets on the sides.
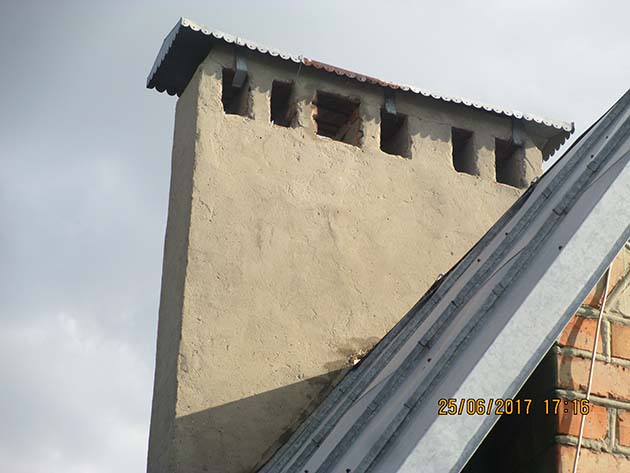 It is noticeable here that the cap does not prevent smoke from escaping through the side vents, but over 15 years of operation, the iron above the gas duct became rusty
To protect a brick block where exhaust and chimney pipes are open at the top, order or make a box with several through pipes inserted into these channels. Place ordinary fungi on top of the ventilation outlets, and cone nozzles on the gas ones, as shown in the photo.
 Exhaust and gas ducts are equipped with different nozzles
Ventilation outlet for metal tiles and profiled sheets
When building and repairing a private house, you need to think through all aspects, one of which is the organization of air circulation and exhaust. From the installation and design of the ventilation outlet for metal tiles and profiled sheets depends:
- The effectiveness of removing unpleasant stagnant odors;
- Air draft force in the system;
- Protection of the heat-insulating layer and rafters from moisture;
- Durability of roofing elements.
The surface of the metal tile is subject to sudden temperature changes, due to which condensation and ice appear under it. Wind can also cause water to get under the profile sheets. It gradually destroys the insulation, which worsens the thermal insulation of the whole house. It also damages the crate, rafters and roof fasteners.
Do-it-yourself manufacturing and installation
A roof hood for roof ventilation can be made at home using the tools and materials at hand. To do this, it is enough to take two metal pipes (larger and smaller diameters), a flat disk, and a welding machine.
The starting material is selected depending on the size of the duct. Installing a fungus will require intervention not only in ventilation, but also in the roof of the building. A hole is cut out in the roof pie through which the pipe is led out. The fungus is installed on the top of this air pipe.
Material selection
The service life of a roof cap is determined not only by the quality of installation, but also by the choice of material for its manufacture at home.When preparing for work, consider the following:
- the main pipe must be made of polymer plastic or stainless steel;
- ventilation hoods are best made of plastic (high temperatures will lead to a change in configuration);
- opt for fasteners made of aluminum and stainless steel (do not corrode);
- exclude wood, sand-lime brick, black steel and asbestos cement as the starting material (quickly destroyed).
Calculation of dimensions
Exhaust hoods are mounted in the roof of the building with the complete exclusion of the possibility of smoke from a working furnace getting into them. The internal section of the fungus is taken into account: it must be no less than the section of the supply channel. For example, the diameter of the flue is 30 cm, then the cross section of the cap should be the same. The cap installed on the roof slope should rise by more than 20 cm. When using the roof as a recreation area, the pipe is raised by 2–2.5 meters.
Mounting Features
The ideal ventilation system includes several air passages that exit in a strictly vertical direction without horizontal bends. When installing a ventilation outlet, the following algorithm of actions is observed:
- A hole is cut out in the roof of the building (for this, metal scissors or a reciprocating saw are used), a metal gasket is mounted on top of it, pre-sealed with a liquid sealant. The gasket is attached with self-tapping screws.
- A special adapter is installed on the gasket, which will continue to protect the outlet from the penetration of precipitation and fix the cap.
- The fungus is mounted inside the adapter, inserted into the duct pipe, fastened with bolts and nuts.
- Using the building level, the verticality of the installed fungus is checked.
Possible mistakes
The most common mistake when installing a fungus is the lack of insulation on the ventilation duct and the product itself. Basalt wool is often used as a heater, a stainless steel cylinder is fixed on top. Another option is to cover the channel with construction foam. When installing the exhaust hood, other errors are possible:
- joints are not sealed with special means;
- corrosive materials are used as the material of ventilation ducts;
- pipes that exit from rooms at different levels are connected into a single passage;
- an inappropriate place is chosen for the fungus.
Ventilation fungus - a metal or plastic product that resembles a mushroom and is installed on the roof of a building. It protects the outlet pipe of the air duct from precipitation, enhances draft in ventilation (removes polluted air, carbon dioxide and other gases).
Self-installation of the ventilation hood is not particularly difficult. The main thing is to follow the installation rules and select a high-quality exhaust fungus. You can use a ready-made factory design or make a vent fungus with your own hands. The correct calculation of dimensions and the selection of suitable material is the key to effective ventilation, which will provide a healthy and comfortable microclimate in the room.
Installation of Vilpe Ventilation Outlet.
 Watch this video on YouTube
Design features
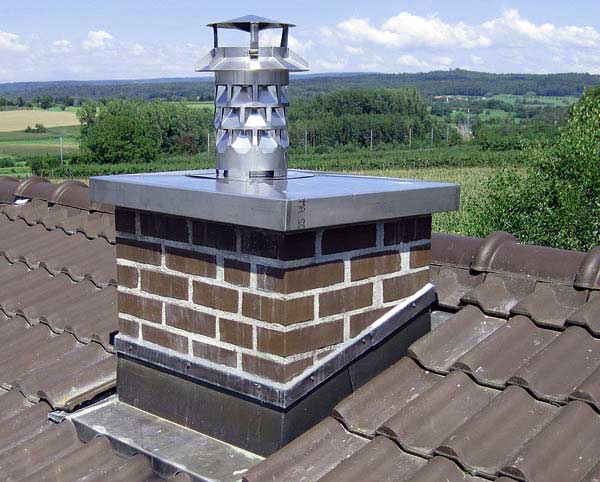
A chimney cap is a device designed to protect the chimney from moisture. The appearance of such visors can be different, which depends both on the preferences of the owner of the house and on the configuration of the pipe.

include:
- Umbrella - protection against precipitation, foreign objects and bird penetration, installed on the top of the cap, the appearance of which is in the form of a pyramid, cone or corresponds to other geometry;
- apron - part of the cap responsible for protecting the top of the pipe from water flowing from the umbrella. Usually, this element is installed when equipping a rectangular or square pipe.As a result, an increase in the service life of the chimney is guaranteed, since it is possible to practically eliminate the likelihood of corrosion and fungus;
- brackets - fasteners, which are metal strips that allow you to connect the visor and apron. Direct fastening in this case is carried out through the use of welding.
Keep in mind! It is quite possible to assemble a chimney cap yourself, but only if you want to install a fairly simple weather vane. Models that are more complex in terms of design features are much more profitable to order or buy.
If you have a choice, it is best to give preference to those models that are equipped with an opening lid. This will allow for a preventive inspection of the chimney and its cleaning without any problems, which is associated with the comfort of access.
A long-term chimney cap can only be made of corrosion-resistant iron: galvanized steel, aluminum and copper. In the latter case, the proposed metal has a pronounced decorative character, since its play in the sun can give your home a certain respectability.
They put a cap on the chimney pipe to extinguish sparks. This is one of his purposes. Therefore, the quality of iron must be good, thus it will not burn out for a long time.
Do-it-yourself fungus on the chimney pipe
Preparatory work
Before starting work, prepare the necessary tools and consumables:
- rubber or wooden mallet;
- sheet of metal (thickness - 10 mm);
- metal scissors;
- a marker of a color contrasting with the selected metal;
- ruler;
- metal corner (length - 1m, width - 0.5m);
- a pair of gloves for protection and convenience during the assembly process.
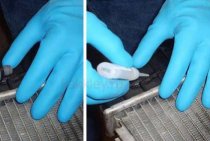
Before starting work, take measurements of the chimney. If there are several air / smoke outlets on the roof, measurements must be taken from each of them separately. The cap should be put on the pipe without effort, make the base of the fungus with a margin of 4-5 cm in diameter - preventive measures will not allow gases and smoke to accumulate under the fungus cover, creating a “dead zone”. Too tight fit of the base to the chimney forms a thermal plug that prevents gases from escaping.
 fungus options
Procedure
Tip: before you make a fungus on a pipe with your own hands, we recommend preparing a drawing on cardboard, trying on a blank.
Proceed according to the following scheme.
- Take a sheet of metal, measure a rectangle of the desired size, cut it off.
- Make a blank for the lid in the shape of a circle with a cut edge - cut a circle from a rectangle, cut a 45 ° corner to the center.
- Bend the edges of the plate with a mallet (the perimeter is optional, the sides of the cut-out triangle-corner are required).
- Give the workpiece a sloping curve - use the corner of the work table or a stable flat surface of the iron corner.
- Connect the blanks along the fold lines, process with a mallet.
- Correct the shape errors by re-walking the workpiece on a flat surface - the cap is ready. Join the edges of the elements with an overlap
- Cut out a rectangle for the base (calculate the length by taking measurements from the pipe, leave a few centimeters in reserve), process the ends with a mallet. Give the plate the shape of a cylinder, connect the ends.
- Cut 3-4 legs from the remnants of the metal, folding the plates in half. Drill holes at the ends of the legs, bend from below.
- Drill holes in the hat at a uniform distance, attach the legs with rivets.
- Try on the hat to the base, mark the places for rivets with a marker. Drill holes, fix the structure with rivets.
Tip: before final assembly, check the evenness of the cap - place the cone on a flat surface (the edges should fit snugly, without swelling and creases).If it is planned to paint the product, before assembly, clean the workpiece, prime it, open it with an anti-corrosion compound and 2-3 layers of exterior paint.
If such a chimney model submits to you, you can try your hand at more complex designs. Consistency is the key to success. It is easy to make a fungus on your own, to ensure comfort and safety at home - try it.
Why insulate ventilation pipes
Many people know such a word as condensate. If the ventilation pipe is not insulated, then condensate will surely collect on its inside. Further, the water will flow down the pipe, and then along the walls into the room. In this case, the consequences can be obvious: the walls begin to dampen, mold and fungus form, the plaster collapses. In the end, streaks from the ventilation duct will be visible.
Depending on what the ventilation duct is made of, the degree of condensate formation depends. For example, a galvanized metal ventilation pipe can be quickly damaged if the coating is broken. Corrosion will destroy the metal. At the same time, aluminum or PVC pipes do not change their qualities under the influence of condensate.
And this is not the end of the troubles that condensation can bring. In winter, moisture begins to turn into ice in those areas where the ventilation pipe is located outdoors. At a time when there are severe frosts on the street, in just a few days a pipe with a diameter of 15 centimeters can completely freeze. Accordingly, ventilation will not be provided.
So, where does moisture (condensate) come from in the ventilation duct? There are two causes of condensation:
- artificial humidification of the air in the room. Moisture appears when washing dishes, floors, laundry and cooking. However, in industrial premises this rule does not work;
- meteorological humidity. It turns out that the higher the air temperature, the more moisture it can hold.
100% humidity is the maximum level of water in the atmosphere when steam is formed. But as soon as the temperature changes, the humidity changes. If there is a strong cooling, then the humidity can reach 100 percent. Then the water will begin to condense on the surface, which has a lower temperature. In this situation, condensate will collect in the ventilation duct.
On an industrial scale, a forced ventilation system is often performed. It creates a high airflow rate. Such a system is used to remove harmful odors, dust and smoke. This creates a lot of noise in the system. Therefore, in production, ventilation is often thermally insulated in order to reduce the volume of the ventilation system.
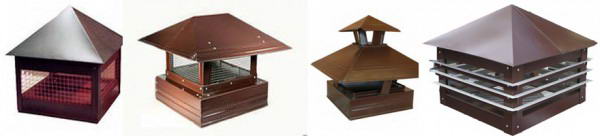
Varieties
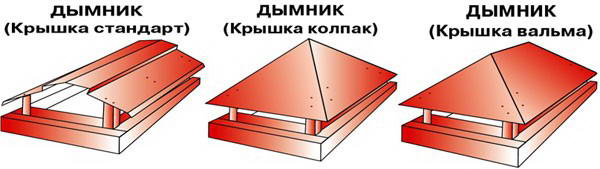
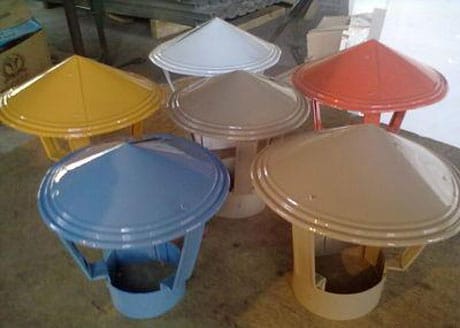
The abundance of shapes and types of chimneys force manufacturers to produce caps of various shapes, styles, sizes. In construction stores there are products of the following types:
- Standard flute. Her umbrella is a pyramid made of sheet metal, attached to a drip apron with brackets.
- Four-sided vane. The top of such models resembles a hip hipped roof. As a rule, they are used for rectangular brick pipes.
- Wind vane with a semicircular umbrella. It is used for mounting on the roofs of European-style houses. From the point of view of increasing traction, it has low efficiency, however, it looks beautiful on a ramp.
- Flat flask. It is equipped with a flat rectangular umbrella, used for buildings in the style of minimalism and modern. The flat cover of the cap does not allow snow to roll down, which is why the brackets of such models experience an increased load, sometimes they are deformed.
- Round weather vane with an umbrella in the form of a cone.They are used to protect round pipes made of stainless steel; such models are not equipped with a dropper.
Note! Vanes are supplied with additional functional elements: dampers, double roofs, folding doors. Do not get carried away with elaborate details, because the main thing in choosing a deflector is durability and efficiency
An ill-conceived shape can cause noise or vibration in the pipe.
The principle of operation of the fungus on the pipe
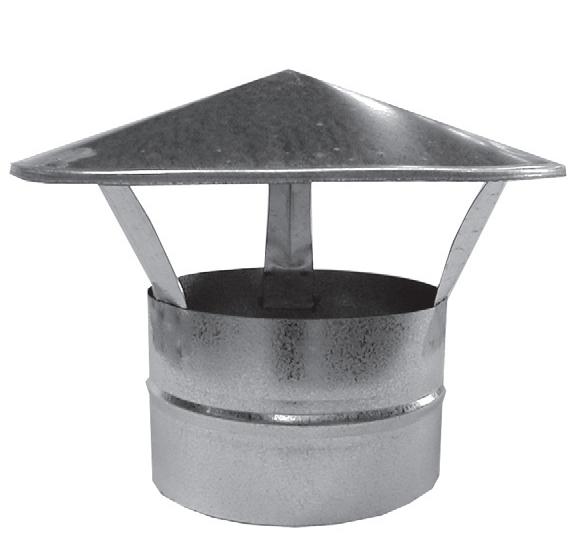
The air flow hits the walls of the upper cylinder, bends around it. The air jet slides over the surface of the fungus, rushing up - the smoke in the pipe is sucked in and removed. The air in the chimney moves more intensively - the draft increases.
Wind currents may not move in a horizontal direction, but vertically or at an angle, but the weather vane will work in this case too: air flows will penetrate into the upper cylinder through the gap, carrying away smoke. The exception is the downwind: mini-vortexes will appear under the hood, slowing down the exit of smoke.
 The cap of the fungus should protrude beyond the edges of the pipe
Construction form
The purpose of the installation determines the choice of design - the fungus on the ventilation pipe can be in the form of a cover, an umbrella. Two more varieties are droppers and water outlets. Umbrella shapes, covers protect the chimney opening from precipitation and dust. Droppers, water outlets localize the flowing moisture, preventing it from entering the building, and prevent the upper fragments of the chimney from freezing in winter.
Material selection
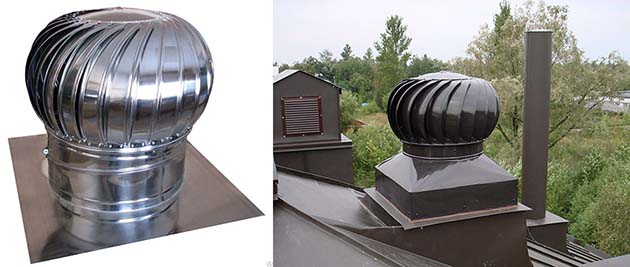
Mushrooms are made of metal (colored, black) and vary in thickness, the presence of forged decorative elements. The most common option is a product made of galvanized sheet. The unitary design allows you to make such a fungus on the chimney pipe with your own hands in an hour and a half, if you have experience - in 10 minutes. The product can be ennobled by painting in a shade in harmony with the color of the roof.
 Follow the evenness of the forms, the result depends on it
Black steel is an expensive material, but it looks modest due to the color, so the steel models of weather vanes are decorated with forged elements. The disadvantage of steel products is a large mass, therefore this option is not suitable for every roof.
On the market there are fungi made of alloy steel, copper, strength - plus, high cost - minus. Therefore, such models are in limited demand.
The choice of material for the fungus is rather a matter of material possibilities, since the functionality depends on the structure of the structure. Buying a finished product is a quick decision, but if you want to make a fungus yourself, it will not be difficult. Let's deal with the algorithm of actions.
 Painting will help to add originality
Flat roof pitched roof aerator
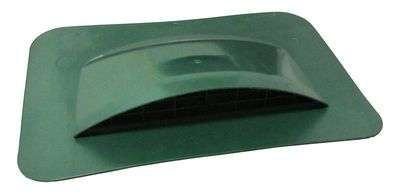 A sloping roof aerator is used to ventilate attics (under roof space). And ensure the durability of insulating materials. Insulating materials lose their properties due to humidity and natural processes. Also, the roof aerator will provide ventilation of the under-roof space, as well as natural ventilation, and it eliminates unpleasant odors. The roof aerator is mounted 50-80 cm from the ridge (as recommended) on the roof with a slope of 25 percent. They can be used both with bituminous tiles and directly with metal tiles.
Roof pipe installation technology
Before constructing the outlet of the ventilation pipe, it is necessary to complete the installation of internal utilities and fix the air ducts. The list of necessary tools depends on the type of roofing material and may include a chisel, metal shears, a drill and a jigsaw. In addition, you will need a building level to control the correct location of the ventilation pipe and a marker for marking.
Stages of installation of the passage assembly
It is more convenient to bring the pipe to the roof through the ceilings using the ready-made design of the passage assembly, which is installed as follows:
- determine the installation location of the passage element on the roof, taking into account the features of its design and the requirements of SNiP;
- outline the contours where the ventilation pipe will be located, and cut a hole of the desired diameter in the roof, choosing a tool and method depending on the material used;
- in the same way, holes are made in the waterproofing and insulation;
- mark the position of the passage node according to the template and drill a number of holes for fastening self-tapping screws;
- clean the surface of the roof from dust, dirt and moisture;
- apply a layer of sealant to the bottom surface of the gasket and place it in the intended place;
- a passage element is installed on the gasket and fixed with self-tapping screws;
- the ventilation pipe is inserted into the passage assembly, then the verticality of its location is checked and fixed with screws.
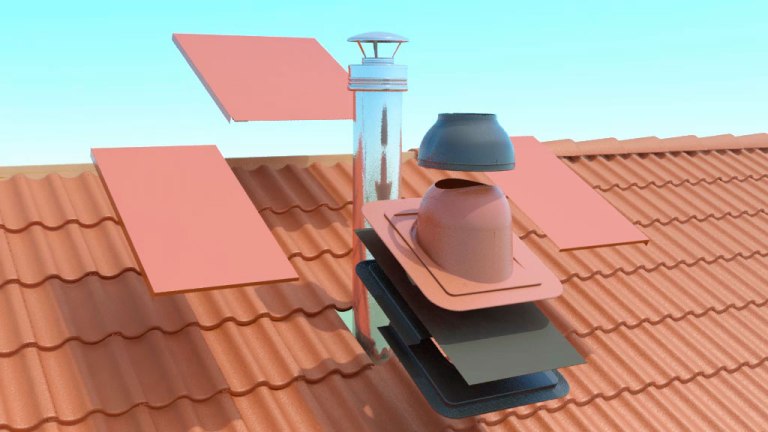
The design of the passage unit for the output of the ventilation pipe to the roof
After installing the ventilation pipe on the roof, check the tightness of the base of the passage element: it must be pressed against the roof in such a way that excess sealant is removed from under the structure gasket. In addition, from the side of the attic, the outlet of the air duct to the roof should be sealed.
Additional devices
To protect the air ducts from debris and atmospheric moisture, a cap is used on the ventilation pipe, which prevents it from clogging and increases its service life. It usually consists of the following parts:
- covers in the form of an umbrella that protects from precipitation;
- a dripper used to divert water flowing from the top.
Cap for ventilation pipe
In addition to the ventilation pipe, aerators can be installed on the roof, which provide air circulation between the thermal insulation layer and the outer covering of the roof. They are necessary if the length of the ramp exceeds 3 m and natural draft is not enough. For the effective functioning of the aerators, it is necessary to provide for the possibility of air inflow and the correct installation of the counter-lattice on the entire area of the roof slope.

Roof aerator
With the right choice of the location of the outlet of the ventilation pipe on the roof, the observance of the technology of its installation and the use of additional devices, it is enough to simply ensure the optimal movement of air masses in the system and create a comfortable microclimate in the room.
Types, shape and designs
Depending on the room in which the fungus is installed, a conventional or heat-resistant type of construction is selected. Ordinary caps are suitable for bathroom, toilet, kitchen and basement area, cellar. Heat-resistant fungi are mounted on pipes exposed to heat and installed in the boiler area.
The volume of gas removed from the room determines the size of the duct, the fungus. The diameters of the structures are different, they range from 1–3 cm. The simplest option consists of a pipe and an umbrella made of sheet metal. More expensive models are practical and aesthetic and include a larger set of elements (a glass for excess moisture, thermal insulation material). Both types of ventilation fungus are installed on the roof, fixed with fasteners.

Types and forms of fungi
How to make a visor
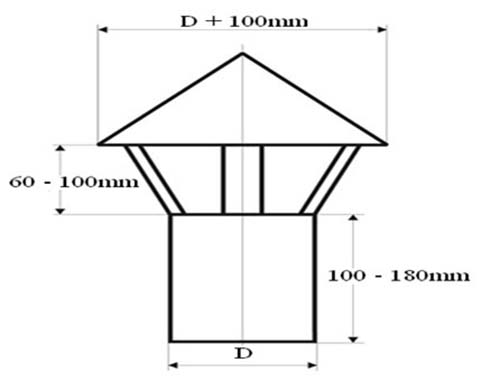
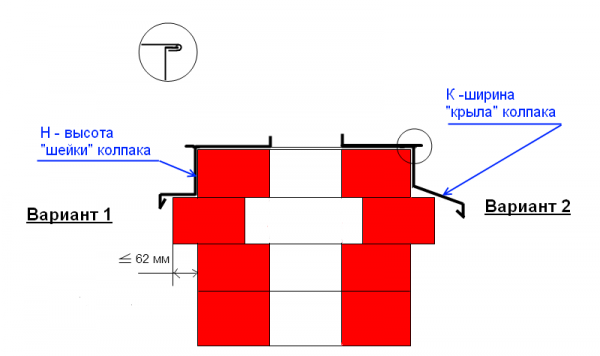
First of all, you need to find out the external dimensions of the head where you plan to mount the umbrella, and then sketch out a freehand sketch depicting the future design. To develop it, use simple rules:
- the dimensions or diameter of the product must be 10 cm larger than the dimensions of the pipe so that the edges protrude 50 mm from all sides;
- slope angle of slopes - from 30 to 45 °;
- the minimum height from the chimney to the fungus is 100 mm, as shown in the drawing.
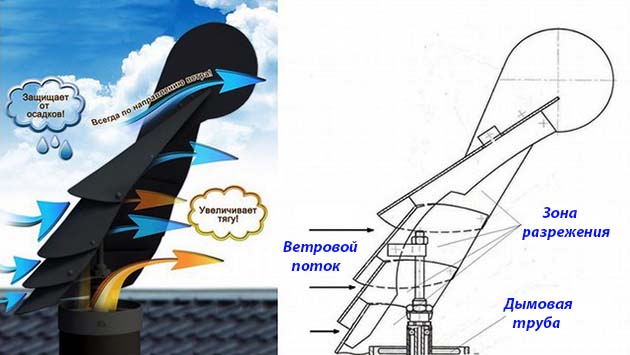
In addition to the traditional umbrella, there are other design options - a deflector and a rotating weather vane - a "sycophant". The first allows you to really increase the thrust due to wind pressure, which creates a rarefaction inside the cylindrical body, where the smoke channel exits. But in calm weather, this device not only loses its advantages, but also worsens the traction force in the pipe, creating increased resistance at the exit of combustion products.
 Scheme of the deflector
For reference. The same effect is created by rotary spherical nozzles, whose example is shown in the picture.
 The nozzle is beautiful, but not very effective
A semi-cylindrical weather vane, assembled from several segments and rotating on a special bearing, was called the "sycophant" due to its ability to turn with the wind. If it were not for the high price and dubious reliability of the bearing, it would be an ideal cap for any round chimney, as it successfully protects the mouth from blowing and precipitation.
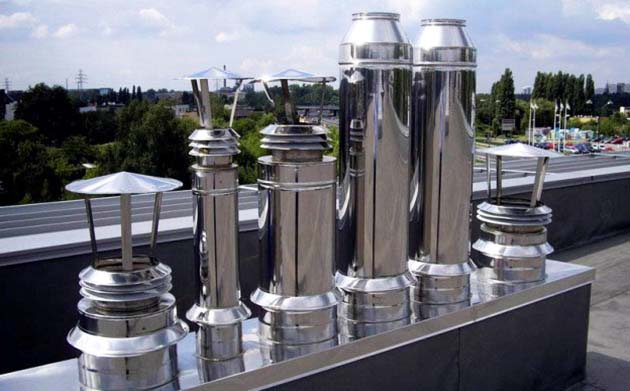
Various materials are used for the manufacture of chimney visors - sheet steel with zinc and polymer coating, stainless steel and even copper. To make a do-it-yourself cap on a pipe, we recommend the first 2 options - galvanized or painted metal with a thickness of at least 0.5 mm.
Making a simple round umbrella
To perform this work, you will need ordinary tools - metal scissors, a drill, a hammer and a device for setting rivets. Having determined the required size of the fungus, proceed in this order:
- Screw 2 screws into the wooden plank at a distance equal to the radius of the product plus 15 mm. Get an impromptu compass, with which you mark the center of the circle on the metal and draw its outline.
- Cut the workpiece with scissors, and then draw a sector with an arc length of approximately 120 mm (the figure resembles the first piece of a round cake).
- Cut out this wedge, and then forcefully align the outer edges of the circle and fix them in a vise.
- Drill 3 holes along the resulting seam and connect the ends of the part with rivets or M4 screws with nuts. The upper part of the wind vane is ready.
Drawing a circle (left) and connecting the edges of the fungus (right)
The legs for the fungus and the clamp encircling the pipe are made of steel strips made by bending a thin sheet 2-3 times. These parts are also attached to the umbrella with rivets, which is clearly demonstrated by the master in the video:
Gable weather vane
For the manufacture of this type of caps, it is advisable to use a machine - a bending machine or contact the appropriate workshop for this service. In extreme cases, you will have to bend the elements manually along the line, gently tapping the metal with a rubber mallet on a wooden block.
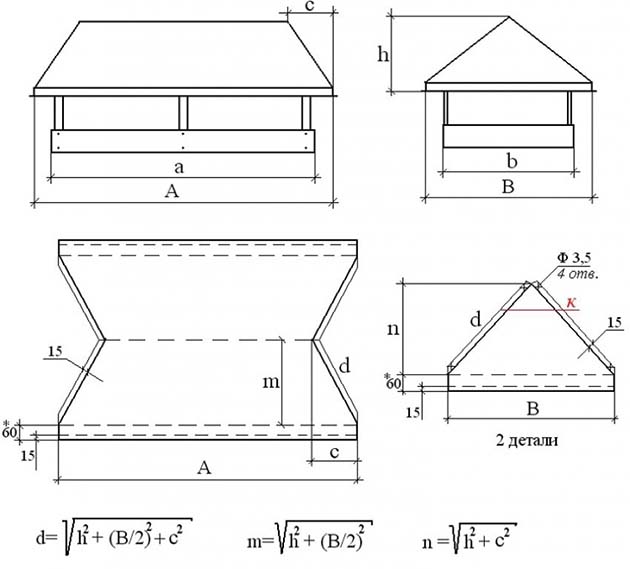
As in the previous version, the first step is to remove the outer dimensions of the brick chimney, and then calculate and sketch the pattern, as shown in the drawing. Here are the formulas for determining the length of the sides of the elements, depending on the initial dimensions of the pipe and the height of the wind vane.
Advice. The lower part, encircling the mouth of the smoke channel, is best done in the form of a Z-shaped profile with 90 ° angles, which subsequently “sits” on top of the head. Then these profiles are connected into a single frame with rivets.
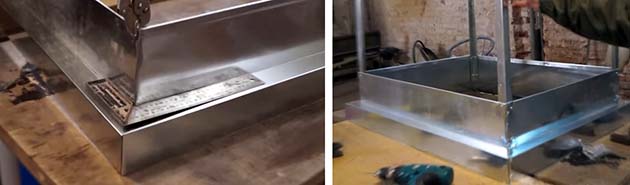 Frame assembly and installation of racks in the corners
The process of assembling the cap with your own hands is quite simple - you need to cut the metal according to the drawing, bend along the dashed lines and connect the parts with rivets. As rigid racks, it is proposed to take ready-made corners made of painted metal with a thickness of 0.5-0.7 mm. How a gable weathervane and a visor in the form of a cover with a pipe passage are assembled is clearly shown in the video:
Design
A chimney cap is a device that resembles an umbrella or a visor in appearance, installed on the head of the pipe in order to protect it from moisture.There is a huge variety of variations in the appearance of weathervanes, depending on the shape and size of the smoke exhaust duct. The design of caps of all types consists of the following elements:

- Protective umbrella. The top of the cap is in the form of a cone, pyramid, semicircle or other more complex shapes. The umbrella protects the pipe from atmospheric precipitation, debris, birds entering the chimney.
- Drop apron. This element of the cap protects the head of the pipe from drops bouncing off the umbrella. It helps to increase the life of the chimney, prevents the appearance of corrosion, fungus. An apron is used when a cap is installed on a rectangular or square pipe.
Important! For a chimney, you can make a do-it-yourself cap from sheet metal, however, more complex models are easier to buy or order. The most convenient type of maintenance and operation is a protective umbrella with an opening lid
Due to the mobility of this element, the protective visor is not removed during cleaning or inspection of the chimney.
To make a durable cap for the chimney pipe, sheet metal is used that is not subject to corrosion. Do-it-yourself manufacturing from galvanized steel, copper or aluminum is common. The umbrella on the copper head has a noble shade, it looks respectable, but it often becomes a “victim” of non-ferrous metal collectors.