materials
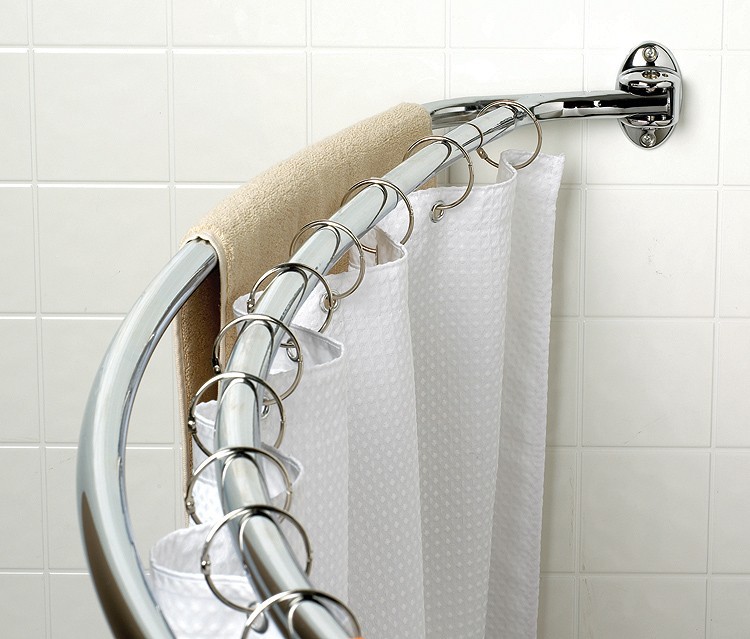
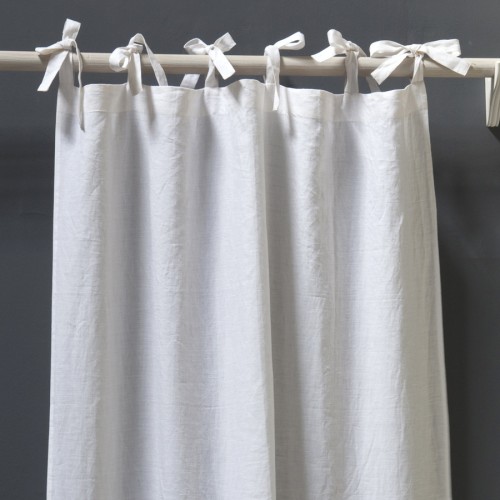
Double chrome curtain rod for bathroom curtains
Corner cornice for curtains in the bathroom can be made of different materials at different prices. The choice of one or the other depends on the durability of use and convenience. Today you can buy products from:
Plastic. Such models are lightweight, when opening / closing the curtains do not make noise. But that's all the benefits. After all, over time, the once bright color fades, the cornice begins to sag. These often crack and break. Manufacturers are working to improve the quality of these budget cornices, they are increasingly being produced from polymeric metal masses. They are more durable and stronger.

Plastic cornice IKEA

Plastic cornice with wood imitation

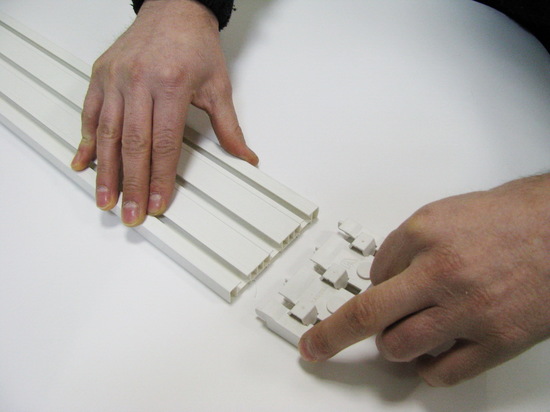
Plastic cornices are easy to assemble and install
Metal cornices. They can be aluminum or stainless steel. The former are resistant to temperature extremes, which are often observed in the bathroom. Corrosion will not affect them. But due to their lightness, they do not have the necessary strength, which leads to sagging. Pressure builds up when the curtain gets wet. The price of aluminum is higher than plastic. Another drawback can be called a dull shade, which can not always be successfully entered into the interior. Stainless steel cornice will last the longest. The color scheme is metallic and gray shades. From this metal, you can create any shape of the bar. Lack of noise when opening and closing the curtain.

Duralumin Aufollien bathroom cornice

An oval cornice with a chic curtain will be a wonderful decor element for your bathroom.

Chrome-plated cornices look very stylish
Combined. Such today are one of the most popular, as evidenced by numerous photos in the catalogs, because they combine the advantages of plastic and metal cornices - they are strong and durable, but at the same time they do not make noise.
Strength and durability are the main advantages of combined cornices
Features of choosing a cornice for a corner bath
Corner bathroom cornice will last a long time if it is of high quality and properly selected, tips will help you not to make a mistake in choosing:
The key component is the quality of the metal. If the cornice is made of metal, there should be no folds on the fold. If they are. Even small ones, this indicates that the cornice is made of low-grade metal, which means it will not last long. In addition, it is dangerous to hang this in the bathroom, because it can fall at any moment.

Corner profile cornice in Scandinavian style bathroom interior
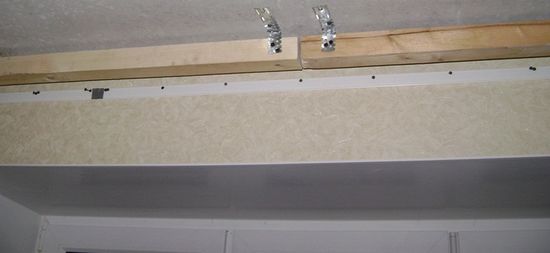
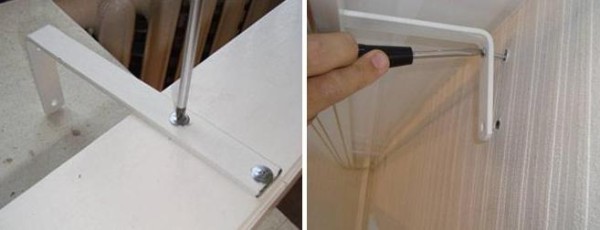
A non-metallic corner cornice or a metal thin-walled one must be additionally fixed to the ceiling, so it will not sag.

To prevent the thin-walled cornice from sagging, it must be additionally fixed to the ceiling
Reliable eaves - means well fixed
In this case, self-tapping screws are the best fasteners.
Ceiling fixation affects the length of the curtain, it "sits" higher.
It is important to consider that the curtain must be constantly moved. The clang of metal rings on the same eaves will be very annoying, although such a solution looks attractive.
The best solution would be durable aluminum rings or hooks, coated with soft plastic.
The choice of curtains should also be given special attention.
So, polypropylene ones are cheap and light, no cornice will sag with them, but they are short-lived - they quickly tear and lose their appearance
Fabric - strong, bright, durable. The negative factor is the complexity of cleaning and maintenance.

Interesting curtain with pockets for bath accessories

Bright fabric shower curtain on a round cornice

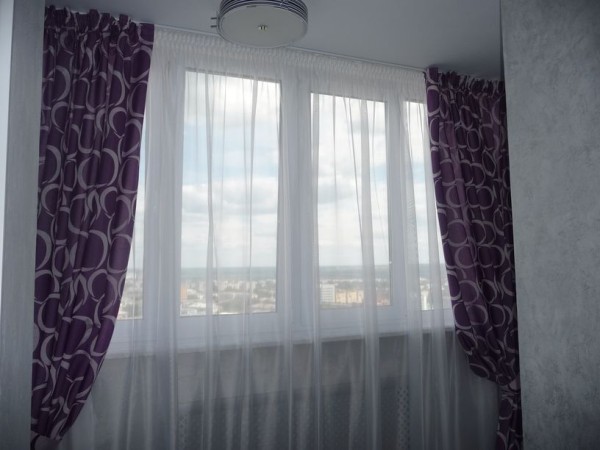
Shower curtains and windows made of the same material will help to make the interior more solid.
If there is a need to order an individual production of a cornice, it is better to entrust measurements to professionals, they will take into account all the design features.
How to make a cornice
- First you need a grinder to divide the rod into 3 parts, each 25 cm.
- Make grooves on the rods. One is located at a distance of 1.5 cm from the edge, and the second - 8 cm from the first.
- Clean the grooves with sandpaper for stripping.
- Prime and paint all parts. For greater strength of the finished structure, varnish them.
- Now we need to make stubs. For these purposes, wooden door handles are perfect. It is desirable that they be round. Drill holes in the handles for the rods.
- It remains to complete the assembly and install the cornice. Drill holes of a suitable size, insert rods there. If necessary, cover the excess space with putty. Install the pipes on the holders and connect them to each other.
Do-it-yourself cornice for curtains (its main components are visible in the photo) do not need to be attached to the holders. It is firmly held due to its weight.
Like in Rome
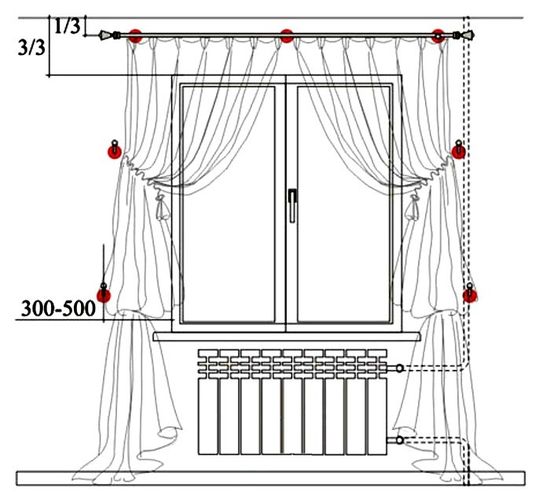
How to quickly make a cornice for Roman blinds with your own hands? First you need to buy rings. You can find out their number using the formula - the number of folds is multiplied by 3. The Roman blind needs top fixation with the help of ears - they need 4 pieces.
Cords and Velcro are also useful. To calculate their size, you need to multiply the height of the curtain itself by 2. Then add allowances for the knots.
- Before you make the cornice itself, you need to sew on the rings. They should be located at the same distance from each other. All manipulations are done on the inside of the curtains. The rings are attached to Velcro, which has a dual role. On the one hand, it is a cornice (the rigid part of the tape is fixed to a bar), and on the other, it is a means of securing the curtains.
- The attached canvas must be turned face down to secure the ears. One should be at the exit of the cords, and the rest opposite the rings.
- Pass the cords through the rings. It is recommended to start from the bottom of the canvas. Each ring must have its own knot. No knots are made on the ears.
- The last stage is the installation of Roman blinds in the window. The curtain is fixed with a metal bracket.
Country option
Do-it-yourself curtain rods for summer cottages are simple. Usually they are made from improvised materials: it can be wood or, for example, plastic pipes. Wooden curtain rods are very popular. But what if the necessary materials are not at hand? Whatever you can find in the country will do. You can make a cornice, such as in the photo. It will require plastic pipes, holders and elements for fixing the finished product (screws or special glue).
What the workflow looks like:
- Plastic pipes are cut into pieces of the required size.
- Prepared holders are attached directly to the wall. If they are attached with glue, you can additionally use adhesive tape.
- Pipes are inserted.
That's all, the cornice is ready.
This design is ideal for lightweight fabrics that are held on rings. Great option for a summer residence.
Like in Japan
Do-it-yourself curtain rods for Japanese curtains are the most difficult to make. They are made from plastic or aluminium. Each part of the structure holds a separate canvas. Velcro is attached to the base, holding the curtain itself.
It is important to decide in advance how many tracks the cornice will contain. If errors are made in the calculation, problems may arise in the installation of additional parts.
It is also necessary to consider how the control of the entire structure as a whole will look like. It can be a special cane or an electronics system.
The video shows how the process of manufacturing and installing curtain rods for Japanese curtains looks like, how to fix the canvases and choose the materials necessary for work.
So, how to make a curtain rod for curtains with your own hands? The process is quite simple.No need to look for a lot of additional parts and tools. For work, improvised materials that are nearby, for example, in the country, are also suitable. Cornices can be very diverse. Ceiling, for Roman and Japanese curtains, wooden and plastic. By the way, ceiling and Japanese structures require more thorough preparation for the workflow, since there are some nuances of their manufacture and installation.
Types of plastic cornices
Two popular types of cornices are produced from PVC - round and profiled. Each has a variety and design features that allow you to choose a product in accordance with your needs and preferences.
Round
These are the simplest and most inexpensive plastic cornices for the home. In addition, the most popular form. They are a hollow pipe-rod on brackets with decorative tips and rings with hooks for hanging curtains.
Despite the name, the cross section of the rod can be not only round, but also rectangular or square.
There are several varieties of such cornices:
| A type | Design Description |
| Single row | With one rod for one layer of curtains |
| double row | With two rods for transparent and thick curtains |
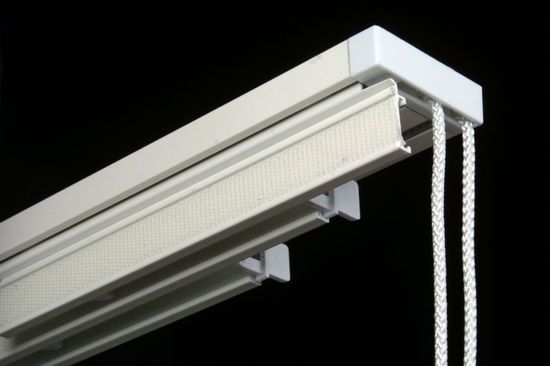
| Double-row combined | With one rod and a metal profile rail - just like you see in the picture above |
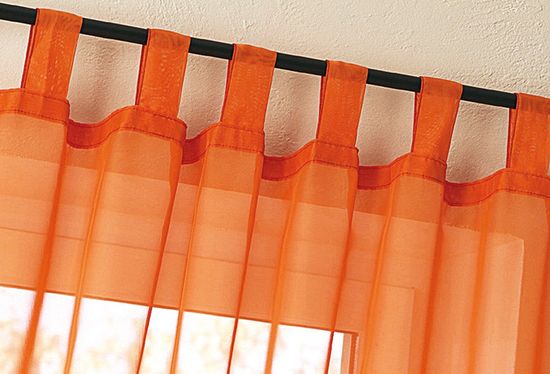
Rings are not an obligatory element that plastic curtain rods are equipped with - they are not needed for curtains with loops or eyelets, since they are worn directly on the rod.
Hinged kitchen curtains
As for the mounting method, such structures are most often mounted on the wall using brackets, but it is also possible to mount to the ceiling.
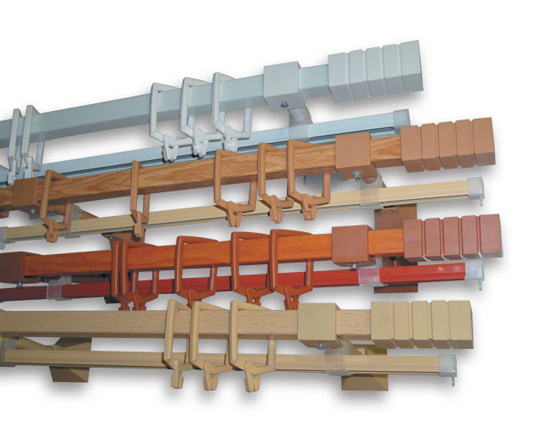
The color solution can also be different - plastic is painted in any color. Most often on sale there are PVC cornices that imitate wood products.
Profile
One of the most convenient and practical solutions for ceiling mounting. You don't even need brackets for this: plastic ceiling curtain rods are screwed directly to the base via a support rail.
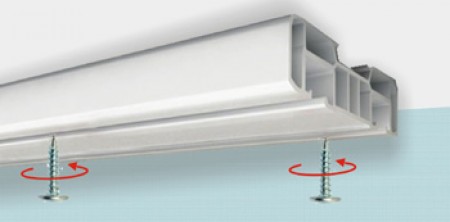
Although the design also allows wall mounting, if this is required by the concept of the room or if it is impossible to mount on a weak base - drywall or stretched canvas.
From these photos you can understand the technology of mounting on wall brackets
The design of profile cornices consists of several elements.
Some of them are not included in the kit, but are purchased separately if you need to lengthen the ceiling or wall curtain, give it a curved shape.
The main bearing element is a profiled tire with one or more working tracks. The more tracks, the wider and stronger the profile. Each is for one layer of curtains;

This technique allows you to use a design with fewer tracks.
- Pivots are 90-degree rounded parts of the same width as the rail, allowing the design of complex cornices.
- Connectors - parts with which the tires grow in length. Since they are produced in standard lengths, often not tailored to the individual needs of customers, such parts are very necessary.
Plastic ceiling cornice 3 m can be extended to the desired length
- Plugs and stoppers that limit the movement of hooks along the tracks and prevent them from flying off the runners.
- Brackets for fastening the structure to walls or ceilings with a set of fasteners.
- Hooks for hanging curtains. They have a lock and, after snapping it into place, form a closed loop, which allows you not to remove the hooks while washing the curtains. To remove them from the eaves, just remove the plug or unscrew the stopper.
A hood or baguette plank is a decorative colored strip made of plastic or wood to decorate the outside of the eaves.
Eaves for corner bath installation sequence
Stage #1
Determining the place of installation.The cornice must be attached to the wall and mark the place where the pipes adjoin the wall. And this should be done not at the top where it will be installed, but at the bottom, where there is a bathroom / shower stall. So it will be possible to avoid incorrect placement of the cornice relative to the bathroom.
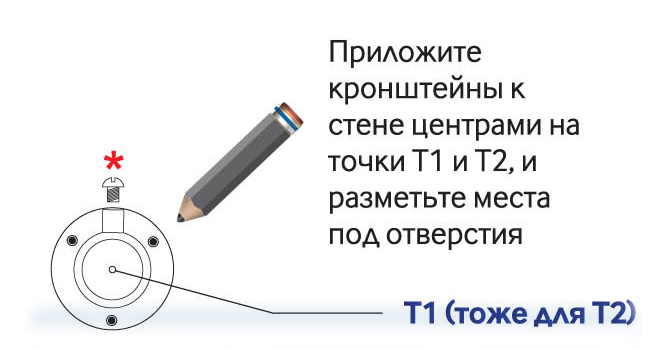
Mark the places for attaching the eaves (points T1 and T2)
Marked points need to be "raised" to a height of 1.6-1.8 meters. This will help the building level or plumb. The height depends on the length of the curtain, and it should be 20 cm less than the curtain. This is necessary so that it goes over the sides, which means that splashes on the floor are excluded.
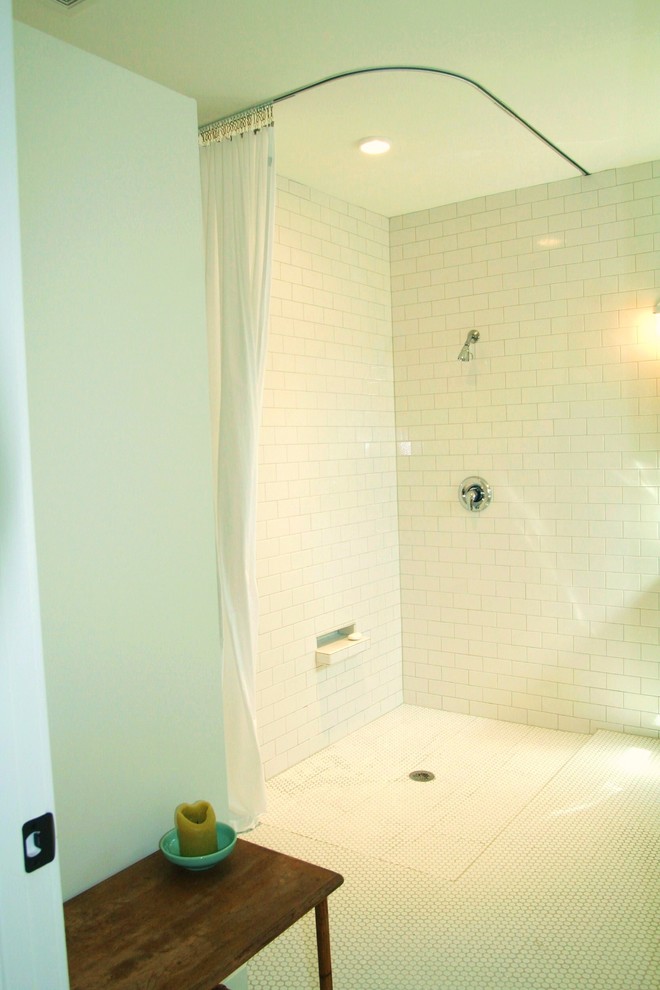
Shower room with modernist corner cornice
Stage #2
Take the mounting bracket and attach to the marks. Its location should be such that the mark point is located in the center of the pipe. This must be done with both ends of the pipe. Make marks at the attachment points.
Drilling markings
Stage #3

After marking, you can start drilling holes
Drill a hole at the marked points. Their depth is 4.5-5 cm. Insert plastic dowels into them so that they come to the surface by 0.5 mm. Unscrew the clamping screws in the brackets, attach them to the wall and tighten the dowels.
Stage #4
Put silicone pads and decorative inserts on the cornice. Insert the cornice into the fastener and tighten. Pull the caps with liners up to the wall so that they close the fasteners.
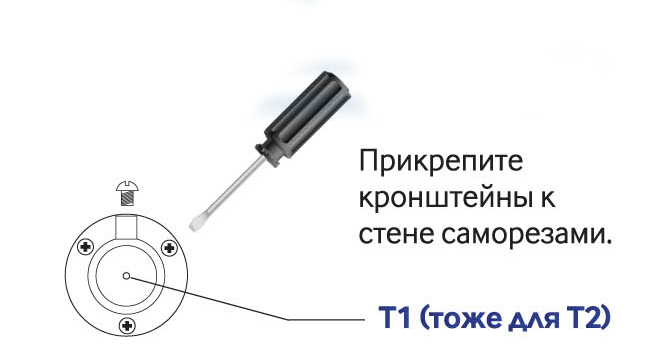
Mounting the bracket to the wall
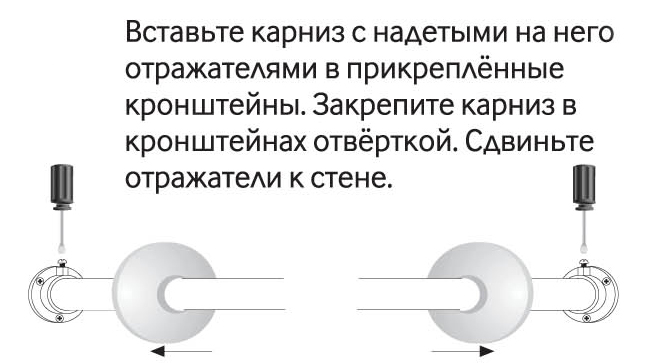
Cornice installation

In some models, the cornice is simply inserted into the grooves of the bracket
In some cases, you need additional fastening to the ceiling, namely:
- on the folds of the corner elements of the eaves;
- if the bar has a large length;
- if the shape of the cornice is non-standard - more than 2 bends.

The bathroom curtain rod not only protects the room from splashes, but also decorates the interior
Fastening to the ceiling is carried out using rods or stretch marks (metal cords). To do this, marking is carried out on the ceiling - a cornice is applied to it, marks are made at the folds. By analogy with the main pipe, rods are attached to them, with decorative overlays, one end is inserted into the clamping mechanism, the other into the cornice (for this, holes must be provided in it).
If there is no additional fastener on the bar, you can find a way out of this situation. As a fastener, you can use a cable that is thrown over the pipe and fixed under the ceiling with a dowel hook. The cable must be secured with a metal crimp.
To help with installation, this video material:
https://youtube.com/watch?v=Gem3EMsQRYg
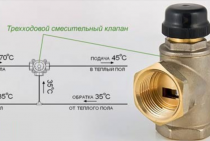
Heating system diagrams
Choose the optimal piping scheme for self-installation of polypropylene heating. In the future, you will receive recommendations for connecting individual elements and place them in accordance with the chosen plan.
Single pipe scheme
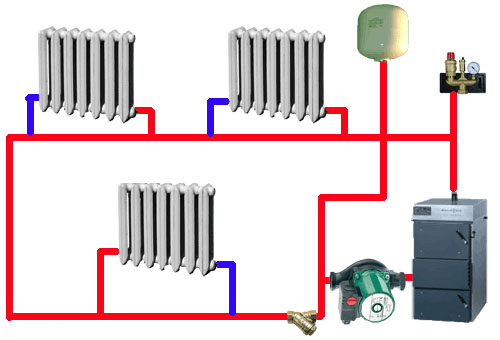
The easiest way to equip the heating system. In accordance with this wiring method, each battery installed farther from the heating unit will be heated to a lower temperature than the previously installed battery.
This method makes it possible to reduce the consumption of materials for the arrangement of the heating system. However, the heating efficiency will be low because the temperature distribution with such a pipe layout is uneven.
In view of this, one should try to refrain from a single-pipe piping scheme.
Collector scheme
More materials will have to be spent on arranging a heating system according to such a scheme, however, the main operational properties of such heating will be much higher.
The distribution of heat throughout the premises will be carried out fairly evenly and efficiently.
Two-pipe system
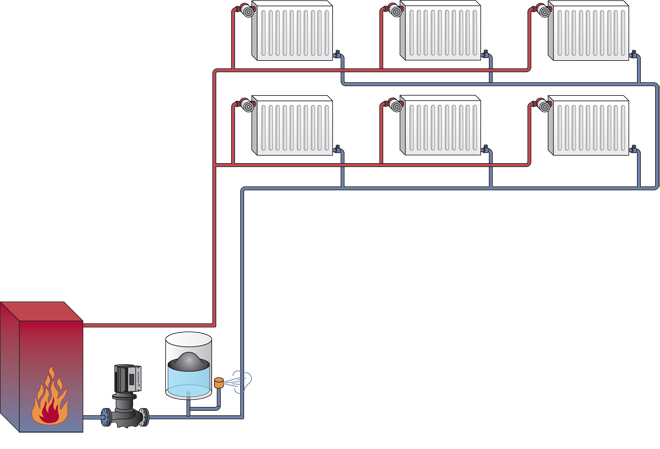
The most optimal method of arranging a heating system. Pipe laying is carried out in the floor or in the walls of the house around the perimeter. Two-pipe heating is best suited for heating a home.Therefore, experts recommend giving preference in favor of this particular piping option.
2 comments
What to do about condensate? Insulate the pipe. Condensation always appears on something that is colder than the room itself (window, pipe) and something that removes heat well. From the condensation itself, the cold surface will heat up and then there will be no condensate at this place, however, if this surface is cooled (with cold water, for example), then the condensate will appear. What is cold to the touch condenses water. A simple PPU will already solve the problem, then these types of corrugations are sold for pipe insulation, put on and that's it. That's what thermodynamics is. However, if you have more moisture in the room than the air can tolerate, there will be condensation somewhere. If a cubic meter of air at 30 degrees can hold, say, 30 grams of water, and it has a relative humidity of 100%, then there are actually 30 grams of water in the air; if the same air is cooled to 20 degrees, then the air can only hold 20 grams of water per cubic meter. That is, then after cooling, the relative humidity will be 150% and the air is looking for a surface that can be wetted to get rid of moisture. In other words: if the relative humidity exceeds 100%, then the air immediately tries to get rid of it (at least somewhere). And if you have cold pipes, then the condensate will be there, if there are none, then the condensate will be on the floor, on the walls, on the faucet, etc. Air selects the coldest surface. Either you need to ventilate and make a draft, or you need to let it condense somewhere where you don’t mind. Under the pipe, you can attach a profile that collects water.
For a summer residence, that's it. But in the apartment, I would not dare to put what I have in the toilet and in the bathroom for water supply. Unless if you somehow decorate, paint, varnish beyond recognition, so that even the loft style does not smell ...
Requirements for cornices
Despite the small list of functions performed and the seeming insignificance of the role in the interior, the main requirements for cornice devices are quite serious:
- strength - the destruction of the device is fraught with injury to a person or (if falling on a heating device) a fire from the ignition of curtains;
- safety - no harmful emissions;
- aesthetics - due to the visual accessibility of the location of the accessory.
When assembling the accessory yourself, these requirements must be taken into account, as do the manufacturers of cornices that manufacture products industrially.
Advantages of plastic cornices
Perhaps the described products cannot be considered exclusive interior design elements of artistic value, but they have several important advantages, including:
Resistance to moisture, aggressive substances, temperature changes, which allows them to be used both in any room of the house and on the street;
Low price, thanks to which you can save a lot
In addition, with a hidden installation of cornices in a ceiling niche or behind a baguette, it does not matter at all what it looks like, and there is no point in overpaying;
The ability not to change the curtains after repair or change of interior - it is enough to replace the decorative facade bar - a hood;
Light weight and easy installation. The package contains detailed instructions and all necessary fasteners.
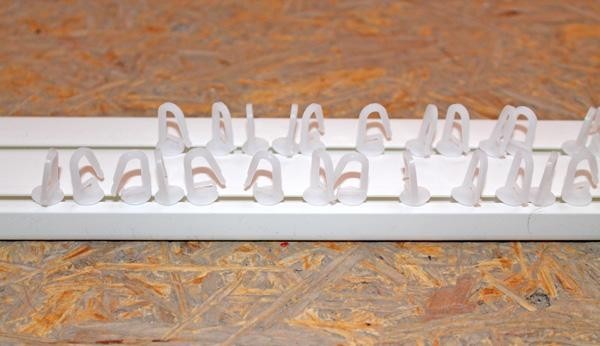
Plastic curtain holders - a practical and versatile solution
purpose
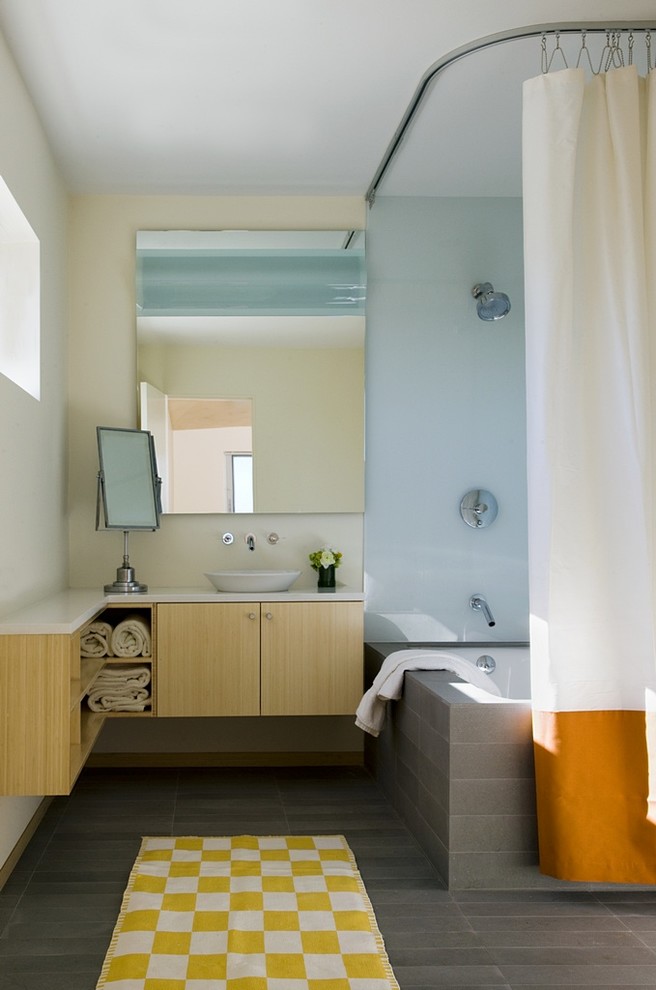
The interior of a small bathroom is formed by the decoration of the walls, ceiling, floor and, oddly enough, a curtain that separates the place for taking a bath / shower from the general space. It is 2 or more meters high, and its width depends on the length of the cornice. The choice of the latter depends on the location of the bathroom or shower
Its importance cannot be overestimated, because it holds a curtain on itself, which:
Helps to divide the space in the bathroom into zones.

Bright yellow accents will add contrast to your interior.
Splashes do not scatter throughout the room, which is especially important if the bathroom is not fully tiled. The same function is protective, if drops fall on the floor, there is a possibility of injury when slipping.
With the help of curtains, you can create a cozy place for taking a bath and shower, even to some extent you can retire in it.
The curtain can transform the interior.
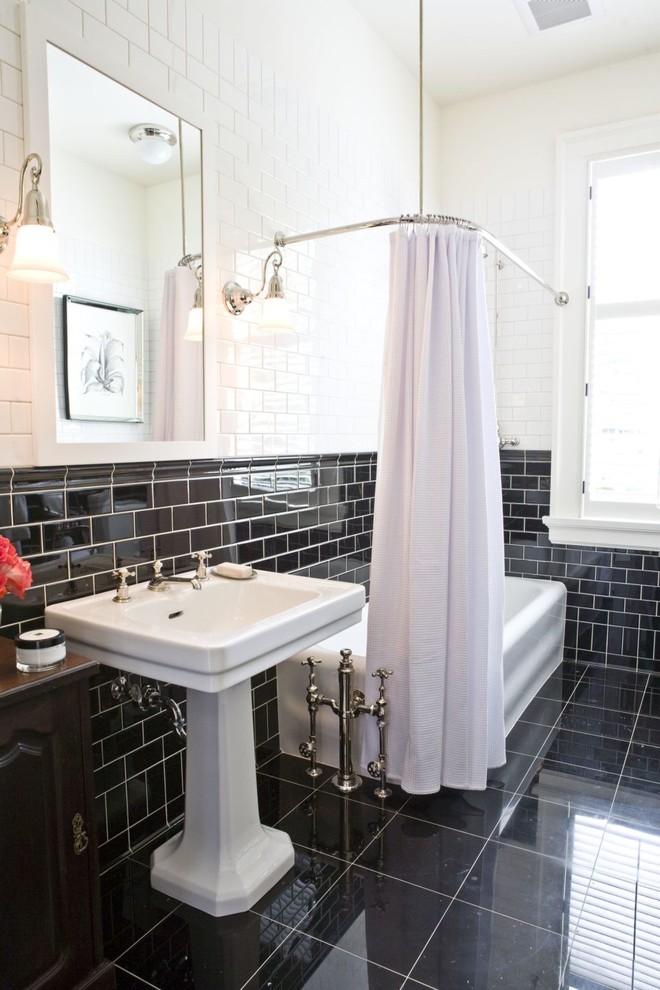
Corner cornice for curtains in the interior of a black and white bathroom

Country-style corner shower with concrete tray
The eaves play a key role in the convenience and safety of using the bath and shower.
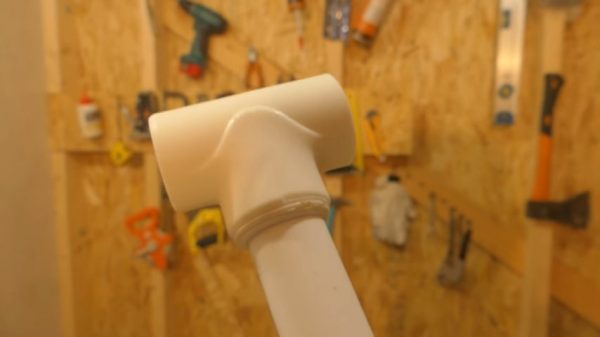
From the pipe we will make a corner for the curtains in the country
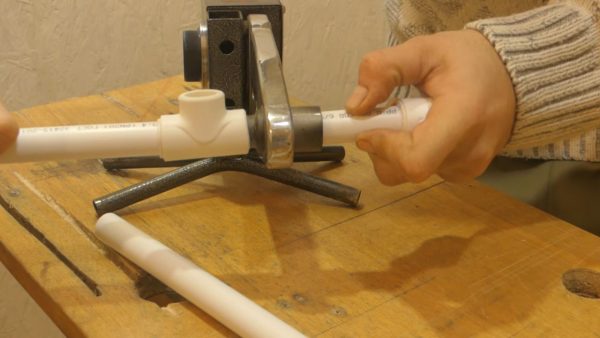
We use a 20 mm PVC pipe for homemade. Also some tees and corners. Budget for 50 rubles. Saving about 2000 rubles. Watch and remember how to do useful things. Having cut a pipe of a certain length, turn on the fantasy, a soldering iron and begin to connect the workpieces. The soldering iron is normal, without any bells and whistles. Having connected the necessary blanks, we finish them.
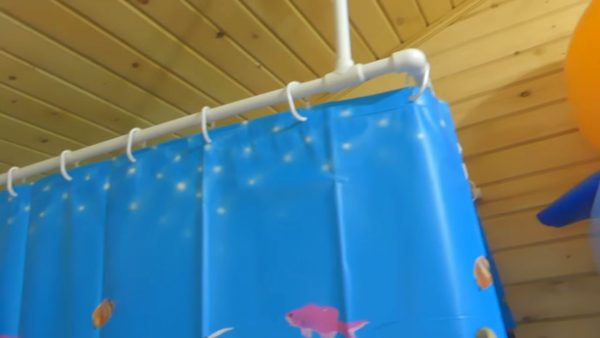
Everyone will have individual sizes, so the author of the video did not name the dimensions of the product. It remains to cut off one more piece of the pipe and the thing useful in the country house is almost ready. We try to make it as smooth as possible. This will look more beautiful. The device is ready. Drill a hole and go fix it. The curtain is not inferior in strength and rigidity to the purchased one. Some may not find this product very attractive. There will be no doubts about homemade products for those who care about functionality, reliability, and budget. And yes, it doesn't look that dark.

I. Functional grow lab for seedlings
Growlab is a great option for growing plants in containers. Based on PVC pipes, you can build a spacious greenhouse for seedlings or growing crops with a small root system in separate flowerpots. Such a greenhouse will be isolated not only by walls, but also by agrofilm from the ground. This allows you to create a real laboratory for growing plants on the site, a certain microclimate and temperature regime.
To begin with, we select a place and prepare the basis for a greenhouse. We mark the perimeter and enclose it with a wooden box. The walls of the box are knocked down with the help of long anchors and reinforced with metal corners at the joints with each other. An important nuance is the leveling of the base. If the plot is sloping, blocks, bricks or other improvised materials should be placed under the walls of the box.
Inside the walls of the box, it is necessary to place base pipes for PVC arches or make holes for PVC pipes in the ribs of the wooden base in advance. The box can also be laid on the finished foundation for the greenhouse. On top of the entire perimeter of the greenhouse, dense agrofibre is laid - a soft floor for our grow lab, which will protect the greenhouse from weeds and help maintain the desired climate regime inside the greenhouse.
Now you need to properly install the PVC frame. You can choose a gable structure or build an arched greenhouse. For the first option, it is better to choose rigid PVC pipes. How to bend arches correctly, we will tell a little later.
Installation of arches must begin with the end arc. Its both edges are inserted into the pipes. If the arches entered too freely, then the material must be compacted. To do this, you can drive wooden pegs together with the pipe or wrap the edges of the arches with sealing material.
To strengthen the PVC frame, it is better to use longitudinal strips. The central pipe is fixed on the outside of the arches. From the inside, the frame also needs to be reinforced with slats. The connection of PVC pipes is carried out with long bolts, the holes for which are made in advance
The arcs are inserted into the grooves of the pipes, which we deepened into the ground according to the level. If the edges of the arches do not fit snugly into the grooves, you can strengthen them with wooden planks inserted into the pipes along with the arcs. For greater reliability, they can be strengthened with bolts.When all the arches are in place, the frame should be reinforced from above with longitudinal pipes. The central pipe is laid on the outside of the greenhouse skeleton, and the two side bars are mounted on the inside. The joints of the pipes are tightened with bolts and nuts so that the frame is collapsible.
A wooden plank with a holding profile for covering material can be fixed to PVC pipes at a distance of about 50 cm from the ground. This will make it possible to ventilate the greenhouse from below.
The hole for the arc on the extreme end strips is made under the slope. It is necessary to accurately measure the angle of the slope of the arc, draw it on the edges of the bars and mark the place of the cut. The pipe must lie tightly on the rack so that the structure does not lose stability.
The end walls are best made of wood. In addition to the pillars of the doorway, it is necessary to make two more supports in the corners of the ends. The bottom of the end walls can be sewn up with plywood or plastic. Now you can stretch the film on the walls and ends of the greenhouse and start preparing the plants for growing.
And another master class on the construction of a greenhouse using the same technology: