What causes excess moisture in the soil
You can see the results of this phenomenon yourself - trees and shrubs are dying. Why is this happening?
- the oxygen content in the soil decreases and the content of carbon dioxide increases, which leads to a violation of the processes of air exchange, water regime and nutrition in the soil;
- oxygen starvation of the root-forming layer occurs, which leads to the death of plant roots;
- the intake of macro and microelements by plants (nitrogen, phosphorus, potassium, etc.) is disrupted, because excess water washes out mobile forms of elements from the soil, and they become inaccessible for assimilation;
- there is an intensive breakdown of proteins and, accordingly, the processes of decay are activated.
Plants can tell at what level groundwater occurs
Take a close look at the flora in your area. The species inhabiting it will tell you at what depth the groundwater layers are located:
- top water - in this place it is best to dig a reservoir;
- at a depth of up to 0.5 m - grow marigold, horsetail, varieties of sedge - blister, holly, fox, Langsdorf reed grass;
- at a depth of 0.5 m to 1 m - meadowsweet, canary grass,;
- from 1 m to 1.5 m - favorable conditions for meadow fescue, bluegrass, mouse pea, rank;
- from 1.5 m - wheatgrass, clover, wormwood, plantain.
What is important to know when planning site drainage
Each group of plants has its own moisture needs:
- with a groundwater depth of 0.5 to 1 m, vegetables and annual flowers can grow on high beds;
- the depth of the water reservoir up to 1.5 m is well tolerated by vegetable crops, cereals, annuals and perennials (flowers), ornamental and fruit and berry shrubs, trees on a dwarf rootstock;
- if groundwater at a depth of more than 2 m, you can grow fruit trees;
- the optimal depth of groundwater for agriculture is from 3.5 m.
Do you need site drainage?
Record your observations at least for a while. You yourself will be able to understand how much drainage is needed.
Maybe it makes sense to simply redirect melt and sediment water along a bypass channel, and not let it flow through your site?
Perhaps it is necessary to design and equip a storm drain and improve the composition of the soil, and will this be enough?
Or is it worth making a drainage system only for fruit and ornamental trees?
The exact answer will be given to you by a specialist, whom we strongly recommend calling. But after reading this article, you will gain some awareness in this matter.
To connect plumbing fixtures to the water supply network, a flexible water supply is used. It is in demand when connecting faucets, showers, toilets and other points of water intake, and greatly simplifies the installation process. Flexible piping is also used when installing gas equipment. It differs from similar devices for water in manufacturing technology and special safety requirements.
Power connection
Connecting the water heater to the mains requires the mandatory presence of an independent power supply of 200 volts, taken away from the shield. With a three-core cable, it is imperative to make an insurance in the form of grounding. The choice of cable is far from simple and requires mathematical abilities, since it involves a miscalculation of the cable cross-section relative to the installed power of the equipment
In addition, it is important to pay attention to the insulation of the cable, it is best if it turns out to be double
First of all, the grounding terminal of the socket should be the end point of this very grounding, and there should not be any interruptions or other unfavorable moments. The initial ground point is located in the electrical panel and is a ground bus.You should not recall different experiences regarding grounding, since the use of any metal objects in this case is unacceptable.
It's no secret that storage wall-mounted water heaters are connected to the power supply through the most ordinary outlet. It is highly undesirable to install it in close proximity to water, this will not lead to anything good. The power supply intended for the boiler is recommended to be separated into a separate group, and a two-pole machine will act as protection here. Like other accessories, this device must be purchased taking into account the power of the heater.
The sizes of storage water heaters today are represented by many options, it is not difficult to choose the right one, the same applies to the power of the unit. However, not only the protection of the device itself should come first, but you should also not forget about your own safety, so a residual current device must be available.
In this case, the choice of this device also needs to be carried out taking into account some rules. For example, the value of this device should be one step less than the value of the machine. Moreover, the latter is definitely recommended to be installed in the circuit before the protective device. Installing an outlet is also not the easiest thing, especially if a storage water heater is chosen under the sink - you should not put it too close to the unit, it will be quite successful to install it at a distance of half a meter from it.
In this case, it is recommended to place the socket above the pipes and their assemblies. Do not forget about your safety, especially if there are animals in the room. In this case, it is necessary to mask all cables or hide them inside the wall. Also, do not bring all the wires too close to the hot water pipes, since it is extremely easy to ruin them, especially since in this case the probability of overheating of the latter is very high. Brands of storage water heaters today are represented by a wide range, which allows you to choose the model you like.
Do-it-yourself instructions for connecting a storage water heater
If you decide to learn how to connect a storage water heater with your own hands, you need to study all the nuances of the installation in advance, since any electrical appliance requires safety precautions.
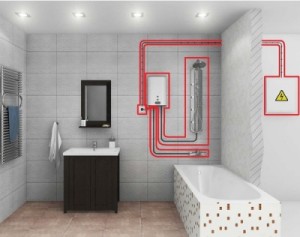
Standard plumbing scheme in the apartment
To begin with, one important nuance should be understood that connecting any storage water heater to a water supply system implies embedding it in a water supply system. The goal of the process is big - to create a source of hot water in the system with your own hands.
It is desirable, of course, that the installation and repair in the apartment coincide with each other, however, modern technologies make it possible to install the boiler as accurately as possible.
In this case, an electric water heater will have to provide hot water to all points of analysis of the apartment.
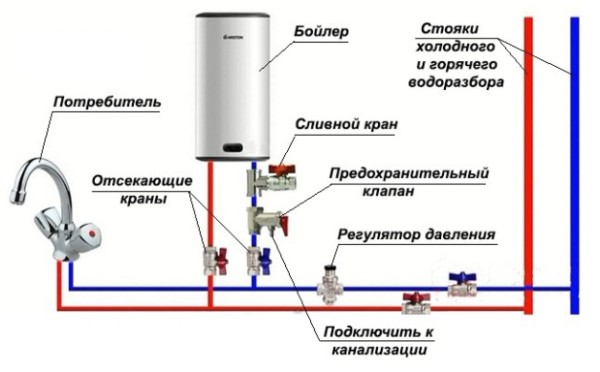
Speaking directly about the standard plumbing scheme, it is necessary to single out the main nodes - the toilet, to which only cold water is installed, followed by a washbasin, where a riser with hot and cold water is connected, then a bathroom or shower, and then a kitchen washbasin, which often has a separate supply Actually, this is a standard scheme for connecting a storage water heater, and it is necessary to build a boiler into it, which allows you to heat the contents of the pipes in the apartment. There are, of course, various branching options, which you can see on the video on the Internet.
If we consider the plumbing scheme with a built-in heater, then it must be installed in such a way that it provides hot water to all points of analysis, except for the toilet bowl.
Features of creating a diagram
The main components of the circuit, as you can see in any video, are special taps and a check valve.A prerequisite for the well-coordinated operation of the circuit, which does not require quick repairs, is the presence of a valve.
It prevents hot water from draining through the pipe with cold water. Here you should understand the main principle of the operation of the water heater, the installation of which can be done by hand.
Cold water exerts pressure on the hot water tank, and by design, hot water is disassembled from above, and cold water from below.
Another important point, without which it is impossible to connect a storage water heater, is the presence of a third tap, which turns off only hot water supply. Its installation can also be done by hand. A prerequisite is to cover it during the operation of the drive. Otherwise, hot water will be able to go into the general hot water supply system.
Installation steps
The main steps that should be carried out when installing a hot water storage tank with your own hands:
- Fixing the device on a bearing wall. In principle, if a good repair is made in the apartment, you can fix it on a simple wall.
- The cold water supply system should then be connected to the unit's nozzle, as can be seen from the video. The connection is made by means of flexible hoses or pipes.
- Connecting to a power source. The most important thing here is the moment of safety, especially if you carry out the procedure yourself. It is also worth noting that the operation of the equipment will require a network with a current of at least 6-8 kW. It is desirable for various reasons to carry out the installation of the product above the head.
General Installation Tips
If the apartment is being renovated, you can entrust the installation of the unit to professionals. Otherwise, if you are going to do this procedure yourself, you can use the tips below:
In the event that repairs in the apartment were carried out for a long time, you should invite a specialist before installation who will diagnose the wiring in the apartment.
The wall serving as the installation site of the boiler must bear a load twice the mass of the device.
Access to the device must be free in case it needs to be repaired.
Equally important is a sufficient analysis of the pipeline in the dwelling. More precisely, the quality of pipes and risers, as well as the availability of outlets for directly connecting the unit, installing taps and other necessary manipulations
In the event that the condition of the risers leaves much to be desired, it is necessary to pre-replace them, carry out repairs, otherwise the adequate operation of the water heater may be in question.
Installing a storage water heater in your own apartment is possible with your own hands. The most important thing here is the observance of safety precautions, as well as the implementation of all installation rules.
The basic principle of operation of the storage water heater
Before connecting the device to the electrical network and the water supply system, it does not hurt to better understand how the device actually works.
Such knowledge will not be superfluous at all, since you will also have to deal with the maintenance of the water heater during its operation.
The basic principle of operation of the device is filling the reservoir with water, heating it to a certain temperature and further maintaining this temperature value throughout the operation. (See also: How to connect a boiler with your own hands)
So, what can a storage water heater do for you:
- Depending on how much tank volume you prefer in the device, you will always have hot water, no matter how the central heating system works. During a short power outage, the water in the heater will still remain hot for a significant amount of time.
A storage device can be connected in such a way that hot water will be supplied to both the kitchen and the bathroom.Flowing water heaters, for example, are simply deprived of such an advantage.
Connecting the device to the network does not require a complete replacement of the wiring and the installation of an additional 380-volt outlet.
(See also: Do-it-yourself storage water heater installation)
The water pressure in the system can be as low as possible. This fact will in no way affect the operation of a storage-type water heater, unlike gas water heaters, for example.
The correct connection scheme for an electric water heater contributes to the fact that water can be heated up to 80 degrees Celsius.
Despite the thermostat built into the device, thanks to which it can automatically turn on and heat the water, hot water retains its temperature inside the tank for a long time.
(See also: How to disassemble an Ariston water heater)
Of course, there are no ideal things, as well as appliances, and therefore storage water heaters have some drawbacks.

- It takes a certain amount of time to heat up water. The larger the tank, the longer it will take. It is not very convenient when you need to urgently go somewhere, but it is impossible to take a shower, because after washing all the household members there was simply no hot water left.
Another inconvenience is the size of water heaters. Even not large storage-type devices, I have significant dimensions. Such a water heater, even the smallest one, cannot be installed under the sink.
If you rarely use the full volume of water, and it is forced to constantly heat up and cool down, you cannot use it for drinking.
Direct device connection
Connecting a water heater with your own hands is a completely acceptable method. The most important thing is to follow all the instructions and follow the recommendations. Before installation, it is advisable to carefully read the passport of the device. Typically, the manufacturer will provide some tips and tricks for installation. Also, a list is usually given of which additional components are not recommended for use with this device.
Be sure to note all the nuances and proceed with the installation, following each step step by step. First of all, you have to mark the place for the fasteners that will hold the water heater. Be sure to consider which side the electrical wires will be connected to: from the top or bottom. Do not fasten the brackets close to the ceiling, be sure to leave space, otherwise you simply will not be able to hang the device on the brackets.

If very often in the water supply system there are failures in the water supply, after which the water from the tap comes out either rusty or contaminated, be sure to install a filter before the water enters the device. Yes, even if interruptions are very rare, it is better to play it safe and use a cleaning filter than to clean the device later.
Do-it-yourself connection of the Termex water heater is required according to the following scheme. For connection to the water supply system, pipes either copper or metal-plastic are best suited. When connecting the nozzles of the device to the connecting pipes, do not use great effort, this can damage the threads on the elements of the water heater or even lead to complete failure.
Be sure to lay all joints with tow or fum tape. The connection of the water heater to the water supply must be carried out using safety or shut-off valves.
Before installing the device, be sure to check the pressure in the water supply system. In the passport of each device, all manufacturers must indicate what pressure the device in the system can withstand without any harm to themselves. Usually the value is not more than 6 atmospheres.
If the water heater is connected to a system in which the pressure is higher than 6 atmospheres, a reducer must be installed before the cold water enters the device.This device protects the device from increased water pressure in the system. If this is not done, it may turn out that the valve that regulates the pressure in the device itself will not withstand the load and will leak.
The only way out will be a complete replacement of the valve, and this part is not so cheap. Now, having installed a storage-type water heater on your own, you will probably quickly figure out how to connect an instantaneous water heater.
The composition of the fittings for inclusion in the water supply network
Do not think that the Ariston instantaneous water heater can do without a bypass valve. Perhaps the consequences of a breakdown will not be so destructive, and repairs will be cheaper, but excess pressure will not bring benefits. This also applies to gas water heaters. Ariston advertises a way to drain water, which is also preached by our site. To do this, a tee with a drain cock in the branch cuts between the bypass valve and the water heater inlet. Some lead the outlet directly into the sewer, as in the video with the Europrisma installation, others leave the valve in the air in order to take a sufficiently large amount of hot water from here if necessary. Including business needs.
When choosing a tee, take plastic or bronze, the same goes for the valve. In light of this, Ariston would have released a tee, check and drain valves, as well as a tap for draining water in one housing. That would be a cool technical solution. The device of the Ariston water heater does not stand out in any way among the "competitors". Many, for example, also apply a bypass valve with an arrow for orientation to the kit. Accordingly, the malfunctions of the Ariston water heater are the most typical: thermostat failure, burnt heating element, scale
Since we are dealing with water, the safety of operation is of particular importance.
The electrical circuit of the Ariston water heater must include a differential protection device. It's hard to read about it anywhere, but you can clearly see it in a YouTube video.
Please note that the differential protection device is not an analogue or replacement for fuses. Inside, the difference between the input and output current of the water heater is measured, which, of course, should be equal to each other, if there is no emergency
If you connect the water heater to the mains without a differential protection device, then the consequences can be the most sad.
Sometimes it may be necessary to start recirculation for the hot water system. This is necessary in private homes where it is required to maintain an acceptable temperature of the heated towel rail. In this case, the thermostat for the Ariston water heater is already a poor helper. You will need a circulation pump with one of three possible regulation schemes:
- By timer.
According to the temperature sensor.
Permanent action.
The inlet for the recirculation circuit can be a technological hole for draining water, if any.
Rules for using the device
- Before switching on, check the presence of water in the tank. This will prevent failure of the heaters.
- It is recommended to install a filter on the pipe supplying water to the boiler. It will protect against dirt and reduce water hardness.
- Descale the storage tank at least once a year.
- Periodically monitor the performance of the protective anode, change if necessary.
PVC pipes and fittings for plumbing are the key to quality water in the house, read about the benefits.
To make water tastier and healthier, take care of filters in a private house, read about it at https://klimatlab.com/vodosnabzhenie/filtraciya/filtry-dlya-ochistki-vodyv-chastnii-dom.html
Flow type devices require compliance with several other rules.
- Check the water pressure before turning on the power. A weak jet will not allow the device to function normally.
- In case of uncomfortable temperature, adjust it with the buttons on the body or by turning the mixer tap.
- If the heater is to be installed in a bathroom, provide splash protection.
- Hot water is no longer needed - be sure to turn off the device.
The reliability of the equipment depends not only on the quality of the products. Also important: the correct installation, inclusion and use of equipment. Compliance with the recommendations given in the article will significantly increase the period of uninterrupted operation of the boiler.
The manufacturer "Ariston" took care of the high degree of safety of its heaters, but it is possible only with proper installation of the equipment.
The operation of the boiler is based on the use of 2 energy carriers - water and electricity - for each of the systems, a connection sequence and the use of auxiliary protective devices are determined. In the article we will tell you how to turn on the Ariston boiler in the apartment.
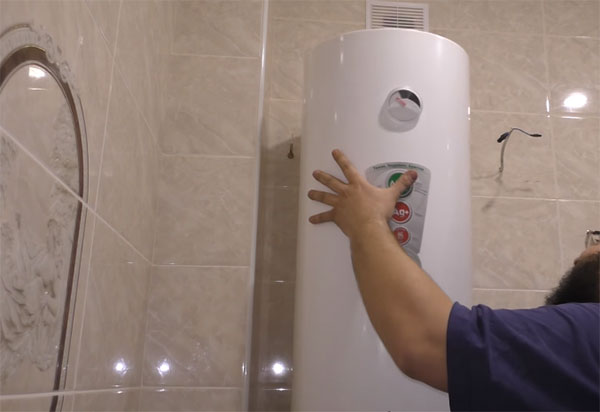
How to turn on
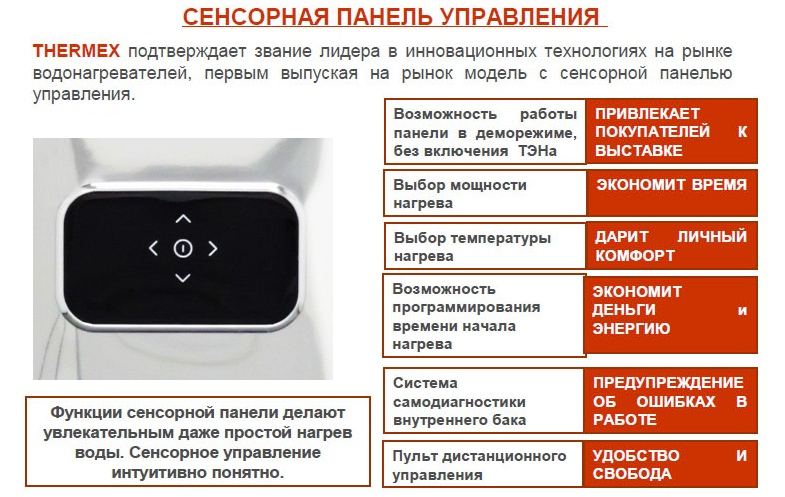
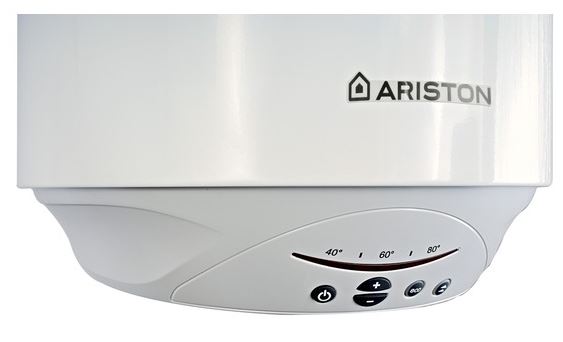
The design of all boilers (storage water heaters) is the same, so it depends little on the model and brand. Considering that, according to statistics, Thermex and Ariston manufacturers are the most popular among Russian consumers, using their example, we will tell you separately how to turn on the Thermex boiler and how to turn on the Ariston water heater.
The initial installation of the equipment is mainly done by specialists, but the users themselves need to deal with the inclusion.
So, how to turn on the thermex water heater, so as not to disable it and avoid mistakes. Connecting an instantaneous water heater is not fundamentally different - air is also released, the hot water pipe is blocked, the settings are set and it starts. The only difference is that the accumulative one takes 2.5-3 hours to heat the water, and the flow one gives it out after 5-15 seconds.

- Shut-off valves on the hot water pipe are blocked.
Even if a faucet is installed on the pipe, shutoff valves are still used. Taps can pass water, and then the water from the boiler will go into the common riser.
- Air is released from the system, for which a hot water tap is opened and hot water exits from the boiler itself, lastly open a cold water tap. The presence of air can be determined by a torn jet - it will go intermittently and a "snorting" sound will be heard.
- After the water stream is level, close all taps, including those on the device itself. Next, connect it to the network.
A separate grounded socket is always used for connection.
- Before turning on the boiler, set the temperature and check the operation.
To make sure it works, do the following:
- check indicators;
- check the temperature
- if the device is working, after 15-20 minutes the temperature will rise.
If the water heater does not turn on
The first thing you do is check the network elements - electricity, sockets, RCDs, machines. Check the voltage in the boiler with a tester to exclude a broken cable.
The most common problem is electronics. If power is supplied, but the Termex water heater does not turn on, look at the error code on the display and refer to the instructions for what it means.
- failure of the heating element, contamination of the heating element with lime and calcium deposits;
- breakdown of the thermostat - when the water temperature rises above 90-92 degrees, the RCD machine may work;
- there is no water in the tank - if there is water in the system, but it does not enter the boiler, the reason may lie in the fact that the air has not been bled.
Even if there was water in the tank before turning it on, but it has not been used for a long time, you should first drain the water, and then definitely air.
We repeat that there is no fundamental difference in connecting storage devices, so we will schematically tell you how to turn on the Ariston boiler.
- If we are talking about an apartment or house with a centralized supply of hot water, close the pipe with shutoff valves.
- Open the tap in the place where the unit is installed and drain the water, close it.
- You bleed air from the boiler, for which you first of all open the inlet valve (the pipe is marked in blue), after that - the tap for the analysis of heated water (marked in red). Wait for all the air to come out and the water to flow in an even stream without interruption.
- Do not close the cold water supply tap - its quantity in the boiler is regulated by automatics.
- Plug it in and set the temperature on the device.
- You check the performance - after a few minutes the temperature in the tank should begin to increase.
What errors can be encountered during operation
Instantaneous water heaters
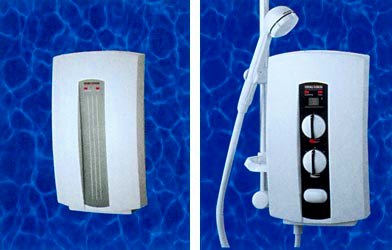
As for compact water heating devices, we note that their installation is very simple:
- remove the old faucet;
- install the unit;
- connect to a pipe with cold water;
- block hot;
- plug into an outlet.
This completes the installation and then just turn on the hot water tap and use it. With this equipment, there should be no questions about how to turn on the boiler when it is already installed. If you do not risk installing it yourself, contact the experts.
All listed devices are high power equipment (from 3 to 7 kW), they must not be connected to a common outlet. A separate socket should be located only in a dry place, and the power is supplied directly from the distribution board.
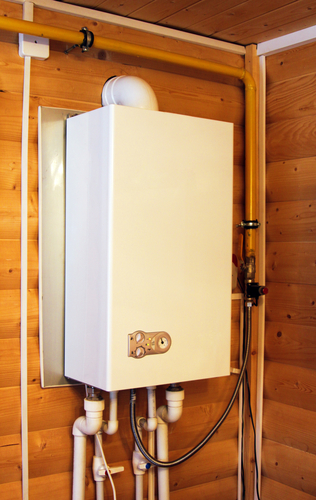
Connecting a gas water heater to the water supply
From the point of view of connecting to the water supply, the same operations should be performed as if it were required to install an electric water heater. In private cottages, you will need a hydraulic accumulator, and a large capacity. This is especially true for instantaneous water heaters. The pump for pumping water into the system is usually guided by pressure. If you do not leave thirty liters in reserve, then the device will work in a jerky-continuous mode (do not look for this in GOST, it's just a good phrase). In this case, a whole host of water hammers will be generated, which will successfully disable either the pump itself or the connected equipment.
Many people ask if it is possible to correctly install a storage water heater without a bypass valve at the inlet (for example, 8 atmospheres). The correct answer is no. If, God forbid, the pump gets stuck, it will begin to build up pressure until something breaks. Be sure to install the rubber hose straight up to the sewer from the bypass valve. Otherwise, everything will pour on the floor in which case. And one more thing! If you plan to install a storage water heater, then please provide for the possibility of draining the water. For example, Ariston recommends placing a tee between the tank inlet and the bypass valve, where to insert the drain valve.
We also mention that many companies come with a bypass valve in one person with a check valve. If this is not in the package, then you need to buy it. The check valve will help the device to work correctly, and also make it possible to drain the water if necessary.
Where to install the water heater, decide for yourself, we have provided all the information for this. Electric ones cannot be placed in the bathroom, as well as any 220 V appliances such as washing machines and dishwashers. Which we strive to shove under the sink! Take this into account before installing a water heater in the bathroom.
Instructions for the first start of the boiler
start the heater for the first time.
We start by checking the correct connection of systems that are responsible for heating water. Fidelity, reliability of the connection of phase and zero wires, the presence of grounding. The operation of the circuit breaker should also be checked. For this, a device is used - a tester or a special electrician's screwdriver.
Next comes the search for leaks in the system.It will be useful to control the connection of underwater pipes. Availability and diagnostics of the check valve operation.
Running water into the boiler
Attention, the correct sequence of actions during the first and subsequent launches of the system will be described in the next section.
Repeated search for water leaks at pipe installation sites.
Heater diagnostics. Turn on the machine by pressing the power button.
Fixing the initial readings of the temperature sensor.
Recheck after 15 minutes
The growth of indicators indicates the correct connection of the heating elements.
How to make an indirect heating boiler with your own hands, read here.
How to drain water from a boiler: tips, recommendations, step-by-step instructions in our article.
How to turn on the Ariston boiler when it is already installed
2017-01-22 Yulia Chizhikova
Consider turning on the water heating unit when it is already installed at the place of operation and connected to the water supply using the example of the following most popular models.
Ariston platinum - for the first launch, follow these steps:
Before turning on the device for the first time, it is necessary to fill the tank, to do this, turn off the hot water valve on the riser, then open the liquid supply and outlet valve at the boiler inlet.
Open a hot water valve on any of the faucets in the house and wait until all the air has completely escaped from the tank. When water starts flowing, turn off the faucet. Inspect the fluid supply pipes to the water heater for leaks.
Then set the desired temperature with a thermostat, the optimum is considered to be 60 degrees, this will save electricity and will contribute to minimal scale formation.
Connect the device to the mains, after which the indicator light will turn on. The heating time for a 50 liter tank will be 1 hour 50 minutes. After this time, your boiler is ready for operation.
Wait 30 minutes and check if the liquid heats up.
Ariston abs vls pw 50. To start the unit, follow the instructions below:
- Fill the reservoir with liquid. How to do this is described above, using the example of the first option.
- Connect the device to the network.
- Set the current time, this can be done by pressing the “+” “-” buttons. changing from hours to minutes with the set key.
- The following actions for the BASE modification boiler: use the on / off buttons to start the water heater, by pressing “+” “-” select a comfortable temperature, in the range from 40 to 80 degrees, the optimum temperature is set at 70 °C by the manufacturer. The indicator on the display will let you know when the water reaches the required temperature. Boiler Ariston with a digital display
- For TOP models. If you are installing the water heater horizontally, in order to change the display position to horizontal, you will need to simultaneously press the “mode” and “eco” keys and hold them for 5 seconds. Start by pressing the on / off button on the indicator. Boiler Ariston with a digital display
Select one of the four modes by pressing “mode” - MANUAL (in this mode, you yourself choose the optimal heating by pressing “set”) or P1 (setting to start heating at 9:00, 70 degrees), P2 (turn on at 19:00, by 70 degrees), Р1+Р2.
Ariston sg 30 or. How to turn on the boiler Ariston sg 30 or? It is enough to do the following:
- Fill the device with water, how to do this can be found above in the first instruction.
- Check for leaks in all connections and joints in the pipelines.
- Start the unit by pressing the switch on the device.
- The temperature is set by turning the regulator, the optimal mode is the “E” position, in this mode the rate of scale deposition decreases.
The video clearly demonstrates how to turn on the boiler correctly:
- Why is the boiler not heating and the light bulb is not on.
- Baxi gas boiler error codes, troubleshooting and methods.
- Single-circuit and double-circuit boilers with an indirect heating boiler.
New appliances in the house require study of the instruction manual. Boring job. Valuable information is always hidden behind a pile of technical terms and is often difficult to digest. But it is on this that the correct and correct operation of the devices depends. To connect the boiler, you can call a specialist, but you can save money and do all the work yourself. We suggest that you familiarize yourself with the standard instructions for connecting the boiler. Everything is explained here, clearly and concisely.