Concreting and waterproofing
In order to make concreting, it is necessary to purchase: reinforcing mesh, steel wire or rods, asbestos-cement slabs or boards treated with an antiseptic, formwork material and cement-sand mixture.
Around it is necessary to build a formwork, install reinforcement, then pour it with a concrete solution.
Be sure to insulate the basement from moisture. Waterproofing is laid between the base and the plinth.
If brick or stone was used to create the basement surface, a layer of roofing material should be placed between the rows of masonry or bitumen should be poured. In the case of concreting, the insulation is made in two layers.
For insulation, it is better to use foam sheets. They must be placed inside the structure. The insulation must exceed the height of the ceiling.
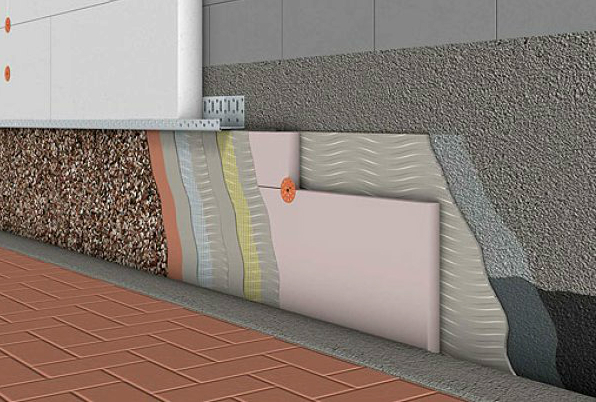
To fix the foam, you can use special glue. After laying the insulation, proceed to the final finish. It can be done with:
- Decorative facing stone;
- Porcelain stoneware;
- Clinker tiles;
- basement siding;
- Mosaic plaster.
How to close the foundation from the outside, imitating brickwork - look at the video:
If you have already built a house and did not finish the base, you should quickly start solving this problem. The house will become much warmer, it will acquire a more beautiful appearance. You will feel comfort not only inside the room, but also contemplating it from the outside.
Hello! On the site site, we learned a lot of ideas for finishing and building a residential building and today we decided to repay our favorite site by giving our readers our answer to the question: “how to close the pile foundation of a frame house from the outside?”
Starting construction, we, like many other people who decided to build a house with their own hands with the minimum possible amount of money, chose the most budgetary version of the foundation that allows you to quickly “get down to business” - a foundation on screw piles. And as soon as we build it, then we’ll think about how we will close it.
Time passed imperceptibly. A year has flown by, the frame house stands, and is blown by all the winds, siding was ordered for finishing the house, but as it turned out, another 50-60 thousand rubles should be spent on basement siding. by the most conservative estimates. At that time, we did not have such funds, but from the installation of the fence, we had sheets of corrugated board just in the color of our metal tiles. We decided to use these sheets to close the pile foundation from the outside.
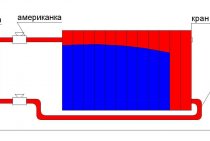
Close the vents for the winter or not
There are two points of view on whether to close the ventilation holes in the underground for the winter or not. If they are left open, moisture will not accumulate. And this is good, but in return we get a cold floor and increased heating costs. The way out is enhanced floor insulation so that ventilation does not affect its temperature and does not require enhanced heating.
If the ducts are closed for the winter, moisture accumulates in the soil. Warm moist air from the house enters the floor, falling on cold surfaces, and in winter it is the basement walls, moisture condenses, flows into the ground. This means that later, in the summer, it will evaporate from there, increasing the humidity in the basement.
Hinged structure
Making a hanging structure is easy. You just need to follow the order:
A crate is created from metal corners, pipes or wooden boards.
- In any convenient way (self-tapping screws or welding), guides are attached to the piles. It can be a metal profile, wooden beams; a kind of frame for fixing panels or asbestos-cement slabs, combined systems with insulation or sheet slate on it.
- Before installation, a “pillow” of sand up to half a meter thick is poured around the perimeter.
- Corners are formed in a convenient way with the help of related components.
- All seams are sealed with a sealed solution.
- The design is complemented by the installation of ebbs and other elements that are not enough for the finished design of the basement.
- Cause crown - finishing decorative finish.
plastic panels
When using decorative plastic panels, a cheaper coating is obtained, but less aesthetically pleasing. Products made of natural brick or stone look more attractive. But on the other hand, such a finishing material well hides the base of the piles.
If the panel sheet has an increased thickness, it is able to withstand fairly large loads. He is not afraid of chemical and biological effects.
If hinged panels are used, the space between the house and the ground surface remains empty. Water cannot accumulate in it and condensation cannot occur due to the free circulation of air.
The panels look very much like a monumental base. At the same time, they retain all the properties of the basement of the foundation on piles. This is especially noticeable in areas with significant elevation changes and other relief difficulties.
Watch the video to appreciate all the advantages of sewing the base of the house with decorative panels:
How to close screw piles
The final stage of construction is the finishing of the basement space. In housing construction with a pile foundation, there is space left that gives an unfinished look.
In this regard, it is important to understand the finish and study all the nuances that you should pay attention to when performing it. Consider how to close the basement of a house on screw piles, the advantages and disadvantages of finishing materials
Consider how to close the basement of a house on screw piles, the advantages and disadvantages of finishing materials.
The advantages of finishing the basement space
Finishing the space between the pile foundation and the house has the following advantages:
- increases thermal insulation;
- prevents medium and large animals from penetrating under the floor;
- prevents snow and rainwater from accumulating under the house.
In order for the finish to perform all of the listed functions, when choosing a material, you need to carefully study all the advantages and disadvantages of each type.
Finishing methods
So that the floors in the house are not blown through, it is necessary to insulate the basement space
The open space between the soil and the floor is blown by the wind and is affected by sub-zero temperatures, due to which the floor in the house turns cold. We close the piles under the house with:
- devices for a shallow tape base;
- hanging finishing material between piles, having previously built a frame.
When choosing a method of finishing and material, we take into account:
- soil type;
- groundwater level;
- climatic conditions.
First of all, we mount the support crate from a profile pipe, it will serve as a link between the supports. The step of the guides should be 300-400 mm. The profile is selected with different widths of the sides (40x20).
To prevent communications from freezing, we insulate them with mineral wool or foil rolled insulation.
When choosing a material, we take into account that it is in contact with the surface of the earth, therefore, with a close occurrence of water or flooding, all harmful factors will affect it.
flat slate
Asbestos slabs - non-environmental material
Every year this material loses its popularity, it is replaced by modern, environmentally friendly materials.
Advantages:
- resistant to atmospheric influences;
- durable.
Flaws:
- asbestos is hazardous to human health and pollutes the environment;
- fragile;
- unattractive appearance.
The plinth of the screw foundation, sewn up with flat slate, will not be in harmony with the construction of modern materials.
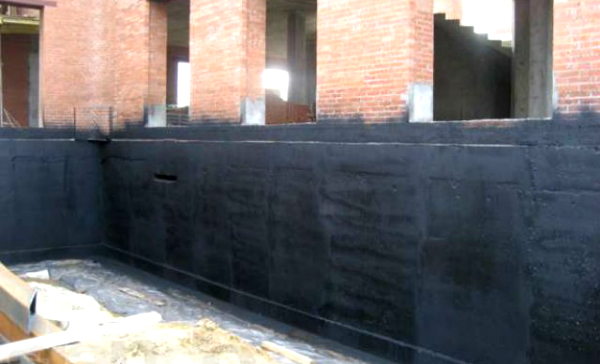
blind area
The blind area isolates the basement from moisture
Upon contact with the soil, the quality of the facing materials is lost, so the surface must be isolated from moisture and a blind area should be made. As a waterproofing, we use roofing material or dense polyethylene, one end of which is filled under the blind area, the second edge is bent onto the crate of the frame under the finishing material.
At the end of the lining, we arrange a blind area, which will prevent rain and melt water from leaking under the building. To ensure the drainage of water and condensate, it must be mounted with an inclination of 1.5 degrees from the base.
Concrete is evenly poured into the formwork, in which a mesh of reinforcement is laid. In the place of docking with the base of the foundation, we lay an expansion joint.
For more information about blind areas in a house on screw piles, see this video:
When the house is located on a slope, part of the underground can be equipped as a cellar, in this case we provide for the installation of a door.
Stages of work on finishing the basement of a frame house on screw piles
We had sheets measuring 1200 mm by 1800 mm (you can also take 2000 mm), the clearance between the ground and the house is standard for dry areas of 500 mm. Therefore, it was very convenient to cut one sheet across the stiffeners into 4 equal parts of 1200 mm by 450 mm (the ventilation gap just remains) using metal shears. The cost is 475 rubles. per sheet, thus, a running meter of our plinth costs only 99 rubles, while the cheapest plinth siding will cost 480 rubles. per linear meter, not counting the cost of the necessary crate.
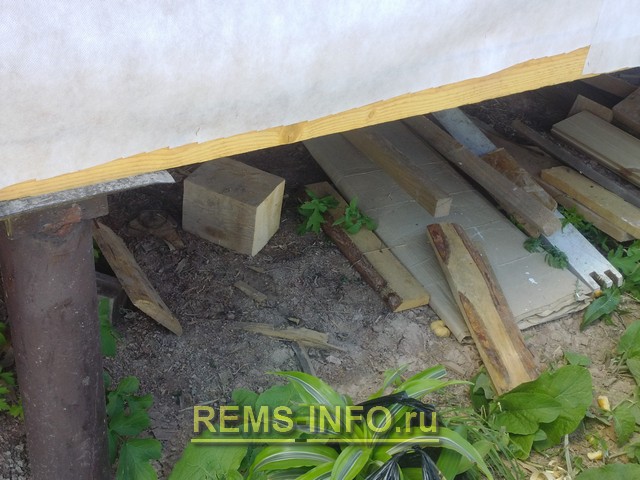
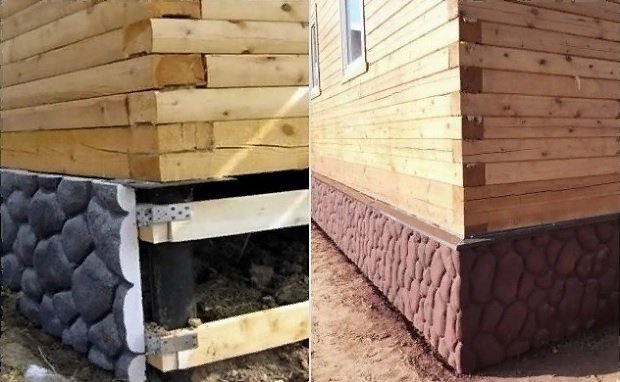
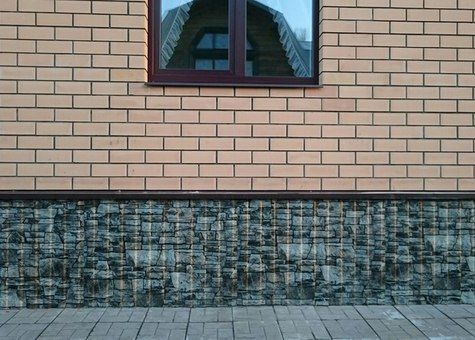
This is how the gap between the frame house on screw piles and the ground looked like before the installation of homemade basement panels.
The cut parts of the profiled sheet were screwed with self-tapping screws directly to the wooden trim of our foundation.
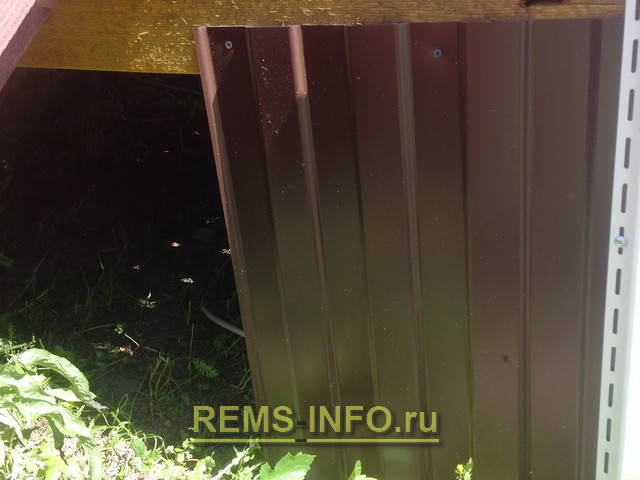
In order to avoid the need to make an ebb from the base, it was decided to place the corrugated board under the level of the main siding, i.e. it was necessary that the corrugated board was located on the same level with the still unfinished wall. In some places, “liners” had to be placed on the OSB sheets so that it was flush with the wall.

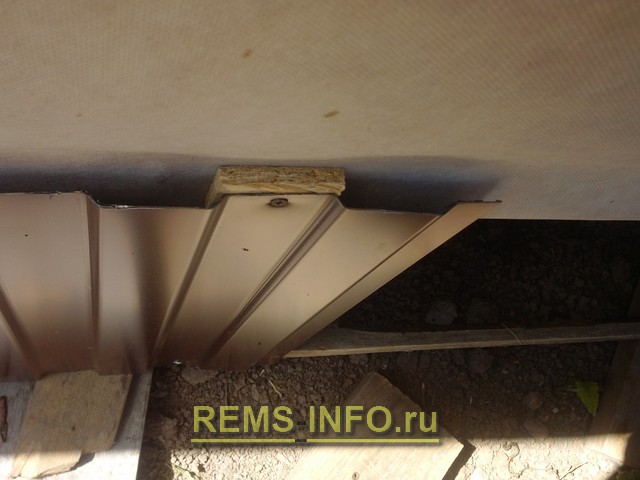
The lower edge of the sheets was tied with a bar with self-tapping screws. The result was a fairly stable structure, which did not require binding to the piles themselves.
Theoretically, in the future it can be fixed to piles.
At the corners, the sheets are bent, this gives additional rigidity. You need to bend in certain places so that the corner profile stands up, not on the stiffener.

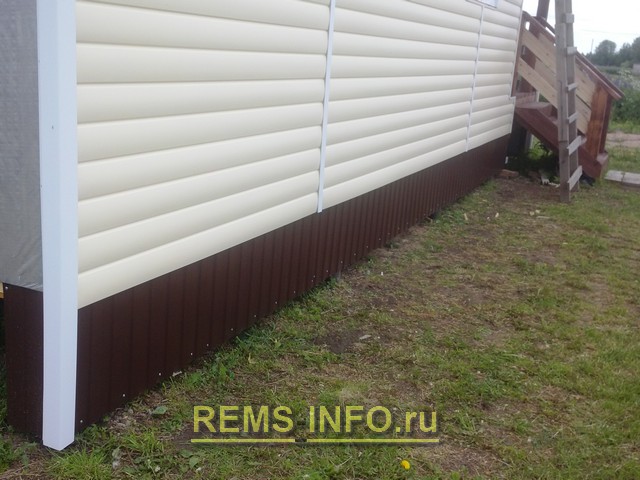
On top of the sheets, the starting strips of the main facade siding are already attached.
As a result, it turned out like this:
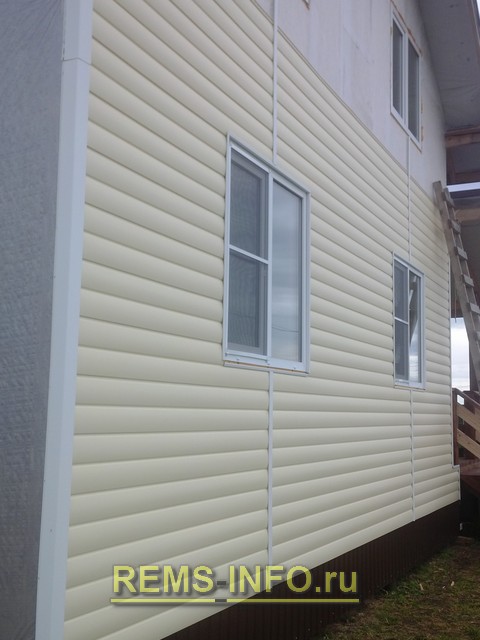
It's beautiful in our opinion. It remains only to make a blind area.
Classic finishes
As an option, you can use standard systems of ventilated facades for tiles, but in this case, the tiles may be subjected to bending loads and impacts, since the plinth is a weak spot and will collapse. On top of any type, an ebb is installed around the entire perimeter of the building.
Ceramic and stone tiles must be fixed with a special adhesive for facades and plinths. The surface is pre-leveled with plaster and cement mortar.
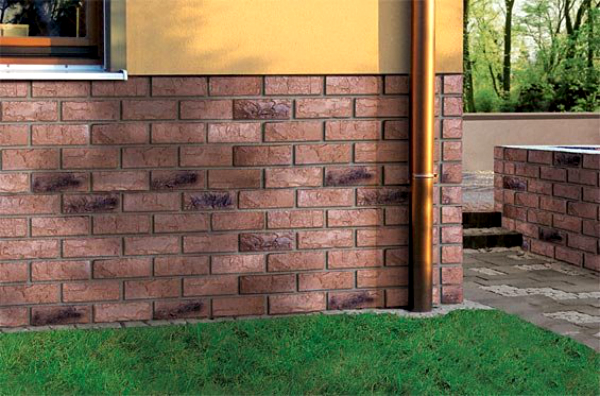
Bricklaying is carried out from a corner of 125x125 mm, which is welded on the outside on embedded elements to a columnar foundation or concrete plinth according to the level. Brick finishing can be done with insulation, if you first take the corner from the columnar foundation to the thickness of the insulation using metal inserts, and after welding the corner, it is insulated. Laying in half brick. Brick is used without holes, not silicate, it is better to use clinker. Laying on cement mortar with dressing in half a brick, with keeping the pattern, if any, in the project.
Every four rows, a reinforcing bar is laid in the brickwork, and anchors are attached to the piles of the columnar foundation or basement in increments of at least one and a half meters.
Screw piles are a product of new technologies, a type of columnar foundations, which are indispensable for construction on soft soils. This technology makes it possible to reach stable soil layers without additional costs of equipment and materials. Piles are considered the best foundation option for private construction. Reliable, safe, most advantageous in all respects, the supports represent a simple and quick foundation. It can be made in a few days, in any weather, at any time of the year, and the supporting structures are mounted immediately.
How to close the piles under the house
There are two options for external cladding of the screw pile foundation basement:
- Hinged screen;
- Strip foundation (shallow).
According to statistics, hinged skin technology is more often used. Its essence lies in the fact that after their installation, wooden or metal guides (crate) are welded or fixed on screw piles on screw piles. After that, sheet material is attached to them (flat slate, corrugated board, vinyl siding, thermal panels).

The work is completed by surface finishing and installation of shaped elements (sills, junctions, drips).
The advantages of a hinged plinth include:
- Low costs (expenses are 2-3 times lower than when pouring a strip foundation);
- Simple and short installation (2 people in 10 hours can complete the cladding on a house measuring 6x8 meters);
- Good ventilation and protection of the underground space from moisture;
- Aesthetics (modern finishing materials reliably imitate expensive types of finishes made from natural wood and stone).
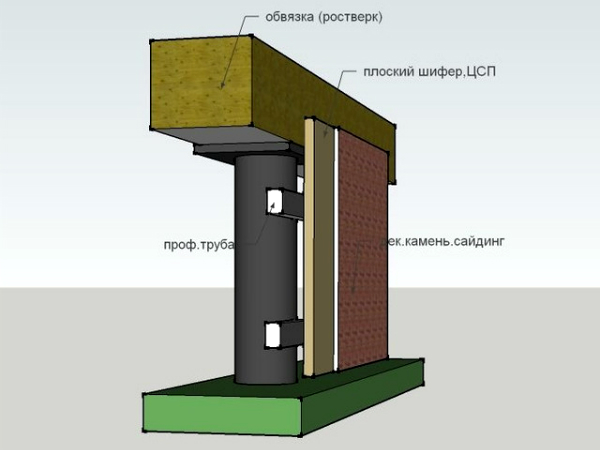
A strip foundation (shallow) for facing a pile grillage is made using heavy materials: brick or stone. The complexity of such work is higher than when installing a hinged screen.
Preparatory operations and stages of arrangement:
- A trench is being dug along the perimeter of the building (depth 20-30 cm, width 15-20 cm);
- A frame of reinforcement with a cross section of 12 mm is placed in the recess and it is poured with concrete;
- After giving the foundation time to gain strength (1-2 weeks), a brick wall half a brick thick is erected on it or a natural rubble stone is laid;
- From the inside, the brick plinth of the foundation of screw piles is sheathed with insulation (polystyrene, mineral wool);
- Outside, if necessary, it is trimmed with decorative plaster.
To increase the service life and increase the rigidity of the base, some builders make the concrete "tape" wider and raise it 20-25 cm above ground level. In this case, the monolithic foundation covers the bottom of the piles - the most vulnerable place for metal corrosion.
This version of the foundation for brick cladding reliably protects the piles from corrosion and increases the strength of the base.
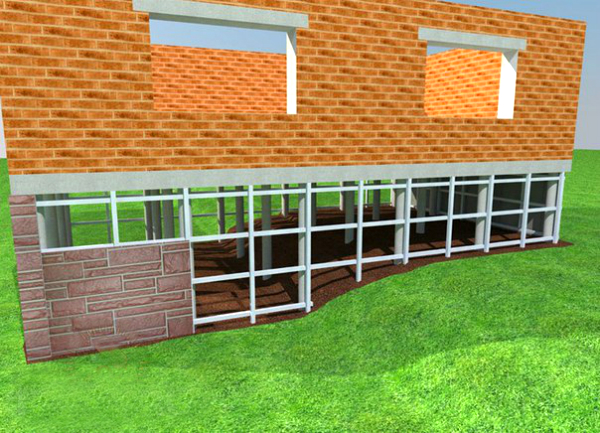
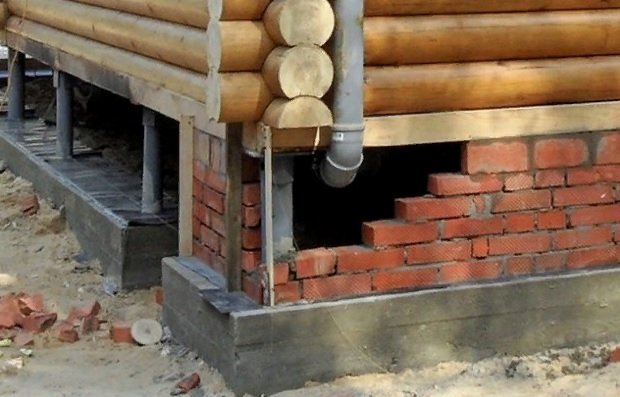
Another option for sheathing the foundation of screw piles can be called intermediate. It does not require pouring concrete to support the masonry and does not require the installation of rails to which the hinged screen is attached.
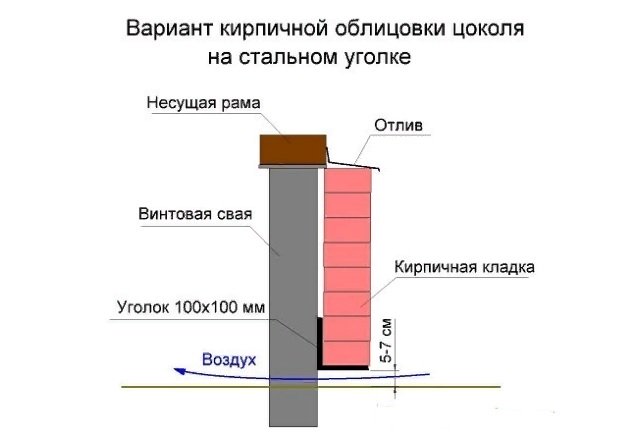
Brick cladding of the plinth using a steel angle
In this case, a steel corner is welded to the piles at a distance of 5-7 cm from the ground. The size of its shelf is 100 or 120 mm. The rigidity of the profile is quite enough to support the masonry half a brick thick. The gap between the corner and the ground serves to ventilate the underground space.
The main methods and functions of finishing a pile foundation
The pile foundation is masked in several ways, that is, there are several options for how to close the base in a pile-screw foundation, this is done using:
- Hanging elements.
- Shallow tape base.
In the first case, light and thin materials made of wood, composite or polymers are used as hinged elements. They are attached to piles or a frame.This is a more economical way to close a pile foundation, the arrangement of which will not take much time. In addition, the above materials give a very small load on the screw supports.
For the second method, brick, natural stone, cinder blocks, concrete and other durable and heavy building materials are used. The design turns out to be more reliable, durable, better protecting the pile frame.
The use of basement siding
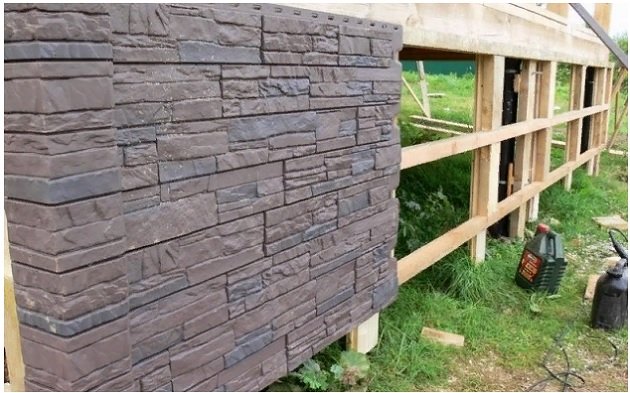
If you only need to decorate the base, and additional insulation is not required, you can use siding. The material is represented by a wide range, including products with different textures and colors.
With it, the base will take the form of a neat pedestal, with a building towering on it.
To install siding you will need:
- Clear the construction site of excess debris;
- Select soil around the outer perimeter of the house;
- Form a trench with a half-meter depth. It should go under the wall a little;
- After the excavation of the earth, a slight slope should form;
- Cover the entire surface of the pit with a layer of waterproofing;
- Pour crushed stone on top and lay a PVC drainage pipe around the perimeter;
- Carry out the withdrawal of wells for drainage;
- Fill the trench with sand and compact well;
- Form a blind area. It can be made from paving slabs or paving stones;
- Weld holders to the surface of the piles. Guides will be installed on them;
- Make a wooden or metal frame. To prevent wood from rotting, it must be treated with an antiseptic;
- Install siding panels;
- Install drains. They are needed in order to remove moisture.
Hanging plinth. Installation steps
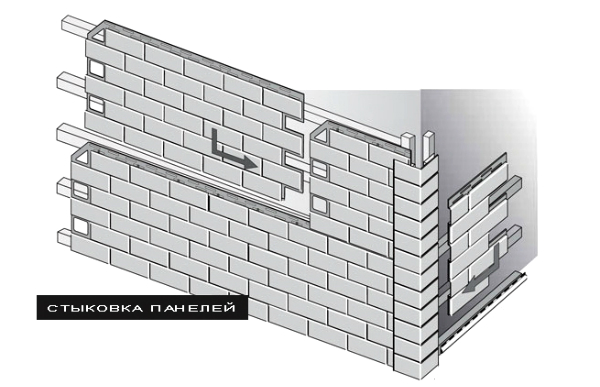
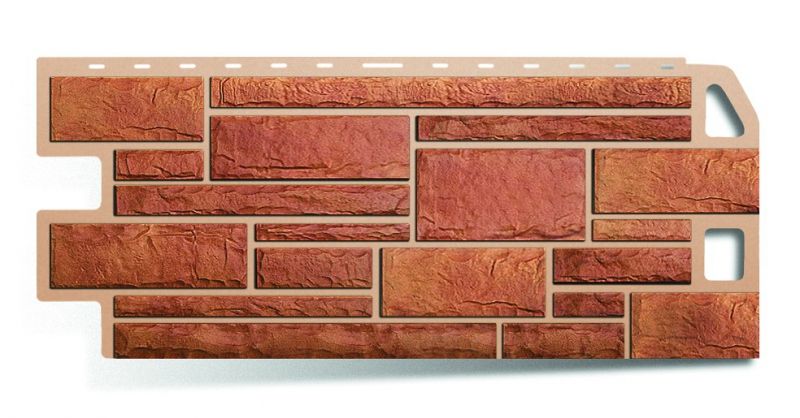
Before starting work, you need to decide what you want to sheathe the base in the pile foundation. As we have said, the choice here is quite wide. Of the materials offered on the market (corrugated board, siding, flat slate, thermal panels), basement siding is the most popular.
These are plastic panels, on the surface of which the texture of brickwork, wood or natural stone is applied. Working with them is easy and simple. The most expensive operation - finishing the basement siding is not needed. Its service life is at least 30 years
It is also important that PVC plastic does not rot and does not require updating by tinting.
Fitted with plastic cladding, shaped elements are sold (external and internal corners, docking, starting and finishing strips).
Do-it-yourself installation of a plastic screen can be done by any beginner.
We describe the main stages of this work:
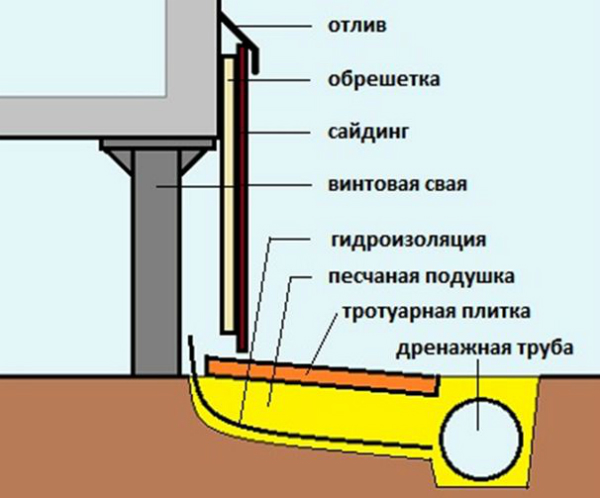
- Before the sheathing of the pile foundation begins, a part of the soil is removed along the outer contour of the building (the depth of the excavation is 20-30 cm and the width is 50-60 cm). Roofing material is laid at the bottom and covered with sand from above. This is done in order to protect the metal of screw piles from rain and snow moisture. For quick drainage of water, a drainage pipe is laid in a sand cushion;
- The finishing process includes the installation of a crate (framework) to which the siding will be attached. The crate consists of two or three horizontal rows of wooden bars or a profile pipe 40x20 mm. The frame is fixed to the piles through steel corners (brackets) welded to their surface. The size of the corners is selected so that the lining protrudes 3-4 cm beyond the surface of the grillage;
- The corner elements of the siding, the starting profile are attached to the installed frame and the installation of the panels begins, moving from the corner from left to right. A gap of 3-5 cm is left between the sheathing and the surface of the blind area. It performs two tasks: ventilation of the underground and compensation for frost heaving of the soil;
- The sheathing is fixed with self-tapping screws, screwing them into the crate through oval holes made in plastic. To exclude thermal deformation of the panels, self-tapping screws 1-2 mm to their surface.This allows the plastic to expand and contract under the influence of ambient temperature without warping;
- Having finished the sheathing, ebbs made of sheet steel coated with a polymer film are attached to the supporting frame of the foundation. They cover the junction of the panels with the crate.
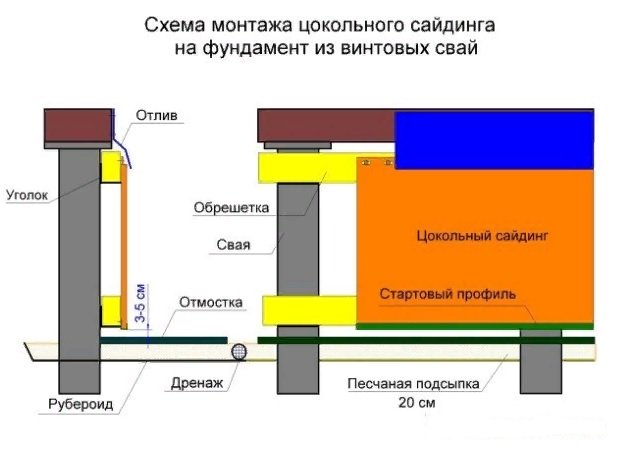
Scheme of installation of basement siding on a screw foundation
When using cement-bonded particle boards (DSP) with a thickness of 16 mm or flat slate for sheathing the plinth, the installation of the crate can be waived. The rigidity of these materials is quite high. Such lining will not lead to severe frosts and summer heat.
It should be noted that, having saved on the crate, you will have to spend money on finishing. Leaving nondescript gray slate or DSP without a decorative layer is not the best option. To ennoble these materials, you will have to hire a plasterer.
Considering the materials for finishing the pile foundation, let's pay attention to the thermal panels made of polyurethane foam. Unlike PVC siding, they combine three functions at once: screen, finish and insulation
Professional flooring can be attributed to the category of budget cladding. The technology of its installation does not fundamentally differ from the installation of basement siding, DSP slabs and thermal panels on the crate. The profiled sheet of brand C (wall) is best suited for work. It is light and has a small wave height.
In addition to the material of a single color, today you can purchase corrugated board with a pattern that imitates masonry. The low price and durability make this plating option quite popular. It goes well with walls made of profiled timber, rounded logs and a facade sheathed with plastic panels.
How to make ventilation in the foundation
There are several factors that determine how exactly it is necessary to equip the basement ventilation:
- the location of the building;
- foundation type;
- climatic features;
- soil composition.
Given these features, a project is being drawn up for natural ventilation of the underground space, the foundation of the building.
Basic rules for the placement of ventilation openings:
- the distance between the openings is not more than 3 m;
- distance from the inner corner - 1.5 m, not less, in order to avoid the formation of air pockets;
- height from the ground level to the middle of the opening is not less than 30 cm;
- for construction in a lowland, the number of ventilation openings increases by 1.5-2 times;
- for buildings on hills, on the contrary, it can be reduced;
- the approximate dimensions of the ventilation holes are 15-20 cm in cross section, or 15 cm on the side of a rectangular / square opening.
Making a shallow foundation
Finishing the basement is carried out after pouring the tape base:
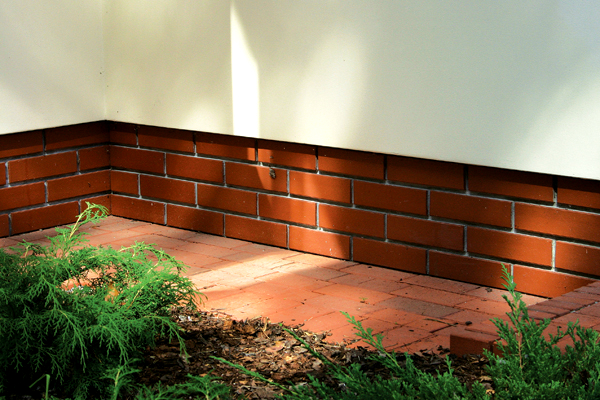
- Brickwork is installed on the tape base;
- It is brought under the walls, vents are formed;
- The façade is being finalized. For this, plaster or plastic panels can be used.
Advantages of brick finishing:
- Such masonry additionally protects the lower part of the building;
- When finishing, a much smaller amount of insulation is consumed than in a hinged structure;
- The design of the tape base is carried out simultaneously with the construction of the blind area;
- Reduced construction time;
- It becomes possible to create a basement;
- Enhances the aesthetics of the design. You can choose any form of decoration.
Plinth finish
A variety of materials are used to finish the basement. The main requirement is that they be strong enough to withstand being in the water.
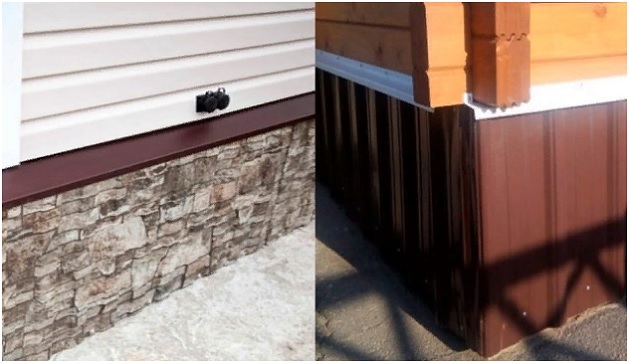
Optimally, the foundation sheathing is carried out with a special one or closed with a profiled metal sheet. Siding imitates the classic stone materials used for the plinth - rubble stone, brick, flagstone, etc.
Decking of soft colors for the plinth will also look quite beautiful.Their main advantage is that they are easily washed from dust and dirt, and your plinth will always have a presentable appearance. Siding can be metal, plastic. It is better to use special siding for the plinth, wall siding will not work here.
Before starting work, it is necessary to install the crate. It is made from wooden bars with a section of 50x50, which must be treated with a composition against decay and fungus, or special plastic guides. Since the bars will be in a humid environment with poor air circulation, it is imperative to treat them with special compounds!
The bars are attached to piles or a monolithic plinth of the house with the help of self-tapping screws. The fastening step depends on the type of siding panels. Usually they use large-sheet siding with a 30 cm bar fastening step, the same rule is also suitable for corrugated board. Then a metal corner is fixed in the lower part. The corner should be higher than the blind area, so it can be done in advance and align the inner perimeter under the corner.
After that, siding or corrugated board is attached to the bars, cutting it along the lower corner, and maintaining a straight line from above. The corrugated board is fixed with an overlap of sheets into two waves. Close up corners, make out windows with slopes. At the end of the work, an ebb is installed in the upper part so that water does not get under the siding.