Literature
- Krylov, G.I. Kamenka. - Saratov: 1980.
- Feldman P.A. The pride of the land of Kamenskaya. - Penza, 2004. - 57 p.
- Feldman P.A. History of the brick factory (1912-2012). - Penza, 2012. - 98 p.
- Feldman P.A. Kamenka and Kamensky district from A to Z: Encyclopedic Dictionary. —Penza. 1998.182s.
- Feldman P.A. Kamenka. Memorial book. 1951-2001 (dedicated to the 50th anniversary of the city): textbook for students. - Penza, 2001. - 87 p.
- Feldman P.A. Kamenka. Guide: to his native city in the year of his 60th birthday! From stone entrepreneurs. - Kamenka, 2011. - 22 p.
- Feldman P.A. Kamenka from ancient times to the middle of the XIX century. - Kamenka, 1995. - 49 p.
- Feldman P.A. Kamenka - the beginning of my fate ...: Poems and songs. - Kamenka, 2015. - 64 p.
- Feldman P.A. Kamensky sugar factory (JSC Atmis-sugar) 1975-2000. - Kamenka, 2000. - 62 p.
- Feldman P.A. Kamensky bread is the head of everything: (historical essay. Kamensky elevator). - Kamenka, 2016. - 83s.
- Feldman P.A. Kamenets during the Great Patriotic War 1941-1945. - 2000.56s.
- Feldman P.A. Kamenets in the Great Patriotic War 1941-1945. - . - Kamenka, 2010. - 54 p.
- Feldman P.A.
- Feldman P.A. There is no homeland more beautiful: a textbook for students. - Kamenka, 2008. - 161 p.
- Feldman P.A. Musa Bigeev - an outstanding scientist-encyclopedist: an essay on the life and work of .I. H. Gurkin, P. A. Feldman. - Kamenka, 2013. - 47 p.
- Feldman P.A. Ordered to survive / KNOU DPO Kamenskaya Automobile School DOSAAF Russia named after. Hero of the Soviet Union V. S. Parshin. / - Kamenka, 2010.46p.
- Feldman P.A. Way to the century: to the 100th anniversary of the founding of the Kamensky garrison. - Kamenka, 2006. 42p.
- Poluboyarov, M.S. Kamenka / Penza Encyclopedia. M.: Scientific publishing house "Great Russian Encyclopedia", 2001.
Metal heater combined with a kitchen stove
Let's look at another version of a homemade metal heater, but this time combined with a kitchen stove. This design will be convenient if in the bath you have a rest room layout where you can relax after the bath and cook something to eat. Also, the option of combining a heater with a kitchen stove is well suited for a bath attached to an existing country house that already has a kitchen. The stove's firebox is connected to the stove's ash pan. The heater also has its own door for the possibility of heating the heater when the kitchen stove is not in use. The steam room is separated from the kitchen by a brick partition, and to protect it from burns from the side of the steam room, the stove is shielded with a metal sheet with a wooden fence. Fire pipes with stones are passed through the stove.
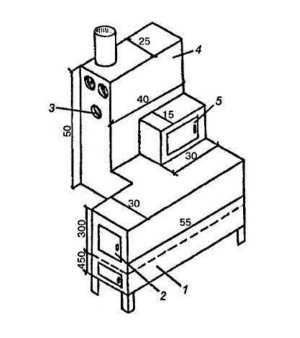
 In the figure, the numbers indicate: 1 - kitchen stove; 2 - furnace door of the kitchen stove; pipes with stone backfill; 4 - stove-heater; 5 – stove firebox door; 6- steam room; 7 - chimney; 8 - brick partition; 9 - kitchen; 10 - screen made of sheet steel; 11 - shelves; 12 - a wooden fence. As you can see, making a metal stove with your own hands is not so difficult. The main thing when installing it is to observe the necessary fire safety rules and do not touch hot surfaces so as not to get burned.
At the end of the article, we bring to your attention a video animation showing the device of a home-made stove-heater with a hot water tank (click the triangle to view). To view in full screen mode, hover over the player and click on the square in the lower right corner.
- How to choose a stove for a bath? >
media
Historically, the first television center in the Penza region appeared in Kamenka in 1957. At the moment, the television center broadcasts from a 45-meter television / radio tower, and until February 2015, a 100-meter medium-wave radio mast with a 50-kilowatt Radio Russia transmitter was in operation. Broadcasting was carried out at a frequency of 855 kHz
- radio stations
| Nominal frequency, MHz | Broadcast program |
|---|---|
| 101.2 | Russian radio |
| 102.6 | love radio |
- The television
| TCE | Broadcast program |
|---|---|
| 2 | First channel |
| 3 | NTV |
| 6 | Russia-1 / GTRK "Penza" |
| 23 | Channel Five |
| 26 | TV Express |
| 29 | Our house |
| 44 | RTRS-2 (DVB-T2) (since 2018) |
| 57 | RTRS-1 (DVB-T2) |
How to make a stove in a bath with a water tank
It is convenient if a built-in tank for heating water is provided in advance in the design of the sauna stove. It can be mounted or attached. Consider the features of both options.
Hanging tank for a bath
A separately located tank has its advantages - it does not evaporate moisture in the steam room and at the same time warms the adjacent room. It is better to take tanks from stainless steel, they are able to withstand even boiling water.
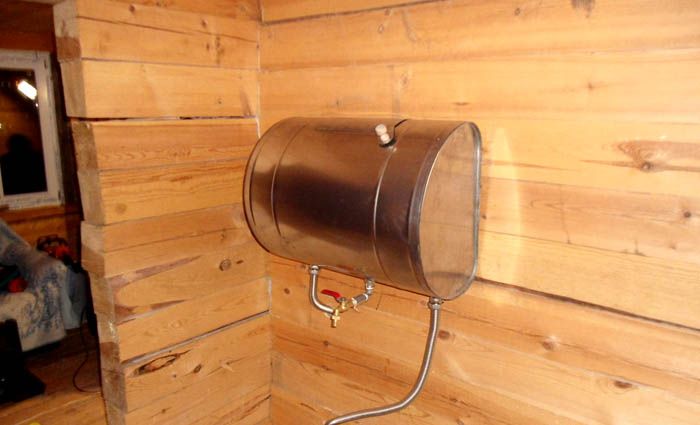
The connection of the furnace and the tank occurs through pipes and hoses
Use pipes that can withstand high temperatures. Water is poured into such a system before the start of the furnace. If you pour water into a hot oven, it may burst due to the temperature difference. Water can circulate in the heating device by gravity - for this, the distance from the furnace to the tank should be no more than 1.5 m, and the lower edge of the tank is placed half a meter above the register. You can simplify your task by installing a small pump.
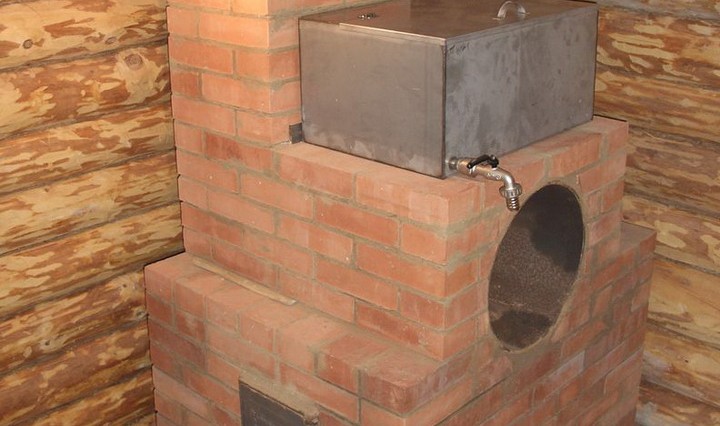
Sauna stove with built-in water tank
The second option for the location of the tank is directly above the stove. It is a simple design that is easy to implement and does not require any pumps or complicated slope systems. Drainage of water from a tank happens through the built-in crane.
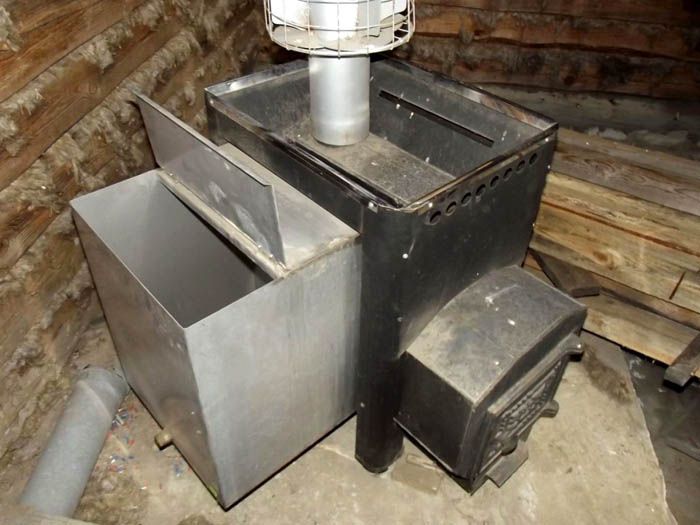
Such tanks are made of solid stainless steel with a wall thickness of 1.5 mm
Built-in tanks contribute to the creation of a humid atmosphere in the steam room. Not everyone will like this, so think it might be better to take the tank out of the steam room after all.
Related article:
The price of the question is how much does it cost to buy a stove for a bath
| Model | Image | Main characteristics |
|---|---|---|
| Hephaestus PB-03 | 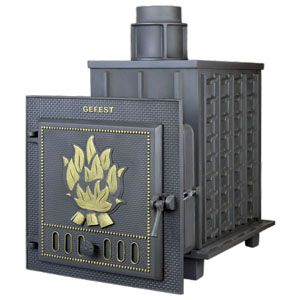 |
Built-in sauna stove. Heated volume - 25 m³. Power - 12 kW. Chimney, wood fuel. |
| Model | Image | Main characteristics |
|---|---|---|
| Vesuvius Skif Standard 12 (DT-3) 2016 | 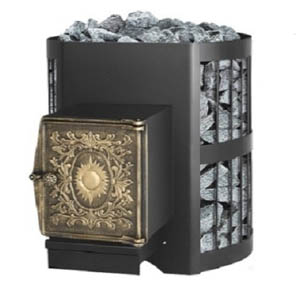 |
Outdoor sauna stove. Heated volume - 14 m³. Power - 12 kW. Chimney, wood fuel. |
| Model | Image | Main characteristics |
|---|---|---|
| Varvara Terma-Kamenka | 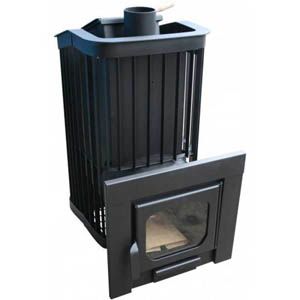 |
Outdoor sauna stove. Heated volume - 24 m³. Chimney, wood fuel, ash drawer. |
| Model | Image | Main characteristics |
|---|---|---|
| TMF Geyser 2014 | 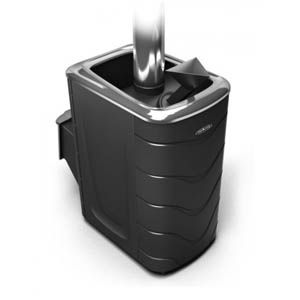 |
Wall-mounted sauna stove. Heated volume - 18 m³. Chimney, wood fuel. The volume of the firebox is 34 l. |
| Model | Image | Main characteristics |
|---|---|---|
| Harvia M3 | 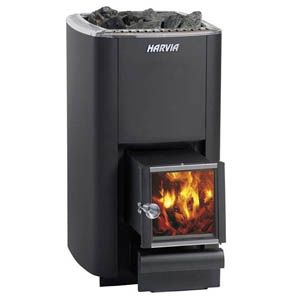 |
Wall-mounted sauna stove. Heated volume - 13 m³. Power - 16.5 kW. Chimney, wood fuel. |
| Model | Image | Main characteristics |
|---|---|---|
| Feringer Optima | 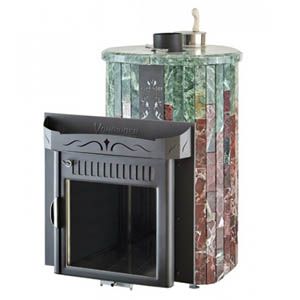 |
Wall-mounted sauna stove. Heated volume - 18 m³. Power - 20 kW. Chimney, wood fuel. |
As you can see, you can pick up quite a decent unit for a relatively small cost.
The units come factory equipped with fire-resistant glass doors and look very attractive.
Save Time: Featured Articles Every Week by Mail
Local government
In accordance with the Constitution of the Russian Federation, the Federal Law of October 6, 2003 No. 131-FZ “On the General Principles of Organization of Local Self-Government in the Russian Federation”, the Charter of the Penza Region and the laws of the Penza Region, the urban settlement of the city of Kamenka, within which local self-government is carried out, is a municipal education, has the status of an urban settlement and is included in the Kamensky district of the Penza region on the basis of the Law of the Penza region dated February 20, 2006 No. 953-ZPO “On the transformation of the municipalities of the city of Kamenka and the city of Serdobsk of the Penza region”.
The new version of the Charter of the city of Kamenka, Kamensky district, Penza region, was adopted by the Decision of the Assembly of representatives of the city of Kamenka, Kamensky district, Penza region dated November 15, 2011, No. 358-43/2.
Metal sauna stoves
As for metal products, it is worth adding to their advantages:
- Compact and can be installed anywhere.
- Low cost of material.
- Operational installation of the unit.
- Instant heat transfer.
Attention: in order to build a stove from metal, you must be able to work with a welding machine. But such furnaces also have disadvantages:
But such furnaces also have disadvantages:
- High heat that can cause burns.
- Rapid cooling.
In order to protect yourself from hot metal as much as possible, it is recommended to make protective screens of brick for such structures.
Combined brick and metal ovens are considered ideal.
What is better factory or homemade
If we talk about the aesthetic side of the issue, of course, the factory ones are more beautiful. Although the aesthetics are different for everyone, in general, factory products look neater. I must also say that serious manufacturers are constantly conducting research, modifying old models, developing new ones. If you've already bought the stove, this is unlikely to please you in any way, but if you are just looking after the stove, this can be useful - modified models are usually really better than prototypes. And some new developments are an option and can be installed on any units, sometimes even from another manufacturer.
Classic design of factory-made bath/sauna stoves
There are, of course, factory furnaces cons. The very first - good ovens have a high price. The second disadvantage is that they are often made of thin metal. And it is these ovens that are usually in the segment of budget ovens. And thin metal in the baths burns out quickly. The third drawback is that you are forced to adapt to the existing design. If the stove is purchased during the construction process, this is not scary, but if it changes, this can become a problem. You will have to look for a unit with the same dimensions or rebuild / redo the premises.
The advantage of homemade bath stoves is their reliability. They are usually brewed “for themselves”, and if for sale, then more often also “as for themselves”, therefore thick metal is used - certainly not thinner than 6 mm. The relatively low price can also be attributed to the positive aspects, especially if you know how to cook metal yourself. Not everyone likes the appearance, it is definitely not for everyone, but often these stoves are hidden behind a brick screen, so the appearance is not always important.
Appearance is not the strongest part of homemade sauna stoves
As for innovations and improvements, they are usually borrowed from factory developments. Craftsmen do not need to model processes using complex programs. They looked in the store at the finished product or even at the photo, and already have an idea of how the device works, what it does, and how to make it. Not everyone, of course, is capable of this, but many are. So there are also enough interesting technical solutions in home-made stoves.
Story
Archaeological excavations have shown that people have lived on the territory of the Kamensky district since ancient times. Late Paleolithic sites have been discovered. During the excavations, two-sided processed arrowheads, retouched plates, bone and horn items were found.
In the IX-X centuries, these lands were part of Kievan Rus, the Galicia-Volyn principality later - the Grand Duchy of Lithuania.
The first mention of Kamenka is found in the documents of 1609 related to the entry of the Zaporizhian Army into Russian citizenship. In January 1654, Prince Fyodor Nikitich Boryatinsky was sent to Briaslavl to bring the population - the Cossacks and the townspeople - to the oath of allegiance to the Tsar of Muscovy. The "Painting of the Bryaslav Regiment" mentions "Kamenka Dnistrovaya".
The left bank of the Dniester was annexed to the Russian Empire in 1793.
In 1857, a free pharmacy was opened to serve ordinary people. Trade is developing, in 1860 two new crossings across the Dniester were built and two three-day fairs were opened. Vineyard terraces are being built.A climatic station was opened in the landowner's park, a kurgauz and dachas were built, where many patients came for treatment for the bathing and especially the grape season.
In 1938, by decree of the Presidium of the Supreme Soviet of the Ukrainian SSR, the village of Kamenka was transformed into an urban-type settlement. On August 2, 1940, the 7th session of the Supreme Soviet of the Ukrainian SSR adopted the Law on the Formation of the Moldavian Soviet Socialist Republic, which included Kamenka.
In July, shortly after the start of World War II, the region became part of Romania.
After the war, the rapid restoration of the city and the region began. And by 1948, the collective farms and state farms of the left bank had surpassed the pre-war level in all respects. In 1958, the Kamensky cannery was built.
In 1939-1997. from Kamenka there was a narrow-gauge railway to the Ukrainian Rudnitsa, which was then dismantled.
The Kamensky district was formed on January 10, 1969 by the Decree of the Presidium of the Supreme Soviet of the MSSR.
In 2002, Kamenka received the status of a city and the administrative center of the Kamenka district.
Brick ovens for a frame bath
As mentioned above, a sauna stove can be built from brick or metal. Let's take a closer look at the positive characteristics of stone products.
Brick has always been used in the construction of stoves in baths. This material has a presentable appearance, long service life, the ability to create the necessary climate and an atmosphere of warmth and comfort in the steam room. The main advantages of stone ovens also include:
- High thermal insulation qualities. Even after the complete burning of coal or firewood, the unit maintains the required temperature indoors for a long time.
- Ability to heat large rooms. Such structures can have different sizes and differ in power.
- Safety in operation.
But the disadvantages of stone ovens can be added:
- Complicated installation process. Without special skills in construction, you will not be able to make a safe and easy-to-use structure.
- High cost of consumables.
- Long warm-up time.
- Large product sizes.
However, heater stoves are quite popular among consumers. With their help, you can create the most favorable atmosphere for a family holiday. If you have the necessary drawings at hand, a plan is a project for the future structure, you have little skills in construction, you can build such a structure on your own.
How to make a do-it-yourself sauna stove out of metal
It is easy to make an iron stove for a bath with your own hands, having the skills to work with a welding machine. Such a heater will cost you less than a brick structure, and if properly executed, it will be no less effective.
How to choose and cut metal
What steel is better to choose for the stove? There is only one advice here - the thicker the material, the better. The whole question is in the budget, because a thick sheet is expensive. The best option is a thickness of 2 mm. Make markings on the sheets with chalk in accordance with the drawing. Here is an example of a drawing of a metal stove for a bath, which is easy to do with your own hands.
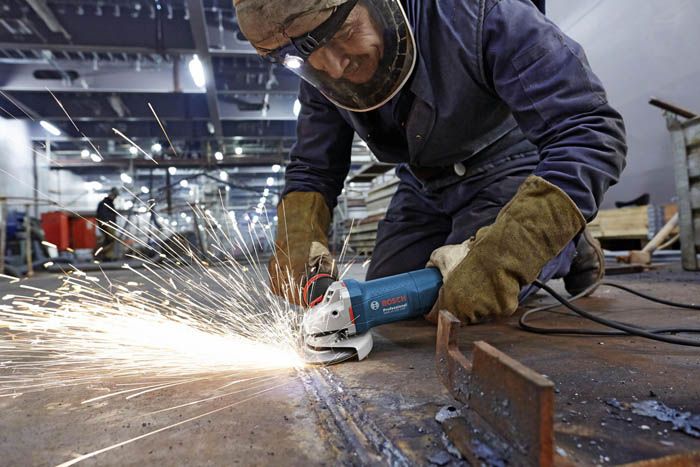
It is more convenient to cut metal with a grinder, try to work so that all corners are even
Remember to use goggles and gloves, metal shavings can hurt. All burrs must be removed and roughness sanded.
Do-it-yourself welding of a metal sauna stove: step by step instructions
Working with metal requires safety precautions: you need to protect your eyes and hands. Do not forget that working with a welding machine can have a very detrimental effect on the condition of the retina, use a special mask for welding. So, the sequence of actions.
Illustration
Action Description
Join two parts at right angles and weld them in three or four places.Later you will completely weld the seam, but now the task is to assemble the body.
In the same way, grab the back wall of the oven. Make sure that all corners of the structure are straight.
Connect the parts in series according to the diagram. Place all tacks inside the structure, then welds will be located outside.
Secure the fifth part of the box with a tack from the inside. Later, it will need to cut a hole for the chimney.
The hole for the chimney, given the thickness of the metal, is more convenient to cut with a plasma cutter.
After the hole is ready, you can close this part of the furnace with another part.
After assembling the main parts of the structure, all seams must be hermetically welded.
Cut a hole for the ash pan. Here later you need to fix the adjustable door.
Another technological opening is the fuel loading door.
This part will be made directly from a cut piece of metal.
At the bottom you need to make holes for air intake.
It is important to securely fasten the hinges for the door and make a handle with a locking latch.
To securely lock the oven door, weld the latch fasteners.
The final part of the work is the welding of fasteners for the ash pan grate from a metal corner and the manufacture of legs for the stove. They must be at least 45 centimeters in height.
Notes
- This settlement is located in the Pridnestrovian Moldavian Republic. According to the administrative-territorial division of Moldova, most of the territory controlled by the Pridnestrovian Moldavian Republic is part of Moldova as administrative-territorial units on the left bank of the Dniester, the other part is part of Moldova as the municipality of Bendery. The declared territory of the Pridnestrovian Moldavian Republic, controlled by Moldova, is located on the territory of the Dubossary, Kaushansky and Novoanensky regions of Moldova. In fact, the Pridnestrovian Moldavian Republic is an unrecognized state, most of the declared territory of which is not controlled by Moldova.
- ↑
- The Moldovan language based on Cyrillic graphics is one of the three state languages of the PMR
- Ukrainian is one of the three state languages of the PMR
- . Retrieved January 23, 2014.
- ↑ . Retrieved January 23, 2014.
- ↑ .
- . Retrieved January 23, 2014.
- (July 17, 2002). Retrieved January 23, 2014.
- . Retrieved 15 May 2019.
- Salko Yuri Ivanovich (unavailable link). pmr21.info (April 2007). Retrieved November 12, 2013.
Do-it-yourself step-by-step instructions for laying the walls of the oven for a bath
So, in order to build a brick oven on your own, you need to prepare tools and materials and you can start the workflow. We lay out the firebox of the furnace from fireclay bricks, we equip an ash pan under it. In the ceiling between the chamber and the blower, we install a grate.
The walls are laid out as follows:
We cover the constructed base with roofing material.
We lay out the first row of solid red brick masonry
Please note that the quality of the entire structure will depend on how even this row will be.
With the help of the second and third rows, the shape of the product and the configuration of niches for the ash pan and heater are laid. For this, it is recommended to use fireproof red brick.
An asbestos-cement sheet is laid on the second row, which will form the bottom of the ash pan.
In the third row, the same stove is installed under the firebox on the other side.
On the fourth row, a niche is laid out under the heater and the foundation for the combustion chamber is laid
The floor and walls of the unit are laid out from fireclay, a grate is installed on top.
On the fifth row, the combustion chamber is built up and the bottom of the heater is partially covered. In its lower part, it is necessary to make a small opening for draining excess water.
On the seventh row, stones are laid out, a furnace door is mounted.
In the eighth row, a channel is laid out that will connect the firebox and the interior of the heater.
Before laying out the 9th row, you will need to install a horizontal valve for a direct flue.
In the 10th row, a vertical shutter is mounted.
Next, the rest of the stones are laid out and the stove cover is made of metal.
The combustion chamber is covered with a cast iron plate.
The last are the 11th and 12th rows, the base is being prepared for the chimney.
Other structural elements
Just installing a heater is not enough. It can only function if there is good traction. To do this, you need to build a chimney. In order for the room to have not only dry steam, but also the required amount of hot water, it is necessary to equip it with a heating tank.
Installation of a chimney in a Russian bath
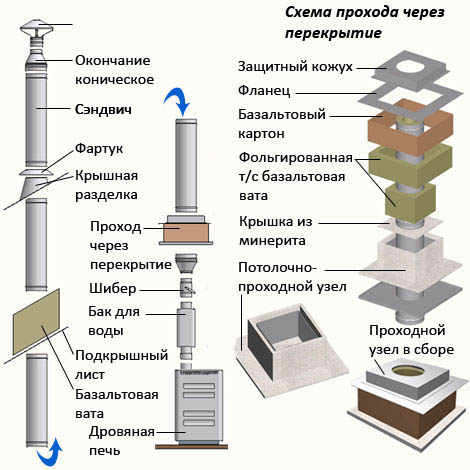
The design of the chimney directly depends on what type of furnace it is intended for. When building a massive brick unit, it is necessary to make a chimney with an increased flow area. The diameter of the chimney must be at least 10 cm. The thickness of its walls must be equal to half the brick. When building a chimney, you can use different types of solutions:
- Clay - for indoor use.
- Lime - for work outside.
Lime mortar will prevent cracking of the joints when exposed to large amounts of moisture. The chimney must rise above the roof level at least half a meter.
Furnaces can be equipped with asbestos or metal pipes, but their lower part must be heat-resistant.
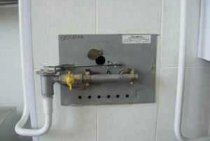
Installing a hot water tank
The sauna stove is equipped with a water-heating tank. It can be open or closed type. If the bath is connected to a central water supply, it is better to install a sealed container with a safety valve.
Heating water in the tank can be done in different ways:
- Capacity is established in a back part of a fire chamber or over it.
- Installation of a water heater on a chimney.
To make a boiler on your own, you will need to prepare a steel sheet 3 mm thick, weld its joints with a continuous seam. The pipe that will be installed inside must be thick. Otherwise, it will quickly corrode.
For buildings with running water, a tank with a liquid heat exchanger can be used. Its contour is welded from steel pipes, the structure is mounted in the back of the furnace.
How to finish the furnace, depending on its type
Finishing the stove will give the bath a noble and presentable appearance. It can be done in various ways: with the help of jointing brickwork and before facing with marble or granite. The choice should be made based on personal requirements, wishes, and financial capabilities.
In conclusion, we can add that it is quite simple to build a brick or metal sauna heater. To do this, stock up on the necessary diagrams and drawings, collect consumables and tools, and stock up on free time. With the right approach to the work process, you will be able to make a stove stove in your bathhouse as soon as possible and at no special financial cost, which will be distinguished by aesthetics, ease of use and a long service life.
masonry mortar
But to solve the question of how to fold the oven with your own hands, one brick is not enough. You will also need a solution.
Masonry mortar for any oven would be best prepared from clay from the same deposit from which the brick is made. Then the coefficients of thermal expansion of the brick and the masonry joint will be the same. And if the thermal expansion is the same, then the durability of the masonry will be much higher. But in our industrial time, finding the same clay from the same deposit is not very realistic. The thinner the masonry seam, the higher the quality of the masonry and the stronger and more durable the stove. Therefore, the thickness of the seam should be a maximum of 5 millimeters and even thinner.With a thin seam, clay will be required approximately 10-12% of the volume of the brick.
To resolve the issue of how to fold the oven correctly, you need to choose the right sand and clay.
- The sand must be pure river sand, but without river silt.
- Fine-grained, that is, a grain of about 1 millimeter. A size of up to one and a half millimeters is allowed, but still undesirable.
- Before preparing the solution, the sand is sifted through a sieve with cells of 1.5 mm.
Clay quality
Clay must be placed in a container, crushed and gradually poured with water, while mixing thoroughly. Leave in a state filled with water for about a day. The water level must be above the clay. The next day, strain the clay solution through a sieve, if there are lumps, then they must be ground and rubbed through a sieve. We repeat the process until we get the right amount of pasty clay. Then add sand to the clay. The amount of sand depends on the fat content of the clay.
- Lean mortar crumbles from the seams, does not provide sufficient bonding to the bricks, strength and density of the masonry as a whole.
- Too greasy solution shrinks and cracks when dried. And it also does not give the desired quality of masonry.
- Reduce the fat content of clay by adding sand.
- The volume of sand should be from ½ to 3/2 of the volume of clay.
An experienced stove-maker will be able to assess the quality of the mortar and clay by touch with his fingers and “by eye”, as well as add the right amount of sand, he knows how to put the stove into a bath. Some authors describe all sorts of "shamanistic" ways. For example, the thickness of the layer or the rate of runoff from a planed wooden plank. But this is all very subjective. After all, who knows what is thick and what is thin? What is fast flow and what is slow flow?
Evaluation of the fat content of clay and the quality of the masonry mortar
For the "teapot" there are several ways to assess the fat content of clay. Here are two methods that seem to be the most objective, because they have numerical indicators that can be measured. You will have to conduct laboratory work on how to fold the stove in the bath yourself and determine the quality of the clay. Take about half a liter of clay, add water and knead with your hands until the consistency of a stiff dough. All the water should be absorbed, and the clay should stop sticking to the hands. Method one
- Roll the clay into a ball with a diameter of about 5 centimeters.
- The ball is placed on a planed wooden board.
- The second plank is placed on top and gently and slowly pressed until visible cracks appear on the clay ball.
Conclusions:
- If the ball crumbles before cracks appear, then the clay is very thin, and the solution is incorrect.
- If cracks appeared at 1/3 of the diameter, then the clay solution is normal.
- If cracks appear on ½ of the diameter, then the clay is very oily and sand must be added to the solution
Method two
- From clay dough, roll two balls with a diameter of about 5 centimeters by hand.
- From one of the balls roll out a cake with a diameter of about 10 centimeters.
- The ball and cake are dried in the shade for about 2-3 days.
Conclusions:
- If the ball and cake are covered with cracks during this time, then the clay solution is too greasy.
- If there are no cracks, and the ball can be thrown from a height of 1 meter onto a wooden surface and it does not crumble, then you have a good solution.
https://youtube.com/watch?v=JEmKhm_YDkM
What is the peculiarity of the stove for the Russian bath
Bath connoisseurs know that the main difference between the Russian bath is in the mode and temperature of the steam room. Humidity here should be in the range of 40-70%, and the correct temperature is 90-120°C. Not every heating device can create such conditions. And one more important point - it is necessary to maintain the required temperature and humidity throughout the entire bathing procedure, and preferably without unnecessary interference with the operation of the furnace. Only in this way, at a uniform temperature, a special steam room atmosphere is created with a soft steam that does not burn mucous membranes and skin.
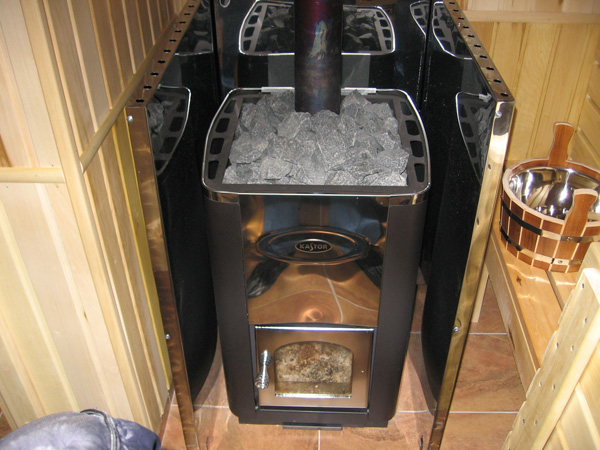
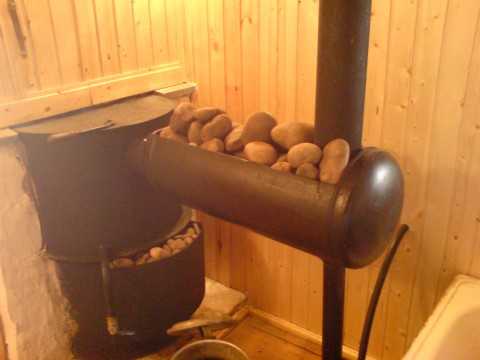
Such an atmosphere is the merit of a stove with stones.They heat up to almost 400 °C in a closed heater
It is the closed container for the stones that allows them to warm up to such a high temperature. The absence of contact of stones with the atmosphere of the steam room gives a light dry steam, which is so valued in a Russian bath
The second and important difference between the heating unit in the Russian bath is the absence of convection, that is, the movement of air masses inside the room. From such stoves there is no heat flow, as in sauna heaters
Convection is allowed only at the stage of warming up the steam room to speed up the process.

If you do not stop the movement of air masses before the start of soaring, the temperature in the steam room will continue to rise, and the humidity will decrease.
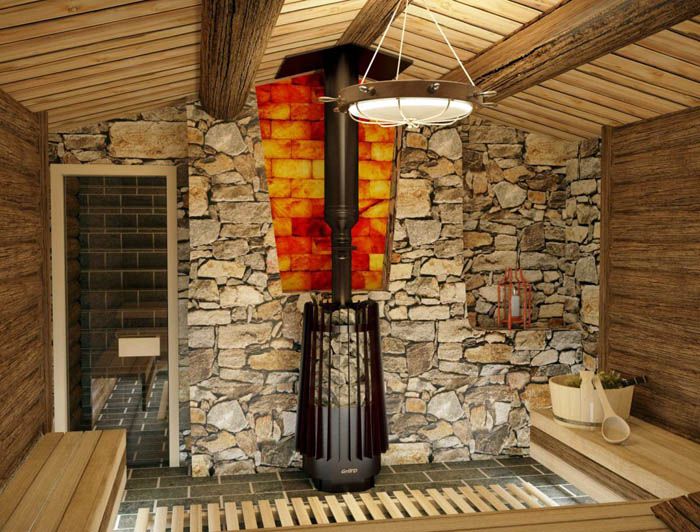
The mild climate of the Russian bath is also created due to the absence of hard infrared radiation. To achieve this result, stoves in steam rooms are lined with stone or brick. The cladding material accumulates the heat of the oven walls and releases it to the atmosphere of the steam room for a long time. This gentle warmth warms the body deeply without burning the skin. In a good bath there are no “bare” metal parts of the furnace, they are all hidden behind the lining. Even the chimney is hidden behind the lining. A possible, but not the most correct option would be to use a grid filled with stones as an IR screen.
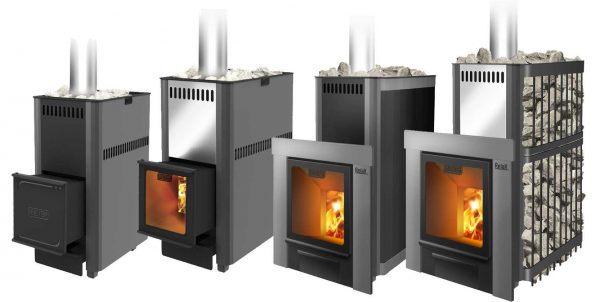
So, what do we get as a result: the right stove in a Russian bath is a closed heater with the ability to adjust convection up to a complete overlap, lined with stone or brick, without open metal parts. The photo shows examples of sauna stoves suitable for our conditions.