Replacement of control rods for ventilation and interior heating
Remove the instrument panel cover.
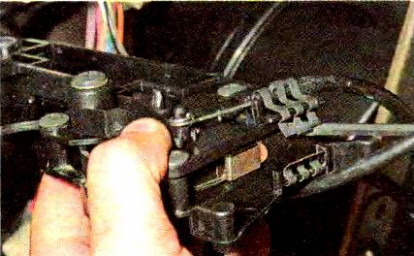
With a slotted screwdriver, we squeeze the spring holder of the shell of the thrust of the air temperature controller and remove the holder
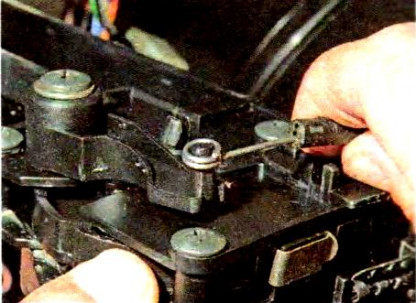
We remove the thrust from the lever of the air temperature regulator.
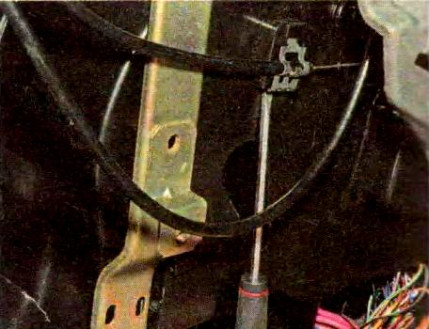
Using a slotted screwdriver, we press the spring holder of the shell of the air temperature regulator rod from the heater body and remove the holder.
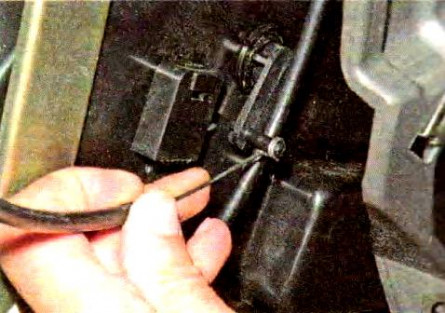
Remove the air temperature control rod from the lever on the heater housing.
We install a new thrust of the air temperature regulator in the reverse order
The sequence of operations for replacing the switch rods with the operating mode of the fan and the air distribution regulator is similar.
, generator repair .
Well, here are the pictures:
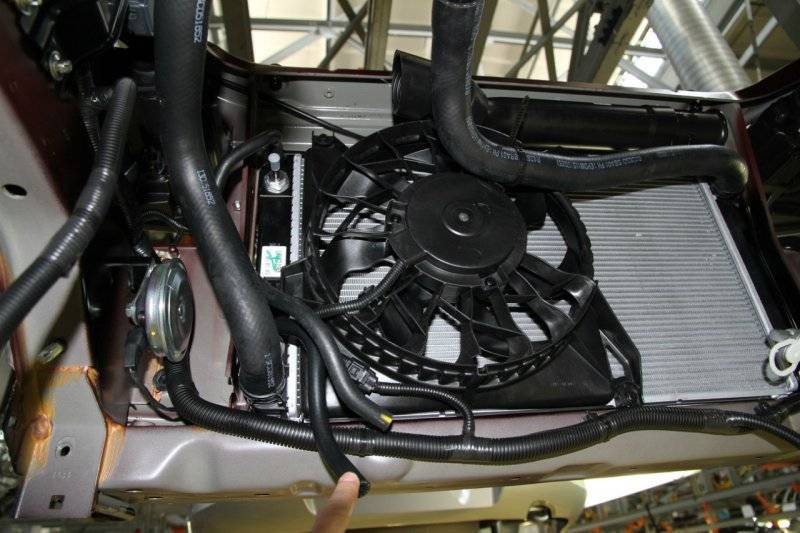
Unscrew:
three screws for fastening the radiator and three wrench nuts for 10 fastening the gas pedal
To all owners of Kalin! It is better to immediately pull the ECU out of its regular place and place it anywhere, as far as the wires allow, but not under the stove body
Two bolts secure the pad, it is Velcro, it’s safe to tear it off and you will be pleasantly surprised by the number of nuts and screws under it :-)
These screws do not need to be loosened.
It's all to tear or tear, dump a slide into a corner
To unscrew the tunnel screw, you must first loosen one handbrake fastening bolt and unscrew one completely
Here this bolt of fastening of the body of the stove does not need to be unscrewed until you remove the torpedo panel
Then it will be much more accessible.
We also unscrew this bar after removing the torpedo
We keep spinning
Removing the dash panel
Now you can move the stove body and remove the radiator
We fold the bolts and screws carefully so that later we don’t forget which one was unscrewed from where and where to screw it later during assembly
We did NOT have enough three screws and two nuts :-) I had to get it from stocks
By the way, in order to deploy the stove body, you must first get the air duct from the motor to the stove body
Before that, halving the motor housing
robinzon66, site E1.ru
I add pictures of a more correct, according to the manual, method of replacing the stove radiator at Kalina. We take out the saddles, unscrew the EUR with the relay shaft from the panel and move the entire panel
Zufa_66.narod.ru
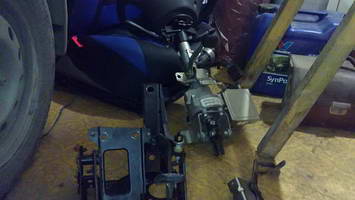
One way to remove the heater core involves removing both front seats, tunnel, electric power steering column and pulling out the entire front panel.
The second method, described by me, involves dismantling the panel lining and pulling out the stove body.
Both methods are quite complicated, expensive and entail subsequent probable malfunctions of the wiring and some nodes. a lot of things need to be turned off and unscrewed.
The third method, which I propose for discussion, is distinguished by the fact that a minimum of nodes and connectors is removed, it takes many times less time, but it requires some refinement of the radiator and pipes. Well, of course, if less time is spent on repairs, then its price is also less.
So, let's go: We have Kalina with air conditioning and a leaking stove radiator. By the way, the advantage of this method is that I can’t even imagine what it will take to remove the entire panel if there are still tubes and an air conditioner evaporator (!) We DO NOT remove the panel here.

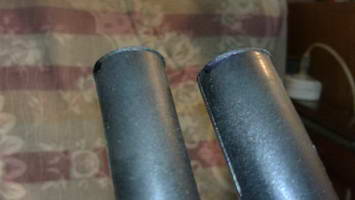
Saw off both tubes with a hacksaw. The length should be chosen according to the thickened bead of the thick tube.
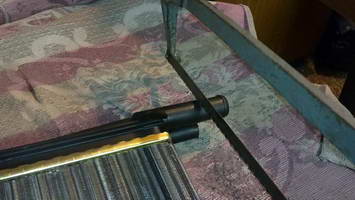
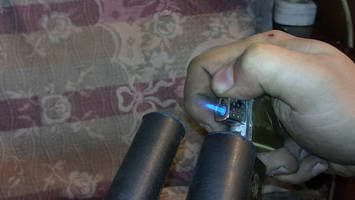
We heat the sawn ends with a lighter ...
And resting on something strong and cold, we make new flanges so that the stove pipe does not slip when there is pressure in the cooling system
Malfunctions and repair of the heating system Lada Kalina
It is not always possible to determine the cause of a heating malfunction in a car the first time, so we will consider the most common problems and methods for their elimination.
The principle of operation of the heating system in Lada Kalina
Before you independently look for a problem in the heating system of a car, you should study the principle of its operation.
The heating system control unit evaluates the data received from the ceiling temperature sensor. After that, he compares the parameters obtained with those set by the driver on the stove panel. If the difference in readings deviates by approximately 2 degrees, the heater control unit sends a command to the microreducer. The latter, in turn, opens and closes the dampers of the stove, through which a heated air flow enters the cabin.
For this reason, if a hot or cold air stream blows from the heater in Lada Kalina, it doesn’t matter how the handle is installed on the stove panel - it’s worth checking the cabin temperature sensor. In addition, quite often problems with the stove can appear due to the car's engine cooling system.
We advise you to check the level of antifreeze in the expansion tank. If it is insufficient, it is necessary to add coolant to the normal level mark.
In addition, quite often problems with the stove can appear due to the car's engine cooling system. We advise you to check the level of antifreeze in the expansion tank. If it is insufficient, it is necessary to add coolant to the normal level mark.
It is worth noting that many drivers in winter deliberately leave antifreeze at a minimum mark, due to which in cold weather the heating system starts to blow warm air faster.
Method for checking the stove on Lada Kalina
The whole procedure is carried out on a running engine.
- We move the temperature control knob of the control unit to the extreme position (blue zone).
- Smoothly switch the fan speed from the first to the fourth speed.
- We monitor the intensity of incoming air, outgoing and air duct. With each speed, its flow must increase.
If the Kalina stove still does not work, we check the operability of the fuse, marked F5 in the diagram. Together with him, we check the power circuit. If the fan does not work at any speed or its intensity does not change linearly, it is worth checking the switch and additional resistor. If there is insufficient air flow, the cabin air filter must be replaced.
After everything described, we proceed to check the heater dampers. For this:
- We move the temperature regulator to the extreme position (blue zone), set the fan speed to maximum.
- We rotate the damper control knob on the block, at the same time we control changes in the direction of the air coming out of them.
If the air flow does not change its direction, this indicates a malfunction in the mechanical part of the heater control unit. For example, the thrust has flown off or, due to a breakdown of the roller, it does not wind onto it, or the damper has simply jammed. At 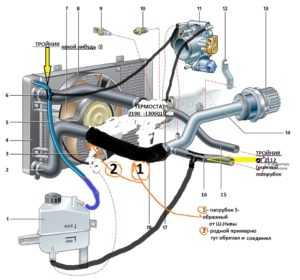 installed climate control, it is worth checking the operability of the micromotor reducer of the damper of the ventilation unit, air conditioning and heater. For this:
- warm up the engine to operating temperature;
- the temperature controller is transferred to the extreme red zone;
- we control the presence of warm or hot air flow from the air ducts.
If the temperature of the air flow has remained unchanged, the operability of the mechanical part of the heater control should be checked. When using climate control, we carry out the above operations. We also check the health of the engine cooling system.
In conclusion, we note that if you are not confident in your abilities and capabilities, it is better to send the car for diagnostics to trained specialists, because any mistake you make leads to the replacement of the entire unit or system, which will hit the family budget hard!
ladaautos.ru
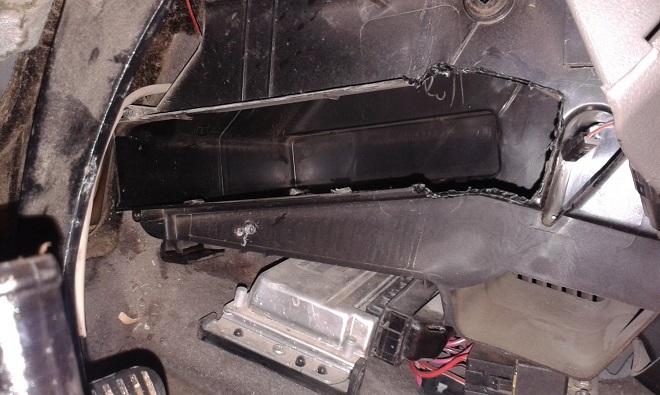
Somehow I got into the niche of the trunk on the right and left, where the troughs are, I found a lot of water there, 2 liters in the trough, and under it another 3 liters of water
The idea arose that the cabin ventilation valve was to blame. It’s useful to look at the valve, but there’s no way to get to it, you can only feel it with your hands. And here's what I found...
 |
This is what the valve should look like in normal position |
 |
But in this position was my valve - one of the petals caught on the grill. The fact is that in the normal state, when the heater fan is running, the valves open and release air from the passenger compartment to the outside. When a vacuum appears in the cabin, the valves close, lying on the grilles, and do not let street air into the trunk. When you open a window to smoke, air is sucked out of the passenger compartment into the gap between the glass and the door, and instead of closing the valve, it caught on the grill at an angle and through it, like a vacuum cleaner, water from the road and all shnyag was sucked from under the bumper. I corrected the valve with my finger, but it can bend again ... At first I wanted to install a fine aluminum mesh instead of a rare plastic grille in the valve, but then a better idea came to mind |
 |
I bought a set of valves and decided to stick stainless steel strips on the rubber bands to prevent bending the corners of the valves and flooding the trunk in the future. At work from stencils for mounting boards there is a sheet stainless steel with a thickness of 0.12 mm |
 |
I cut out strips of 80x20 mm from stainless steel. Wiped with alcohol something talc-like from the rubber bands of the valves |
 |
I decided to glue it with the right glue, designed just for connecting the metal-rubber pair. I degreased the stainless steel strips, applied the first layer of glue to both surfaces. After waiting 15 minutes, I applied a second layer of glue to the rubber as instructed and pressed hard. |
 |
After rubbing the resulting petals, I realized that the likelihood that the valve would catch on the edge of the grill with a corner still remained: it became more difficult to catch, but it also became much more difficult to unhook - this is no longer a simple elastic band, it does not bend, but springs. I decided to supplement the grilles along the outer edges with metal plates that would not allow the edges of the petals to get into the corners of the grilles |
 |
This is how the blanks of the extreme corner plates look like |
 |
Here's what happened in the end. The mass of stainless steel plates is a fraction of a gram, the valves open from the breath, which demonstrates their performance. The plates on the gratings do not protrude above the plane blocked by the valves, the valves close tightly enough |
 |
We remove the bumper from the car, change the valves, check their operation. And we are satisfied! |
What is the damper responsible for?
During the operation of the motor in the cooling system, the heated liquid moves through, while it heats the air passing through it. The volume of air passing through the radiator and outside it is controlled by the main damper of the stove. Depending on how the temperature control knob is located on the dashboard, the amount of incoming air will depend.
You can distribute the movement of air throughout the cabin by turning the handle that regulates the position of the damper. But there are cases when the damper is stuck and it is impossible to properly regulate the flow of heat into the interior of Kalina.
If the matter is only in the valve, then the situation can be corrected quite simply by pulling up its cable. If after these actions the situation has not changed for the better, then you need to conduct a visual diagnosis of the state of the mechanism and perform a number of simple actions.
Technical device of the heating system
The functions of the heating system are to heat and cool the car interior, as well as blowing warm and cold air on the windows. If you cannot effectively warm up the interior, and the windows constantly fog up, you should look for the cause in the operation of the stove.
Lada Kalina has a traditional supply and exhaust system, and the air is heated by a liquid heated to 90 ° C in the cooling system, which is then pumped through the stove. In the stove there is a heat exchange of water with air, which is subsequently directed through the air ducts to the passenger compartment.
Heating system in the car
The heating system of Lada Kalina includes the following elements.
- Radiator with air distributor.
- Electric fan.
- Ventilation system filter.
- Air ducts.
The fan on Kalina has 4 modes of operation. The change in the rotation speed is provided by the work of additional resistances.If it is necessary to replace the resistors, it should be borne in mind that they have a resistance of 0.23 and 082 ohms.
The air flow is carried out through the intake device installed in front of the windshield. Before entering the cabin, the air is cleaned through a cabin filter. The filter element is made of synthetic fabric, and its replacement is necessary every 15 thousand km.
Lada Kalina Cross. VENTILATION AND HEATING MODES
Lada Kalina Cross. Cabin ventilation
To ventilate the cabin (supply unheated air into it), it is necessary to set the handles of the ventilation and heating system control unit to the following positions:
— handle 2 (see Fig. 41) turn clockwise to the extreme right position until it stops (blue dot on the control unit), and in the variant version (see Fig. 43) turn counterclockwise to the extreme left position of the blue zone;
— set the handle 4 depending on the desired flow direction;
- adjust nozzles 1 and 4 (see Fig. 42) depending on the desired direction and strength of the flows. Moreover, nozzles 1 are regulated by direct action on the nozzle deflectors (to open it is necessary to press a special recess), and nozzles 4 by levers 2 and 3;
- set the handle 1 (see Fig. 41) of the heater electric fan operation mode switch to the desired speed of air supply to the passenger compartment.
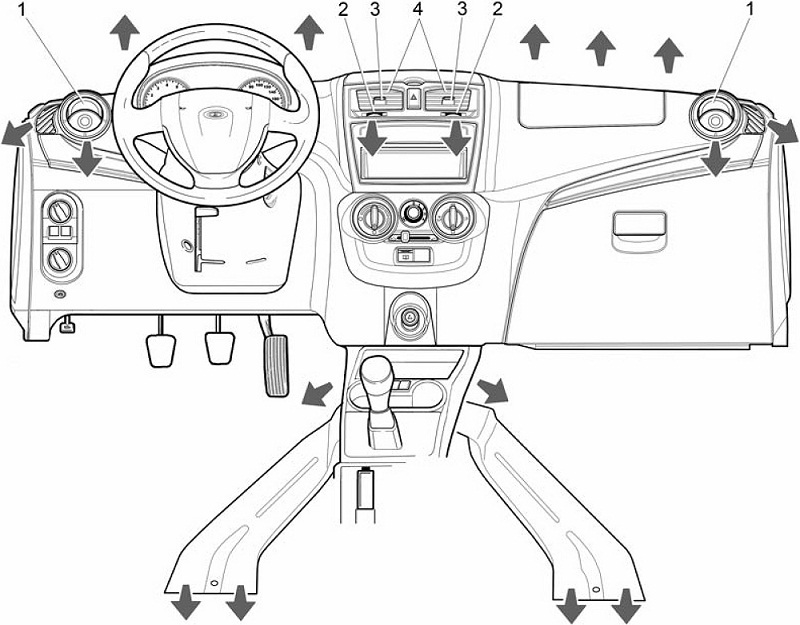
Rice. 42. Air flow directions from deflectors and air ducts
Lada Kalina Cross. Preventing glasses from fogging up
If the air humidity is high, such as during heavy rain, the car windows may fog up. To prevent fogging of the windshield and front door windows, do the following:
— handle 2 (see Fig. 41) turn counterclockwise to the extreme left position until it stops (red dot on the control unit), and in the variant version (see Fig. 43) turn clockwise to the extreme right position of the red zone;
— set handle 4 to position
- direct nozzles 1 (see Fig. 42) to the corresponding side windows in the zone of the greatest fogging;
- set the handle 1 (see Fig. 41) of the fan operating mode switch to the speed depending on the degree of fogging of the windows.
ATTENTION!
When washing the car, do not turn on the climate system fan, which corresponds to the “O” position of handle 1.
Cleaning windows from snow and ice
To quickly clean the windshield and front door windows from snow and ice, it is recommended to do the following:
- use a soft brush to remove snow and ice from the windows and the air intake in front of the windshield (it is not recommended to use hard scrapers to clean the glass from ice in order to avoid scratches on the glass);
— handle 2 (see Fig. 41) turn counterclockwise to the extreme left position until it stops (red dot on the control unit), and in the variant version (see Fig. 43) turn clockwise to the extreme right position of the red zone;
— handle 4 (see Fig. 41) set to position
- direct nozzles 1 (see Fig. 42) to the corresponding side windows in the zone of the greatest icing;
- handle 1 (see Fig. 41) of the heater fan operation mode switch set to the maximum speed of air supply to the passenger compartment.
Lada Kalina Cross. Quick interior warm-up
To quickly warm up the interior, it is recommended to set the handles of the ventilation and heating system control unit to the following positions:
— handle 2 (see Fig. 41) turn counterclockwise to the extreme left position until it stops (red dot on the control unit), and in the variant (see Fig. 43) clockwise to the extreme right position of the red zone;
- handle 4 (see fig. 41) set to position’
- put the handle 1 of the heater fan operating mode switch to position "3";
— set handle 3 to the extreme right position (recirculation mode) for a short warm-up time. If at the same time fogging or frosting of the windows occurs, then the handle 3 must be set to the extreme left position (outside air supply).In the variant
version (see Fig. 43), the recirculation mode is switched on and off by button 3.
Video on the topic “Lada Kalina Cross. Cabin ventilation»
Cabin ventilation deflector Kalina-Grant
Kalina 2 cabin ventilation. Why don't the windows fog up?
Kalina cross sweat glass.
Alternative Method for Replacing a Heatsink
The second method requires some additional intervention, but it is quite possible to master it and gain invaluable experience. At stage 1, the coolant is drained from the system. Next, remove the battery. We remove the terminals like this: first "minus", then "plus". Gently lead them towards them. You will also need to remove the battery stand, which is mounted on 4 bolts.
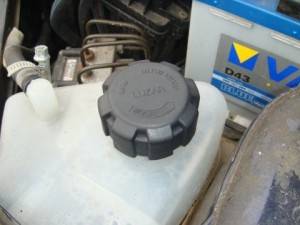
Expansion tank for coolant
We remove and remove the car air filter housing, having previously dismantled the air duct that goes to the engine. This will provide access to the necessary details.
In the cabin, you will need to dismantle the driver's seat. A mandatory preparatory step before removing the stove is to release the gas and brake pedals so that they can be taken to the side. The gas pedal is screwed with 3 nuts to 10.
To free up additional space, you will need to dismantle the electric power steering. You can disconnect the pipes from the heater radiator by obtaining the necessary access from the hood. Using a Phillips screwdriver, release the clamps on the nozzles.
To remove the radiator from the driver's side, you will need to not only unscrew the 3 fastening screws, but also expand the space a little more so that the radiator tubes can come out. Otherwise, you will also have to disassemble the entire center console.
Further, a new radiator of the car heating system is inserted through the hole prepared and slightly expanded due to the incision. Outside, hoses are screwed to the fittings, parts that have been removed or loosened are mounted.
Probably every motorist eventually encounters. The owners of Lada Kalina are also, unfortunately, no exception. Sometimes it is very difficult to understand the true cause of poor interior heating, when a normally working heater suddenly begins to fail to cope with its task.
The problem of weak heating can be solved by replacing and adjusting the stove damper on the Lada Kalina.
Car heater Lada Kalina
How to get to the damper
To see where the central heater flap is located, you will need to partially disassemble the dashboard, specifically, unscrew the beard. This is the place on where the heater switches are located.
Progress:
- Remove the ashtray.
- Squeeze out 2 plugs located next to the emergency button.
- Remove all control knobs.
- Unscrew the 2 screws of the center console and carefully pull it out, while prying it in place of the latches.
- Disconnect all wires.
- Now you can freely reach the damper.
- Replace the damper or its drive components.
Very often, the cause of a malfunction can be a broken damper drive mount. If the situation is not critical, then you can simply glue the part that has fallen off with superglue.
There are times when the valve actuator mount breaks off due to an undeveloped cable that falls very tight. In this case, it must be developed manually, after which this problem should not arise.

List of faults in the heating circuit
If the owner of LADA Kalina suspects the presence of any deviations from the normal functioning of the heating system, then the following diagnostic procedures will be required.
- The first step is to make sure that there is a sufficient amount of antifreeze in the cooling circuit.
- Next, check the integrity of the fuse.
- We make sure that the fan speed control is working properly.
- A weak air flow penetrating through the deflectors hints at the need to check the condition of the filter component.
- If a warm stream is not supplied to the passenger compartment on a warm engine, then there may be air pockets in the cooling system or jammed dampers in the air ducts.
- A faulty temperature sensor will cause only hot or vice versa cold flow to enter the cabin.
- Among the common causes is the depressurization of the LADA Kalina cooling system. Sometimes the reason for this may be the loss of tightness by the heater radiator itself. At the same time, antifreeze will enter the salon, posing as a specific smell and a wet decorative floor covering. In order to detect a leak in a timely manner, it is required to control the level in the expansion tank with frequent intervals.
Design Description
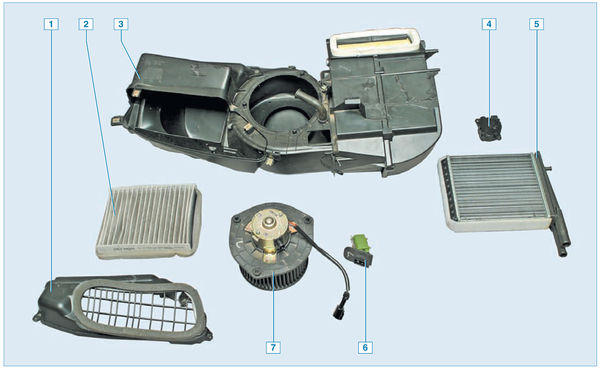
Heater details:
1 - filter cover;
2 - filter of the heating and ventilation system;
3 - heater body;
4 - micromotor reducer of the heater damper;
5 - heater radiator;
6 - additional heater fan resistor;
7 - heater fan
The car is equipped with a heating and ventilation system, which serves to create the most comfortable conditions for the driver and passengers, regardless of weather conditions. The heating and ventilation system includes: a heater, a heater fan, an air temperature sensor in the cabin, an air distributor housing, air ducts and deflectors.
Air from the heater enters the air distributor housing, and then into the air ducts. Through them, air is supplied to the grilles for blowing the windshield and side windows, to the central and side deflectors on the instrument panel, as well as to the feet of the driver and passengers.
Air heaters of various types, configurations and purposes for any car can be found at https://starter.ms/otopiteli.
Heating and ventilation control unit
The system is controlled by turning the handles located on the heating and ventilation control unit. The control unit is installed on the instrument panel console. Cabin air temperature sensor
To maintain the set air temperature in the passenger compartment at a constant level, an air temperature sensor in the passenger compartment is installed in the ceiling upholstery trim.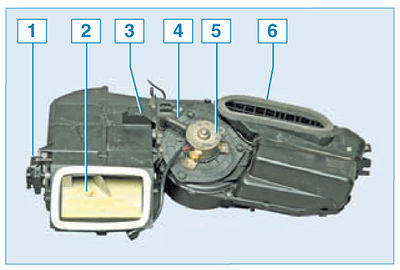 Heater assembly:
1 - micromotor reducer of the heater damper;
2 - heater control damper;
3 - additional heater fan resistor;
4 - blower hose for the fan motor;
5 - heater fan;
6 - filter cover of the heating and ventilation system
The heater is installed in the engine compartment under the right windshield trim and is attached to the front panel.
At the inlet to the heater, a filter is installed to clean the air entering the heating and ventilation system. Additional resistor
A heater fan, a heater radiator, a filter for the heating and ventilation system, an additional fan resistor and a heater control damper connected to the temperature controller are installed in the heater housing.
The heater radiator is connected by hoses to the engine cooling system. Coolant constantly circulates through the heater core. The heater control damper directs outside air to or bypasses the heater core. In intermediate damper positions, part of the air passes through the radiator, and the rest bypasses the radiator. In the extreme positions of the damper, all air passes through the radiator or bypasses it. Micromotor reducer of the heater damper:
1 - micromotor-reducer;
2 - damper position sensor;
3 - output shaft
The heater control damper is turned by a micromotor-reducer mounted on the left side of the heater body. The output shaft of the micromotor-reducer is connected to the damper axis.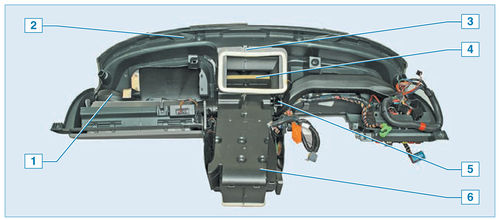 Location of the air distributor housing and air ducts on the instrument panel:
1 - air duct side deflector;
2 - air duct for blowing glass;
3 - air distributor housing;
4 - damper;
5 - damper gear motor;
6 - air duct for blowing the legs of the driver and passengers
The air distributor housing and air ducts are fixed on the back side of the instrument panel.
The air distributor housing contains the air flow control dampers, which are controlled by the air distribution regulator. The dampers are turned by a motor-reducer mounted on the air distributor housing. By controlling the dampers, the regulator directs air flows through the air ducts to the central and side deflectors, to the legs of the driver and passengers, as well as to the nozzles located in the instrument panel for blowing the windshield and front door windows.
When the car is moving, air is forced into the passenger compartment by high-speed pressure through the holes in the right windshield lining. To increase the air supply to the passenger compartment while the car is moving, as well as in the parking lot, a heater fan is used.
The air supply intensity is determined by the fan speed.
The fan motor, depending on the connection of an additional resistor, can rotate at four speeds. Air outlet in trunk lining
The air exits the passenger compartment through valves installed on the rear panel of the trunk, behind the bumper. In the rear part of the trunk upholstery, opposite the valves, air outlets are made.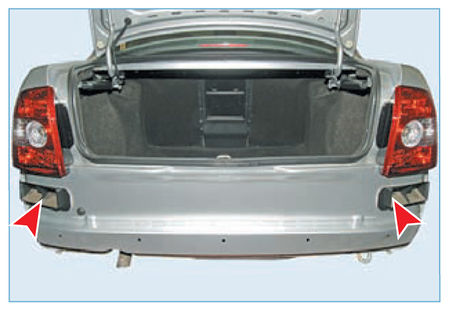 Valves for air outlet from the passenger compartment (with the rear bumper removed)
When loading the trunk, do not block the air outlets in the trunk lining.
Air recirculation in Priora main malfunctions
Many drivers never use the recirculation button, simply because, having once tried this mode in inappropriate conditions, they did not see any advantages in it. Others use the button regularly, well aware of all the local advantages of this mode. Despite the simplicity of the design (the recirculation system consists of a damper that blocks the access of air from the outside, and an electromagnetic valve that acts as a damper actuator), it is not uncommon for this mode to be inoperative on the Priore. The reasons for the inoperability of the system, respectively, may be either problems with the valve, or a violation of the integrity of the damper. The Priora recirculation button may also be faulty.

The jamming of the damper occurs when, for example, it is covered with rust due to the presence of moisture in the air. Note that corrosion processes occur only with a damper on air conditioning systems of a new type, since in this case it is made of metal, and sealing gum is used as a gasket. On older models, the damper is made of plastic and protected by sealing foam rubber.
To find out if the damper is to blame for the inoperability of the recirculation mode, you should manually try to move it. True, for this you will have to disassemble the deflector of the main (central) panel. If the damper is metal and turns by hand, but with difficulty (or if it fails to turn), the reason really lies in the presence of rust. There are two options for solving the problem:
- try to treat the place affected by corrosion with VD-40;
- if the result turned out to be negative or the operability of the damper returns for a short time, you should simply replace this part with a new one.

Plastic shutters, although not susceptible to corrosion, can also wedged due to deformation caused by exposure to heated air. In this case, it will not be possible to restore the damper geometry, and therefore the only way out is to replace the part.
Diagnostics of the stove

stove radiator
The operation of the heating system should be periodically monitored. This check can be done in the following way.
- With the engine running, we check the operation of the stove without heating the air in all fan speed modes.
- We control the change in the direction of the air flow when adjusting on the direction switch.
- When the engine reaches operating temperature, we check the degree of heating of the air entering the passenger compartment by moving the regulator to the red zone.
- We check the operation of the dampers of the heating system, periodically moving the regulator from the red zone to the blue sector. The degree of air heating must change.
To understand that the stove is flowing, the owner of the car may not immediately. The floor mats will not necessarily be wet, and a strong smell of antifreeze will not always appear. This is due to the possible rapid evaporation of the escaping liquid. The stove in Lada Kalina does not have nozzles brought into the cabin that could wear out.
A feature of the Lada Kalina is not the most convenient location of the radiator-heater. It may take a long time to replace it.
Owners of the Lada Kalina car can choose one of 2 ways to change the stove on their own. The first method is recommended in the car repair manual and is usually carried out at service stations. This method requires careful and step-by-step operations. It is associated with the dismantling of a significant number of parts and elements of the car, so self-replacement causes some difficulty.
If it is decided to nevertheless act in this way, additionally it will be necessary to carry out such operations.
- The front panel is freed from the mounting bolts. The following screws are unscrewed: at the ends on the side of the doors, at the top left and right at the corners of the A-pillars, in the glove box, along the edge at the windshield.
- Release the plastic casing of the central tunnel at the parking brake.
- Remove the instrument cluster, all external toggle switches, buttons.
- As they are released, the plastic case is lifted, monitoring the condition of the electrical wires and connectors.

Dismantling begins with a complete disassembly of the panel
This work cannot be done alone, the help of 2-3 people is needed, since the correctness of dismantling cannot be objectively controlled.
It is better to remove the central panel completely, but if you can securely fix it, you can leave it in a slightly raised state. The main thing is to get free access to the radiator of the heating system.