Causes of a Radiator Leak
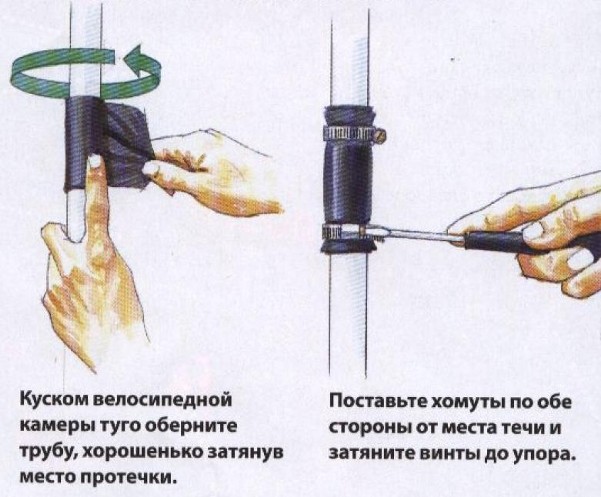
Scheme for sealing a leaky radiator.
Very often, the cause of leaks in the heating system is corrosion processes affecting the metal (of course, if the radiator is not plastic). So, metal pipes from the inside are affected by a liquid that constantly circulates in the system. It is difficult to call it water, since very often various chemical compounds of unknown origin are added to it to improve the properties of the coolant. From the outside, the material is susceptible to moisture and temperature fluctuations. These factors together lead to corrosion and, consequently, leakage.
Plastic pipes are not subject to corrosion processes, but they have their drawbacks. So, pipes made of polypropylene or polyethylene can leak if the installation was incorrectly performed or consumables were incorrectly selected. A common mistake is an acute desire to save on materials. Pipes designed for cold water are much cheaper, and many mistakenly use them for heating systems. Hot water has a destructive effect on them: under its influence, they can burst, swell or deform.
Metal-plastic radiators are also susceptible to leakage: this may be the result of non-observance of the bending radius or poor-quality installation work. When installing a heating system, you should be guided in how to seal the radiator, depending on the material from which it is made and on the place of leakage.
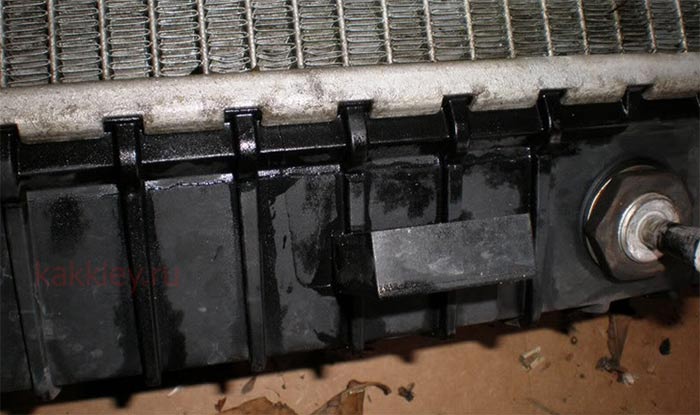
A leak can occur at the most unexpected moment in any place - on a flat section of the radiator, in the places of a threaded connection or fastening of fittings, in the place where radiator sections are joined.
Choice of repair and adhesive methods
There are several ways to restore the integrity and tightness of the cooling radiator:
- Soldering. Housing elements of modern automotive radiators made of heat-resistant plastic are perfectly soldered using a conventional soldering iron (we will consider this process in more detail below).
- Cold welding. This is the fastest way to join plastic parts without heating. A special plastic mass, which includes polymer resins, metal filler and chemical additives, connects the surfaces to be glued, forming a heat-resistant seam.
This process does not require special equipment, but such repairs cannot be called durable.
Due to the low adhesion of plastic, cold welding is very weak. This method allows you to only temporarily solve the problem (for example, to get to the nearest car service).
Application of glue. If the damage is small, special glue will help restore the tightness of the case.
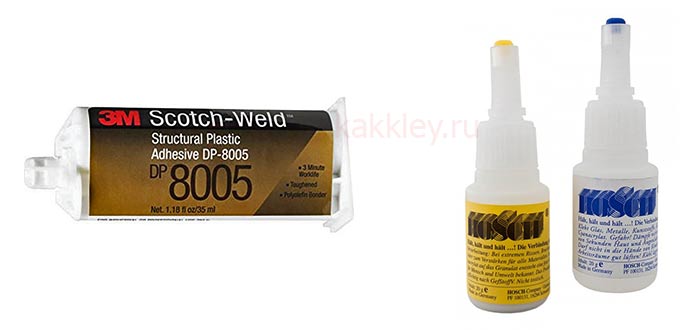
Such compositions have proven themselves well, such as:
3M DP8005 Two-Part Adhesive is a specialized acrylic-based compound designed for bonding difficult-to-bond plastics, polyethylene, and polypropylene.
Great for repairing a cracked radiator. The adhesive seam formed by DP8005 adhesive from the 3M trademark is resistant to aggressive solutions and high temperatures.
The only drawback of this glue is the high price (1300-1500 rubles per pack of 38 grams).
Adhesive welding for Hosch plastics. This two-component industrial adhesive effectively repairs cracks and other damage in all plastic products.
The adhesive seam is able to withstand exposure to high and low temperatures, as well as pressure up to 12 atmospheres, so they can easily glue a plastic radiator with it.
Often the junction is stronger than the plastic being glued. The average cost of a set of two complementary components is 1500-1700 rubles.
Tips for Repairing a Plastic Car Radiator
Vehicle cooling systems are extremely important components that ensure the regular functioning of the most loaded components and parts of the vehicle.
If in the early periods they were completely made of metal of various types, then today it is increasingly necessary to deal with plastic samples.
Although they are somewhat more dynamically stable than some metal radiators, significant problems can arise when repairing them.
A fluid circulates inside the radiator, which removes heat from the car engine through it.
As a result, if this component malfunctions, the engine simply overheats above the specified rate and may even jam.
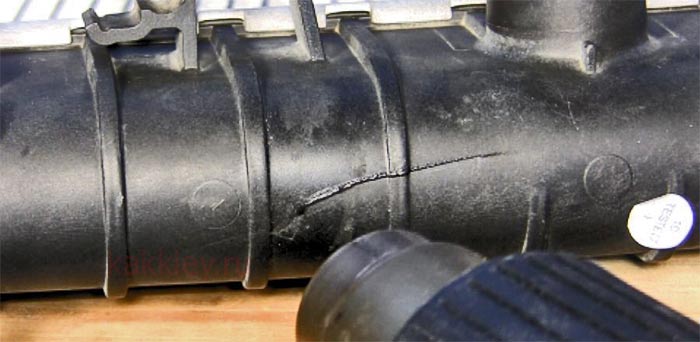
In this case, the radiator is a rather vulnerable element. Even a minimal impact can lead to significant mechanical damage.
How to seal the plastic parts of a car radiator
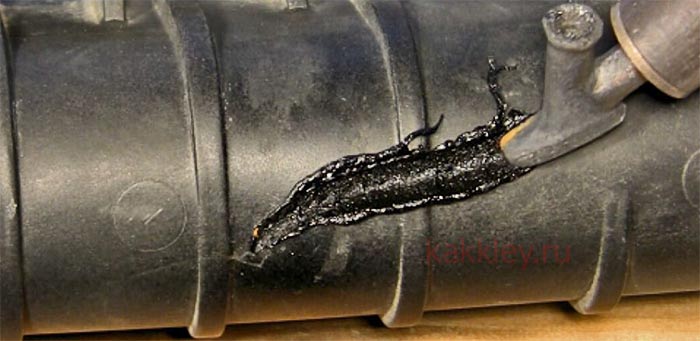
Let us consider in more detail the adhesive method of repairing a damaged radiator using the example of the use of Hosch two-component industrial adhesive.
To seal the radiator tank, you should prepare the following materials and tools:
- powder welding granulate and liquid component of glue-welding;
- sandpaper;
- acetone for degreasing surfaces;
- gloves;
- cotton swabs.
Stages of work:
- Training . Both surfaces to be bonded must be free of grease and other contaminants. If traces of other glue remain on the parts, they must be completely removed. In most cases, ordinary acetone is suitable for cleaning;
- Applying glue. The minimum amount of adhesive welding is applied directly to the crack. To fill the void or in the absence of body fragments, a powdered adhesive component is sprinkled onto the liquid base. If it is necessary to restore a large depression, gluing is recommended to be carried out in several stages (several layers are applied sequentially with an interval of 10 minutes). After the gap is filled with dry granulate, it must be evenly impregnated with the liquid component.
- Seam processing. After 10-15 minutes after completion of the work, you can start machining the seam with a grinder or fine-grained sandpaper to give the seam an aesthetic appearance.
VIDEO INSTRUCTION
Instructions - how to solder the plastic parts of a car cooling radiator
For soldering (welding) a plastic radiator, the following materials and tools should be prepared:
- Special building hair dryer for heating the place of soldering;
- Soldering iron with a sharp tip and precise temperature control;
- Solder for plastic - special welding rods. The marking on them must match the marking on the radiator housing. As a rule, it is "PA" - polyamide (nylon) or "PP" - polypropylene. Instead of purchased welding rods, you can use pre-prepared strips cut from a similar plastic tank;
- Acetone.
Work order:
- Degrease the repair site with acetone;
- While the soldering iron is heating up, we heat the junction with a building hair dryer;
- We connect the seam and gradually draw along it with a heated soldering iron, forming a groove equal in width to the thickness of the welding rod;
- We apply a welding rod and, heating it with a soldering iron, put it in the groove of the seam;
- We check the radiator for leaks, and then install it on the car.
The welding temperature (heating of the soldering iron) is selected in accordance with the brand of plastic. For PP, this is about 250 degrees.
The aluminum radiator has many advantages, thanks to which it is installed in many homes. But sometimes it can "please" the appearance of holes and the flow of coolant.
There are two ways to get rid of this disadvantage:
More difficult is soldering aluminum.
Soldering method 2
This method involves the use of tin-lead-bismuth solder and homemade flux. You need to make the last one from:
- cryolite (the proportion in the solution should be 10%);
- sodium sulfate (share 4%);
- lithium chloride (share 23%);
- potassium chloride (share 56%);
- common salt (share 7%).
Tin-lead-bismuth solder can be purchased in stores (it looks like a rod or wire) or you can make it yourself. The second option is implemented by adding bismuth to the molten tin-lead solder. The mass of bismuth in the mass of the finished solution should be 5%. You can calculate the mass of bismuth by dividing the mass of the initial solder by 95 and multiplying the resulting figure by 5. To solder sufficiently large defects in an aluminum radiator, you need:
- Prepare the area where there is a hole. The result of the preparation should be clean, dry, non-greasy aluminium.
- Make a float. This procedure begins with grinding each component in a mortar. Grind so that a powder is formed. In this case, each element is brought to the state of powder separately. After all the "ingredients" are poured into a glass container and mixed until a homogeneous mixture is formed. It is advisable to take a dark, hermetically sealed glass container. This is necessary to protect the mixture from moisture and sunlight when you need to take some pauses. Before soldering, the mixture is poured into a crucible and melted over a gas stove.
- The molten flux is poured onto aluminum, soldering is performed. Features of soldering are no different from the features of the above process.
What is the difficulty of soldering aluminum
This metal quickly reacts with oxygen and any acids. Most often, an aluminum radiator interacts with oxygen. As a result, the metal surface is oxidized and covered with a thin layer of aluminum oxides. It is also known as "oxide film". This layer evenly covers the entire surface of the product.
On the one hand, this film is useful, because any possibility of contact of pure aluminum with oxygen and all other chemical elements or substances. That is, it is a kind of protective barrier. However, this barrier does not allow high-quality soldering, because the solder must be in direct contact with aluminum.
The simplest solution is to remove the oxide film and then solder the hole. But it is not correct, because after the removal of the oxide film, pure aluminum begins to interact with oxygen again, and until the end of soldering, the treated area again receives a protective barrier. The soldering result will be poor.
To solve the problem of removing the oxide film and ensuring that it cannot form further, fluxes must be used. They are a mixture of inorganic and organic substances. They destroy the oxide film and prevent its formation, they also:
- reduce the tension of the treated surface;
- improve the spreading of solder over the treated area;
- do not react with solder (most types of fluxes).
Fluxes are different:
- cadmium;
- bismuth;
- zinc;
- combined substances;
- floats (homemade).
Soldering the radiator method 1
It includes the following steps:
- Surface preparation. This process must be done carefully. It consists in cleaning the treated area from all contaminants and paint residues. Clean the aluminum surface with emery cloth and solvent. Preparation also includes degreasing the treated area (for this, those preparations that have alcohol in their base are used), as well as wiping the metal dry.
- Preparation of iron-rosin flux. To do this, the crucible is placed on a gas stove and heated. You can heat up with a blowtorch. A piece of rosin is placed in a heated crucible. It needs to be completely melted.Next, iron filings are added little by little and the mixture is immediately stirred. The ratio of rosin and sawdust should be 2:1.
- Applying flux to the prepared area. The solution is applied so that the desired part of the radiator surface is completely covered. Otherwise, oxygen will have access to aluminum, and it will not work well to seal the hole. At the end, the entire soldering surface should be under the flux layer.
- Soldering. It involves the introduction of solder into the liquid flux medium. On the soldering iron you need to take small portions of solder. Solder is applied to the soldering area so that it is under the flux layer. At the same time, circular movements are performed. During these movements, the soldering iron constantly shifts some of the solder particles. The displacement of iron particles leads to the destruction of the oxide film. Rosin does not allow air to penetrate to aluminum.
This method should be used to eliminate small defects. If the damage is large, then it will be possible to solder the radiator only with the help of a homemade flux.
Security measures
When repairing a car radiator, you should be extremely careful and follow certain safety measures. The heat exchanger itself must be disconnected without fail. Drain all liquid completely.
If you have not previously had experience with a soldering iron, it is better to entrust this task to professionals. In this case, you should at least practice on less important surfaces and car parts.
When working with cold welding or glue, it is important to use gloves so as not to injure your hands. In addition, be sure to follow the instructions for using the adhesive.
So you can not only achieve the perfect effect of the repair, but also protect your hands from the harmful effects of adhesives.
conclusions
So, following the recommendations and advice in the article, it will not be difficult to determine how to glue a car radiator. In this case, the main thing is to observe some safety measures and choose the best repair option. If you are not sure that you can cope with such a task on your own, it is better not to take risks and seek help from qualified auto mechanics.
Any questions left? In this case, we advise you to watch a video on how to repair a car radiator at home. We wish you good luck in your endeavor!