Existing threading options
Pipe threads are divided into five types, but the most popular options are conical and cylindrical. Households often face such pipe thread options. There are two ways to thread a water pipe:
- Automatic, which involves cutting threads on water supply pipes using special machines and power tools.
- Manual. For this, special hand tools are used.
If, on duty, a person needs to cut threads on a large number of pipes, then it is appropriate to purchase a special power tool, which will facilitate manual labor.

When the need to obtain a threaded connection is a single case, then manual technology is suitable for such purposes. On water pipelines, as well as pipes of heating systems, threading is performed using a die.
The die is a steel disk, and its inner diameter has axial holes in different numbers, depending on the size of the product. The edges of these holes form cutters, with the help of which threading is performed. To ensure the reliability of such a tool, it is made of alloyed steels or hard alloys.
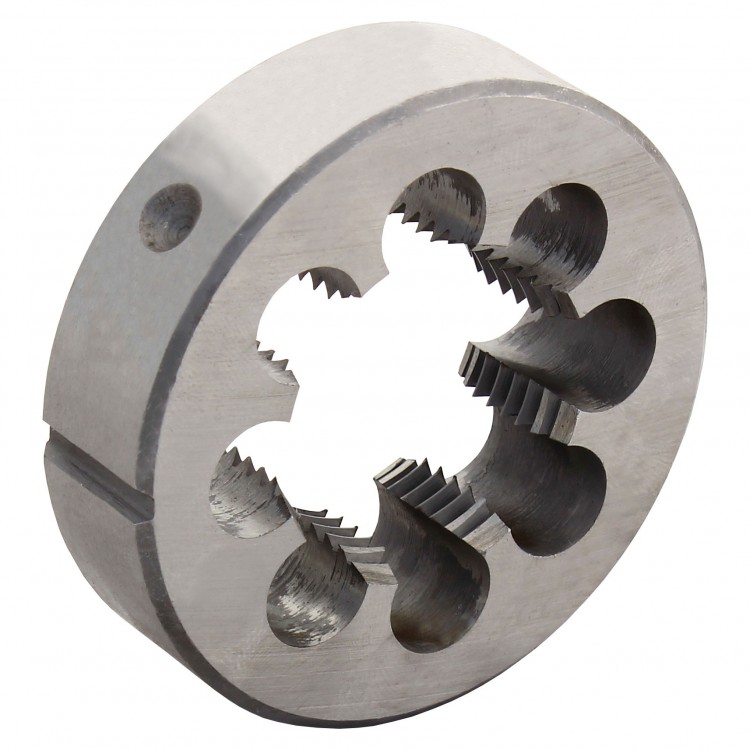
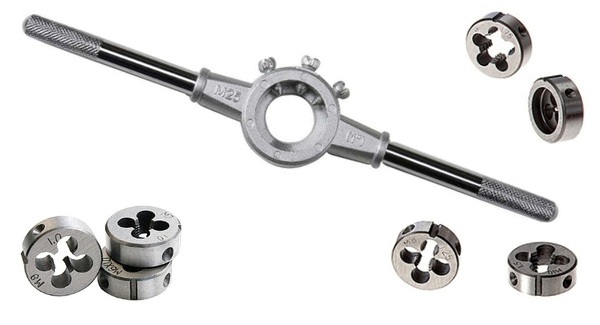
Dies can have a different shape (round, square, hexagonal or prismatic), but most often disk options are used. It is the disk dies that are intended to obtain a threaded connection on water pipes. To make it convenient to work with a die, they are additionally equipped with knobs, as well as clamps in the form of screws. Dies are also solid, split and sliding.
One-piece dies for threading pipes have one significant drawback - this is the rapid wear of the cutters. This is due to the rigidity of the product's own design. Split or spring-loaded dies have a less rigid design, which significantly increases the life of the product. Due to the spring-loaded mechanism, such a tool for threading pipes allows you to vary the diameter of the resulting threaded connections in the range from 0.1 to 0.3 mm. A device of this type has a high resistance to wear of the cutters, but is not capable of providing high accuracy.
Sliding dies are 2 working parts intended for installation in a mounting module. A die with a special fastening module forms a tool called a pipe die. The die in the die is fixed with a cracker and an adjusting screw. It is with the help of the adjusting screw that the thread diameter is adjusted.
I cut the threads on the pipe with a lerka, or a screw clamp.
For cutting threads on a pipe with a diameter of 15 (it is also 1/2″, it is also half an inch), I usually use a lerk in the holder, which I put on the prepared cut of the pipe, on the side that has edges, due to its length it acts as a guide, which is important for a uniform hook on the lerkoy. I lightly press down on the end with my hand and rotate it beyond the edges with an adjustable wrench, clockwise
It is not always possible to use the guide side, this is due to the fact that for some reason the cut of the pipe was made very close to the tie-in into the riser, then you make the entry from the side of the lerka. In this case, you need to be more careful, keep the handle perpendicular to the axis of the pipe, otherwise the thread may go crooked and the fourth turn will push the pipe through. Actually, if the chamfer was removed evenly over the entire diameter, then the entry will go smoothly, respectively, and the entire thread.
You can also cut threads with a screw, but usually a pipe of this diameter is used for wiring, and it is not possible to use a wrench due to its massiveness.
Everything for pipe threading.
On a pipe with a diameter of 20 (it’s 3/4″, it’s also three quarters of an inch), I cut the thread with a screw clamp, although just in case I also have a three-quarter lehr in the lerko holder. For the same reasons as in the paragraph above.
And pipes with a diameter of 25 (it's 1 ″, it's an inch) and a diameter of 32 (it's 1 1/4 ″, it's an inch and a quarter), I cut it only with screw caps with a ratchet. This is due solely to the complexity of this work. Using klupps, the process is much simplified, facilitated and accelerated.
In the photo, in addition to lerki and kluppov with a crank, I imagined that I use for the tightness of the threaded connection, namely, universal, sanitary sealant and sanitary flax. After I cut the thread, I apply sealant on it, trying to distribute it evenly over all the turns, and after that I wind flax, I tell (and show) this in detail in another article, I will leave the link below.
Connections are not only threaded.
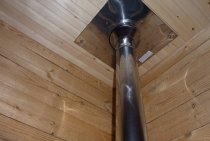
In my profession, I have to combine polypropylene with cast iron when installing sewers.
Basically, this connection is carried out by means of a transitional rubber cuff, which, when smeared with sealant, is inserted into the socket of a cast-iron pipe or fitting, and already into it you insert a fitting or polypropylene pipe smeared with sealant. Due to this, the connection is hermetically sealed.
The photo shows a cable, different in thickness, it is also used in the installation of sewers, by tamping into the gap between the materials described above. The use of a cable is convenient in that it can be dissolved and a strand of the required thickness can be selected. Its use is relevant in the case when the adapter cuff does not fit in size, such cases are not frequent, but still occur.
Video: klupp - a tool for threading a pipe:
Perhaps these articles will be useful to you: How to thread a pipe. 10 important nuances How to rewind the thread hermetically (video) How easy it is to cut with a grinder
If you have any questions or additions, write in the comments box. That's all for today, success in your work, regards Andrey.
Tired of looking for information from practitioners? Subscribe (scroll down the page) and the information will find you by itself. A click on the social network icon is the best reward for my work.
Share with friends online:
2. Rules for tapping internal threads
At
hand thread cutting tool
inserted into the hole vertically (without
skew). The collar is rotated in the desired
direction (for right-hand thread clockwise
arrow) not all the time, but periodically
make 1-2 turns in the opposite direction.
At
such a revolving motion
tap, the cut chips break,
becomes short (crushed) and lighter
is removed from the working area, and the process
thread formation significantly
relieved. After finishing cutting
the tool is turned out by rotation
gate in the opposite direction
then it is driven along the finished thread
through or all the way for the deaf
holes. It is also necessary to follow
the following rules:
At
thread forming in tough and soft
metals (aluminum, copper, babbits and
others), as well as in deep holes
tool should be periodically
unscrew from the hole for cleaning
chip grooves.
At
using a set of taps
all tools required
set. Cutting straight away
tap or medium, and then finishing
without a rough pass does not speed up, but
only slows down and hampers the process
cutting. Moreover, the carving
turns out to be of poor quality, and the tool
may break. Fine and medium
taps are screwed into the hole by hand
(without wrench) until the tool
will not go along the thread correctly, and only
then install the collar and
continue to work.
V
cutting process required
carefully follow the correct
tie-in tool so that it is not
skew. For this, it is necessary through
every newly cut 2-3 threads
chips check the position of the tap
relative to the top plane of the part
using a square
Be especially careful
should work with deaf and small
holes
Design
tap
Tap
(Fig. 1) is a hardened
screw with several
straight or helical grooves forming
tool cutting edges. grooves
also provide chip placement,
chip generated during cutting
can be removed from the cutting zone.
Tap
consists of two parts
- working and shank, at the end of which
a square is made (for manual taps).
The working part of the tap includes:
cutting (intake) part, which
provides removal of the main part
allowance for processing; calibrating
the part that carries out the final
thread processing; chip grooves;
feathers (threads separated
flutes) and core,
providing the tap with sufficient
for processing strength and rigidity.
The tail part of the tap is used for
fixing it in the collar, which
produced working and idle
tap movement.
working
part of the tap is made
from tool carbon steels
grades U11, U11A, high speed steel or
hard alloy. The choice of material for the working
parts depends on physical and mechanical
workpiece properties. At
solid taps tail material
parts are the same, but for taps consisting of
two pieces joined by welding
tail section is made of
structural steel grades 45 and 40X:
Number of flutes made
on the tap depends on its diameter (three
grooves for taps up to 20 mm in diameter
and four - for taps with a diameter of over
20 mm).
main
threading work is performed
cutting edges formed by the intersection
front surfaces of the groove with the back
(backed up, made according to
Archimedean spiral) surfaces
working part. backing
the surface of the cutting teeth allows
keep their profile constant after
transfer, which is carried out
centrally in the grinding shops.
How
as a rule, taps are made with straight
grooves, however, to improve conditions
cutting and obtaining precise and clean
threads use taps with screw
grooves. The angle of inclination of such a groove
to the axis of the tap is 8 ... 15 °. For
obtaining accurate and clean threaded
surfaces in through holes at
processing of soft and viscous materials
use fluteless taps.
Rice.
1 Tap:
a
- design: 1
- thread (coil); 2 - square; 3 - tail;
4 - groove; 5 - cutting pen;
b
– geometric parameters: 1
- front surface; 2 - cutting
edge; 3 - backed surface;
4 - rear surface; 5 - cutting pen;
α is the back angle; β is the cutting angle;
δ
- taper angle;
γ is the rake angle;
in - from
helical flute: 1
- groove; g - cutting a blind thread;
ω is the angle of inclination of the helical groove.
Rules for working with taps
When cutting threads in deep holes, in soft and ductile metals (copper, aluminum, bronze, etc.), the tap must be periodically unscrewed from the hole and the grooves must be cleaned of chips; you need to cut the thread with a full set of taps - rough, medium and fine. The middle and finishing taps are inserted into the hole without a wrench, and only after the tap goes correctly along the thread, the wrench is put on the head and threading continues;
in the process of cutting, it is necessary to carefully monitor with the help of a square that there is no skew of the tap; the place of thread cutting should be lubricated with oil.
Cutting an external thread with a die
For cutting external threads, the following tools and materials will be required: a die or a pipe die, a die holder, a file, a vise, a caliper, machine oil.
The most widespread are round dies (lerks). They are either solid or split. The diameters of solid round dies are standardized. This allows you to choose the appropriate option from a large range of sizes, for example, M10, M12, M14, M16.
A feature of split dies is the ability to adjust the diameter of the thread being cut within 0.1 ... 0.25 mm. However, they have reduced rigidity, which affects the accuracy of the resulting profile.
Operating procedure
The die is installed in a die holder of a suitable size. After that, it is fixed with screws. In the case of external pipe threads, ratchet die holders are often used. They provide convenience of work in hard-to-reach places, for example, at a wall.
The thickness of the rod is chosen 0.1 ... 0.25 mm less than the diameter of the external thread. For example, for M6 with a large pitch, this is 5.80 ... 5.90 mm; M8 - 7.80 ... 7.90 mm; M10 - 9.75 ... 9.85 mm. Measurements are taken with a caliper. Diameters of rods for cutting metric threads of medium accuracy class 6g are presented in the table.
|
Nominal diameter Threads, mm |
Step, P |
Rod diameter, mm |
|
|
Nominal |
Minimum |
||
To ensure better insertion of the die, a chamfer is sawn at the end of the rod. Its width should be 1 - 1.5 mm for M6 ... M18. The workpiece is lubricated with machine oil, which facilitates subsequent work and allows you to get a better surface.
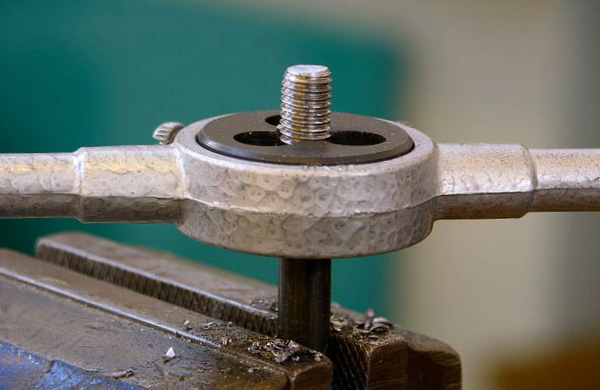
The die is applied to the end of the rod so that its plane is perpendicular to the axis of the bolt being cut. Then, with a slight pressure, rotate the die holder clockwise (if the thread is left, then counterclockwise). When the die cuts into the rod for one or two threads, it should be turned back half a turn for better chip removal. After that, 1-2 turns are again made along the thread and 0.5 in the opposite direction. Acting according to this scheme, the bolt is cut to the required length.
The diameter of the external thread is checked with a regular nut or ring gauge. If necessary, the step is controlled by a thread gauge.
Threading - general information
What is carving? This is a line twisted by a screw, which looks like a protrusion with a vertex of a different shape on the cylindrical surface of the body. She has a step, it can be different and is defined as the gap between adjacent vertices. The protrusions are separated by a depression. Threads for different purposes have their own protrusion shape.
To get a thread, it needs to be cut, that is, using a tool, select a groove in the metal along the path of the screw. To do this, there is a special tool - both manual and one that is fixed in an electric (lathe) machine. What they have in common is that the cutters are made of special strong steel, which makes it easy to remove chips from a steel workpiece.
To obtain different thread quality, different grades of metal are used. Hence the division into fixing, fixing, running, special. Parts are cut in production by qualified turners. A high-quality helical surface should not have chips, scuffs and roughness.
Conclusion
Carrying out work on threading, you must follow the safety rules
At the same time, it is very important to work in protective gloves and goggles in order to avoid damage to skin tissues by sharp metal shavings.
Cutting
internal thread tap start with
selecting the desired tool.
After
the first step is drilling
holes. Essentially, this stage is
the most important thing, because if you make a mistake
with the selection of the diameter, then either the bolt will be
dangle, or when cutting threads
overload will break the tap. It is better
the total diameter of the holes is determined by
tables, but you can also make a rough
estimate: subtracting the thread pitch from the thread diameter
you can get an estimate
required hole diameter.
For instance,
if the outer diameter of the thread is 18 mm, and the pitch
1mm, you need to drill a hole
in 17 mm. Drilling must be strictly
perpendicular to the part surface
(due to deviations, marriage is possible when
cutting). At the drilled hole
it is desirable to make a small chamfer. At
blind holes depth should be
more than the length of the cut part,
so that the cutting tool extends beyond
required thread length. If
this margin is not provided, then the thread
will be incomplete.
Detail
with drilled hole fix
in a vice. The tap is fixed in the collar (when
the absence of using an adjustable wrench)
or machine chuck. on the quality of the thread,
cutting speed and tool life
tool significant impact
makes the right choice
cutting fluid (coolant).
In order not to spoil the tool, but the thread
get clean and with the right
profile, you must apply the following
coolant:
diluted emulsion (one part
emulsion mixed with 160 parts of water);
for
brass and steel parts
use linseed oil;
for
products
aluminum
- kerosene;
for
parts made of red copper - you can turpentine;
v
cast iron and bronze products cutting
should be done dry.
It is forbidden
use mineral and machine
oils - they contribute significantly
an increase in resistance, which
the tool is overcome in the process
work have a negative impact
on thread roughness and lead to
rapid tap wear.